chap103 pps Automotive technology at University of Cambridge
Bạn đang xem bản rút gọn của tài liệu. Xem và tải ngay bản đầy đủ của tài liệu tại đây (2.69 MB, 58 trang )
start
Automotive Technology: Principles, Diagnosis, and Service, 3rd Edition
By James D. Halderman
©©2008
2009Pearson
PearsonEducation,
Education,Inc.
Inc.
Pearson
PearsonPrentice
PrenticeHall
Hall- -Upper
UpperSaddle
SaddleRiver,
River,NJ
NJ07458
07458
OBJECTIVES:
After studying Chapter 103, the reader should
be able to:
•
•
•
•
Discuss how to disassemble an automatic
transmission/transaxle.
Explain how to properly install and check
clutch packs.
Describe how to flush the cooler.
Explain how to properly reassemble an
automatic transmission/transaxle.
Continued
Automotive Technology: Principles, Diagnosis, and Service, 3rd Edition
By James D. Halderman
©©2008
2009Pearson
PearsonEducation,
Education,Inc.
Inc.
Pearson
PearsonPrentice
PrenticeHall
Hall- -Upper
UpperSaddle
SaddleRiver,
River,NJ
NJ07458
07458
OBJECTIVES:
After studying Chapter 103, the reader should
be able to:
•
•
•
List the steps necessary to follow when
removing an automatic
transmission/transaxle assembly.
Describe how to properly remove and install
an aluminum pump in an automatic
transmission/transaxle.
Explain how to flush an automatic
transmission fluid cooler.
Automotive Technology: Principles, Diagnosis, and Service, 3rd Edition
By James D. Halderman
©©2008
2009Pearson
PearsonEducation,
Education,Inc.
Inc.
Pearson
PearsonPrentice
PrenticeHall
Hall- -Upper
UpperSaddle
SaddleRiver,
River,NJ
NJ07458
07458
KEY TERMS:
Assembly lube
OSHA air nozzle
Automotive Technology: Principles, Diagnosis, and Service, 3rd Edition
By James D. Halderman
©©2008
2009Pearson
PearsonEducation,
Education,Inc.
Inc.
Pearson
PearsonPrentice
PrenticeHall
Hall- -Upper
UpperSaddle
SaddleRiver,
River,NJ
NJ07458
07458
REMOVING THE AUTOMATIC TRANSMISSION/
TRANSAXLE FOR SERVICE
Removing an automatic transmission/transaxle from a vehicle
includes many steps to avoid doing damage to the vehicle or harm
to yourself. Most procedures include the following:
Step #1 Disconnect the negative (-) battery cable from the battery.
Step #2 Disconnect the driveshaft or drive axle shafts.
Step #3 Disconnect all cooler lines, linkage, and electrical
connections. Be sure to label each to ensure proper reinstallation.
Step #4 Disconnect the torque converter from the flex (drive) plate
of the engine.
Step #5 Support the engine before disconnecting the automatic
transmission/transaxle, as shown in Figure 103–1.
Continued
Automotive Technology: Principles, Diagnosis, and Service, 3rd Edition
By James D. Halderman
©©2008
2009Pearson
PearsonEducation,
Education,Inc.
Inc.
Pearson
PearsonPrentice
PrenticeHall
Hall- -Upper
UpperSaddle
SaddleRiver,
River,NJ
NJ07458
07458
Figure 103–1 (a) A tall safety stand with a
block of wood on top being used to
support the engine to permit the removal
of the automatic transmission without
doing harm to the engine or its
accessories.
Continued
Automotive Technology: Principles, Diagnosis, and Service, 3rd Edition
By James D. Halderman
©©2008
2009Pearson
PearsonEducation,
Education,Inc.
Inc.
Pearson
PearsonPrentice
PrenticeHall
Hall- -Upper
UpperSaddle
SaddleRiver,
River,NJ
NJ07458
07458
Figure 103–1 (b) A chain and holding fixture being used on this front-wheel-drive vehicle to
support the engine when the transaxle is removed.
Continued
Automotive Technology: Principles, Diagnosis, and Service, 3rd Edition
By James D. Halderman
©©2008
2009Pearson
PearsonEducation,
Education,Inc.
Inc.
Pearson
PearsonPrentice
PrenticeHall
Hall- -Upper
UpperSaddle
SaddleRiver,
River,NJ
NJ07458
07458
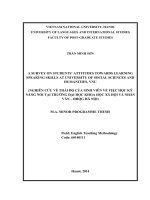
Step #7 Support the transmission/transaxle on a jack and remove
the attaching bolts at the bell housing of the engine, as shown
below. Remove the transmission/transaxle from the vehicle.
Figure 103–2 (a) A typical
transmission jack. The top
portion of the jack can be
raised by pumping the
lever on the side.
Continued
Automotive Technology: Principles, Diagnosis, and Service, 3rd Edition
By James D. Halderman
©©2008
2009Pearson
PearsonEducation,
Education,Inc.
Inc.
Pearson
PearsonPrentice
PrenticeHall
Hall- -Upper
UpperSaddle
SaddleRiver,
River,NJ
NJ07458
07458
Figure 103–2 (b) A transmission jack in position during the removal of the transaxle assembly.
Continued
Automotive Technology: Principles, Diagnosis, and Service, 3rd Edition
By James D. Halderman
©©2008
2009Pearson
PearsonEducation,
Education,Inc.
Inc.
Pearson
PearsonPrentice
PrenticeHall
Hall- -Upper
UpperSaddle
SaddleRiver,
River,NJ
NJ07458
07458
The Chain Trick
If two slide hammers are not available to remove a cast iron pump from
anautomatic transmission, try using a length of chain. Attach each end
of a chain to the pump and jerk the chain. The pump should come out.
CAUTION: Do not attempt this procedure with an aluminum pump or
damage could result.
Automotive Technology: Principles, Diagnosis, and Service, 3rd Edition
By James D. Halderman
©©2008
2009Pearson
PearsonEducation,
Education,Inc.
Inc.
Pearson
PearsonPrentice
PrenticeHall
Hall- -Upper
UpperSaddle
SaddleRiver,
River,NJ
NJ07458
07458
AUTOMATIC TRANSMISSION/
TRANSAXLE DISASSEMBLY
For best results, the automatic
transmission/transaxle should be attached
to a holding fixture that allows the unit to
be rotated yet properly supported during
disassembly and reassembly.
Torque Converter Check
Check the torque converter
for internal end play of the
stator.
Figure 103–3 Special tool being used
to help measure the end play of the
stator inside the torque converter.
Automotive Technology: Principles, Diagnosis, and Service, 3rd Edition
By James D. Halderman
©©2008
2009Pearson
PearsonEducation,
Education,Inc.
Inc.
Pearson
PearsonPrentice
PrenticeHall
Hall- -Upper
UpperSaddle
SaddleRiver,
River,NJ
NJ07458
07458
NOTE: Many automotive transmission/transaxle experts recommend that
the torque converter be replaced when the automatic transmission is rebuilt
or replaced. This is because the torque converter is generally considered to
be the “garbage pit” of the entire unit in that it often collects wear particles
from the clutch and bands that can cause future problems. According to
remanufacturers of torque converters, the majority of the torque converters
being
turned in as cores have
little, if any, friction
material remaining
for the torque
converter clutch.
Figure 103–4 A cutaway of a
torque converter clutch
showing the thin paper friction
material.
Automotive Technology: Principles, Diagnosis, and Service, 3rd Edition
By James D. Halderman
©©2008
2009Pearson
PearsonEducation,
Education,Inc.
Inc.
Pearson
PearsonPrentice
PrenticeHall
Hall- -Upper
UpperSaddle
SaddleRiver,
River,NJ
NJ07458
07458
If the Torque Converter Is Dropped,
Replace It
Torque converters include plastic thrust plates which are very strong under the compressive forces of
normal torque converter operation. However, if a torque converter is dropped, even from a distance of
less than six inches (15 cm), the thrust washer can easily break, ruining the torque converter.
Even though torque converters look strong and feel heavy, handle them as if they are glass.
Pump Assembly Remove the pump assembly using the proper
removal tool to avoid damaging it. See Figures 103–5 and 103–6.
Check the pump for wear as shown in Figure 103–7.
Automotive Technology: Principles, Diagnosis, and Service, 3rd Edition
By James D. Halderman
©©2008
2009Pearson
PearsonEducation,
Education,Inc.
Inc.
Pearson
PearsonPrentice
PrenticeHall
Hall- -Upper
UpperSaddle
SaddleRiver,
River,NJ
NJ07458
07458
Figure 103–5 Two slide hammers are usually used to remove a cast-iron pump assembly from
older automatic transmissions.
Continued
Automotive Technology: Principles, Diagnosis, and Service, 3rd Edition
By James D. Halderman
©©2008
2009Pearson
PearsonEducation,
Education,Inc.
Inc.
Pearson
PearsonPrentice
PrenticeHall
Hall- -Upper
UpperSaddle
SaddleRiver,
River,NJ
NJ07458
07458
Figure 103–6 A special puller is usually
specified to remove aluminum pumps
from transmissions/transaxles.
Alignment pins (arrows) are used to
properly align the gasket and pump on
the case during reassembly.
Continued
Automotive Technology: Principles, Diagnosis, and Service, 3rd Edition
By James D. Halderman
©©2008
2009Pearson
PearsonEducation,
Education,Inc.
Inc.
Pearson
PearsonPrentice
PrenticeHall
Hall- -Upper
UpperSaddle
SaddleRiver,
River,NJ
NJ07458
07458
Figure 103–7 Checking a transmission pump assembly for wear using a feeler gauge. Compare
the readings to factory specifications.
Continued
Automotive Technology: Principles, Diagnosis, and Service, 3rd Edition
By James D. Halderman
©©2008
2009Pearson
PearsonEducation,
Education,Inc.
Inc.
Pearson
PearsonPrentice
PrenticeHall
Hall- -Upper
UpperSaddle
SaddleRiver,
River,NJ
NJ07458
07458
Valve Body Remove the valve body and check all valves for proper
operation. To service a valve body, disassemble all the parts and
identify them for reassembly.
Figure 103–8 A cutaway of an auxiliary valve body showing the valves and springs that should
be checked for smooth operation.
Continued
Automotive Technology: Principles, Diagnosis, and Service, 3rd Edition
By James D. Halderman
©©2008
2009Pearson
PearsonEducation,
Education,Inc.
Inc.
Pearson
PearsonPrentice
PrenticeHall
Hall- -Upper
UpperSaddle
SaddleRiver,
River,NJ
NJ07458
07458
Save the old gaskets to match with
the new ones.
Figure 103–9 Sometimes unique tools make
the job go smoother. An engine valve spring
compressor is used to compress a servo
piston so the snap ring can be removed.
Clean all parts in a solvent that
removes all gum, varnish, dirt,
and grease.
Rinse clean parts in hot water,
then immerse in clean mineral
spirits or a similar solvent to
separate water from the parts.
Finish cleaning by blow-drying
with low-pressure, filtered,
compressed air.
Continued
Automotive Technology: Principles, Diagnosis, and Service, 3rd Edition
By James D. Halderman
©©2008
2009Pearson
PearsonEducation,
Education,Inc.
Inc.
Pearson
PearsonPrentice
PrenticeHall
Hall- -Upper
UpperSaddle
SaddleRiver,
River,NJ
NJ07458
07458
Once clean, inspect the valve body and its components and look for:
Scored, cracked, or burred plugs and valves
Broken, bent, or worn springs
Scored or rusted bores
Plugged or restricted fluid passages
Bent or rusted separator plates
Stuck check valves
Bent manual valves
Cracked castings and distorted or nicked mating surfaces.
Continued
Automotive Technology: Principles, Diagnosis, and Service, 3rd Edition
By James D. Halderman
©©2008
2009Pearson
PearsonEducation,
Education,Inc.
Inc.
Pearson
PearsonPrentice
PrenticeHall
Hall- -Upper
UpperSaddle
SaddleRiver,
River,NJ
NJ07458
07458
Shiny areas on valve lands indicate friction between the spool valve and body. On steel valves,
these areas can be polished carefully with 400- to 600-grit wet or dry sandpaper, crocus cloth,
or polishing stone.
Take care not to round off the edges of the valve lands while polishing. Aluminum valves
cannot be polished. If a valve needs polishing, the bore it rides in also requires servicing. Polish
the valve bore by inserting and turning loosely rolled wet or dry sandpaper or crocus cloth.
Avoid rounding the edge of the bore. Rewash and dry any valves and bores that are polished.
After polishing and washing, lubricate the spool valve with ATF and slide it into its bore to
check fit and operation. The valve should slide back and forth freely of its own weight.
Continued
Automotive Technology: Principles, Diagnosis, and Service, 3rd Edition
By James D. Halderman
©©2008
2009Pearson
PearsonEducation,
Education,Inc.
Inc.
Pearson
PearsonPrentice
PrenticeHall
Hall- -Upper
UpperSaddle
SaddleRiver,
River,NJ
NJ07458
07458
Clutch Packs Begin disassembling a clutch pack by removing
the snap ring that holds the discs in the housing.
Remove the snap ring from most clutches by prying one end of it
free from its groove with a small screwdriver.
Then, slide the screwdriver around the drum and the snap ring
removes easily.
Continued
Automotive Technology: Principles, Diagnosis, and Service, 3rd Edition
By James D. Halderman
©©2008
2009Pearson
PearsonEducation,
Education,Inc.
Inc.
Pearson
PearsonPrentice
PrenticeHall
Hall- -Upper
UpperSaddle
SaddleRiver,
River,NJ
NJ07458
07458
Friction Disc Inspection Wipe each friction disc with a dry, lintfree cloth. Inspect for:
Excessive wear
Cracks in the lining material
Charred, burned, or glazed lining surface
Pitting, flaking, or scoring
Chips or particles embedded in the lining
Scoring or burns on disc serrations
Distortion
Friction discs tend to discolor in use, which is normal. If any
friction disc shows signs of one or more of the defects above,
replace the entire set. Replace the set of friction discs if they do
not fit freely in the clutch hub serrations or if there is wear or
damage to their splines.
Continued
Automotive Technology: Principles, Diagnosis, and Service, 3rd Edition
By James D. Halderman
©©2008
2009Pearson
PearsonEducation,
Education,Inc.
Inc.
Pearson
PearsonPrentice
PrenticeHall
Hall- -Upper
UpperSaddle
SaddleRiver,
River,NJ
NJ07458
07458
Steel Disc Inspection Also clean steel discs by wiping with a dry,
lint-free cloth. Once clean, inspect each disc for:
Uneven heat discoloration
Surface scuffing or scoring
Drive lug damage
Distortion
Replace the entire set of steels if you note a rough surface or there
is uneven or spotty discoloration on any of the discs. Also replace
steel discs if they do not fit freely into the clutch drum serrations.
NOTE: Be sure to soak all the friction discs in ATF before assembling
the clutch pack.
Continued
Automotive Technology: Principles, Diagnosis, and Service, 3rd Edition
By James D. Halderman
©©2008
2009Pearson
PearsonEducation,
Education,Inc.
Inc.
Pearson
PearsonPrentice
PrenticeHall
Hall- -Upper
UpperSaddle
SaddleRiver,
River,NJ
NJ07458
07458
Smooth Is In; Rough Is Out
It used to be common practice in the automatic transmission business for
the rebuilder to use sandpaper to “roughen up” the surface of the steel
discs to achieve a good clutch apply. This is not true now.
Sanding creates grooves and sharp peaks that decrease the oil film
between the paper on the friction plate and the steel plates. There should
be a thin oil film between the paper and the steel to create a holding
bond and make it possible for a clutch pack to apply and release
thousands of times without wear.
For consistent shifts and long-lasting transmissions/transaxles, do not
sand the steel discs. Used steel discs are often smoother than new steel
discs due to normal wear. As long as the steel discs are not discolored,
heat checked, or warped, used steel discs should be reused.
Automotive Technology: Principles, Diagnosis, and Service, 3rd Edition
By James D. Halderman
©©2008
2009Pearson
PearsonEducation,
Education,Inc.
Inc.
Pearson
PearsonPrentice
PrenticeHall
Hall- -Upper
UpperSaddle
SaddleRiver,
River,NJ
NJ07458
07458
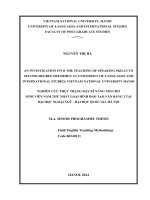
Clutch Piston Removal and Inspection To remove the snap
ring holding the clutch piston in place, compress the piston
return springs, which is done with a compressor tool.
Tightening a nut onto the shaft draws the fingers of the tool
down, compressing the spring, and allowing the snap ring
to be removed.
After removing the snap ring, release and remove the spring
compressor, then remove and inspect the return springs.
See Figure 103–10.
Continued
Automotive Technology: Principles, Diagnosis, and Service, 3rd Edition
By James D. Halderman
©©2008
2009Pearson
PearsonEducation,
Education,Inc.
Inc.
Pearson
PearsonPrentice
PrenticeHall
Hall- -Upper
UpperSaddle
SaddleRiver,
River,NJ
NJ07458
07458