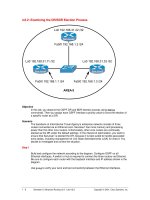
Examining the DR/BDR Election Process
Bạn đang xem bản rút gọn của tài liệu. Xem và tải ngay bản đầy đủ của tài liệu tại đây (32.79 KB, 6 trang )
1 - 6 Semester 5: Advanced Routing v2.0 - Lab 4.6.2 Copyright 2001, Cisco Systems, Inc.
4.6.2: Examining the DR/BDR Election Process
Lo0 192.168.31.22 /32
Fa0/0 192.168.1.2 /24
Lo0 192.168.31.33 /32Lo0 192.168.31.11 /32
Fa0/0 192.168.1.1 /24 Fa0/0 192.168.1.3 /24
AREA 0
SanJose2
SanJose1 SanJose3
Objective
In this lab, you observe the OSPF DR and BDR election process using debug
commands. Then you assign each OSPF interface a priority value to force the election of
a specific router as a DR.
Scenario
The backbone of International Travel Agency’s enterprise network consists of three
routers connected via an Ethernet core. SanJose1 has more memory and processing
power than the other core routers. Unfortunately, other core routers are continually
elected as the DR under the default settings. In the interest of optimization, you want to
ensure that SanJose1 is elected the DR, because it is best suited to handle associated
extra duties, including management of Link State Advertisements (LSA) for Area 0. You
decide to investigate and correct the situation.
Step 1
Build and configure the network according to the diagram. Configure OSPF on all
Ethernet interfaces. A switch or hub is required to connect the three routers via Ethernet.
Be sure to configure each router with the loopback interface and IP address shown in the
diagram.
Use ping to verify your work and test connectivity between the Ethernet interfaces.
2 - 6 Semester 5: Advanced Routing v2.0 - Lab 4.6.2 Copyright 2001, Cisco Systems, Inc.
Step 2
Use the show ip ospf neighbor detail command to verify that the OSPF routers
have formed adjacencies:
SanJose3#show ip ospf neighbor detail
Neighbor 192.168.31.11, interface address 192.168.1.1
In the area 0 via interface FastEthernet0/0
Neighbor priority is 1, State is FULL, 12 state changes
DR is 192.168.1.3 BDR is 192.168.1.2
Options 2
Dead timer due in 00:00:17
Index 2/2, retransmission queue length 0, number of
retransmission 1
First 0x0(0)/0x0(0) Next 0x0(0)/0x0(0)
Last retransmission scan length is 1, maximum is 1
Last retransmission scan time is 0 msec, maximum is 0 msec
Neighbor 192.168.31.22, interface address 192.168.1.2
In the area 0 via interface FastEthernet0/0
Neighbor priority is 1, State is FULL, 6 state changes
DR is 192.168.1.3 BDR is 192.168.1.2
Options 2
Dead timer due in 00:00:15
Index 1/1, retransmission queue length 0, number of
retransmission 5
First 0x0(0)/0x0(0) Next 0x0(0)/0x0(0)
Last retransmission scan length is 1, maximum is 1
Last retransmission scan time is 0 msec, maximum is 0 msec
1. Which router is the DR? Why?
2. Which router is the BDR? Why?
Recall that router IDs determine the DR and BDR.
Step 3
If your network is configured according to the diagram, SanJose1 will not be the DR. You
decide to temporarily shut down SanJose3, which has the highest router ID
(192.168.31.33), and observe the DR/BDR election process. To observe the election,
issue the following debug command on SanJose1:
SanJose1#debug ip ospf adj
Now that OSPF adjacency events will be logged to SanJose1’s console, you can remove
SanJose3 from the OSPF network by shutting down its FastEthernet interface:
SanJose3(config)#interface fastethernet 0/0
SanJose3(config-if)#shutdown
Watch the debug output on SanJose1:
SanJose1#
00:48:47: OSPF: Rcv hello from 192.168.31.22 area 0 from
FastEthernet0/0 192.168.1.2
00:48:47: OSPF: Neighbor change Event on interface FastEthernet0/0
00:48:47: OSPF: DR/BDR election on FastEthernet0/0
00:48:47: OSPF: Elect BDR 192.168.31.11
00:48:47: OSPF: Elect DR 192.168.31.22
00:48:47: OSPF: Elect BDR 192.168.31.11
00:48:47: OSPF: Elect DR 192.168.31.22
00:48:47: DR: 192.168.31.22 (Id) BDR: 192.168.31.11 (Id)
00:48:47: OSPF: Remember old DR 192.168.31.33 (id)
00:48:47: OSPF: End of hello processing
3 - 6 Semester 5: Advanced Routing v2.0 - Lab 4.6.2 Copyright 2001, Cisco Systems, Inc.
1. Who is elected DR? Why?
The former BDR is promoted to DR.
In the debug output, look for a statement about remembering the “old DR.” Unless
SanJose1 and SanJose2 are powered off, they will remember that SanJose3 was the old
DR. When SanJose3 comes back online, these routers will allow SanJose3 to reassume
its role as DR:
SanJose1#
00:51:32: OSPF: Rcv hello from 192.168.31.22 area 0 from
FastEthernet0/0 192.168.1.2
00:51:32: OSPF: End of hello processing
00:51:33: OSPF: Rcv hello from 192.168.31.33 area 0 from
FastEthernet0/0 192.168.1.3
00:51:33: OSPF: 2 Way Communication to 192.168.31.33 on
FastEthernet0/0, state 2WAY
00:51:33: OSPF: Neighbor change Event on interface FastEthernet0/0
00:51:33: OSPF: DR/BDR election on FastEthernet0/0
00:51:33: OSPF: Elect BDR 192.168.31.11
00:51:33: OSPF: Elect DR 192.168.31.33
00:51:33: DR: 192.168.31.33 (Id) BDR: 192.168.31.11 (Id)
00:51:33: OSPF: Send DBD to 192.168.31.33 on FastEthernet0/0 seq
0x21CF opt 0x2 flag 0x7 len 32
00:51:33: OSPF: Send with youngest Key 1
00:51:33: OSPF: Remember old DR 192.168.31.22 (id)
00:51:33: OSPF: End of hello processing
Step 4
At this point, SanJose1 should have assumed the role of BDR. Bring SanJose3 back
online, and observe the new election process.
1. SanJose3 will assume its former role as DR. Who is elected BDR? Why?
SanJose1 remains the BDR even though SanJose2 has the higher router ID.
Step 5
You can manipulate which router becomes the DR using two methods. You could change
the router’s router ID to a higher number, but that could confuse your loopback
addressing system and affect elections on other interfaces. The same router ID is used
for every network that a router is a member of. For example, if an OSPF router has an
exceptionally high router ID, it could win the election on every multiaccess interface and,
as a result, do triple or quadruple duty as a DR.
4 - 6 Semester 5: Advanced Routing v2.0 - Lab 4.6.2 Copyright 2001, Cisco Systems, Inc.
Instead of reconfiguring router IDs, you manipulate the election by configuring OSPF
priority values. Because priorities are an interface-specific value, they provide finer
control of your OSPF internetwork by allowing a router to be the DR in one network and a
DRother in another. Priority values are the first consideration in the DR election; highest
priority wins. Values can range from 0-255; a value of 0 indicates that the interface will
not participate in an election. Use the show ip ospf interface command to
examine the current priority values of the three routers’ Ethernet interfaces:
SanJose1#show ip ospf interface
FastEthernet0/0 is up, line protocol is up
Internet Address 192.168.1.1/24, Area 0
Process ID 1, Router ID 192.168.31.11, Network Type BROADCAST,
Cost: 1
Transmit Delay is 1 sec, State BDR, Priority 1
Designated Router (ID) 192.168.31.33, Interface address
192.168.1.3
Backup Designated router (ID) 192.168.31.11, Interface address
192.168.1.1
Timer intervals configured, Hello 5, Dead 20, Wait 20,
Retransmit 5
Hello due in 00:00:03
Index 1/1, flood queue length 0
Next 0x0(0)/0x0(0)
Last flood scan length is 1, maximum is 2
Last flood scan time is 0 msec, maximum is 0 msec
Neighbor Count is 2, Adjacent neighbor count is 2
Adjacent with neighbor 192.168.31.33 (Designated Router)
Adjacent with neighbor 192.168.31.22
Suppress hello for 0 neighbor(s)
Message digest authentication enabled
Youngest key id is 1
1. What is the priority value of these interfaces?
The default priority is 1. Because all have equal priority, router ID is used to determine
the DR and BDR.
Modify the priority values so that SanJose1 will become the DR and SanJose2 will
become the BDR, regardless of their router ID. Use the following commands:
SanJose1(config)#interface fastethernet 0/0
SanJose1(config-if)#ip ospf priority 200
SanJose2(config)#interface fastethernet 0/0
SanJose2(config-if)#ip ospf priority 100
In order to reset the election process, you must write each router’s configuration to
NVRAM and reload SanJose1, SanJose2, and SanJose3. You can issue the following
commands at each router:
SanJose1#copy running-config startup-config
SanJose1#reload
5 - 6 Semester 5: Advanced Routing v2.0 - Lab 4.6.2 Copyright 2001, Cisco Systems, Inc.
When the routers finish reloading, try to observe the OSPF election on SanJose1 by
using the debug ip ospf adj command. You can also verify your configuration by
issuing the show ip ospf interface command at both SanJose1 and SanJose2.
SanJose1#debug ip ospf adj
00:01:20: OSPF: Rcv hello from 192.168.31.22 area 0 from
FastEthernet0/0 192.168.1.2
00:01:20: OSPF: Neighbor change Event on interface FastEthernet0/0
00:01:20: OSPF: DR/BDR election on FastEthernet0/0
00:01:20: OSPF: Elect BDR 192.168.31.22
00:01:20: OSPF: Elect DR 192.168.31.11
00:01:20: DR: 192.168.31.11 (Id) BDR: 192.168.31.22 (Id)
00:01:20: OSPF: End of hello processing
SanJose2#show ip ospf interface
FastEthernet0/0 is up, line protocol is up
Internet Address 192.168.1.2/24, Area 0
Process ID 1, Router ID 192.168.31.22, Network Type BROADCAST,
Cost: 1
Transmit Delay is 1 sec, State BDR, Priority 100
Designated Router (ID) 192.168.31.11, Interface address
192.168.1.1
Backup Designated router (ID) 192.168.31.22, Interface address
192.168.1.2
Timer intervals configured, Hello 5, Dead 20, Wait 20,
Retransmit 5
Hello due in 00:00:03
Index 1/1, flood queue length 0
Next 0x0(0)/0x0(0)
Last flood scan length is 1, maximum is 1
Last flood scan time is 0 msec, maximum is 0 msec
Neighbor Count is 2, Adjacent neighbor count is 2
Adjacent with neighbor 192.168.31.33
Adjacent with neighbor 192.168.31.11 (Designated Router)
Suppress hello for 0 neighbor(s)
Message digest authentication enabled
Youngest key id is 1
After the election is complete, verify that SanJose1 and SanJose2 have assumed the
correct roles by using the show ip ospf neighbor detail command. Troubleshoot,
if necessary.
SanJose3#show ip ospf neighbor detail
Neighbor 192.168.31.22, interface address 192.168.1.2
In the area 0 via interface FastEthernet0/0
Neighbor priority is 100, State is FULL, 6 state changes
DR is 192.168.1.1 BDR is 192.168.1.2
Options 2
Dead timer due in 00:00:17
Index 2/2, retransmission queue length 0, number of
retransmission 0
First 0x0(0)/0x0(0) Next 0x0(0)/0x0(0)
Last retransmission scan length is 0, maximum is 0
Last retransmission scan time is 0 msec, maximum is 0 msec
Neighbor 192.168.31.11, interface address 192.168.1.1
In the area 0 via interface FastEthernet0/0
Neighbor priority is 200, State is FULL, 6 state changes
DR is 192.168.1.1 BDR is 192.168.1.2
Options 2
Dead timer due in 00:00:19
Index 1/1, retransmission queue length 0, number of
retransmission 2
First 0x0(0)/0x0(0) Next 0x0(0)/0x0(0)
Last retransmission scan length is 1, maximum is 1
Last retransmission scan time is 0 msec, maximum is 0 msec