Fantasic Figures - CONSTRUCTING BODIES GENERAL
Bạn đang xem bản rút gọn của tài liệu. Xem và tải ngay bản đầy đủ của tài liệu tại đây (721.19 KB, 24 trang )
CONSTRUCTING BODIES
GENERAL
If there is a part of dollmaking I dislike, it is making the body. With most of my dolls, which begin as a set
of sculpted parts, I have to do something to hook all the parts together. However, the structure while in progress just
doesn't thrill me, but the process must be done, and done well, because I know that the body and the movement of
the piece can make or ruin the doll as a completed and successful piece. The greatest sculpture and the most fantastic
costuming will not amount to anything if they are hung on a poorly thought-out body. Notice that I did not say
"poorly constructed": in this area, as with all of dollmaking, if you think it out well, it will construct well.
While you are sculpting, you will have already made a decision about the body. Some of us are inclined to
like sculpture and the beauty of the human form, so we will create our dolls to show as much of that as possible.
This type of doll is usually sculpted as a solid piece and then cut apart to make joints for movement. Artists who
prefer body work could be easily content to do a figurine (fixed, unmovable figure), but they do jointing as a token
recognition of the doll idea.
Some artists are enamored of the idea of human motion. They love the idea of the play of the muscles and
tendons, and the action of the joints. These artists tend to become immersed in the problems of engineering joints
close to the nature of the real human. Some of their results are, indeed, feats of engineering very close to divine.
Most dollmakers who choose to work in polymer or paperclay do so because they like the idea of
expressing character. They are more interested in creating a costumed miniature human replica than a dressable play
doll. Therefore, they do not have a great need to sculpt the whole body. They choose a wire-armatured body, so that
fine details of character can be expressed through posture and gesture.
Those who do larger clay dolls based on the play concept tend to construct their dolls on soft or minimally
wired bodies, similar to the old composition or plastic-limbed "mama doll" commercial toys. But there are no
particular rules here.
Sculpted parts assembled on soft cloth body by Marleen Engler. Photo by Meindert Wentzel
My own preference is for a figure that is adjustable while the doll is under construction or packed for shipping but is
fixed in display. My experience, therefore, is with constructing dolls having the parts assembled on a wire armature.
In some cases, I have combined elements of the solid limb joint—usually at the shoulder to show a low-cut bodice—
with the wire armature. How much or how little I might combine these two types depends directly on how I imagine
the doll will look when completed. In the sculpture stage, then, I have to have at least a rough idea of the final body
position and costume.
Considering the need for a doll body, we are faced with the fact that we somehow have to get the separate
parts together; since we are making a little human figure, the method has to reflect correct human proportion and
action. No matter how simple or how complex we might make that construction, it is at all times working as our
own skeleton, muscles, and tendons work for us, to hold us up against the forces of gravity.
The tricky part of the doll body in theory and practice is that, whereas our bodies have four separate
working actions—bones, muscles, tendons, and joints—the doll body usually does not. All those actions have to be
mimicked with one or two materials. The commercial type, where a jointed hard-plastic bone is covered with a soft
vinyl skin, is closest to the human body. Artists working with porcelain or wood, where the parts are hollow, are
often able to engineer movement by creating systems of springs. One studio artist, Lisa Lichtenfels, creates a wire-
and-cloth doll body incorporating all aspects of the human body, although not all parts may actually work. George
Stuart constructs a movable armatured body covered with fabric that flawlessly mimics the outward form of a real
human. Both of these artists, and others, have developed their methods because the figure they imagined required
them to do it that way. Any artists whose doll you respect as a successful art piece will tell you that they work for
the idea. The doll's concept controls what they do.
Acknowledging the importance of body construction in their dollmaking, four artists provided sketches of
the ways they have arrived at solutions to fit their individual concepts. Each follows the basic outline and proportion
of the human body but, as you can see, there is infinite variation possible in the actual construction methods and
materials.
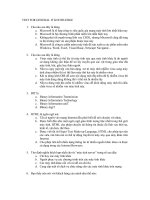
Sketch of armature wiring made by Carol Nordell. Notice how the wire for the spine curves in an
anatomically correct fashion at the neck. Also notice that the major spine wire is straight. The long ends of the head
loop wire are twisted around the main spinal wire. Extending the armature wire below the foot allows the doll to be
fitted securely into a base without additional support structures that would detract from the final form or look of the
character and its costume. Shaded areas are small pieces of ceiling board (plaster wallboard) taped to wires to give
interior padding for sculpture. Carol remarks that, although the armatures do move, the movement is only for
facilitating sculpture and costuming. Completed figures are permanently posed and not meant to be moved.
Drawing by Carol Nordell
Paul Robbins makes a plaster head-torso dummy. He then sculpts over this by applying thin layers of
paperclay. When the paperclay has dried, the plaster can be carved or hollowed with a knife, so that the sculpture
can fit over a flexible wire-armatured cloth torso. Arms and legs are sculpted over a paper cylinder to create a
hollow core or, in the case of small figures, hollowed with a knitting needle. Wires running from the cloth torso
extend through the hollow legs to secure the figure to a solid base. Arms are attached by setting wire loops in the
arm top, filling the torso-arm socket with hot-melt glue, and pushing the arm loop into the socket.
Drawing by Paul Robbins
George Stuart constructs his figures over an iron-wire armature which achieves flexibility from a loop and
hook system. Lower leg and arm bones are composed of a double run of wire spaced at the joints by a loop
simulating the bone end. Upper arm and leg wires are double-looped to attach the lower limbs and to provide natural
elbow and knee movement. Limbs are jointed to the torso by creating loops to catch hooks bent in the upper arm and
leg wires. Torso stability, spacing, and movement are achieved by a loop grid. The result is a naturally moving
skeleton which is then filled in with papier mache. Mr. Stuart uses best-quality wool felt to create the body skin, and
the fatty parts are padded in as necessary with synthetic batting.
Drawing used by permission of Martha Armstrong-Hand
In assembling most figures made of parts sculpted in hard materials, the soft parts of the fabric or
armatured body are usually covered by the costume. Still, proper bone and muscle placement is important to achieve
a credible doll. Working with figures with soft-sculpted fabric surfaces led Lisa Lichtenfels to engineer a body
which would consistently present the natural look of the skin surface as it reflects the underlying bones and muscles.
Lisa creates an armature of bent aluminum sculpture wire which reflects the major bones of the body. Wire bones
are wrapped with batting, and padding is added to muscle areas until the body is correctly filled out. A skin
sometimes consisting of several layers of two-way stretchable nylon stocking material is then needle-sculpted along
the appropriate body contours. Notice that in the areas where bones naturally show directly under the skin, such as
collar bones and pelvis, the muscle padding meets but does not cover the bones.
Drawing by Lisa Lichtenfels
CONSTRUCTION CONSIDERATIONS
No matter what kind of wire you use or how complicated your construction might be, here are three
constant considerations in making a wire armature:
1. Provide for correct shoulder and hip width, and for the natural right angle formed by the hang of the arm
from the shoulder and the leg from the hip. Imagine two nested three-sided rectangles.
2. The major vertical wiring (spine, legs) must run straight. Bent, spiraled, and wrapped wire create an
undesirable spring effect. Wrapping and tucked wire ends will work, but do not use them on any part which will
carry weight or need to hold a position.
3. The fabric-covered armature must be so bent or needle-sculpted that major joints are properly indicated.
Knees and elbows need to be seen as sharply defined as they are on a human body. Nothing is more unsatisfactory
than a figure that seems to be composed of limp, jointless limbs. To avoid this, when posing your armature bend the
limbs to form angles rather than curves. When covering the armature with fabric, be sure to allow elbow and knee
angles to show. When costuming the figure, drape or fold the fabric at elbow and knee bends to indicate natural
folds of the costume.
MATERIALS
During a court appearance as an expert witness, I was asked by an attorney whether I make wire armatures.
When I answered in the affirmative, he asked what kind of wire I use. I replied, "Any kind or all kinds." This
seemed to startle him; he evidently felt that each artist would use one type of wire. When he asked me to specify
wire types, I listed a whole hardware store of types, as well as coat hangers, telephone wire, electrical cable, and
sculpture wire. It might have startled him even more to find that an armature can be made of plastic balls hooked
together like pop beads.
The most common material for a wire armature is ordinary galvanized wire, available in rolls as hardware
supply. For 10" to 20" dolls, 16 gauge is adequate. For larger dolls, you can double the strands of 16-gauge wire. For
smaller dolls, use a finer wire, 18 to 20 gauge. For very flexible dolls like a dollhouse type under 10", you can use
copper wire; however, for most armatures, I find copper far too soft. Armatures for dolls of any size can be made
with an aluminum-alloy wire that artists call "sculpture wire," which is very strong and very flexible, soft enough to
bend easily yet strong enough to carry weight. This wire is usually found in art or ceramic supply shops, in several
thicknesses. Compared with ordinary galvanized wire or electrical cable, however, it is expensive.
Larger armatures can also be made with elec trical cable, found on large spools in hardware electrical
departments. You can peel the cable cover off and separate the interior wires for smaller areas, such as finger
armatures. In general, most ordinary armatures can be made from 16-gauge wire, but you can use any wire that
looks workable and will not rust, including coat hangers.
Warning: Always take care not to bend or twist wires that have been cured inside polymer or paperclay, as
you may crack the cured or dried sculpture. When you want to bend your piece to pose it, bend the wires at a point
above the hard sculpture. Collectors who own your pieces should also be given this posing caution.
Review: As you sculpted in polymer clay, you have sculpted with a thought to constructing a wire armature and,
therefore, arm and leg pieces should have two wires extending out of the cured sculpture. These pieces should also
have been scored with a J/32" to Vs" groove around the top of each limb, so that a cloth body can be easily attached.
If your sculpture was in paperclay, grooves should have been carved; if not, make them before continuing with body
construction. If you did not use wires, you will need to drill or cut a tunnel in the material so that you can now set
wires in. Depending on the size of the paperclay limb, sometimes you can poke or drill a hole. When the hole is
made, insert doubled wire and set with craft glue or wet paperclay. Setting looped wire creates a spring action: each
wire presses against the side of the hole, and that pressure helps keep the wires from slipping out.
COVERINGS
For figures 12" and taller, I prefer to use a trouser-weight double-knit fabric. However, as this fabric is no
longer popular, I have increasingly been using plain-weave heavyweight muslin or felt. The choice usually depends
upon the size and complexity of the body. A larger basic form would be made with felt, a smaller, more detailed
form with muslin. If necessary, I will add a skin of stretchy nylon pantyhose fabric or Lycra® and pad it to form
specific contours like bust, hip, or elbow.
Bodies under 12" may be made with high-quality stockinette similar to heavy T-shirt weight, or with two-
way stretch fabrics like Lycra. Extra care should be taken with the lightweight stretch fabrics to make the form firm.
On a body this size, I almost always hand sew all parts.
WEIGHTING, STUFFING, AND PADDING
To wrap the armature types shown, you will need Polyfil Needlepunch® or low-loft quilt batting. You will
also need Polyfil stuffing to add padding for contours. A ten-pound bag of ball bearings will make many weight
bags. I also use hunters' copper shot. I strongly recommend a weight bag for any doll that is meant to sit, as it adds
extra weight to simulate the natural downward force or slump of the body. It also keeps a doll from seeming to float
up and off a base or chair. Weighting can help balance a doll in an unusual pose. Most dollmakers will also find it
convenient to keep weight materials on hand. You might want to investigate a variety of drapery weights for use in
specific areas, or even in parts of the costume. Resist the temptation to make weight bags with organic materials
such as rice, beans, or birdseed: they will eventually deteriorate and attract insects. Catbox litter is usable, but does
tend to be dusty. Plastic doll-weight pellets are usable but, since they are not as heavy by volume as metal shot, it
will take significantly more of them to get the same effect.
You will also need masking or adhesive tape and wire-cutting pliers.
CONSTRUCTION
The body-covering pieces given in the illustration on the following page are very basic, so enlarge or
reduce them as necessary. This body has a rather narrow waist so that costume fabric or gathers will not increase the
size or make the piece disproportionate. I find it is usually better to make the body slightly smaller, as it is easier to
pad than reduce it. In all cases, at this point, you will have to adjust the body-covering pieces to the type, size, and
pose of your figure. Before cutting body pieces, pose your wire armature. Cut pieces and lay them against the body
to be sure you allow enough leeway for the action or pose of the doll. For instance, a doll that is bent at the waist
will need a little more length in the back of the body. Do think about the width of your doll's limbs. Often the size of
the foot or the spread of an open hand cannot be put through the width of the machine-stitched fabric cover for the
limb. If the hands or feet are too large for the sewn piece to be slipped on, you will need to lay fabric around the
limb, turn under the raw edges, pin to hold, and whipstitch the seam by hand. Hand sewing takes only a few minutes
more, and it is always much more satisfactory for achieving special details: you can actually needle-sculpt the fabric
if necessary.
Assemble and cover the body as shown:
Wire form for assembling sculpted head, hands, and feet