Light—Science & Magic- P5
Bạn đang xem bản rút gọn của tài liệu. Xem và tải ngay bản đầy đủ của tài liệu tại đây (23.26 MB, 50 trang )
LIGHT—SCIENCE & MAGIC
188
face. (The extreme example of such “flat” lighting comes from
mounting a strobe directly on top of the camera.)
Evaluating whether the lighting is too flat can be difficult for
photographers who are just beginning to learn portrait lighting,
especially if the picture will be printed in only black ink.
Anticipating how color translates to shades of gray takes prac-
tice. But the decision becomes simple when we see that such
lighting also makes the key triangle so large that it is no longer
a triangle.
8.6
The key triangle extending
from the eye, through the
cheek, to the lip line is the
starting point for good portrait
lighting.
Hunter-Ch08.qxd 10/1/07 8:39 PM Page 188
Please purchase PDF Split-Merge on www.verypdf.com to remove this watermark.
AN ARSENAL OF LIGHTS
189
We can usually improve such lighting by moving the light far-
ther to the side and higher to reduce the size of the key triangle.
To maximize contour, we move the light far enough to get the key
triangle as small as possible but stop just short of moving it far
enough to create either of the following two problems.
Key Triangle Too Low: Main Light Too High
Regardless of whether the eyes are the window to the soul, they
are certainly essential to almost any portrait. Keeping the eyes
of the subject in shadow can be unsettling to anyone looking at
the portrait. Figure 8.8 illustrates this problem. Notice how the
strong eye shadow eliminates the top of the key triangle and
produces an unnatural and ghoulish picture.
8.7
Flat lighting, far too
uniform to show contour, is the
result of placing the main light
too near to the camera.
Hunter-Ch08.qxd 10/1/07 8:39 PM Page 189
Please purchase PDF Split-Merge on www.verypdf.com to remove this watermark.
LIGHT—SCIENCE & MAGIC
190
This shadow is there because we positioned our light too
high above the head of the subject. Fixing the problem simply
means lowering the light a bit.
Key Triangle Too Narrow: Main Light Too Far to Side
Figure 8.9 illustrates still another potential problem. We
positioned the light so that the nose casts a dark shadow across
her cheek. This shadow blocks the key triangle. Once more the
cure is simple. To avoid a shadow such as this one, all we have
to do is move the light a bit more to the front. When we do this,
the key triangle will reappear.
8.8
The unsettling “raccoon
eyes” that we see here come
from lifting the main light too
high above the model’s face.
Hunter-Ch08.qxd 10/1/07 8:39 PM Page 190
Please purchase PDF Split-Merge on www.verypdf.com to remove this watermark.
AN ARSENAL OF LIGHTS
191
Left Side? Right Side?
Photographers generally prefer to put the main light on the
same side as the subject’s dominant eye, or the eye that appears
to be more open than the other. The greater the visible domi-
nance of the eye, the more important it is that we light that
side. Of course, some people have very symmetrical features;
then it makes no difference on which side we put the main
light.
The other influence on our decision is where the person’s
hair is parted. Lighting on the same side as the part prevents
extraneous shadows, especially if the hair is long.
8.9
The result of positioning
the main light too far to one
side. The nose of the model
casts a shadow across her
cheek, blocking the key
highlight.
Hunter-Ch08.qxd 10/1/07 8:39 PM Page 191
Please purchase PDF Split-Merge on www.verypdf.com to remove this watermark.
LIGHT—SCIENCE & MAGIC
192
Some people absolutely insist that we photograph them
from one side or the other. Very often we should listen to such
opinions because they are based on that individual’s dominant
eye or hair style, whether the person knows it or not. Just be
sure that the subject has not confused his “good” side with his
“bad” side when looking in a mirror!
Broad Lighting or Short Lighting
So far we have made all pictures with the model approximately
facing the camera. Whether the light was on the right or the left
would have made only a minor difference. However, the differ-
ence is major if the subject turns his or her head to either
8.10
Putting the main light on
the side opposite the visible
(were it not covered by her hair)
ear produces short lighting.
Hunter-Ch08.qxd 10/1/07 8:39 PM Page 192
Please purchase PDF Split-Merge on www.verypdf.com to remove this watermark.
AN ARSENAL OF LIGHTS
193
side. Where do we main light then? Figures 8.10 and 8.11 show
the options. We either put the light on the same side as the
subject’s visible ear or on the other side.
A main light on the same side as the visible ear is called
broad lighting. Positioning the main light on the side opposite
from your subject’s visible ear produces short lighting.
(Whether the hair covers the “visible” ear has nothing to do
with which side of the face we are talking about.)
If you look at Figures 8.10 and 8.11 again, the reason behind
these two somewhat confusing names becomes apparent. First,
look at the picture that we made with broad lighting. Notice
that a broad, or wide, highlight runs from the back of the
8.11
Broad lighting means
putting the main light on the
same side as the visible ear.
Hunter-Ch08.qxd 10/1/07 8:39 PM Page 193
Please purchase PDF Split-Merge on www.verypdf.com to remove this watermark.
LIGHT—SCIENCE & MAGIC
194
model’s hair, across her cheek, all the way to the bridge of her
nose. Now, look at the portrait that we made with short light-
ing. This time the highlight is quite short, or narrow. The
brightest part of it only extends from the side of the model’s
cheek to her nose.
There are no firm rules to dictate when to use broad and
when to use short lighting. Our personal preference, however,
leans decidedly to short lighting. It puts the light where it
will do the most good, on the front of the face. This, we feel,
produces by far the most interesting portraits.
Other photographers have a completely different bias. They
feel strongly that the short or broad light decision should be
based on the subject’s body build. They prefer to use short
lighting if their subject has a broad face. Such lighting, they
argue, helps make the subject look thinner by putting much of
the face in shadow. If, however, the subject is very thin, they
like the way that broad lighting increases the amount of the
image that is highlighted and makes the subject appear more
substantial.
Eyeglasses
Eyeglasses sometimes dictate the position of the main light,
regardless of the other preferences of the photographer. Figure
8.12 was shot with short lighting. Look at the resulting direct
reflection from the glasses.
It impossible to eliminate the glare with the light positioned
as it was for this portrait. We could, of course, raise it, but
depending on the size and shape of the glasses, by the time we
get it high enough it might fill the eye with shadow.
Figure 8.13 shows the only solution that always works. It is
the same subject shot with broad lighting. Changing from short
to broad lighting positions the main light outside the family of
angles that produces direct reflection.
Problems with eyeglasses increase with the diameter of the
eyeglass lenses. From any particular camera position, the fam-
ily of angles that produces direct reflection is greater if the
glasses have big lenses. If the subject has small eyeglass
lenses, we can sometimes keep a short lighting arrangement
by using a smaller main light. It is easier to position the
smaller light so that no part of the light is within that family of
angles.
Hunter-Ch08.qxd 10/1/07 8:39 PM Page 194
Please purchase PDF Split-Merge on www.verypdf.com to remove this watermark.
AN ARSENAL OF LIGHTS
195
Still life photographers exploring portraiture are sometimes
tempted to use polarizing filters on the main light and on the
camera lens to eliminate reflection from glasses. However, this
can cause other problems. Human skin also produces a small
amount of direct reflection. Consequently, eliminating all
direct reflection in the highlights of a portrait may give the skin
a lifeless appearance.
ADDITIONAL LIGHTS
Up to this point, we have shown some of the different ways to
position and manipulate highlights and shadows using a single
8.12
Short lighting produces
an objectionable glare on the
eyeglasses.
Hunter-Ch08.qxd 10/1/07 8:39 PM Page 195
Please purchase PDF Split-Merge on www.verypdf.com to remove this watermark.
LIGHT—SCIENCE & MAGIC
196
light source. These techniques are powerful because they pro-
duce fine work even if we have only one light at our disposal.
Depending on taste, we may be satisfied with the results of a
single light and proceed no further with the lighting, even if we
have a whole studio full of strobes available. This should be
reassuring to anyone not earning a professional income from
photography and only able to afford to light a portrait with
sunlight.
Still, very few photographers shooting professional portraits
use a single light, so this book will discuss what those other
lights are and how to use them.
8.13
Broad lighting eliminates
the glare problem.
Hunter-Ch08.qxd 10/1/07 8:39 PM Page 196
Please purchase PDF Split-Merge on www.verypdf.com to remove this watermark.
AN ARSENAL OF LIGHTS
197
Fill Lights
Shadows are essential to most portraits. Much of the time, how-
ever, we prefer to lighten a shadow or even eliminate it altogether.
We can do this with a single light source only if we place it near
the camera lens. If we want to keep the main light farther from
the camera, however, we need some kind of fill light.
Photographers commonly use a fill light that gives the
subject about half as much illumination as the main light, but
this guideline is by no means absolute. Some photographers
like to use a lot of fill in portraits, whereas other equally
talented ones prefer to use none. The important thing is not to
try to memorize any set of rules; instead, adjust your lighting
until it is satisfactory to you.
Some photographers use additional lights for fill, whereas
others prefer flat reflecting surfaces. Both methods have their
advantages.
The most basic multiple light arrangement consists of a
main light plus a fill light. An additional light allows good flexi-
bility in fill light placement. We can put the fill light far enough
from the subject to be out of the way and still expect it to be
bright enough.
Figure 8.14 was made with a single fill light. We turned off
the main light so that you could see exactly what effect a fill
light has by itself.
Now look at Figure 8.15, in which we turned the main light
back on. This is a typical example of the combination of fill light
and a main light.
Notice that the shadow under the chin is darker than the
other shadows in the face. This area receives little illumination
from either the main light or the fill. The shadow is not offen-
sive, but it would be if it were a bit darker or harder. We will
talk about how to keep that from happening.
Size is important when you are using fill lights. Generally
speaking, the rule is, “the bigger, the better.” As you might
remember, the larger a light source is, the softer the shadows it
produces. The soft-edged shadows produced by a large fill light
are less visible and less likely to compete with shadows
produced by the main light.
The use of a large fill light allows greater freedom in deciding
where to place the light. Because the shadow of a large fill
light is not clearly defined, the position of the light is, within a
wide range, of no importance. That means we can put it nearly
Hunter-Ch08.qxd 10/1/07 8:39 PM Page 197
Please purchase PDF Split-Merge on www.verypdf.com to remove this watermark.
LIGHT—SCIENCE & MAGIC
198
anywhere that we will not knock it over and the lighting
differences will be too minor to matter.
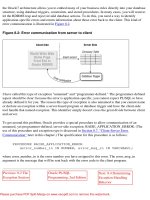
Figure 8.16 shows a two-light portrait arrangement includ-
ing a main light and two possible fill lights, a large one and a
small one. We are unlikely to use both fill lights, but we could
successfully use either, depending on our preference and
available equipment.
One fill light, like the main light, uses an umbrella. This
increases its effective size and softens the shadows it produces.
Because it is large, we could move the fill light around a
good bit without a major effect on its shadow pattern. Such an
8.14
The fill light was all that
was used to make this
exposure. Notice that it is much
dimmer than the main light.
Hunter-Ch08.qxd 10/1/07 8:39 PM Page 198
Please purchase PDF Split-Merge on www.verypdf.com to remove this watermark.
AN ARSENAL OF LIGHTS
199
arrangement makes it easy to vary the fill light intensity by
moving it closer to or farther from the subject.
Alternatively, the fill light can be small if we position it near
and slightly above the camera. Notice that the fill light is as
close to the camera lens as we can put it. Such a fill light still
casts hard shadows, but most of these shadows fall behind the
subject, where the camera cannot see them.
Reflector Cards as Fill Lights
One of the simplest and least expensive ways of brightening
dark shadows is to use reflector cards to bounce light coming
from the main light onto the face of the subject. Figure 8.17
8.15
We used a main and a fill
light together to make this
exposure.
Hunter-Ch08.qxd 10/1/07 8:39 PM Page 199
Please purchase PDF Split-Merge on www.verypdf.com to remove this watermark.
LIGHT—SCIENCE & MAGIC
200
uses a main light position similar to that in previous photo-
graphs, but now a white reflector card has been added to pro-
vide fill light.
We would like to show you the effect of the reflector fill card
alone, but this is impossible. Because the reflector is illumi-
nated by the main light, it has no effect by itself. However, it is
useful to compare its effect with that of the additional lamp in
Figure 8.15. The reflector fill is dimmer, but the two pictures
are more alike than different.
Notice that the dark shadow we saw under the chin in
Figure 8.15 has been greatly reduced by the reflector card. The
shadow is still present, but it is softer. This is because the reflec-
tor card is much larger than the fill light used earlier. We could,
of course, have used a fill light as large as the reflector card to
produce the same result.
The only common problem with a reflector fill is that it may
not be bright enough to suit some photographers’ preferences.
This is especially likely when we move the camera back to
include more than the head and shoulders. The reflector also
has to be moved back to get it out of camera range.
The amount of fill light a reflector provides is determined by
numerous factors, including the following:
Main
Small
Fill Here
Large Fill Here
OR
8.16
Two fill light alternatives.
Bouncing one light into an
umbrella produces softer
lighting. The small light, near the
camera, produces hard
shadows, but they fall mostly
behind the subject, where the
camera cannot see them.
Hunter-Ch08.qxd 10/1/07 8:39 PM Page 200
Please purchase PDF Split-Merge on www.verypdf.com to remove this watermark.
AN ARSENAL OF LIGHTS
201
●
The reflector distance from the subject. The closer
the reflector is to the subject, the brighter the fill light
becomes.
●
The reflector angle. A reflector card illuminates the sub-
ject most when it faces an angle between the subject and
the main light. Turning it more to the subject reduces the
intensity of the light falling on it. Turning it more to the
main light reflects more light in a direction away from the
subject.
●
The reflector surface. Different reflector surfaces reflect
different amounts of light. In our example, we used a white
reflector card. If we had wanted more light on the subject,
we could have used a silver reflector. Remember, however,
8.17
In this photograph, light
from the main light bounced off
a reflector to the face of the
subject to fill some of the
shadows.
Hunter-Ch08.qxd 10/1/07 8:39 PM Page 201
Please purchase PDF Split-Merge on www.verypdf.com to remove this watermark.
LIGHT—SCIENCE & MAGIC
202
that the choice of reflector surface also depends on the size
of the main light. A large silver reflector fill can be a soft
source only if the main light is also soft.
●
Colored reflectors. When shooting in color, you may also
want to experiment with colored reflector cards. At times
they are useful for either adding or subtracting shadow color.
In a daylight portrait, for example, the sun is usually the main
light and, without reflectors, the open sky is the fill. The blue
sky adds blue to the shadow.
Using a gold reflector warms the shadow, thus eliminating
the blue and producing a more neutral color. Using exactly
the opposite approach can make a studio portrait resemble
daylight. A pale-blue reflector cools the shadow color enough
to look more like that in an outdoor photograph. The effect
is subtle and few viewers will notice it consciously; still, they
are more likely to believe it is an outdoor portrait.
Because we personally prefer the reflector to the earlier
strobe fill, we will keep it in place for all of the subsequent pho-
tographs. Figure 8.18 shows where we placed the reflector in a
Main
Reflector
Gobo
above
lens
Kicker
Background
Hairlight
8.18
A main light, reflector fill,
plus other common portrait
lights. Although some
photographers use fewer lights
and others use more, this
arrangement is common.
Hunter-Ch08.qxd 10/1/07 8:39 PM Page 202
Please purchase PDF Split-Merge on www.verypdf.com to remove this watermark.
AN ARSENAL OF LIGHTS
203
more complex portrait lighting arrangement. Now we will talk
about the other lights in that arrangement.
Background Lights
So far we have talked about lighting the subject. Background
lights illuminate, as the name implies, the background rather
than the person being photographed. Figure 8.19 shows the
effect of the background light by itself.
Figure 8.20 was made with a three-light setup. Besides the
main and fill lights that we used before, we added a background
8.19
In making this picture,
we used a background light to
separate the subject’s head and
shoulders from the background.
Notice how this adds depth.
Hunter-Ch08.qxd 10/1/07 8:39 PM Page 203
Please purchase PDF Split-Merge on www.verypdf.com to remove this watermark.
LIGHT—SCIENCE & MAGIC
204
light. Compare it with Figure 8.17, which was made with just a
main light and a fill.
As you can readily see, the two pictures are very similar, but
look at how nicely the back of the model’s head and her shoulders
are separated from the background in Figure 8.20. That is
exactly what background lights do. They provide a degree of
tonal separation between the subject and the background. This
separation helps give a feeling of added depth to a portrait and
surrounds the subject with what is often a visually pleasing
“glow.” You can be heavy-handed with this, giving the subject
has a pronounced halo, or you can be subtle, pulling the light
further from the background or using multiple lights to light
the background evenly.
8.20
Adding the background
light to the fill and main lights
surrounds the subject with a
pleasing glow.
Hunter-Ch08.qxd 10/1/07 8:40 PM Page 204
Please purchase PDF Split-Merge on www.verypdf.com to remove this watermark.
AN ARSENAL OF LIGHTS
205
Background lights can also add color to portraits. We do this
by attaching colored gels, or filters, to the light. Gels are not
expensive and they come in a wide range of colors. By using
them and a white background, photographers can reduce the
number of different colored backgrounds that they need to
keep around the studio. Several background lights with filters
of different colors can create color combinations impossible
with colored seamless paper and white lights.
Figure 8.18 shows one common background light position.
The light is placed on the floor and aimed up to lighten the back-
ground. This arrangement works well for a head-and-shoulders
portrait.
Hiding the background light behind the subject is more
difficult in a full-length portrait. Furthermore, lighting the
background uniformly, instead of a bright center spot, is almost
impossible with the background light in such a position. To
photograph the whole body or to illuminate the background
evenly, we prefer using two or more background lights on each
side of the subject.
Background lights may be very bright or very dim.
Experiment until you come up with the lighting you like. For
portraits you intend to later paste into another scene, try lighting
a background slightly lighter than pure white (just to be sure).
You can then often place the portrait into another scene using
the software “darken” mode. In many scenes, this eliminates
the need for tediously silhouetting the hair.
Hair Lights
The next light that we are going to discuss is the hair light. This
light is often used for highlights that separate dark hair from a
dark background. However, even if the hair is blonde, bright-
ening it with additional light can make the photograph less
somber. Figure 8.21 was made with a hair light alone to show
the effect.
Look at Figure 8.22. It was made with a main light, a fill
light, and a hair light. This combination has the hair light set at
a typical brightness. Some photographers might prefer to keep
it dimmer, providing separation in the dark areas but attracting
less attention to it. Others prefer a brighter hair light for a more
theatrical look.
The diagram in Figure 8.18 shows one common position for
the hair light, on the side opposite the main light and behind
Hunter-Ch08.qxd 10/1/07 8:40 PM Page 205
Please purchase PDF Split-Merge on www.verypdf.com to remove this watermark.
LIGHT—SCIENCE & MAGIC
206
the subject. Alternatively, a boom can suspend the hair light
above and to the rear of the subject. The boom allows better
freedom to position the hair light without getting the light stand
in the picture.
The hair light, like any other light coming from behind the
subject, reveals loose strands of hair. Whether this is a problem
depends on personal taste and current style. (Some people
prefer to look meticulously tidy, whereas others are happy to
be absolutely shabby. Either way, their children are probably
the opposite!) If we do not want the loose hair, we have to use
hair spray, anticipate retouching, or forego the hair light
entirely.
8.21
We made this exposure
using nothing but a hair light.
Notice the highlights that it puts
on the subject’s hair.
Hunter-Ch08.qxd 10/1/07 8:40 PM Page 206
Please purchase PDF Split-Merge on www.verypdf.com to remove this watermark.
AN ARSENAL OF LIGHTS
207
It is important to position the hair light so that light coming
from it does not produce flare. Remember to look at the lens
as you position the hair light to see if the light is falling directly
into the lens. If it is, you may be able to move the light a bit. If
you do not want to change the light position, block the offend-
ing light from the lens with a barndoor or a gobo. The gobo
above the lens in Figure 8.18 serves this purpose.
Kickers
Along with the different lights that we have talked about so far,
some photographers also like to use a kicker as a part of their
setup. Figure 8.23 was lit by a kicker alone.
8.22
A hair light used along
with the main and fill lights. This
one is of typical brightness.
Some photographers like
brighter highlights, whereas
others prefer them dimmer.
Hunter-Ch08.qxd 10/1/07 8:40 PM Page 207
Please purchase PDF Split-Merge on www.verypdf.com to remove this watermark.