SWING 4 layout input (lập TRÌNH NÂNG CAO SLIDE)
Bạn đang xem bản rút gọn của tài liệu. Xem và tải ngay bản đầy đủ của tài liệu tại đây (328.14 KB, 79 trang )
PHẦN 2 - SWING
LAYOUT MANAGEMENT
Introduction
Every container, by default, has a layout manager -an object that implements the LayoutManager
interface.* If a container's default layout manager
doesn't suit your needs, you can easily replace it
with another one. The Java platform supplies layout
managers that range from the very simple
(FlowLayout and GridLayout) to the special purpose
(BorderLayout and CardLayout) to the very flexible
(GridBagLayout and BoxLayout).
Khoa CNTT – ĐH Nông Lâm TP. HCM 2014
2/79
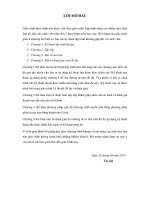
BorderLayout
BorderLayout is the default layout manager for
every content pane. A BorderLayout has five
areas available to hold components: north,
south, east, west, and center. All extra space is
placed in the center area.
Khoa CNTT – ĐH Nông Lâm TP. HCM 2014
3/79
BorderLayout
public class BorderLayoutFrame extends JFrame{
public BorderLayoutFrame(String title) {
super(title);
Container contentPane = getContentPane();
//Use the content pane's default BorderLayout.
contentPane.setLayout(new BorderLayout(2,2));
contPane.add(new JButton("Button 1 (NORTH)"),
BorderLayout.NORTH);
contentPane.add(new JButton(“Button 2 (CENTER)"),
BorderLayout.CENTER);
contentPane.add(new JButton("Button 3 (WEST)"),
BorderLayout.WEST);
contentPane.add(new JButton("Long-Named Button 4
(SOUTH)"),
BorderLayout.SOUTH);
contentPane.add(new JButton("Button 5 (EAST)"),
BorderLayout.EAST);
pack();
// coding
}}
Khoa CNTT – ĐH Nông Lâm TP. HCM 2014
4/79
The BorderLayout API
By default, a BorderLayout puts no gap between the
components it manages. In the preceding applet, any
apparent gaps are the result of the buttons reserving extra
space around their apparent display area. You can specify
gaps (in pixels) using the following constructor:
BorderLayout(int horizontalGap, int
verticalGap)
You can also use the following methods to set the horizontal
and vertical gaps, respectively:
void setHgap(int)
void setVgap(int)
Khoa CNTT – ĐH Nông Lâm TP. HCM 2014
5/79
FlowLayout
FlowLayout is the default layout manager for
every JPanel. It simply lays out components
from left to right, starting new rows if
necessary.
Khoa CNTT – ĐH Nông Lâm TP. HCM 2014
6/79
FlowLayout
Container contentPane = getContentPane();
contentPane.setLayout(new FlowLayout());
contentPane.add(new JButton("Button 1”);
contentPane.add(new JButton("2"));
contentPane.add(new JButton("Button 3"));
contentPane.add(new JButton("Long-Named Button 4"));
contentPane.add(new JButton("Button 5”);
pack();
Khoa CNTT – ĐH Nông Lâm TP. HCM 2014
7/79
The FlowLayout API
The FlowLayout class has three constructors:
public FlowLayout()
public FlowLayout(int alignment)
public FlowLayout(int alignment, int
horizontalGap, int verticalGap)
The alignment argument must have the value
FlowLayout.LEFT, FlowLayout.CENTER, or
FlowLayout.RIGHT. The horizontalGap and
verticalGap arguments specify the number of pixels to put
between components. If you don't specify a gap value,
FlowLayout uses 5 for the default gap value.
Khoa CNTT – ĐH Nông Lâm TP. HCM 2014
8/79
GridLayout
GridLayout simply makes a bunch of
components equal in size and displays them in
the requested number of rows and columns.
Here's an applet that uses a GridLayout to
control the display of five buttons:
Khoa CNTT – ĐH Nông Lâm TP. HCM 2014
9/79
GridLayout
Container contentPane = getContentPane();
contentPane.setLayout(new GridLayout(0,2));
contentPane.add(new JButton("Button 1"));
contentPane.add(new JButton("2"));
contentPane.add(new JButton("Button 3"));
contentPane.add(new JButton("Long-Named
Button 4"));
contentPane.add(new JButton("Button 5"));
The constructor tells the GridLayout class to
create an instance that has two columns and as
many rows as necessary.
Khoa CNTT – ĐH Nông Lâm TP. HCM 2014
10/79
The GridLayout API
The GridLayout class has two constructors:
public GridLayout(int rows, int columns)
public GridLayout(int rows, int columns, int
horizontalGap, int verticalGap)
At least one of the rows and columns
arguments must be non zero. The
horizontalGap and verticalGap arguments to
the second constructor allow you to specify the
number of pixels between cells. If you don't
specify gaps, their values default to zero. In the
applet above, any apparent gaps are the result
of the buttons reserving extra space around
their apparent display area.
Khoa CNTT – ĐH Nông Lâm TP. HCM 2014
11/79
GridBagLayout
GridBagLayout is the most sophisticated, flexible
layout manager the Java platform provides. It aligns
components by placing them within a grid of cells,
allowing some components to span more than one
cell. The rows in the grid aren't necessarily all the
same height; similarly, grid columns can have
different widths.
Khoa CNTT – ĐH Nông Lâm TP. HCM 2014
12/79
Constraints
GridBagLayout gridbag = new GridBagLayout();
GridBagConstraints c = new GridBagConstraints();
JPanel pane = new JPanel();
pane.setLayout(gridbag);
//For each component to be added to this
container: //...Create the component...
//...Set instance variables in the GridBagConstraints
gridbag.setConstraints(theComponent, c);
pane.add(theComponent);
You can reuse the same GridBagConstraints
instance for multiple components, even if the
components have different constraints. The
GridBagLayout extracts the constraint values and
doesn't use the GridBagConstraints again. You
must be careful, however, to reset the
GridBagConstraints instance variables to their
13/79
CNTT – ĐH Nông Lâm TP. HCM 2014
default valuesKhoa
when
necessary.
Constraints
gridx, gridy
Specify the row and column at the upper left of the
component. The leftmost column has address gridx=0
and the top row has address gridy=0. Use
GridBagConstraints.RELATIVE (the default value) to
specify that the component be placed just to the right
of (for gridx) or just below (for gridy) the component
that was added to the container just before this
component was added. We recommend specifying the
gridx and gridy values for each component;
gridwidth, gridheight
Specify the number of columns (for gridwidth) or rows
(for gridheight) in the component's display area. These
constraints specify the number of cells the component
uses, not the number of pixels it uses. The default
value is 1. Use GridBagConstraints.REMAINDER to
specify that the component be the last one in its row
(for gridwidth) or column (for gridheight). Use
GridBagConstraints.RELATIVE to specify that the
– ĐH to
Nônglast
Lâm TP.
HCM 2014
component beKhoa
theCNTT
next
one
in its row (for 14/79
Constraints
fill
Used when the component's display area is larger than
the component's requested size to determine whether
and how to resize the component. Valid values
(defined as GridBagConstraints constants) are NONE
(the default), HORIZONTAL (make the component wide
enough to fill its display area horizontally, but don't
change its height), VERTICAL (make the component
tall enough to fill its display area vertically, but don't
change its width), and BOTH (make the component fill
its display area entirely).
ipadx, ipady
Specifies the internal padding: how much to add to the
minimum size of the component. The default value is
zero. The width of the component will be at least its
minimum width plus ipadx*2 pixels, since the padding
applies to both sides of the component. Similarly, the
15/79
Khoa CNTT – ĐH Nông
Lâmbe
TP. HCM
2014
height of the component
will
at least
its minimum
Constraints
insets
Specifies the external padding of the component -the minimum amount of space between the
component and the edges of its display area. The
value is specified as an Insets object. By default,
each component has no external padding.
anchor
Used when the component is smaller than its display
area to determine where (within the area) to place
the component. Valid values (defined as
GridBagConstraints constants) are CENTER (the
default), NORTH, NORTHEAST, EAST, SOUTHEAST,
SOUTH, SOUTHWEST, WEST, and NORTHWEST.
Khoa CNTT – ĐH Nông Lâm TP. HCM 2014
16/79
Constraints
weightx, weighty
Specifying weights is an art that can have a significant impact
on the appearance of the components a GridBagLayout
controls. Weights are used to determine how to distribute space
among columns (weightx) and among rows (weighty); this is
important for specifying resizing behavior. Unless you specify at
least one nonzero value for weightx or weighty, all the
components clump together in the center of their container.
This is because when the weight is 0.0 (the default), the
GridBagLayout puts any extra space between its grid of cells
and the edges of the container.
Generally weights are specified with 0.0 and 1.0 as the
extremes: the numbers in between are used as necessary.
Larger numbers indicate that the component's row or column
should get more space. For each column, the weight is related
to the highest weightx specified for a component within that
column, with each multicolumn component's weight being split
somehow between the columns the component is in. Similarly,
each row's weight is related to the highest weighty specified for
a component within that row.
Khoa CNTT – ĐH Nông Lâm TP. HCM 2014
17/79
Summary
gridx, gridy : Toạ độ (vị trí cột hàng)
gridwidth, gridheight : Chiều dài, chiều cao của đối
tượng (Số cột, số dòng mà đối tượng sẽ hiển thị).
Fill : tự động resize đối tượng theo kích thước cử sổ hiện
hành.
ipadx, ipady: Số pixel cộng thêm vào chiều dài, cao của
đối tượng để đạt được kích thước tối thiểu. MinWidth =
TextWidth + ipadx*2
Insets: Khoảng cách giữa các đối tượng.
Anchor: Vị trí (alignment) hiển thị của đối tượng khi
vùng hiển thị > kích thước đối tượng
weightx, weighty : tỷ lệ (Kích thước tương đối) của các
đối tượng. Weightx = 0 : đối tượng khơng resize theo bề
rộng. Các giá trị có thể từ 0.0-1.0
Khoa CNTT – ĐH Nông Lâm TP. HCM 2014
18/79
Example
JButton button;
Container contentPane = getContentPane();
GridBagLayout gridbag = new GridBagLayout();
GridBagConstraints c = new
GridBagConstraints();
contentPane.setLayout(gridbag);
c.fill = GridBagConstraints.HORIZONTAL;
button = new JButton("Button 1");
c.weightx = 0.5;
c.gridx = 0;
c.gridy = 0;
gridbag.setConstraints(button, c);
contentPane.add(button);
Khoa CNTT – ĐH Nông Lâm TP. HCM 2014
19/79
Example
button = new JButton("2");
c.gridx = 1;
c.gridy = 0;
gridbag.setConstraints(button, c);
contentPane.add(button);
button = new JButton("Button 3");
c.gridx = 2;
c.gridy = 0;
gridbag.setConstraints(button, c);
contentPane.add(button);
button = new JButton("Long-Named Button 4");
c.ipady = 40; //make this component tall
c.weightx = 0.0;
c.gridwidth = 3;
c.gridx = 0;
c.gridy = 1;
gridbag.setConstraints(button, c);
contentPane.add(button);
Khoa CNTT – ĐH Nông Lâm TP. HCM 2014
20/79
Example
button = new JButton("Button 5");
c.ipady = 0; //reset to default
c.weighty = 1.0; //request any extra vertical
space
//bottom of space
c.anchor = GridBagConstraints.SOUTH;
//top padding
c.insets = new Insets(10,0,0,0);
c.gridx = 1; //aligned with button 2
c.gridwidth = 2; //2 columns wide
c.gridy = 2; //third row
gridbag.setConstraints(button, c);
contentPane.add(button);
Khoa CNTT – ĐH Nông Lâm TP. HCM 2014
21/79
MAKE CHOICES
How to Use Check Boxes
The JCheckBox class provides support for check box
buttons. You can also put check boxes in menus, using
the JCheckBoxMenuItem class. Because JCheckBox and
JCheckBoxMenuItem inherit from AbstractButton,
Swing check boxes have all the usual button
characteristics.
Check boxes are similar to
radio buttons but their
selection model is different,
by convention. Any number
of check boxes in a group -none, some, or all -- can be
selected. A group of radio
buttons, on the other hand,
can have only one button
selected.
Khoa CNTT – ĐH Nông Lâm TP. HCM 2014
23/79
How to Use Check Boxes
public class CheckBoxDemo extends JPanel {
JCheckBox chinButton;
JCheckBox glassesButton;
JCheckBox hairButton;
JCheckBox teethButton;
StringBuffer choices;
JLabel pictureLabel;
public CheckBoxDemo() {
// Create the check boxes
chinButton = new JCheckBox("Chin");
chinButton.setMnemonic(KeyEvent.VK_C);
chinButton.setSelected(true);
glassesButton = new JCheckBox("Glasses");
glassesButton.setMnemonic(KeyEvent.VK_G);
glassesButton.setSelected(true);
Khoa CNTT – ĐH Nông Lâm TP. HCM 2014
24/79
How to Use Check Boxes
hairButton = new JCheckBox("Hair");
hairButton.setMnemonic(KeyEvent.VK_H);
hairButton.setSelected(true);
teethButton = new JCheckBox("Teeth");
teethButton.setMnemonic(KeyEvent.VK_T);
teethButton.setSelected(true);
// Register a listener for the check boxes.
CheckBoxListener myListener = new
CheckBoxListener();
chinButton.addItemListener(myListener);
glassesButton.addItemListener(myListener);
hairButton.addItemListener(myListener);
teethButton.addItemListener(myListener);
Khoa CNTT – ĐH Nông Lâm TP. HCM 2014
25/79