Tài liệu Nghệ thuật xếp hình Nhật Bản:tyrannosaurus doc
Bạn đang xem bản rút gọn của tài liệu. Xem và tải ngay bản đầy đủ của tài liệu tại đây (119.72 KB, 11 trang )
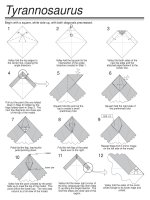
Tyrannosaurus
Begin with a square, white side up, with both diagonals precreased.
1
Valley fold the top edges to
the center line, creasing the
angle bisectors.
2
Valley fold the top point to the
intersection of the angle
bisectors created in Step 1.
3
Valley fold both sides of the
new top edge and the
attached paper below it to the
center line.
4
Pull out the point (the one folded
down in Step 2) hidden by the
flaps folded down in Step 3. The
next few diagrams are close-ups
of the top of the model.
5
Squash fold the point at the
top to create a small
preliminary fold.
6
Squash fold the right side of
the preliminary fold.
7
Petal fold the flap, leaving the
petal pointing down.
8
Fold the left flap of the petal
back over to the right.
9
Repeat Steps 6-8 in mirror image
on the left side of the model.
10
Valley fold the point created by the petal
folds up to meet the top of the model. This
point will be the lower jaw. The next step
returns to a full view of the model.
11
Valley fold the lower right corner of
the long, rectangular flap (from Step
3) up along the angle bisector. The
next few steps are close-ups of this
region.
12
Valley fold the sides of the small
white triangle to its lower edge and
unfold.
6-8 x1
head
lower jaw
13
Rabbit ear the white triangle. The
point created by the rabbit ear will
become the first toe (see Step 65).
The next step returns to a full view
of the model.
14
Repeat Steps 12-13 on the
left side of the model.
15
Turn the model over from
side-to-side. The next
diagrams are enlarged.
16 17 18
19
Valley fold the top point down so that
the crease connects the points where
the angle bisectors (from Step 16)
intersect the top edges. (The point falls
on the intersection of the vertical
diagonal and the original horizontal
diagonal.) Turn the model over from
side-to-side.
20 21
Valley fold the top edges to the
new horizontal diagonal line and
unfold, creating new angle
bisectors.
Valley fold the top point down
such that the crease goes
through the intersection of the
angle bisectors (from Step 17)
and unfold. Turn the model over
from side-to-side.
Valley fold the top edge down on the
crease from Step 18, allowing the
point with the lower jaw to swing up
from behind.
Valley fold the top sides inward along
the edge of the uppermost, triangular
point and unfold. (These creases also
happen to fall along the edges of the
rectangular flaps on the other side of
the model.)
Create a new horizontal diagonal
crease by valley folding the lower
point to the upper, then unfold.
12-13 x1
first
toe
22
Reverse fold the top sides inward
along the creases from Step 21. The
next diagrams are enlarged.
23
Valley fold the two small, triangular
points at the sides of the pleated top
point inwards.
24
Valley fold the two rectangular flaps
in half lengthwise and unfold.
25
Collapse the rectangular flaps with a
rabbit ear at the top end, leaving the
ears pointing up. These points will
be the arms.
26a
The result. The next few diagrams
are close-ups of the right side of the
model.
Valley-fold the rectangular flap in half
again. Towards the arm point, the
fold becomes increasingly difficult to
do, and you won’t be able to crease
easily on the point itself.
26b
Open sink the upper end and reverse
fold the lower end of the inner edge
of the rectangular flap using the
creases from Step 26b. The next
diagram shows the resultant crease
pattern on the inside of the flap (which
you would see if you opened the flap
back up to Step 25).
27a 27b 27c
This is the crease pattern which will
allow the sink to be performed. Note
how the folds change around the
upper end. The next diagram shows
the rectangular flap in the process of
being collapsed.
The sink in progress...
limit of
easy
creasing
armarm
The result. The series of pleats created
at the end of the rectangular flap will
become the second, third, and fourth
toes. The next diagram returns to a
full view of the model.
28a
28b
Repeat Steps 26b-28a in mirror
image on the left side of the model.
29
Turn the model over from side-to-
side.
30
Valley fold the lower edge to the
vertical, center diagonal, bisecting
the angles of the bottom point,
and unfold.
31
Valley fold the top pointdown so
that the endpoints of the crease
connect the upper endpoints of
the angle bisectors from Step 30.
32
Valley fold the top sides in to the
vertical, center diagonal; this
brings the two corners at the top
in to meet the tip of the colored
point. Unfold.
33
Reverse fold the top sides in along
the creases made in Step 32. The
next diagrams are enlarged.
34
Petal fold the preliminary form at the
top of the model. Note that there is
a hidden white flap under the top-
most colored layer (indicated by the
x-ray lines); this flap is not included
with the top-most flap in the petal.
35
Reach inside the top of the petal
and pull out the hidden lower jaw
assembly (from Step 10), placing
it on top of the layers currently
covering it.
26b-28a x1
}
second-
fourth
toes
36
Turn the model over from side-to-
side.
37
Valley fold the right side in to the
center line and unfold.
38
Squash fold the right side on the
crease from Step 37.
39
Squash fold the lower horizontal
edge upwards, valley folding along
the angle bisector of the white
triangle.
40
Fold the portion of the model with
the white flap underneath and
inside the model.
41
Fold the flap back over to the right,
incorporating a rabbit ear in the
large triangle.
42
Repeat Steps 38-41 in mirror
image on the left side of the
model. The point created at
the bottom will be the tail.
43a
The next few diagrams detail
the top of the model (where
the head and lower jaw points
are located).
43b
Valley fold the short, broad,
triangular point down as far
as possible; simultaneously,
pull out the loose flaps at the
sides of the point.
38-41 x1
tail