Tài liệu Lab 4.2.4 Advanced Telnet Operations pdf
Bạn đang xem bản rút gọn của tài liệu. Xem và tải ngay bản đầy đủ của tài liệu tại đây (245.22 KB, 6 trang )
1 - 6 CCNA 2: Routers and Routing Basics v 3.0 - Lab 4.2.4 Copyright 2003, Cisco Systems, Inc.
Lab 4.2.4 Advanced Telnet Operations
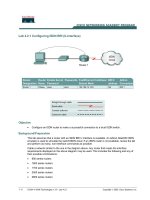
Objective
• Use the telnet command to remotely access other routers.
• Verify that the application layer between the source and the destination is working properly.
• Suspend a Telnet session.
• Engage in multiple Telnet sessions.
• Return to the suspended session.
• Disconnect from the Telnet session.
Background/Preparation
It is often desirable to have Telnet sessions to multiple routers simultaneously in order to check and
compare configuration information. This lab focuses on the ability to Telnet to multiple routers,
suspend those sessions, and switch between the active sessions. A list of active connections can
also be displayed in the process.
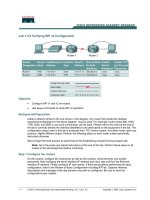
Cable a network similar to the one in the previous diagram. Any router that meets the interface
requirements may be used. Possible routers include 800, 1600, 1700, 2500, 2600 routers, or a
combination. Refer to the chart at the end of the lab to correctly identify the interface identifiers to be
2 - 6 CCNA 2: Routers and Routing Basics v 3.0 - Lab 4.2.4 Copyright 2003, Cisco Systems, Inc.
used based on the equipment in the lab. The configuration output used in this lab is produced from
1721 series routers. Any other router used may produce slightly different output. The following steps
are intended to be executed on each router unless specifically instructed otherwise.
Start a HyperTerminal session as performed in the Establishing a HyperTerminal session lab.
Note: Go to the erase and reload instructions at the end of this lab. Perform those steps on all
routers in this lab assignment before continuing.
Step 1 Configure the GAD, BHM and PHX routers using the tables
a. Configure the three routers as indicated in the Copying, Editing, and Pasting Configurations lab.
b. If there are any difficulties configuring hostname or passwords, refer to the Configuring Router
Passwords lab.
If there are any difficulties configuring interfaces or the routing protocol, refer to the Configuring
Host Tables lab.
c. Verify the routers configurations by performing a show running-config on each router. If not
correct, fix any configuration errors and verify.
Step 2 Login to Router 1 and verify the connection to Routers 2 and 3
a. Login to the Gadsden router.
b. Verify the connection between the two routers. Ping the serial 0 interface of the Birmingham
router. If the ping is not successful, return to Step 1 and troubleshoot the configuration.
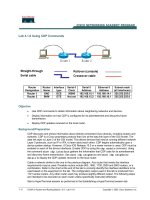
Step 3 Telnet to a remote router
a. Enter telnet router-name if IP host tables were configured. Otherwise, enter ip address
at the router prompt to connect to the Birmingham router.
Enter the password cisco to enter the router.
b. What prompt did the router display?
____________________________________________
Step 4 Look at the interfaces on the remote router
a. Enter show interface at the router prompt.
b. Are both the serial 0 and the FastEthernet 0 interfaces up?
___________________________
Step 5 Suspend the current Telnet session
a. Enter Ctrl-Shift-6 followed by the x key.
This only suspends the session and returns to the previous router. It does not disconnect from this
router.
b. What prompt did the router display?
____________________________________________
Step 6 Establish another Telnet session
a. Enter telnet router-name if IP host tables were configured. Otherwise, enter ip address
at the router prompt to connect to the Phoenix router.
Enter the password cisco to enter the router.
b. What prompt did the router display?
____________________________________________
Step 7 Suspend the current Telnet session
a. Enter Ctrl-Shift-6 followed by the x key.
3 - 6 CCNA 2: Routers and Routing Basics v 3.0 - Lab 4.2.4 Copyright 2003, Cisco Systems, Inc.
This only suspends the session and returns to the previous router. It does not disconnect from this
router.
b. What prompt did the router display?
____________________________________________
Step 8 Use the show session command to see the connections
a. Enter show sessions at the command prompt.
This will reveal that 2 sessions are in use.
Step 9 Resume the previously suspended Telnet session
a. Type resume and the number of the session that is to be resumed followed by the Enter key at
the router prompt. The router will respond with:
[Resuming connection 1 to 192.168.X.X ... ]
b. Press the Enter key.
This will resume a Telnet session that was previously suspended.
c. What prompt did the router display?
____________________________________________
Step 10 Use the show session command to see the connections
a. Enter show sessions at the command prompt.
b. How many sessions are shown?
_______________________________________________
c. There were two the last time. What is the difference?
________________________________
Step 11 Close a Telnet session
a. Enter the command exit while in a Telnet session.
This will terminate the Telnet session.
b. What prompt did the router display?
____________________________________________
Note: Do not do this now. To disconnect from a suspended Telnet session, type disconnect
and press Enter.
Step 12 Use the show session command to see the connections
a. Enter show sessions at the command prompt.
b. How many sessions are shown?
_______________________________________________
c. There were two on this router the last time. What is the difference?
__________________________________________________________________________
Step 13 Resume the previously suspended Telnet session
a. Press the Enter key. The router will respond with:
[Resuming connection 1 to 192.168.X.X ... ]
Press the Enter key.
This will resume a Telnet session that was previously suspended.
b. What prompt did the router display?
____________________________________________
4 - 6 CCNA 2: Routers and Routing Basics v 3.0 - Lab 4.2.4 Copyright 2003, Cisco Systems, Inc.
Step 14 Close a Telnet session
Enter the command exit while in a Telnet session.
This will terminate the Telnet session.
Step 15 Problems with linked Telnet sessions on multiple routers
a. When working with Telnet, one of the most common problems is remembering the focus of the
session. Focus means the device that is the focus of the commands that are being issued. Many
times people telnet to a router and then telnet from that router to another and so on. Without host
names, or if the routers have similar hostnames, confusion can happen. For example:
b. Telnet to the Phoenix router.
From the configuration prompt type no hostname.
Step 16 Telnet to the Birmingham router
a. Telnet to the Birmingham router.
From the configuration prompt type no hostname.
Step 17 Telnet back to the Phoenix router
a. Telnet back to the Phoenix router.
b. By looking at the prompt, it is not evident whether the Telnet worked or not.
Step 18 Telnet to the Gadsden router
a. Telnet to the Gadsden router.
From the configuration prompt type no hostname.
Step 19 Telnet to the Birmingham router
a. Telnet to the Birmingham router.
b. Type show sessions.
c. How many sessions are there running?
__________________________________________
d. Why are there that many?
___________________________________________________
e. Now type exit three times.
f. What router are you on?
____________________________________________________
g. How many Telnet sessions are still open?
________________________________________
Step 20 Exiting from all sessions
a. Keep typing exit until the following prompt appears:
Router con0 is now available
Press RETURN to get started.
b. Scroll back up the HyperTerminal listing.
c. How many session closed messages were displayed?
______________________________
d. Is that the number listed in the how many Telnet sessions are still open question?
__________
Upon completion of the previous steps, logoff by typing exit. Turn the router off.
5 - 6 CCNA 2: Routers and Routing Basics v 3.0 - Lab 4.2.4 Copyright 2003, Cisco Systems, Inc.
Erasing and reloading the router
Enter into the privileged EXEC mode by typing enable.
If prompted for a password, enter class. If “class” does not work, ask the instructor for assistance.
Router>enable
At the privileged EXEC mode, enter the command erase startup-config.
Router#erase startup-config
The responding line prompt will be:
Erasing the nvram filesystem will remove all files! Continue?
[confirm]
Press Enter to confirm.
The response should be:
Erase of nvram: complete
Now at the privileged EXEC mode, enter the command reload.
Router(config)#reload
The responding line prompt will be:
System configuration has been modified. Save? [yes/no]:
Type n and then press Enter.
The responding line prompt will be:
Proceed with reload? [confirm]
Press Enter to confirm.
In the first line of the response will be:
Reload requested by console.
After the router has reloaded the line prompt will be:
Would you like to enter the initial configuration dialog? [yes/no]:
Type n and then press Enter.
The responding line prompt will be:
Press RETURN to get started!
Press Enter.
The router is ready for the assigned lab to be performed.