Tài liệu Configuring HTTP Services on Windows 2000 doc
Bạn đang xem bản rút gọn của tài liệu. Xem và tải ngay bản đầy đủ của tài liệu tại đây (30.13 KB, 4 trang )
1 - 4 IT Essentials II v2.0 - Lab 8.5.1 Copyright 2002, Cisco Systems, Inc.
Lab 8.5.1: Configuring HTTP Services on Windows 2000
Estimated Time: 30 Minutes
Objective
In this lab, the student will configure a Windows 2000 system with HTTP services and
create an HTTP server.
Equipment
The following equipment is required for this exercise:
• A computer system running Windows 2000 Professional
Scenario
The Marketing Director of the XYZ Company needs help creating a web site that the
employees in the Marketing and Sales department will be able to access and provide
content and information for their clients. It is your job to create an HTTP site on the server
for them to access.
Procedures
In the first step of this lab, start the HTTP services and configure the HTTP site on the
server. In the second step, configure the HTTP site properties and build the content that
will be on the HTTP server.
Step 1: Starting the HTTP Services
1. Log on with the administrator account.
2. Open the Control Panel. Go to Start > Settings > Control Panel.
3. From the Control Panel, double-click on the Add & Remove Programs icon.
4. Next, click on the Add/Remove Windows Components button.
5. When the “Windows Components Wizard” appears, click in the box next to Internet
Information Services (IIS).
2 - 4 IT Essentials II v2.0 - Lab 8.5.1 Copyright 2002, Cisco Systems, Inc.
6. Click the Next button to install the Internet Information Services. The Windows 2000
CD will be needed to complete the installation. When prompted, insert the Windows
2000 CD to copy the necessary files. The installation process will complete in a few
minutes.
7. Click Finish to close the Installation box. Then click Close to close the Add/Remove
Programs Box. Close the Control Panel as well.
Step 2: Configuring the HTTP sites properties and building the content
1. Open the Start Menu and go to Programs > Administrative Tools > Internet
Services Manager. This will open the IIS configuration page where the user can
begin to configure and create an HTTP site.
3 - 4 IT Essentials II v2.0 - Lab 8.5.1 Copyright 2002, Cisco Systems, Inc.
2. Once the IIS page opens, find the name of the computer and click the plus (+) sign
next to it. This will display the FTP, HTTP, and SMTP Virtual Server icons.
3. Click on the Default Web Site icon to display the default web site contents and the
directories where the content files are stored.
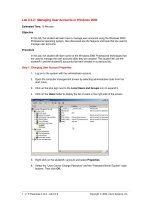
4. Right-click the Default Web Site icon and choose properties. From this page, the
user can configure all the properties and control what will be displayed on the HTTP
site.
5. While on the Web site tab, select the IP address box. Click on the arrow from the
drop-down menu and select the IP address of the computer.
6. Next, go to “Connections” section of the same tab and change “time-out” value to
120. After making these changes select Apply.
7. Click on the Home Directory tab and click Browse to select the folder that will
contain the website documents to view on the site. This is typically,
C:\inetpub\wwwroot then click Apply to save the changes. Close the Internet
Services Manager.
Note: If using a third party HTML editor like FrontPage, make the home directory folder
the “My Webs” folder. As web pages are created and edited, all the files will be
saved in this folder, not the default folder.
1. To check if the HTTP site is working properly, go to any computer on the network and
type the IP address of your HTTP server into the address bar of the Internet browser.
4 - 4 IT Essentials II v2.0 - Lab 8.5.1 Copyright 2002, Cisco Systems, Inc.
All the contents of the FTP directory should be visible in the browser.
Troubleshooting
If there is trouble connecting to the HTTP site, check the IP address that is typed in the
browser as well as the IP address that is specified in the HTTP site properties page. If the
network IP addresses are assigned dynamically with a DHCP server, then the IP address
might change from time to time. Assign the HTTP server a static IP address so that the IP
address does not change. This will save administrative costs and troubleshooting access
to the HTTP site.
Reflection
If setting up a HTTP server in a business or corporate network, routers and firewalls will
have to be configured to allow HTTP access to the HTTP server. Remember that the IP
address of the HTTP server might not be a public IP address and therefore will not be
directly connected to the network. In this case, you will have to configure the router to
forward incoming HTTP requests to the proper computer on which the HTTP server
resides.