Tài liệu Customizing the Login Process docx
Bạn đang xem bản rút gọn của tài liệu. Xem và tải ngay bản đầy đủ của tài liệu tại đây (22.63 KB, 6 trang )
Customizing the Login Process
The standard login process can be customized by editing the registry. The procedures
described in this section are also applicable for Windows NT 4.0, Windows 2000,
Windows XP and Windows Server 2003.
Specifying the Custom Logo Displayed at Login Time
This tip is useful for each of Windows NT/2000, Windows XP and Windows Server
2003. You can change the screen logo used as a background for the login dialog. Any
BMP file can be used for this purpose (for example, a custom logo or any graphic file).
To introduce this modification, you need to do the following:
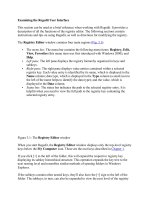
1. Start the registry editor and expand the HKEY_USERS\.DEFAULT\Control
Panel\Desktop registry key.
2. Find the Wallpaper value entry, and specify the path to the BMP file that you want
to use as a background for the login dialog (Fig. 4.11
).
Figure 4.11: To specify the custom logo displayed at login time, edit the
Wallpaper value under HKEY_USERS\.DEFAULT\Control Panel\Desktop
Note This tip will also work for Windows XP, but only if you disable the Welcome
screen, which by default, is enabled. To disable the Windows XP Welcome screen,
open the Control Panel window, start the User Accounts applet, click the Change
the way users log on or off option, and clear the Use Welcome screen checkbox.
Note that you can customize the Windows XP Welcome screen itself by adding or
removing user accounts to it. To do so, simply expand the
HKEY_LOCAL_MACHINE\SOFTWARE\Microsoft\Windows
NT\CurrentVersion\Windologon\SpecialAccounts\UserList registry key. Add the
value REG_DWORD data type, name it as required, and set the value to 0. This
account will be hidden from the Welcome screen. If you want to make the account
visible again set the value to 1, and it will appear on the Welcome screen. For
example, if you want the Administrator account (which is hidden by default) to
appear on the Welcome screen, create the REG_DWORD value, name it
Administrator, and set it to 1.
Adding a Custom Message to Be Displayed at Login Time
You can also add custom messages to be displayed for all users at login. If you make this
change, a small message box containing the custom message text and an OK button will
appear when the user logs on to the system. The boot process will continue as usual after
the user clicks the OK button. You can find tips on this both in Internet forums and in
other books. However, there's a much easier and safer method of performing this
customization. In Windows NT 4.0, you can use the System Policy Editor tool that is
supplied with Windows NT 4.0 Server. In Windows 2000, Windows XP and Windows
Server 2003, you can use either the Local Security Policy snap-in (for systems
participating in workgroups) or the Group Policy snap-in (for systems joined to domains).
In this section, we'll cover different ways of adding a custom message, both by using
administrative tools and by editing the system registry directly.
Adding a Custom Login Message Using the Local Security Policy Snap-in
To create a custom login message, proceed as follows:
1. Start the Administrative Tools applet in Control Panel. For standalone systems or
systems participating in workgroups, select the Local Security Policy option. For
systems participating in domains, use Group Policy. Expand the Security Settings
hierarchical list by selecting Local Policies | Security Options. The right pane of
the MMC window will display the system policies that can be specified for the
local system.
2. Double-click the Interactive logon: Message text for users attempting to log on
option, or right-click this option and select the Properties command. The
Interactive logon: Message text for users attempting to log on window will
appear (Fig. 4.12
).
Figure 4.12: Using MMC for specifying a custom login message (Windows Server
2003 domain controller)
3. Fill in the text field in this window with your custom message text and click OK.
To specify the text for the title bar caption, select the Interactive logon: Message
title for users attempting to log on option.
Chapter 10
contains more detailed information on using system policies.
Adding a Custom Logon Banner by Editing the Registry Directly
To specify a custom logon banner by direct registry editing, proceed as follows:
1. Open the
HKEY_LOCAL_MACHINE\SOFTWARE\Microsoft\WindowsNT\CurrentVersio
n\WinLogon key.
2. Find the LegalNoticeCaption value entry. Edit its value to specify the phrase that
will be displayed as the caption in the custom-message box.
3. Next, open the LegalNoticeText value entry and edit its value to specify the text of
your custom message.
Not
e
In Windows XP and Windows Server 2003, the LegalNoticeCaption and
LegalNoticeText values were moved to the following registry key:
HKEY_LOCAL_MACHINE\SOFTWARE\Microsoft\Windows\CurrentVersion\pol
icies\system. These are the registry values that are set when you use Local Security
Policy or Default Domain Controller Security Settings snap-ins. Values with the
same names also exist under
HKEY_LOCAL_MACHINE\SOFTWARE\Microsoft\WindowsNT\CurrentVersion\
WinLogon. However, the LegalNoticeCaption and LegalNoticeText Values Under
HKEY_LOCAL_MACHINE\SOFTWARE\Microsoft\Windows\CurrentVersion\pol
icies\system have priority, and if they are set, the values under the Winlogon registry
key will have no effect.
Automating the Logon Process
In contrast to Windows 9x/ME, the logon procedure used in all Windows NT-based
operating systems is an integral part of the security subsystem. However, there may be
times when you want to automate this procedure so that other users can start your
computer and use the account you establish for automatic logon.
Note Note that enabling the Autologon feature, however convenient it may seem, also
involves a security risk. Setting a computer for Autologon means that anyone who
can physically obtain access to the computer can gain access to all of the computer's
contents, including any network or networks to which it is connected. Any users
who have logged on remotely can view and read it. Therefore, this option is not
available in the UI for server platforms (for example, you can't configure Windows
2000 Server or Windows Server 2003 to use Autologon). The automatic logon
feature is also unsupported when you log on to a domain and, therefore, you must
join a workgroup to use this feature. However, if your computer belongs to a
Windows 2000 or Windows Server 2003 domain, you can still enable automatic
logon by editing the registry (in this case, however, doing so is highly risky and
undesirable).
To add logon information using Regedit.exe
1. Start Regedit.exe and locate the following Registry subkey:
2. HKEY_LOCAL_MACHINE\SOFTWARE\Microsoft\WindowsNT\
CurrentVersion\Winlogon
3. Locate the DefaultUserName entry, and set its value to the user name that you
want to be logged on automatically.
4. If the DefaultPassword value does not exist, create a new value entry of the
REG_SZ data type, rename it to DefaultPassword, and specify the default
password as its value.
5. If the AutoAdminLogon value entry doesn't exist, create a new value of the
REG_SZ data type, rename it AutoAdminLogon, and set its value to 1.
6. Save your changes, and then exit Regedit.
7. Shut down and restart your computer.
When you restart the computer, the default user will be logged on automatically.
Note Note that the AutoAdminLogon is a REG_SZ type value entry, not a
REG_DWORD registry value entry. Also note that, in order to enable automatic
logon, you need to disable the Interactive logon: Do not require
CTRL+ALT+DEL Local Security Setting (Fig. 4.13
).
Figure 4.13: To enable automatic logon, the Interactive logon: Do not require
CTRL+ALT+DEL local security setting must be disabled
Hiding the Last User Name Logged On
In the previous section, we discussed a setting that weakens your security system and
exposes it to risk. Now we are going to discuss a method that will allow you to strengthen
security. When the standard Windows NT/2000/XP or Windows Server 2003
configuration is used, the system displays the name of the user who last successfully
logged. If you hide this name, the security rules will become more restrictive, since
guessing both the user name and password is more difficult. This customization is one of
the most frequently made. As you can guess, it also requires that you to add a new value
to the registry. To hide the user name from the last log on, proceed as follows:
1. Run Regedit.exe and open the following key:
HKEY_LOCAL_MACHINE\SOFTWARE\Microsoft\Windows\CurrentVersion\p
olicies\system.
2. Add the DontDisplayLastUserName value and specify the REG_DWORD data
type for it.
3. Set this entry to 1. When you next log on to the system, the name of the user who
logged on last won't be displayed. If you need to disable this feature later, set this
value to 0.
Note You can carry out the same task using MMC snap-ins to edit the Interactive
Logon: Do not display last logged on user name local security setting. Note
that the same effect can be produced by setting a value with the same name under
HKEY_LOCAL_MACHINE\SOFTWARE\Microsoft\WindowsNT\CurrentVersi
on\WinLogon. However, the settings under
HKEY_LOCAL_MACHINE\SOFTWARE\Microsoft\Windows\Currentversion\p
olicies\system have priority, and if they are set, the same value under the
Winlogon key has no effect.