Tài liệu Troubleshooting Aids phần 1 doc
Bạn đang xem bản rút gọn của tài liệu. Xem và tải ngay bản đầy đủ của tài liệu tại đây (30.04 KB, 6 trang )
Troubleshooting Aids
There are many registry-editing tips and tricks that can be used to customize the
Windows XP or Windows Server 2003 user interface. Unfortunately, it's impossible to
describe them all; even books dedicated to this topic usually only show the top of the
iceberg. Some of these registry-editing techniques can be used as troubleshooting aids. In
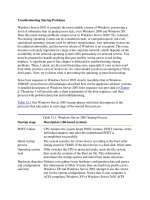
this section, I'll describe those that may be the most helpful.
Customizing System Restore for Windows XP Workstations within Your Domain
Environment
System Restore, introduced with Windows XP, is one of the most useful features of this
operating system (OS). Unfortunately, some users tend to disable it because it consumes
a lot of free disk space (no less than 200 MB). If you are an administrator, you can
prevent users from disabling System Restore. To achieve this, simply disable the GUI
tools available on Windows XP workstations for configuring System Restore within your
domain environment.
Note To perform these tasks, log on as Administrator or user with administrative
privileges.
There are two ways of performing this task. Let's consider them both.
Using Group Policy Editor to Disable System Restore
To prevent users from disabling or configuring System Restore:
1. Open the Group Policy tool MMC snap-in, focused on a specific GPO. To do so,
start the Active Directory Users and Computers MMC snap-in, right-click the
name of the domain or organizational unit (OU) of interest, and select the
Properties command from the context menu. Go to the Group Policy tab and
highlight the GPO of interest. (Note that if you haven't created any GPOs, only the
Default Domain Policy will be available.) Click the Edit button.
2. Expand the console tree Computer Configuration | Administrative Templates |
System | System Restore (Fig. 13.10
).
Figure 13.10: Configuring System Restore using Group Policy Editor
3. Double-click Turn off System Restore. On the Setting tab, select Disable. After
you apply this policy, System Restore will be turned on and enforced. Click
Apply, then click OK.
4. Double-click Turn off Configuration. On the Setting tab, select Enable. (For
more information about what these settings do, click the Explain tab on the
Properties dialog box.) Click Apply, then click OK.
5. Open a command prompt and type the gpudate command to refresh the policy.
Note Gpupdate is the command introduced with Windows XP and Windows Server 2003
for refreshing Group Policy. This command replaces the secedit refreshpolicy
command used in Windows 2000. If you choose not to use the gpupdate command,
Group Policy will still refresh; it will just take longer. The settings described above
are only read at boot time; therefore, it is necessary to reboot.
Now, if users try to access System Restore Configuration on their Windows XP
computers within your domain environment, the System Properties dialog box is
present, but the System Restore tab is not.
Using Registry Editor to Disable System Restore
On standalone Windows XP computers or within a workgroup environment, you can
either apply the setting described above in local security policy or make the registry key
modification. As outlined in Chapter 11
, applying changes via Local Security Policy is
easier and much safer. However, direct registry editing might be preferable, especially if
you have to update a large number of Windows XP workstations within a workgroup
environment. To use Registry Editor for disabling the System Restore Configuration UI
on a standalone Windows XP computer or within a workgroup environment, proceed as
follows:
1. Start Regedit.exe and expand the following key:
2. HKEY_LOCAL_MACHINE\SOFTWARE\Policies\Microsoft\Windows NT
3. Under HKEY_LOCAL_MACHINE\SOFTWARE\Policies\Microsoft\Windows
NT, create a new nested key, named SystemRestore.
4. Within this key, create a new REG_DWORD value named DisableConfig, and set
this value to 1.
5. Close Regedit.exe and reboot the system.
Note You can manage settings by including the modified registry key in a script. More
information on this topic will be provided in Chapter 15
.
Problems with Configuring Encrypting File System in a Mixed Environment
Encrypting File System (EFS), first introduced with Windows 2000, protects sensitive
data in files stored on NTFS-formatted disks. Only the user who encrypts a file can open
that protected file and work with it. This is especially useful for securing sensitive data on
computers shared by several users or on portable computers. For example, if someone
else obtains a lost or stolen laptop, that person will be unable to access any of the
encrypted files stored on that disk.
Windows XP and Windows Server 2003 include many improvements over EFS
implementation in Windows 2000. You now have the option of encrypting the Offline
Files database, which could not be encrypted under Windows 2000. To encrypt offline
files, select the Folder Options command from the Tools menu in My Computer or
Windows Explorer, go to the Offline Files tab, and set the Encrypt offline files to
secure data checkbox (Fig. 13.11
).
Figure 13.11: Options for encrypting the Offline Files database
Note Administrative privileges are required to configure how offline files will be
encrypted.
On the other hand, if EFS is not appropriate in your environment, or if you have files that
you do not want encrypted, you can use one of several options to disable EFS. There are
also numerous ways to configure EFS to meet the needs of your organization.
Unfortunately, this is where problems might arise, especially in a mixed environment.
For example, you may have Windows 2000 and Windows Server 2003 domains with
client workstations running Windows 2000 Professional. If you decide to upgrade client
workstations to Windows XP Professional and want to disable EFS, you will notice that
the public key policy, which disables Encrypting File System, has no effect on Windows
XP clients.
Note The same problem exists for Windows 2000 Professional clients joined to a
Windows NT domain, since the Windows NT domain administrator cannot be a
File Recovery Agent. To disable EFS on a computer running Windows 2000
Professional within a Windows NT domain, you must download Microsoft's hotfix
( />). This
hotfix adds the registry key, which will be discussed later in this section. Note it is
still necessary to change the added registry value to 1 to disable EFS.
The reason for such behavior lies in the difference between the EFS models implemented
in Windows 2000 and in its successors (Windows XP and Windows Server 2003). The
new EFS model does not require a Data Recovery Agent to be present before files can be
encrypted. In Windows 2000, this requirement was mandatory - no recovery agent, no
encryption. Because of this limitation, you could prevent file encryption within an entire
domain of Windows 2000 clients. You simply had to remove the Data Recovery Agent
certificate from the public key policy and delete the recovery policy.
Windows XP Professional and Windows Server 2003 have no such limitation; they allow
data encryption regardless of the existence of a Data Recovery Agent.
Thus, if you want to disable EFS in Windows XP or Windows Server 2003, it is
necessary to use a different approach. Once again, you have several choices. For
example, on standalone systems or within a workgroup environment, you can choose one
of the following:
Apply the setting in Local Security Policy
Edit the system registry directly
For Windows XP clients joined in a Windows Server 2003 domain, the preferred method
is to use a Group Policy setting. You also could choose to manage the changes by
including the modified registry key in a script. For Windows XP workstations joined to
Windows 2000 domains, you can add the modified registry key to a security template,
and then import that template into Group Policy.
Using Group Policy to Disable EFS in Windows XP and Windows Server 2003
For a standalone Windows XP or Windows Server 2003 system, you can disable EFS
using the following procedure:
1. From the Start menu, select Programs | Administrative Tools | Local Security
Policy.
2. Expand the console tree and navigate to Local Computer Policy | Computer
Configuration | Windows Settings | Security Settings | Public Key Policies.
3. Right-click the Encrypting File System folder and select the Properties
command from the right-click menu.
4. The Encrypting File System Properties window will open (Fig. 13.12
). Notice
that in Windows XP or Windows Server 2003, EFS is enabled by default. To
disable it, clear the Allow users to encrypt files using the Encrypting File
System (EFS) check box. Click OK.