Tài liệu Accessing a Database Using Visual Studio .NET ppt
Bạn đang xem bản rút gọn của tài liệu. Xem và tải ngay bản đầy đủ của tài liệu tại đây (32.72 KB, 3 trang )
Accessing a Database Using Visual Studio .NET
Visual Studio .NET's Server Explorer allows you to use a subset of the features contained
in the Databases folder of Enterprise Manager. Specifically, Server Explorer allows you
to view, create, and edit databases, database diagrams, tables, views, stored procedures,
and user-defined functions. In this section, you'll be introduced to Server Explorer and
some of its functionality. As you'll see, Server Explorer operates in a similar way to
Enterprise Manager, which was covered in Chapter 2
. Because of the similarity between
Server Explorer and Enterprise Manager, I'll only briefly cover Server Explorer here. You
should feel free to experiment with Server Explorer yourself.
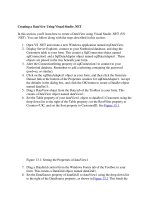
Your first step is to connect to a database. To do this, you select Tools ➣ Connect To
Database. This displays the Data Link Properties dialog box. Figure 3.26
shows this
dialog box with appropriate entries to connect to the Northwind database running on the
computer JMPRICE-LAP.
Figure 3.26: Entering database details using the Data Link Properties dialog box
Once you've entered your database details, your second step is to click the Test
Connection button to verify the database connection details. Click the OK button once
your test succeeds.
Once you've connected to the database, you can view things such as the tables. You can
also retrieve and modify rows in the tables. You can drill down to the tables in the
database by clicking the Add icon in the tree in Server Explorer, and you can retrieve the
rows from a table by clicking the right mouse button on the table in the tree and selecting
Retrieve Data From Table in the pop-up window. Figure 3.27
shows the rows from the
Customers table.
Figure 3.27: Viewing the rows in the Customers table using the Server Explorer
You can enter SQL statements by clicking the Show SQL Pane button in the toolbar, as
shown in Figure 3.28
.
Figure 3.28: Entering a SQL statement
You can build SQL statements visually by clicking the Show Diagram button in the
toolbar and selecting columns from the table, as shown in Figure 3.29
. As you can see,
I've selected the ContactName, CompanyName, and CustomerID columns from the
Customers table.
Figure 3.29: Building a SQL statement visually
You can view the properties of a column in a table by clicking the right mouse button
over the column and selecting Properties from the pop-up window. Figure 3.30
shows the
properties of the CustomerID column of the Customers table.
Figure 3.30: Properties of the CustomerID columns
You've only scratched the surface of the Server Explorer in this section. If you have VS
.NET, you should feel free to experiment with the Server Explorer-that's the best way to
learn.