Tài liệu Use Visual Studio .NET Tools to Speed Up Writing ADO.NET doc
Bạn đang xem bản rút gọn của tài liệu. Xem và tải ngay bản đầy đủ của tài liệu tại đây (34.75 KB, 15 trang )
9.3 Use Visual Studio .NET Tools to Speed Up Writing ADO.NET Code
The code you've written up to this point doesn't do that much. It doesn't even access the
database. The next task is to write code that populates the class with data from the
database, and the first step in doing this is setting up database access objects.
Technique
In Chapter 3, you learned how to fill a dataset to store data in a disconnected fashion. In
this chapter, you will use a strongly typed dataset-that is, a dataset with data rows that
match the name and datatypes of the columns. You will learn how to use the DataAdapter
Configuration Wizard to autogenerate code that initializes Command and DataAdapter
objects for use with a specific table.
Steps
1. Right-click on your project and select Add New Item from the Add menu. Choose
DataSet and name it dsCustomers.xsd.
2. Visual Studio .NET opens dsCustomers.xsd in Design mode. Expand the Server
explorer and drill down to Data Connections, Northwind, Tables. Drag the
Customers table onto the Design view.
3. Visual Studio might process for a few seconds, but afterward, you'll have a
strongly typed dataset.
The result? Instead of writing dataset code like this:
strCustomerID = CType(ds.Tables("Customers").Rows(0).Item("CustomerID"),
String)
you'll have code that looks like this:
strCustomerID = ds2.Customers(0).CustomerID
A strongly typed dataset is a combination of two documents. One is a .vb file with
the same name as the dataset. Visual Studio .NET will not show you the contents
of this file (unless you step into it while debugging), and the contents don't appear
in the Solution Explorer. The other file is an .xsd file, or a XML Schema
Definition (XSD), which defines a data structure. The .vb file reads the XSD to
properly instantiate a strongly typed dataset.
You should always take a look at any code that is generated automatically by a
tool because the tool might generate code that doesn't do precisely what you want
it to do. If you have never seen an XSD, this is also a good time to learn something
new. Listing 9.18 shows the XSD for the dsCustomers dataset. You can view the
XSD you created by opening dsCustomers.xsd from the Solution Explorer and
then clicking the XML button at the bottom of left corner of the screen.
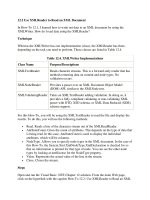
Listing 9.18 dsCustomers.xsd: The Customers XSD
<?xml version="1.0" encoding="utf-8" ?>
<xsd:schema id="dsCustomers"
targetNamespace="
elementFormDefault="qualified"
xmlns="
xmlns:xsd="
xmlns:msdata="urn:schemas-microsoft-com:xml-msdata">
<xsd:element name="dsCustomers" msdata:IsDataSet="true">
<xsd:complexType>
<xsd:choice maxOccurs="unbounded">
<xsd:element name="Customers">
<xsd:complexType>
<xsd:sequence>
<xsd:element name="CustomerID" type="xsd:string" />
<xsd:element name="CompanyName" type="xsd:string" />
<xsd:element name="ContactName" type="xsd:string" minOccurs="0" />
<xsd:element name="ContactTitle" type="xsd:string" minOccurs="0" />
<xsd:element name="Address" type="xsd:string" minOccurs="0" />
<xsd:element name="City" type="xsd:string" minOccurs="0" />
<xsd:element name="Region" type="xsd:string" minOccurs="0" />
<xsd:element name="PostalCode" type="xsd:string" minOccurs="0" />
<xsd:element name="Country" type="xsd:string" minOccurs="0" />
<xsd:element name="Phone" type="xsd:string" minOccurs="0" />
<xsd:element name="Fax" type="xsd:string" minOccurs="0" />
</xsd:sequence>
</xsd:complexType>
</xsd:element>
</xsd:choice>
</xsd:complexType>
<xsd:unique name="dsCustomersKey1" msdata:PrimaryKey="true">
<xsd:selector xpath=".//Customers" />
<xsd:field xpath="CustomerID" />
</xsd:unique>
</xsd:element>
</xsd:schema>
It is beyond the scope of this chapter and this book to fully explain an XSD. The
subject requires an entire book of its own. But it's important to point out a few
areas of this XSD.
The element tags are really nothing more than the properties you have already
declared. Each element has a name that corresponds to a column in the Customers
table, as well as a type that loosely corresponds to the datatype of the column.
The element tag also has a minOccurs attribute. This attribute actually defines
whether a value is required for that element. The default for the minOccurs
attribute is 1, which means that the element does not allow Null values.
Also, take a close look at the lines at the end of the XSD that begin with
<xsd:unique. This XML block refers back to the CustomerID element, and it
declares that that element is the primary key of the dsCustomers XSD.
A dataset is just one part of what you need. Without a data adapter, the dataset just
sits there. You could create all the data adapter code yourself, but again, Visual
Studio .NET can do a lot of the work for you.
4. Right-click on your project and select Add New Item from the Add menu. Choose
Component Class and name it CCustomerData.vb.
5. Visual Studio opens CCustomerData.vb in Design mode. Expand the Toolbox on
the left side of the screen. Choose the Data tab, and drag an OleDbConnection
onto the Design view.
6. Click on OleDbConnection1 and rename it oleCnn.
7. Set the ConnectionString property. You should have an existing connection to the
Northwind database. (You set this up in section 9.1.) If you don't have an existing
connection, create a connection by selecting New Connection from the
ConnectionString menu.
8. Drag an OleDbDataAdapter from the Data tab of the Toolbox. Doing so opens the
DataAdapter Configuration Wizard.
9. First, in the Choose Your Data Connection page of the wizard, shown in Figure
9.2, select a connection for the data adapter, and then click Next.
Figure 9.2. The Choose Your Data Connection page of the DataAdapter
Configuration Wizard.
10. Now, you have the option of choosing the type of query to use with the data
adapter. For the purposes of this example, use SQL statements. The other choices,
shown in Figure 9.3, allow you to specify existing stored procedures, or have the
wizard create new database stored procedures for you.
Figure 9.3. The Choose a Query Type page of the DataAdapter Configuration
Wizard.
11. The next page of the wizard, shown in Figure 9.4, asks for a SQL statement to
retrieve data from the database. Choose Query Builder to create a new query.
Figure 9.4. The Generate the SQL Statements page of the DataAdapter
Configuration Wizard.
12. Using the Query Builder, shown in Figure 9.5, select the Customers table, and
return all the columns in the table. Add a WHERE condition to select a single
customer row based on the Customer ID as in Listing 9.19. Click Next and then
Finish.
Listing 9.19 CustomerData.vb: The SELECT Command Text to Use in the
DataAdapter Configuration Wizard
SELECT CustomerID, CompanyName, ContactName, ContactTitle,
Address, City, Region, PostalCode, Country, Phone, Fax
FROM Customers
WHERE CustomerID = ?
Figure 9.5. The Query Builder allows you to graphically build a SQL
statement.