Tài liệu SQL Server MVP Deep Dives- P11 pdf
Bạn đang xem bản rút gọn của tài liệu. Xem và tải ngay bản đầy đủ của tài liệu tại đây (888.38 KB, 40 trang )
356
C
HAPTER
27
Automating SQL Server Management using SMO
code can then be executed every time your backup
strategy calls for a full database backup of all data-
bases on the target server. If you remove the full
database backup logic from the code sample the
code can be run every time transaction log backups
are to be run for all databases on the server, improv-
ing your recovery interval to minimize the potential
data loss in the event of a system failure.
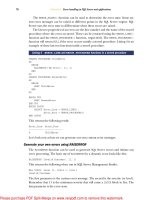
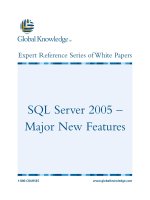
In the following script, shown in listing 2, we’ll
connect to our target server, and then get the
default backup directory from the
Settings
collec-
tion. We’ll next grab the database collection and
iterate through that to do the backups. For each
database we’ll get the current date and time and put
it into a string to use in the backup filename. We’ll
do the full backup for the database, then we’ll
check to see if the database recovery model is Sim-
ple. If not, we’ll perform a transaction log backup
on the database as well.
#backup.ps1
#Performs a Full backup followed by a transaction log backup on all user
➥
databases
param (
[string]$srvname='MyServer\MyInstance'
)
# Load SMO assembly, and if we're running SQL 2008 DLLs load the
➥
SMOExtended and SQLWMIManagement libraries
$v = [System.Reflection.Assembly]::LoadWithPartialName
➥
('Microsoft.SqlServer.SMO')
$p = $v.FullName.Split(',')
$p1 = $p[1].Split('=')
$p2 = $p1[1].Split('.')
if ($p2[0] -ne '9') {
[System.Reflection.Assembly]::LoadWithPartialName('Microsoft.SqlServer.
➥
SMOExtended') | out-null
[System.Reflection.Assembly]::LoadWithPartialName('Microsoft.SqlServer.
➥
SQLWMIManagement') | out-null
}
$s = new-object ('Microsoft.SqlServer.Management.Smo.Server') $srvname
$bkdir = $s.Settings.BackupDirectory
$dbs = $s.Databases
foreach ($db in $dbs) {
if ($db.IsSystemObject -eq $False -and $db.IsMirroringEnabled -eq $False)
➥
{
Listing 2 Backing up user databases
SqlBackup
AddDevice
Action
BackupSetDescription
BackupSetName
Database
MediaDescription
BackupDevice
Backup
Devices
Figure 2 The SMO
Backup
object
Licensed to Kerri Ross <>
Please purchase PDF Split-Merge on www.verypdf.com to remove this watermark.
357
Restore
$dbname = $db.Name
$dt = get-date -format yyyyMMddHHmmss
$bk = new-object ('Microsoft.SqlServer.Management.Smo.Backup')
$bk.Action = 'Database'
$bk.BackupSetDescription = "Full backup of " + $dbname
$bk.BackupSetName = $dbname + " Backup"
$bk.Database = $dbname
$bk.MediaDescription = "Disk"
$bk.Devices.AddDevice($bkdir + "\" + $dbname + "_db_" + $dt + ".bak",
➥
'File')
$bk.SqlBackup($s)
# Simple Recovery Model has a Value Property of 3
# SQL Server 2008 doesn't recognize the enumerated value so the code is
➥
slightly different
# Set a variable to run the transaction log backup, and if Simple, turn
➥
it off
$trnbck = 1
if ($p2[0] -eq '9')
{
if ($db.DatabaseOptions.RecoveryModel -eq 'Simple') { $trnbck =
➥
0 }
}
else
{
if ($db.RecoveryModel.value__ -eq 3) { $trnbck = 0 }
}
if ($trnbck -eq 1) {
$dt = get-date -format yyyyMMddHHmmss
$trn = new-object ('Microsoft.SqlServer.Management.Smo.Backup')
$trn.Action = 'Log'
$trn.BackupSetDescription = "Trans Log backup of " + $dbname
$trn.BackupSetName = $dbname + " Backup"
$trn.Database = $dbname
$trn.MediaDescription = "Disk"
$trn.Devices.AddDevice($bkdir + "\" + $dbname + "_tlog_" + $dt
➥
+ ".trn", 'File')
$trn.SqlBackup($s)
}
}
}
Restore
All the backups in the world don’t do a bit of good if they can’t be restored, and there
are scenarios that require restores to be done. One is where a server or disk drive fails
and the data needs to be recovered for business to continue. This is the primary rea-
son we perform regular backups. For this case, the backup is restored (generally) to
the same location where the original database files existed.
In addition to this there may be the case where data is inadvertently modified or
deleted, and some alternate recovery method is required, usually restoring the data-
base backup to a new database name, so that the original data can be copied to the
production database without disturbing other transactional activity occurring.
Licensed to Kerri Ross <>
Please purchase PDF Split-Merge on www.verypdf.com to remove this watermark.
358
C
HAPTER
27
Automating SQL Server Management using SMO
Another use is for development and Quality
Assurance (
QA
) testing, where a copy of the
production database is restored in the develop-
ment or
QA
environment to examine the effect
of some application update. Finally, and this is
often overlooked, database backups should be
regularly tested in disaster recovery testing, to
be certain that, should a problem occur, the
backups are in fact usable.
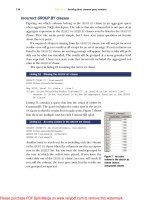
A valuable piece of information is available
to us via
SMO
for the restore process that isn’t
available through Management Studio or
through straight
T-SQL
, and that is the location
of the default data and log file paths (figure 3).
We can use this in our restore scenario, using
the following objects.
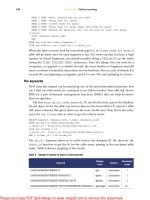
When we have this information, we can set
the properties of the
SMO
Restore
object
(figure 4). We first connect to the server, then
we create a
BackupDeviceItem
, specifying the
name and path of the backup file we’re going
to use, and add that to the
Devices
collection
of the
Restore
object. We need to create at least
two
RelocateFile
objects (more if there are
more logical files in the backup file) and add
them to the
RelocateFiles
collection. These
RelocateFile
objects will allow us to specify
both the
LogicalFileName
and the
Physical-
FileName
properties of the new database. In the
PhysicalFileName
properties, we’ll use the
MasterDBPath
and
MasterDBLogPath
properties
from the server information shown previously.
Figure 4 shows the object hierarchy for the
Restore
object.
As shown in listing 3, after we’ve set the
properties, we can invoke the
SqlRestore
method to perform the restore; then the
restored database is available for use.
#restore.ps1
#Restores a database with a new name from an existing backup
param (
Listing 3 Restoring a copy of an existing database from backup
DefaultLog
DefaultFile
MasterDBLogPath
MasterDBPath
Information
Server
Settings
Figure 3 Database file path properties
Restore
Action
Database
BackupDeviceItem
Add
RelocateFiles
RelocateFile
LogicalFileName
PhysicalFileName
SqlRestore
Devices
Figure 4 The SMO
Restore
object
Licensed to Kerri Ross <>
Please purchase PDF Split-Merge on www.verypdf.com to remove this watermark.
359
Creating a database
[string]$srvname='MyServer\MyInstance',
[string]$dbname='AdWorks',
[string]$bckfile='C:\MSSQL.2\MSSQL\Backup\AdventureWorks_db_20071227175
➥
004.bak'
)
# Load SMO assembly, and if we're running SQL 2008 DLLs load the
➥
SMOExtended and SQLWMIManagement libraries
$v = [System.Reflection.Assembly]::LoadWithPartialName
➥
('Microsoft.SqlServer.SMO')
$p = $v.FullName.Split(',')
$p1 = $p[1].Split('=')
$p2 = $p1[1].Split('.')
if ($p2[0] -ne '9') {
[System.Reflection.Assembly]::LoadWithPartialName('Microsoft.SqlServer.
➥
SMOExtended') | out-null
[System.Reflection.Assembly]::LoadWithPartialName('Microsoft.SqlServer.
➥
SQLWMIManagement') | out-null
}
$srv = new-object ('Microsoft.SqlServer.Management.Smo.Server') $srvname
$bdi = new-object ('Microsoft.SqlServer.Management.Smo.BackupDeviceItem')
➥
($bckfile, 'File')
$restr = new-object('Microsoft.SqlServer.Management.Smo.Restore')
$restr.Database = $dbname
$restr.Devices.Add($bdi)
$restrfile = new-object('Microsoft.SqlServer.Management.Smo.RelocateFile')
$restrlog = new-object('Microsoft.SqlServer.Management.Smo.RelocateFile')
$restrfile.LogicalFileName = "AdventureWorks_Data"
$restrfile.PhysicalFileName = $s.Information.MasterDBPath + '\'+ $dbname +
➥
'_Data.mdf'
$restrlog.LogicalFileName = "AdventureWorks_Log"
$restrlog.PhysicalFileName = $s.Information.MasterDBLogPath + '\'+ $dbname
➥
+ '_Log.ldf'
$restr.RelocateFiles.Add($rsfile)
$restr.RelocateFiles.Add($rslog)
$restr.SqlRestore($srv)
Creating a database
Using
SMO
to create databases and database objects may seem counterintuitive,
because these objects are usually created using
T-SQL
scripts, but automating the pro-
cesses that create the objects can provide consistency in an area that is usually quite
inconsistent. Let’s start with the database itself.
SQL
Server requires that a database have a
PRIMARY
filegroup and that the system
tables (the database metadata) reside in that filegroup (in fact their location cannot
be changed). Best practices recommendations include keeping your application data
out of the
PRIMARY
filegroup, to help in managing the disk files for the database.
When using
SSMS
, it can be tedious to create a database with the desired size, file loca-
tion, and with a separate, default, filegroup to hold the application data. This is a rela-
tively simple process with
SMO
.
Licensed to Kerri Ross <>
Please purchase PDF Split-Merge on www.verypdf.com to remove this watermark.
360
C
HAPTER
27
Automating SQL Server Management using SMO
For the example database, we’ll
create a database called MyAppDB,
which will have a 5
MB
file in the
PRI-
MARY
filegroup to hold the database
metadata. This file should never
grow beyond 5 MB because it con-
tains only database metadata. We’ll
use the logical name
MyAppDB_
SysData
for this file and house it in
the default data path for the server.
The application data will be
located in a second filegroup called
AppFG, which we’ll set as the default
filegroup for the database. We’ll cre-
ate one file with a logical name
MyAppDB_AppData
and house it in
the default data path for the server
as well. We’ll set an initial size of 25
MB
and allow it to grow by 25
MB
each time it is required, but set a
maximum size of 100
MB
.
Log files in
SQL
Server do not use
filegroups, so we’ll add a log file to
the LogFiles collection of the data-
base with a logical name
MyAppDB_
Log
and house it in the default log
file path for the server. We’ll set its
initial size to 10
MB
and allow it to
grow by 10
MB
each time it needs to
do so, but we won’t set a maximum
size for the log file.
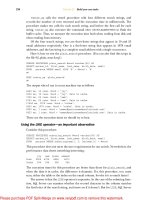
After we’ve created the structural
objects for the database, we execute
the
Create
method, but
SQL
Server
automatically sets the default file-
group to
PRIMARY
when a database
is created, so we have to go back in
and set the default filegroup to AppFG using the
Alter
method at both the filegroup
and database levels.
Figure 5 is a hierarchical diagram of the objects we’ll use to create the database.
Now let’s look at the example code in listing 4.
Create
Alter
Alter
MaxSize
Growth
GrowthType
FileName
Name
MaxSize
Growth
GrowthType
FileName
Name
IsDefault
Database
MasterDBLogPath
MasterDBPath
Information
LogFile
LogFiles
DataFile
Files
FileGroup
FileGroups
Databases
Server
Figure 5 The SMO
Databases
collection and
Database
object
Licensed to Kerri Ross <>
Please purchase PDF Split-Merge on www.verypdf.com to remove this watermark.
361
Creating a database
#createdatabase.ps1
#Creates a new database using our specifications
param (
[string]$srvname='MyServer\MyInstance',
[string]$dbname='MyAppDB',
[int]$datsize=25,
[int]$maxsize=100,
[int]$logsize=10
)
# Load SMO assembly, and if we're running SQL 2008 DLLs load the
➥
SMOExtended and SQLWMIManagement libraries
$v = [System.Reflection.Assembly]::LoadWithPartialName
➥
('Microsoft.SqlServer.SMO')
$p = $v.FullName.Split(',')
$p1 = $p[1].Split('=')
$p2 = $p1[1].Split('.')
if ($p2[0] -ne '9') {
[System.Reflection.Assembly]::LoadWithPartialName('Microsoft.SqlServer.
➥
SMOExtended') | out-null
[System.Reflection.Assembly]::LoadWithPartialName('Microsoft.SqlServer.
➥
SQLWMIManagement') | out-null
}
$srv = new-object ('Microsoft.SqlServer.Management.Smo.Server') $srvname
# Instantiate the database object and add the filegroups
$db = new-object ('Microsoft.SqlServer.Management.Smo.Database') ($srv,
➥
$dbname)
$sysfg = new-object ('Microsoft.SqlServer.Management.Smo.FileGroup') ($db,
➥
'PRIMARY')
$db.FileGroups.Add($sysfg)
$appfg = new-object ('Microsoft.SqlServer.Management.Smo.FileGroup') ($db,
➥
'AppFG')
$db.FileGroups.Add($appfg)
# Create the file for the system tables
$dbdsysfile = new-object ('Microsoft.SqlServer.Management.Smo.DataFile')
➥
($sysfg, 'MyAppDB_SysData')
$sysfg.Files.Add($dbdsysfile)
$dbdsysfile.FileName = $srv.Information.MasterDBPath +
➥
'\MyAppDB_SysData.mdf'
$dbdsysfile.Size = [double](5.0 * 1024.0)
$dbdsysfile.GrowthType = 'KB'
$dbdsysfile.Growth = [double](5.0 * 1024.0)
$dbdsysfile.IsPrimaryFile = 'True'
# Create the file for the Application tables
$dbdappfile = new-object ('Microsoft.SqlServer.Management.Smo.DataFile')
➥
($appfg, 'MyAppDB_AppData')
$appfg.Files.Add($dbdappfile)
$dbdappfile.FileName = $srv.Information.MasterDBPath +
➥
'\MyAppDB_AppData.ndf'
$dbdappfile.Size = [double](25.0 * 1024.0)
$dbdappfile.GrowthType = 'KB'
Listing 4 Creating a user database
Licensed to Kerri Ross <>
Please purchase PDF Split-Merge on www.verypdf.com to remove this watermark.
362
C
HAPTER
27
Automating SQL Server Management using SMO
$dbdappfile.Growth = [double]($datsize * 1024.0)
$dbdappfile.MaxSize = [double]($maxsize * 1024.0)
# Create the file for the log
$dblfile = new-object ('Microsoft.SqlServer.Management.Smo.LogFile') ($db,
➥
'MyAppDB_Log')
$db.LogFiles.Add($dblfile)
$dblfile.FileName = $srv.Information.MasterDBLogPath + '\MyAppDB_Log.ldf'
$dblfile.Size = [double]($logsize * 1024.0)
$dblfile.GrowthType = 'KB'
$dblfile.Growth = [double]($logsize * 1024.0)
# Create the database
$db.Create()
# Set the default filegroup to AppFG
$appfg = $db.FileGroups['AppFG']
$appfg.IsDefault = $true
$appfg.Alter()
$db.Alter()
After this script is completed, the MyAppDB database will exist and user objects will be
placed in the AppFG filegroup instead of
PRIMARY
, which will improve the long-term
management of the database.
Scripting
The scripting of
SMO
is a vast improvement over the
scripting of its predecessor,
DMO
. With
SMO
you can cre-
ate
T-SQL
scripts from objects even if they don’t yet exist.
When you open almost any maintenance dialog box in
SQL
Server Management Studio, you’ll see a button that
allows you to generate a script from the changes you’ve
made in that dialog box. You can then save that script for
archival purposes, cancel out of the dialog box, and exe-
cute the script as written, or make changes to it before
you execute it.
Another useful feature of scripting existing objects is
to generate scripts of all database objects for documenta-
tion or source code control. This allows the administra-
tors to then rebuild a database in the form it existed at
the time the script was created.
At any time while creating or working with objects in
SMO
, you can script those objects for archival or later
use. Figure 6 shows the
Scripter
object and the proper-
ties we need to set.
The
Server
property allows the
Scripter
object to
connect to the server. The remaining properties that
need to be set are in the
Scripter
Options
collection.
Server
ScriptDrops
WithDependencies
FileName
IncludeHeaders
AppendToFile
ToFileOnly
ClusteredIndexes
Indexes
DriAll
Scripter
Options
Script
Figure 6 The SMO
Scripter
object
Licensed to Kerri Ross <>
Please purchase PDF Split-Merge on www.verypdf.com to remove this watermark.
363
Scripting
The
ScriptDrops
property specifies whether the script will consist of drops for the
objects or create for the objects. If you specify
c
to this property, the script will contain
a
DROP
statement for the object (within an
IF
condition to ensure that it exists), but a
False
value will cause the scripter to generate the
CREATE
statement for the object.
The
WithDependencies
property, if
True
, will cause the objects to be scripted in an
order that respects the dependency of one scripted object on another. The
FileName
property contains the full path of the resultant script file. The
IncludeHeaders
prop-
erty, when
True
, will include a comment indicating the name of the object and when
the script was created in the script. The
AppendToFile
will append the script to the
end of an existing file if
True
, and overwrite the file if
False
. By default the scripting
process will send the results to the console, so setting the
ToFileOnly
to
True
will
cause the scripter to send the script only to the file specified. Setting
Clustered-
Indexes
to
True
will cause the clustered index for a table to be included in the script,
and setting
Indexes
to
True
will cause the nonclustered indexes to be included in the
script. The
DriAll
property, when set to
True
, will cause all objects with enforced
declarative referential integrity to be included in the script.
The objects to be scripted need to be added to an array of type
SqlSmoObject
. This
allows you to decide at what point you want the object included in the script. After the
array has been populated with all the objects to be scripted you can invoke the
Script
method and the script will be created.
Now let’s look at the example code in listing 5.
#scripting.ps1
#Script all the table objects in the AdventureWorks database
param (
[string]$srvname='MyServer\MyInstance',
[string]$dbname='AdventureWorks',
[string]$scrname='c:\dbscript.sql'
)
# Load SMO assembly, and if we're running SQL 2008 DLLs load the
➥
SMOExtended and SQLWMIManagement libraries
$v = [System.Reflection.Assembly]::LoadWithPartialName
➥
('Microsoft.SqlServer.SMO')
$p = $v.FullName.Split(',')
$p1 = $p[1].Split('=')
$p2 = $p1[1].Split('.')
if ($p2[0] -ne '9') {
[System.Reflection.Assembly]::LoadWithPartialName('Microsoft.SqlServer.
➥
SMOExtended') | out-null
[System.Reflection.Assembly]::LoadWithPartialName('Microsoft.SqlServer.
➥
SQLWMIManagement') | out-null
}
$srv = new-object ('Microsoft.SqlServer.Management.Smo.Server') $srvname
$db = $srv.Databases[$dbname]
$scrp = new-object ('Microsoft.SqlServer.Management.Smo.Scripter') ($srv)
Listing 5 Scripting all objects in the AdventureWorks database
Licensed to Kerri Ross <>
Please purchase PDF Split-Merge on www.verypdf.com to remove this watermark.
364
C
HAPTER
27
Automating SQL Server Management using SMO
$scrp.Options.ScriptDrops = $False
$scrp.Options.WithDependencies = $True
$scrp.Options.FileName = $scrname
$scrp.Options.IncludeHeaders = $True
$scrp.Options.AppendToFile = $True
$scrp.Options.ToFileOnly = $True
$scrp.Options.ClusteredIndexes = $True
$scrp.Options.DriAll = $True
$scrp.Options.Indexes = $True
$scrp.Script($db.Tables)
Summary
This chapter presents just a few examples of methods for automating your manage-
ment of
SQL
Server using
SMO
and PowerShell. You can find many additional exam-
ples on the web and on the Codeplex site to help you solve your
SQL
Server
management problems. You’ll also find additional examples in my blog at http:
//sql-
blog.com/blogs/allen_white/default.aspx.
About the author
Allen White is a
SQL
Server trainer and consultant who’s been
using
SQL
Server since 1992. He has been awarded Microsoft’s
MVP
Award for his work in the
SQL
Server community for three
years.
Licensed to Kerri Ross <>
Please purchase PDF Split-Merge on www.verypdf.com to remove this watermark.
365
28 Practical auditing
in SQL Server 2008
Jasper Smith
In
SQL
Server 2008 Enterprise Edition, instance- and database-level audit is now
built into the Database Engine with its own set of instance- and database-level
objects—Server Audit and Server Audit Specification at the instance level, and
Database Audit Specification at the database level.
SQL
Server 2005 introduced event notifications and data definition language
(
DDL
) triggers as mechanisms for auditing
DDL
statements, but coverage of events
wasn’t complete. There was no support for auditing access to data, and there was
no tool support available in
SQL
Server Management Studio (
SSMS
).
Generating audit event s in
SQL
2008 is extremely lightweight compared to pre-
viously available mechanisms, and is based on the new extended events infrastruc-
ture, which is designed to have an extremely low overhead even for large numbers
of events. It also allows much finer-grained event filtering.
NOTE
All of the new audit features described in this chapter require
SQL
Server 2008 Enterprise or Developer Edition, and aren’t available in
lower editions.
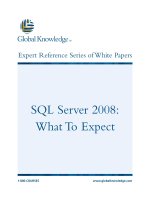
Overview of audit infrastructure
In
SQL
Server 2008, all events are now auditable using the new audit objects,
including those not available via event notifications in previous versions of
SQL
Server. Configuration is greatly simplified with built-in tool support in
SSMS
.
Figure 1 gives an overview of the various audit objects.
Server audit objects
You can define the properties of an audit, such as Queue Delay or Action on Audit
Failure, as well as the output target, such as File, Windows Application Log, or
Windows Security Log. You can create multiple server audits, each of which
defines its own target.
Licensed to Kerri Ross <>
Please purchase PDF Split-Merge on www.verypdf.com to remove this watermark.
366
C
HAPTER
28
Practical auditing in SQL Server 2008
Server audit specification objects
You can define the audit action groups that you want to audit at the instance level,
along with the server audit they belong to. There can be a maximum of one server
audit specification per server audit. You can create multiple server audit specifica-
tions, as long as each one uses a separate server audit.
Database audit specification objects
You can define the individual audit actions or action groups that you want to audit at
the database level, including any filters and the server audit they belong to. There can
be a maximum of one database audit specification per database per server audit. You
can create multiple database audit specifications for the same database, but they need
to belong to separate server audits.
Server audits
The Server Audit object is the first object you create when enabling auditing for an
instance of
SQL
Server 2008. It defines the output target for audit events generated by
audit specifications. You can choose from three possible audit output types for a
Server Audit object:
Windows Application Event Log
Windows Security Event Log
File (local or remote)
When you specify the Application or Security Log target, the settings listed in table 1
are available for configuration.
NOTE
Writing events to the Windows Security Log isn’t allowed on Windows
XP
.
Figure 1 Overview of audit object relationships
Licensed to Kerri Ross <>
Please purchase PDF Split-Merge on www.verypdf.com to remove this watermark.
367
Server audits
Configuring the Windows Security Log target
In order to allow
SQL
Server to write events to the Windows Security Log, a number of
additional configuration steps are required. The following walkthrough demonstrates
how to enable the Windows Security Log target for Windows Server 2003. For details
of how to configure this target for Windows Server 2008, see the
SQL
Server Docu-
mentation (http:
//msdn.microsoft.com/en-gb/library/cc645889.aspx).
1
Launch the Local Security Policy
MMC
snap-in by clicking Start > Run >
secpol.msc.
2
Select the Audit Policy folder under the Local Policies folder and double-click
Audit Object Access in the right pane.
3
Check both the Success and Failure check boxes in the resultant dialog, as
shown in figure 2.
Table 1 Server Audit configuration settings for Application and Security Log targets
Setting Description
Queue Delay Amount of time in milliseconds that events are buffered before being forced
to be processed. To enable synchronous event delivery, you’d set this to 0.
Synchronous delivery may have a performance impact. The default value is
1000.
Shutdown on Failure Whether the SQL instance will shut down if audit events can’t be written to
the target. The default value is CONTINUE.
Audit GUID To support scenarios such as database mirroring, an audit needs a specific
GUID that matches the GUID found in the mirrored database. The GUID can’t
be modified after the audit has been created.
Figure 2 Enabling Audit Object Access
Licensed to Kerri Ross <>
Please purchase PDF Split-Merge on www.verypdf.com to remove this watermark.
368
C
HAPTER
28
Practical auditing in SQL Server 2008
4
Click
OK
to apply the changes.
5
In the same snap-in, select the User Rights Assignment folder under Local Poli-
cies and double-click on Generate Security Audits in the right pane.
6
Add the
SQL
Service account as shown in figure 3 and click
OK
.
7
Restart the
SQL
Server service in order for the changes to take effect.
NOTE
The required options can be set by Group Policy in a domain environ-
ment, in which case local settings will be overwritten. You should discuss
these settings with the team that manages Group Policy to ensure the
required settings remain in effect for
SQL
Servers where you need to be
able to write events to the Security Log.
Creating a server audit using the Windows Security Log target
To create a server audit, you can either use
SSMS
or
T-SQL
. The following example dem-
onstrates how to create a server audit that uses the Windows Security Log using
SSMS
:
Figure 3 Enabling Generate Security Audit for SQL Service account
Licensed to Kerri Ross <>
Please purchase PDF Split-Merge on www.verypdf.com to remove this watermark.
369
Server audits
1
In
SSMS
Object Explorer, expand the Security node, right-click on the Audits
node, and select New Audit from the context menu, as shown in figure 4.
2
In the Create Audit dialog box shown in figure 5, specify the audit name as
SecurityLogAudit
, choose Security Log from the Audit drop-down list, and
click
OK
.
Figure 4 Creating a new audit using SSMS
Figure 5 Setting server audit properties using SSMS
Licensed to Kerri Ross <>
Please purchase PDF Split-Merge on www.verypdf.com to remove this watermark.
370
C
HAPTER
28
Practical auditing in SQL Server 2008
3
Note that the server audit has been created in a disabled state, as indicated
graphically by the small downward-pointing red arrow on the server audit icon.
In order to use this server audit, it must first be enabled. To enable the server
audit, right-click on it and select Enable Audit from the context menu, as shown
in figure 6.
The code in listing 1 is the equivalent of what we’ve just done via
SSMS
, but using
T-SQL
.
CREATE SERVER AUDIT [SecurityLog]
TO SECURITY_LOG
WITH
( QUEUE_DELAY = 1000,
ON_FAILURE = CONTINUE
)
GO
ALTER SERVER AUDIT [SecurityLog]
WITH(STATE=ON)
GO
NOTE
Windows Security Log is the most secure destination for auditing events
from system administrator activity. It can also be used to integrate with
the
ACS
(Audit Collection Service) functionality in
SCOM
2007 (System
Center Operations Manager).
Creating a security audit using
the Windows Application Log target
To create a server audit using the Windows Application Log target, use the code
shown in listing 2. As with the previous example, the server audit can be created using
SSMS
or
T-SQL
. The same options are available as for the Security Log target described
in table 1. The server audit will be created in a disabled state and must be enabled
before a server or database audit specification can write audit events to it.
Listing 1 Creating a server audit using the Security Log target
Figure 6 Enabling a server audit
using SSMS
Licensed to Kerri Ross <>
Please purchase PDF Split-Merge on www.verypdf.com to remove this watermark.
371
Server audits
CREATE SERVER AUDIT [ApplicationLog]
TO APPLICATION_LOG
WITH
( QUEUE_DELAY = 2000,
ON_FAILURE = CONTINUE
)
GO
ALTER SERVER AUDIT [ApplicationLog]
WITH(STATE=ON)
GO
Configuring a server audit using the File target
When you specify the File target, the settings in table 2 are available for configuration.
The code in listing 3 demonstrates creating a server audit that uses the File target. In
this example, the audit folder is C:\Audit\Server, the maximum size on any individual
file is 100
MB
, the number of rollover files is unlimited, and we aren’t preallocating
disk space for the audit files. The queue delay is set to 2 seconds; therefore, this is an
asynchronous audit and it won’t cause the instance to shut down if audit events can’t
be written to the target.
CREATE SERVER AUDIT [ServerAuditFile]
TO FILE
( FILEPATH = N'C:\Audit\Server\'
Listing 2 Creating a server audit using the Application Log target
Table 2 Server audit configuration settings for File targets
Setting Description
Queue Delay Amount of time in milliseconds that events are buffered before being forced to be
processed. To enable synchronous event delivery, you’d set this to 0. Synchro-
nous delivery may have a performance impact. The default value is 1000.
Shutdown on Failure Whether the SQL instance will shut down if audit events can’t be written to the
target. The default value is CONTINUE.
Audit GUID To support scenarios such as database mirroring, an audit needs a specific GUID
that matches the GUID found in the mirrored database. The GUID can’t be modi-
fied after the audit has been created.
Filepath The folder used to store the audit files. The filenames are automatically gener-
ated based on the audit name and GUID.
Maxsize The maximum size of an audit file. The default value is UNLIMITED.
Max Rollover Files The maximum number of rollover audit files. The default value is 0 (unlimited).
Reserve Disk Space Whether to preallocate disk space to the Maxsize value. The default value is OFF.
Listing 3 Creating a server audit using the File target
Licensed to Kerri Ross <>
Please purchase PDF Split-Merge on www.verypdf.com to remove this watermark.