Tài liệu SQL Server MVP Deep Dives- P13 ppt
Bạn đang xem bản rút gọn của tài liệu. Xem và tải ngay bản đầy đủ của tài liệu tại đây (561.75 KB, 40 trang )
436
C
HAPTER
33
Efficient backups without indexes
CREATE NONCLUSTERED INDEX ncix_Table1 ON dbo.Table1 (Col1)
WITH DROP_EXISTING --, ONLINE = ON
ON NCIX_FG;
The
DROP_EXISTING
option causes the newly created index to be created as the
replacement of the existing index, without needing to explicitly drop the existing
index (which could damage query performance for queries that might be in flight,
while the index is dropped). The
ONLINE
option can be used to further reduce con-
currency impact with
SQL
Server 2005 or 2008 Enterprise Edition.
The
ON
NCIX_FG
clause is the main focus of our attention in this statement, which
defines the new location for the nonclustered index.
Backing up only the PRIMARY filegroup
Now that we’ve successfully separated our nonclustered indexes (one only) from the
PRIMARY
filegroup into a separate filegroup, it’s now possible to perform a tables-only
filegroup backup. Instead of issuing a standard
BACKUP
DATABASE
command, add a file-
group specification to back up only the
PRIMARY
filegroup. For example:
BACKUP DATABASE BackupTest
FILEGROUP = 'PRIMARY'
TO DISK = 'E:\BackupTest_Primary.bak'
SQL
Server will then perform a filegroup backup of the
PRIMARY
filegroup only, with-
out copying any contents from the newly created
NCIX_FG
to the backup set.
NOTE
Although no data is backed up from
NCIX_FG
, the backup still contains
definitions of nonclustered indexes because index metadata information
is stored in system tables, which are located in the
PRIMARY
filegroup
(sys.indexes, sys.index_columns and so on). This means that we can re-
create the nonclustered indexes in the restore process from their defini-
tions, even though we don’t have their allocated data structures in our
backup file.
Restoring the PRIMARY filegroup backup
The process required to restore the database from the
PRIMARY
filegroup backup dif-
fers depending on whether you’re restoring only to perform data extraction purposes
(re-creation of indexes not required), or whether you intend to bring the database
fully online (re-creation of indexes is required).
Restoring from the
PRIMARY
filegroup backup to perform data extraction is sim-
ple and faster than restoring a full backup. On the other hand, restoring the database
back to its full state to bring it back into a production role—including a rebuild of all
nonclustered indexes—requires more steps than from a simple full database backup.
Let’s quickly review both of the steps required in each scenario.
Licensed to Kerri Ross <>
Please purchase PDF Split-Merge on www.verypdf.com to remove this watermark.
437
Restoring the PRIMARY filegroup backup
Restoring for extraction only
When restoring a database from the
PRIMARY
(tables-only) filegroup for data extrac-
tion/examination only, you include
FILEGROUP
and
RECOVERY
(or
NORECOVERY
if you
also wish to restore a chain of log backups) clauses in your
RESTORE
command, as
follows:
RESTORE DATABASE BackupTest
FILEGROUP = 'PRIMARY'
FROM DISK = 'E:\BackupTest_Primary.bak'
WITH RECOVERY
SQL
Server will then restore the
PRIMARY
filegroup and recover the database, bring-
ing it online and available for querying. This allows extraction of data by executing
SELECT
commands, but
INSERT
,
UPDATE
, or
DELETE
commands will fail with error 8607:
Msg 8607, Level 16, State 1, Line 1: The table '[Tablename]' cannot be modified
because one or more nonclustered indexes reside in a filegroup which is not
online.
It’s also possible that
SELECT
statements might fail if a nonclustered index is used to
process the query, either via selection by
SQL
Server’s query optimizer or explicit
index hint. In this case, error 315 will be returned:
Msg 315, Level 16, State 1, Line 2: Index "[IndexName]" on table "[TableName]"
(specified in the FROM clause) is disabled or resides in a filegroup which
is not online.
In this scenario, you might need to either remove index hints, or explicitly hint
SQL
Server to access the table via its heap or clustered index storage, instead of via the
nonclustered index (which is offline).
Restoring for production use
Restoring a database from a
PRIMARY
filegroup backup for production use does
require a few more steps than restoring from a regular full database backup. The most
significant of these involves rebuilding nonclustered indexes from the underlying
tables.
In summary, these are the steps required to bring a database fully online from a
PRIMARY
filegroup backup:
1
Restore the primary filegroup backup and recover the database.
2
Script out index definitions from the
PRIMARY
filegroup, using a new filegroup
name.
3
Restart
SQL
Server in single-user mode (with
-m
startup parameter).
4
Connect to
SQL
Server using the Dedicated Administrator Connection.
5
Delete nonclustered index definitions from the
sys.sysindexes
system view.
6
Remove
-m
startup parameter and restart
SQL
Server in multi-user mode.
7
Create a new, renamed filegroup to re-create the nonclustered indexes in.
8
Rebuild nonclustered indexes in the new filegroup.
Licensed to Kerri Ross <>
Please purchase PDF Split-Merge on www.verypdf.com to remove this watermark.
438
C
HAPTER
33
Efficient backups without indexes
NOTE
Scripting nonclustered index definitions from the
PRIMARY
filegroup is
still possible even though the nonclustered index filegroup hasn’t been
restored, because index definitions exist within the system meta tables
in the
PRIMARY
filegroup, regardless of where the physical index stor-
age allocations are located. This is a crucial fact that enables this tech-
nique to work.
Before walking through each of these steps, two issues associated with this technique
should be discussed:
An update to system views is required to re-create nonclustered indexes (step 5).
The nonclustered index filegroup’s name must be changed (step 7).
ISSUE 1: INDEX DEFINITIONS MUST BE REMOVED BY UPDATING A SYSTEM VIEW
The process of re-creating indexes following restoration of the
PRIMARY
filegroup
requires deleting existing index metadata from the
sys.sysindexes
system view prior
to re-creating indexes (step 3 in the previous list). This fact might discourage some
from using this technique, but it should be pointed out that updating this system view
does not, in and of itself, compromise the integrity of the database, as the database
tables that contain the real data in our database are stored within the
PRIMARY
file-
group and are not affected by the update of this system view.
WARNING
Updating a system catalog is an operation that’s not supported by
Microsoft. An alternative supported solution is to reconstruct the data-
base by scripting its definition, re-creating the database, exporting all
table data from the backup, and re-importing to the new re-created
database.
This system update is required because neither
DROP
INDEX
nor
CREATE
INDEX
WITH
DROP_EXISTING
work when only the
PRIMARY
filegroup has been restored. Each
fails with an error stating that the index’s filegroup is offline as
SQL
Server attempts
to remove the index’s allocations, which aren’t available during execution of the
command.
To avoid this system catalog update, an alternative is to re-create an entirely new
database by scripting all database objects from the
PRIMARY
filegroup (tables,
indexes, and all other objects) and exporting all data from the restored
PRIMARY
file-
group into that new database. This is obviously more time-consuming than only re-
creating nonclustered indexes (as tables are also re-created in the new database), but
it’s a workable alternative that allows you to bring a database back online from
PRI-
MARY
filegroup backup without using any system catalog updates.
ISSUE 2: NEW NONCLUSTERED INDEX FILEGROUP MUST BE RENAMED
Another issue is that the filegroup that contained the nonclustered indexes in the
source database (
NCIX_FG
in our example) cannot be fully removed from the
restored database without further system catalog updates.
This is less of a problem though, as another filegroup can be added to the
restored database and nonclustered indexes be built into it. The name of a filegroup
Licensed to Kerri Ross <>
Please purchase PDF Split-Merge on www.verypdf.com to remove this watermark.
439
Restoring the PRIMARY filegroup backup
is rarely important to an application, so this doesn’t pose a serious problem—simply
create another filegroup (for example
NCIX_FG2
) and rebuild nonclustered indexes
into it instead. This is what we’ll do in our example.
Restoring for production use—step by step
Let’s walk through the individual steps required to restore our database for produc-
tion use from a
PRIMARY
filegroup backup.
STEP 1—RESTORE THE PRIMARY FILEGROUP BACKUP AND RECOVER THE DATABASE
The first step is identical to the restore process for extraction only. Assuming our
PRI-
MARY
filegroup backup remains located in the root of E:\ drive, execute the following
command:
RESTORE DATABASE BackupTest
FILEGROUP = 'PRIMARY'
FROM DISK = 'E:\BackupTest_Primary.bak'
WITH RECOVERY
This restores the database’s
PRIMARY
filegroup, meaning that all tables, views, stored
procedures, user-defined functions, and other database objects stored in the
PRIMARY
filegroup have been restored to the database. Index definitions have also been
restored to the system catalogs (which reside in the
PRIMARY
filegroup), but their
data structure allocations have not, as they are located within the dedicated nonclus-
tered index filegroup (
NCIX_FG
in our example)—which was neither backed up nor
restored.
STEP 2—SCRIPT OUT INDEX DEFINITIONS FROM PRIMARY FILEGROUP
In the current state of our database, it’s not possible to rebuild our nonclustered
indexes using more convenient options such as
DBCC
DBREINDEX
,
ALTER
INDEX
REBUILD
, or
CREATE
INDEX
WITH
DROP_EXISTING
. Each of these generates an error
whether executed from a normal connection or dedicated administrator connection
(
DAC
), because each requires existing index allocations to be available during execu-
tion of the command.
Instead, we’ll script index definitions out to a file and use the script later (step 8),
to rebuild the indexes, after we have dropped index definitions from the sys.sysin-
dexes system catalog and created a new nonclustered index filegroup to contain the
new indexes.
To generate the index scripts, use the utility stored procedure (
SP
) described later
in this chapter, named
usp_Manage_NCIX_FileGroup
. This
SP
accepts two parame-
ters—
@ScriptOnlyOrExecute
(nvarchar(6))
and
@NCIXFGName
(nvarchar(255))
.
The
@ScriptOnlyOrExecute
parameter should be set to
N'Script'
, which
instructs the SP to generate scripts only, without executing them.
The
@NCIXFGName
parameter should be provided with the name of a new file-
group to rebuild nonclustered indexes into. At this stage, this filegroup does not
exist, but we’ll create it in step 7. The name provided for this new filegroup must be
different from the existing nonclustered index filegroup for this database (which is
Licensed to Kerri Ross <>
Please purchase PDF Split-Merge on www.verypdf.com to remove this watermark.
440
C
HAPTER
33
Efficient backups without indexes
NCIX_FG
in our example) because that filegroup’s descriptive metadata still exists in
the system catalogs. For our example, we’ll create another filegroup named
N
'
NCIX_FG2
'.
EXEC usp_Manage_NCIX_FileGroup N'Script', N'NCIX_FG2'
Output from the execution of this procedure should contain a list of
CREATE
INDEX
statements, one per nonclustered index in the database. Save this output to a script
file (for example NCIXScripts.sql) for later use in step 7. Note that each
CREATE
INDEX
statement will include the filegroup name
NCIX_FG2
. When we run this script later,
nonclustered indexes will be re-created within this filegroup, so we’ll need to add it to
the database (which we do in step 7).
STEP 3—RESTART SQL SERVER IN SINGLE-USER MODE
Before we can re-create our nonclustered indexes, we need to remove existing index
definitions from the database by deleting them from the sys.sysindexes system catalog.
This requires us to connect to
SQL
Server in single-user mode, using the
DAC
before
we can perform the
DELETE
.
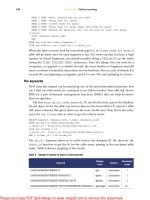
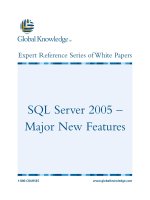
Starting
SQL
Server in single-user mode requires adding the
-m
startup parameter
via the
SQL
Server 2005 or 2008 Configuration Manager utility, as displayed in figure 4.
1
Navigate to the
SQL
Server Program Files menu.
2
Open the
SQL
Server Configuration Manager utility.
3
Right-click on the relevant instance of
SQL
Server from the right-hand window.
4
Select the Properties menu.
5
Click on the Advanced tab.
6
Select the Startup Parameters configuration.
7
Add
;
-m
to the end of the existing list of Startup Parameters (or the beginning
of Startup Parameters with
SQL
Server 2008).
8
Click Apply, and click
OK
in the warning dialog box that appears.
Licensed to Kerri Ross <>
Please purchase PDF Split-Merge on www.verypdf.com to remove this watermark.
441
Restoring the PRIMARY filegroup backup
9
When the Properties dialog box closes, right-click on the
SQL
Server instance
and select Restart.
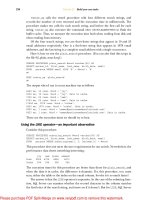
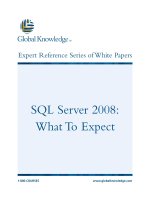
STEP 4—CONNECT TO SQL SERVER USING DEDICATED ADMINISTRATOR CONNECTION
Once the
SQL
Server instance has been restarted, connect through the
DAC
to allow
updates to the system catalogs. Connect or reconnect an
SSMS
connection by adding
ADMIN:
to the beginning of the server name in your connection dialog box, as dis-
played in figure 5.
STEP 5—DELETE NONCLUSTERED INDEX DEFINITIONS
Once connected through the
DAC
, delete existing nonclustered index definitions
from the system schema by running the following command:
DELETE
FROM sys.sysindexes
WHERE OBJECTPROPERTY (id, 'IsUserTable') = 1
AND indid > 1 AND indid < 255
Executing this command allows us to run the script generated in step 2 to re-create all
nonclustered indexes—but first we need to remove the
-m
startup parameter, restart
Figure 4 Adding the
-m
startup
parameter in SQL Server
Configuration Manager
Figure 5 Specifying the Dedicated
Administrator Connection using the SSMS
connection dialog box
Licensed to Kerri Ross <>
Please purchase PDF Split-Merge on www.verypdf.com to remove this watermark.
442
C
HAPTER
33
Efficient backups without indexes
the
SQL
Server, and add a new nonclustered index using the filegroup name specified
for the @NCIXFGName parameter in step 2.
STEP 6—REMOVE -M STARTUP PARAMETER AND RESTART SQL SERVER
To remove the
-m
startup parameter, follow the steps outlined in step 3 but remove
;
-m
from the Startup Parameters configuration before restarting the
SQL
Server
instance.
STEP 7—CREATE A NEW, RENAMED FILEGROUP
Once the
SQL
Server instance has been restarted in multi-user (normal) mode, a new
filegroup must be added prior to re-creating the database’s nonclustered indexes. This
is a two-step process; first we create the filegroup by executing the following command:
ALTER DATABASE BackupTest
ADD FILEGROUP NCIX_FG2;
Then, we add at least one file to the filegroup by executing the following command:
ALTER DATABASE BackupTest
ADD FILE (
NAME = N'NCIX_FG2_F1'
, FILENAME = N'C:\ NCIX_FG2_F1.ndf')
TO FILEGROUP NCIX_FG2;
NOTE
The name used for this new filegroup must match the name provided to
the parameter
@NCIXFGName
in step 2 because the script generated in step
2 will attempt to build nonclustered indexes into this filegroup when it is
run in step 8.
STEP 8—REBUILD NONCLUSTERED INDEXES IN THE NEW FILEGROUP
To re-create the nonclustered indexes in the new filegroup, connect to the database
using
SSMS
and execute the script created in step 2.
usp_Manage_NCIX_Filegroup
This utility stored procedure has been designed to simplify two tasks described in this
technique:
Move a large number of nonclustered indexes into a dedicated filegroup, as
part of reorganizing your database in preparation to perform
PRIMARY
(tables-
only) filegroup-based backups.
Generate a script to re-create nonclustered indexes during the restore process
if necessary.
The workflow of this stored procedure iterates over a database’s indexes, generating a
CREATE
INDEX
statement for each index, and either executes the statement (when
reorganizing the database in preparation for performing
PRIMARY
filegroup backups)
or prints the statement (to generate scripts for re-creating nonclustered indexes dur-
ing restore). The value supplied for the
@ScriptOnlyOrExecute
parameter defines
which behavior will occur. Supply
N'Execute'
to execute the scripts (moving the
Licensed to Kerri Ross <>
Please purchase PDF Split-Merge on www.verypdf.com to remove this watermark.
443
usp_Manage_NCIX_Filegroup
indexes into the filegroup named in the other parameter
@NCIXFGName
) or
N'Script'
to script out the
CREATE
INDEX
statements when restoring the database.
Note that slightly different
CREATE
INDEX
statements are generated when
N'Exe-
cute'
is supplied to the
@ScriptOnlyOrExecute
parameter. When
N'Execute'
is sup-
plied,
WITH
DROP_EXISTING
is appended to the
CREATE
INDEX
statement so that each
existing index remains in place while a new copy is being created in the new, dedi-
cated nonclustered index filegroup. In addition, the script identifies whether the edi-
tion of the
SQL
Server instance is Enterprise or Standard Edition and includes
WITH
ONLINE=ON
if Enterprise Edition is detected. The idea here is to cause minimal inter-
ruption to queries during reorganization of the database, with close to zero interrup-
tion if the Enterprise Edition of
SQL
Server is in use.
Here’s a sample usage. Move all nonclustered indexes into a newly created file-
group named '
NCIX_FG
':
EXEC usp_Manage_NCIX_FileGroup N'Exec', N'NCIX_FG'
As in listing 1, script out
CREATE
INDEX
statements into a newly created filegroup
named '
NCIX_FG2
'.
EXEC usp_Manage_NCIX_FileGroup N'Script', N'NCIX_FG2'
CREATE PROCEDURE [dbo].[usp_Manage_NCIX_FileGroup]
@ScriptOnlyOrExecute NVARCHAR(6) /* N'Script' or N'Exec' */
, @NCIXFGName NVARCHAR(255) /* the name new filegroup to move NCIXs into*/
AS
SET NOCOUNT ON
/*cursor variables*/
DECLARE @tnm NVARCHAR(128), @ixnm NVARCHAR(128), @cnm NVARCHAR(128)
, @schnm NVARCHAR(128), @isPK BIT, @isUn BIT, @isIncCol BIT
, @cixnm NVARCHAR(128), @ctbschnm NVARCHAR(256)
, @ixcr NVARCHAR(4000), @ixcnt INT, @indid INT, @order NVARCHAR(5)
, @inccols NVARCHAR(4000)
SELECT @ixcnt = 0, @cixnm = N'', @ctbschnm = N''
/*open cursor over schema / table / index / columns*/
DECLARE cr CURSOR FOR
SELECT ss.name, so.name, si.name, N'[' + sc.name + N']', is_primary_key
, CASE WHEN is_descending_key = 0 THEN N'' ELSE N' DESC' END
, is_included_column, si.index_id, is_unique
FROM sys.schemas ss
JOIN sys.objects so on ss.schema_id = so.schema_id
JOIN sys.indexes si on so.object_id = si.object_id
JOIN sys.index_columns ic ON si.object_id = ic.object_id
AND si.index_id = ic.index_id
JOIN sys.columns sc ON ic.object_id = sc.object_id
AND ic.column_id = sc.column_id
WHERE OBJECTPROPERTY (so.object_id, 'IsUserTable') = 1
AND si.index_id > 1 AND si.index_id < 255 /*only interested in NCIXs*/
ORDER BY ss.name, so.name, si.name, ic.index_column_id
/*order crucial for cursor logic*/
Listing 1 Scripting
CREATE
INDEX
commands to a new filegroup
Licensed to Kerri Ross <>
Please purchase PDF Split-Merge on www.verypdf.com to remove this watermark.
444
C
HAPTER
33
Efficient backups without indexes
OPEN cr
FETCH NEXT FROM cr INTO @schnm, @tnm, @ixnm, @cnm, @isPK, @order, @isIncCol,
@indid, @isUn
/*move over cursor, constructing & executing a
drop / create index statement per index*/
WHILE @@FETCH_STATUS = 0
BEGIN
IF @ixnm != @cixnm or (@schnm+@tnm != @ctbschnm) /*new index or table*/
BEGIN
/*if index, table or schema name changes, reinitialise*/
IF @schnm+@tnm != @ctbschnm SET @ctbschnm = @schnm+@tnm
SELECT @ixcnt = @ixcnt + 1
IF @ixcnt > 1
BEGIN
SELECT @ixcr = LEFT(@ixcr, LEN(@ixcr) - 2) + N')'
+ CASE WHEN LEN(@inccols) > 1 THEN N' INCLUDE ('
+ LEFT(@inccols, LEN(@inccols) - 2) + N')' ELSE N'' END
+ N' WITH (DROP_EXISTING = ON'
+ CASE WHEN SERVERPROPERTY('EngineEdition') = 3
THEN N', ONLINE = ON)' ELSE N')' END
+ N' ON [' + @NCIXFGName + ']'
/*execution of create NCIX in other FG occurs
on first row of NEXT index*/
PRINT @ixcr; IF @ScriptOnlyOrExecute = N'Exec' EXEC(@ixcr)
END
SELECT @cixnm = @ixnm, @inccols = ''
SET @ixcr = N'create ' + CASE WHEN @isUn = 1
THEN N'unique ' ELSE N'' END
+ N'nonclustered index [' + @ixnm + N'] on ['
+ @schnm + N'].[' + @tnm + N'] (' + @cnm + @order
+ N', '
END
ELSE
BEGIN
/*if same index, build key of included cols csv list*/
IF @isIncCol != 0 SET @inccols = @inccols + @cnm + N', '
ELSE SET @ixcr = @ixcr + @cnm + @order + N', '
END
FETCH NEXT FROM cr INTO @schnm, @tnm, @ixnm, @cnm, @isPK, @order,
@isIncCol, @indid, @isUn
END
/*should usually be one last index (assuming there were any)*/
IF @ixcnt > 1
BEGIN
SELECT @ixcr = LEFT(@ixcr, LEN(@ixcr) - 2) + N')'
+ CASE WHEN LEN(@inccols) > 1 THEN N' INCLUDE ('
+ LEFT(@inccols, LEN(@inccols) - 2) + N')' ELSE N'' END
+ N' WITH (DROP_EXISTING = ON'
+ CASE WHEN SERVERPROPERTY('EngineEdition') = 3
THEN N', ONLINE = ON)' ELSE N')' END
+ N' ON [' + @NCIXFGName + ']'
Licensed to Kerri Ross <>
Please purchase PDF Split-Merge on www.verypdf.com to remove this watermark.
445
Planning before moving NCIXs into a dedicated filegroup
PRINT @ixcr; IF @ScriptOnlyOrExecute = N'Exec' EXEC(@ixcr)
END
CLOSE cr ; DEALLOCATE cr
Note the following points about the preceding script:
The script iterates over all schemas and their user tables within the current
database, identifying all nonclustered indexes and generating a
CREATE
INDEX
..
WITH
DROP_EXISTING
ON
[NCIX_FG]
script for each index, which is then exe-
cuted dynamically to move each nonclustered index.
The script will not attempt to move tables. Heaps or clustered indexes are elim-
inated by the cursor query’s
WHERE
filter:
and si.index_id > 1 and si.index_id < 255"
Unique definitions, key order, and included columns are all also preserved, so
nonclustered indexes should be moved identically with their current definitions.
Each individual
CREATE
INDEX
statement is also printed, allowing easy review of
the commands that have been dynamically executed by the script.
Planning before moving NCIXs
into a dedicated filegroup
Using the usp_Manage_
NCIX
_FileGroup utility stored procedure makes moving all of
your database’s nonclustered indexes into a new, dedicated nonclustered index file-
group an easy process, but there are some important considerations that need to be
addressed before doing this.
Moving NCIXs temporarily requires additional disk space
As nonclustered indexes are moved into the new, dedicated nonclustered index file-
group, extra space needs to be consumed in the filesystem by the filegroup to allocate
new page extents to contain the moved nonclustered indexes.
At the same time, space is being freed within the
PRIMARY
filegroup (as each non-
clustered index is moved out to the new filegroup) but this space is not freed back to
the filesystem. Filegroup space is only returned to the filesystem if the filegroup’s files
are explicitly shrunk, using
DBCC
SHRINKFILE
. This doesn’t happen automatically, so
moving nonclustered indexes out of the
PRIMARY
filegroup to a new dedicated non-
clustered index filegroup will require consumption of more filesystem space.
How much more space is required depends on how much nonclustered index
data your database contains. The more nonclustered index data you have, the more
filesystem space you need for the new filegroup but the more space you will save in
your tables-only filegroup backups.
The amount of space consumed by nonclustered indexes can be roughly esti-
mated in
SQL
Server 2005 and
SQL
Server 2008 by running the following query:
SELECT SUM(page_count) * 8192.0 / 1048576 as NCIXs_Mb
FROM sys.dm_db_index_physical_stats(db_id(), NULL, NULL, NULL , 'LIMITED')
Licensed to Kerri Ross <>
Please purchase PDF Split-Merge on www.verypdf.com to remove this watermark.
446
C
HAPTER
33
Efficient backups without indexes
WHERE OBJECTPROPERTY (object_id, 'IsUserTable') = 1
AND index_id > 1 AND index_id < 255
Here is a similar query for
SQL
Server 2000:
SELECT SUM(dpages) * 8192.0 / 1048576 as NCIXs_Mb
FROM sysindexes
WHERE OBJECTPROPERTY (id, 'IsUserTable') = 1
AND indid > 1 AND indid < 255
Moving NCIXs creates empty space in PRIMARY filegroup
Once nonclustered indexes have been moved out of the
PRIMARY
filegroup to a new
dedicated nonclustered index filegroup, a significant amount of space will have been
freed within the
PRIMARY
filegroup.
This space can be returned to the filesystem by shrinking the filegroup’s files via
DBCC
SHRINKFILE
, but using this command will significantly fragment any clustered
indexes within the filegroup.
Another option is to add another dedicated filegroup for table storage (heaps
and clustered indexes), leaving the
PRIMARY
filegroup for system tables only. The
process of building this additional filegroup requires even more filesystem space, but
allows you to re-create the table storage structures within it without fragmenting
those structures. After completion of this step, you can shrink the
PRIMARY
filegroup
without significant impact.
Alternatively, you can leave the free space in the
PRIMARY
filegroup. A problem
with this approach is that restoring backups of the database in this state requires
equivalent filesystem space on the server the backup is being restored to. Given that
the
PRIMARY
filegroup contains a significant amount of empty space, this might cre-
ate difficulties in restoring backups on standby or development servers.
Log shipping
So what about combining this technique with log shipping and piecemeal restore?
Log shipping standby databases are typically initialized by restoring a full backup of
the primary database, and then continuously synchronized by performing regular
transaction log backups on the primary database, and restoring those transaction log
backups on the standby with
NORECOVERY
until the standby database needs to be
brought online.
It’s also possible to initialize a standby database by restoring a tables-only file-
group, then continuously synchronizing via a similar process —except that restora-
tion of log files on the standby utilizes
SQL
Server 2005’s new
piecemeal
restore
feature to include a
FILEGROUP
clause to the
RESTORE LOG
commands. Consider this
example:
RESTORE LOG StandbyDatabase
FILEGROUP = 'PRIMARY'
FROM DISK = 'E:\PrimaryDatabase_LogBackup_20090301090005.lbak'
WITH NORECOVERY
Licensed to Kerri Ross <>
Please purchase PDF Split-Merge on www.verypdf.com to remove this watermark.
447
Summary
Using the
FILEGROUP
clause directs the
RESTORE
command to ignore entries in the
transaction log that belong to the dedicated nonclustered index filegroup, only
restoring log entries that relate to tables (ignoring log entries that relate to nonclus-
tered indexes).
An advantage from combining this technique with log shipping and piecemeal
restore is that initialization of the log shipping standby database is faster because a
smaller tables-only filegroup backup only needs to be copied from the log shipping
primary server to the standby server and restored to the standby database. Unfortu-
nately, there’s no way to eliminate index-related transaction log entries from the log
backup files, so this technique does not solve the widespread problem of routine
index maintenance breaking log shipping systems.
On the other hand, it might be considered a disadvantage that this technique
complicates the process of bringing the standby database online in the event of a
failover requirement, as indexes also need to be rebuilt.
It’s important to point out that it’s also possible to continue using regular log
shipping (without piecemeal filegroup level restore) while still taking advantage of
the disk space, time, and energy savings from switching regular daily full database
backups to tables-only filegroup backups. Initializing log shipping in this scenario still
requires a full backup of the primary database, but this is still possible because full
database backups can still be taken—irrespective of whether tables and indexes have
been separated into separate filegroups or not.
In this mode of regular backups and log shipping, you can continue to take regu-
lar tables-only filegroup backups of the primary database while still fully restoring
transaction log backups against a standby database that has been initialized from a
full backup. If log shipping ever breaks, take an ad hoc full backup to re-initialize the
log shipping standby database.
Summary
You have much to gain from eliminating index data from backups by the method
described in this chapter. Reductions in disk space required to store backups, time
taken to process routine backups, and also energy consumed in the process, are all
real, tangible benefits.
As with many other technology choices, these advantages need to be weighed
against the inconvenience of a slightly more complex and time-consuming restore
process in the event that a database needs to be fully reconstructed from backup. In
many cases, though, restoration of backups is only performed for ad hoc extraction
of historical data, in which case using this technique makes the restoration process
faster, allowing quicker recovery of data.
Another benefit is that the reduction in size of backup files from this technique
also allows for more copies of historical backups to be maintained. Although this
might not be of significant value with smaller databases, with larger databases it could
Licensed to Kerri Ross <>
Please purchase PDF Split-Merge on www.verypdf.com to remove this watermark.
448
C
HAPTER
33
Efficient backups without indexes
make the difference between being able to store a second backup file rather than
only a single full database backup.
Perhaps Microsoft might consider including a feature that allows backups to be
taken of table data only, without requiring updates to the system schema, in a future
release of
SQL
Server. Such a feature might even extend to filtering log backups to
contain only table-related entries so that log shipping standby servers can be kept in a
tables-only state without needing to copy all transaction log entries (including unnec-
essary index entries) during log shipping.
Although some might consider the updates to system catalogs or increased time
required to restore a database as unacceptable, the benefits gained every day in disk
space, backup processing time, and energy saved should outweigh these issues in
many cases.
About the author
Greg Linwood is the Managing Director of MyDBA—a dedicated
SQL
Server support
business—and also Australian Director of SQLskills, a specialist provider of
SQL
Server training. Greg has worked in a range of developer and
DBA
capacities with
SQL
Server since 1993, and was the first Australian to receive Microsoft’s
SQL
Server
MVP
award in 2003. He has gained significant expertise in
SQL
Server tuning, and most of
his professional time is currently spent tuning customer
SQL
Server systems. Greg is
passionate about building high-quality
SQL
Server community events in Australia, and
is one of the founders of the Australian
SQL
Server User Group, leading the Mel-
bourne
SQL
Server User Group.
Licensed to Kerri Ross <>
Please purchase PDF Split-Merge on www.verypdf.com to remove this watermark.
449
34 Using database mirroring
to become a superhero!
Glenn Berry
This chapter covers how to use database mirroring not only to increase availability
in the traditional sense, but also for less common situations that are not typically
mentioned in the
SQL
Server documentation or literature. One example is using
database mirroring to seamlessly upgrade from
SQL
Server 2005 to
SQL
Server 2008
with a 10–15-second outage. Another example is using database mirroring to move
multiple terabytes of data from one storage system to another with a 10–15-second
outage. This chapter reveals these secret techniques.
Why should I use database mirroring?
SQL
Server 2005 introduced database mirroring, and
SQL
Server 2008 enhanced it.
Back in the pre-
SQL
Server 2005 days, you had several choices for high availability
solutions with
SQL
Server, including failover clustering, log shipping, and replica-
tion. In many situations, database mirroring offers key advantages over all older
technologies. It is simple to set up and administer, it offers fast automatic failover, it
works at the database level (rather than at the instance or table level), and it can be
used with commodity-level hardware.
Database mirroring offers fast failover (usually much faster than failover cluster-
ing), and automatic failover (unlike log shipping or replication). It also avoids the
single point of failure that you have with the shared storage in failover clustering.
In addition, it is much easier to administer than failover clustering (where adding
and removing drives can be pretty painful, for example).
How does database mirroring work?
If you are unfamiliar with how database mirroring works, here is a quick primer.
You have one user database, which must be running with the
FULL
recovery
model, which is called the principal. The principal is available for client connec-
tions, and does most of the work. You also have a complete, synchronized copy of
Licensed to Kerri Ross <>
Please purchase PDF Split-Merge on www.verypdf.com to remove this watermark.
450
C
HAPTER
34
Using database mirroring to become a superhero!
that database (which must be running on another
SQL
Server instance, preferably on
another server). The copy, known as the mirror, is not available for client connections.
Optionally, if you want automatic failover, you have a third instance of
SQL
Server,
hopefully on its own server, which is the witness. The witness can run on older hard-
ware, and it can be
SQL
Server Express Edition. Its job is to help determine when a
failover is required, by communicating with the principal and mirror. One witness
instance can be used for multiple principal/mirror pairs if needed, because the wit-
ness is not doing intense work, and it can also be used as a Central Management
Server with
SQL
Server 2008.
All of the write activity on the principal (including
DDL
and
DML
) is sent over your
network to the mirror, where it is replayed on the mirror. Depending on how your
database mirroring is configured, this may be happening synchronously or asynchro-
nously. You must be running in high-safety mode (synchronous) with a witness, to
allow automatic failover. If you are running Enterprise Edition of
SQL
Server, you can
run in high-performance mode (asynchronous), which does not allow automatic
failover, but can still be useful for many situations.
With database mirroring, you have two complete copies of your data, which can be
a good thing. Failover clustering uses shared, external storage, usually a storage area
network (
SAN
), where drives are owned by a particular node in the cluster. Shared stor-
age is a common single point of failure. If unavailable, the cluster service will not start,
and
SQL
Server will not start on the cluster.
From a storage perspective, having a second copy of the data with the mirror can
be expensive, but it protects you from the single point of failure you have with a
failover cluster (assuming the mirror database is on a different storage system than
the principal database). This second copy of your data is ready to go after recovery has
completed. The mirror database can be available much faster than a database
restored from backups or
SAN
snapshots. As a
DBA
responsible for multiple, mission-
critical databases, having the databases mirrored gives me additional peace of mind,
because the mirrors represent additional copies of the data, over and above my nor-
mal backups and
SAN
snapshots.
How do you set up database mirroring?
You have several ways to do this, depending on your objectives, available infrastruc-
ture, and budget. You should invest sufficient time and resources in testing your infra-
structure (including server and network hardware) to make sure it can handle your
anticipated workload reliably. Make sure you have enough disk space available to
accommodate possible log file growth if you encounter temporary issues with the mir-
roring session.
If you need or want a robust, high availability solution with automatic failover and
the ability to run comfortably on the mirror server for an extended period, consider
using these best practices.
Make sure that both the principal and mirror have identical hardware:
Licensed to Kerri Ross <>
Please purchase PDF Split-Merge on www.verypdf.com to remove this watermark.
451
How do you set up database mirroring?
Server model
Number and types of
CPU
s
Amount of
RAM
Amount of
I/O
capacity, space, and
RAID
level on separate storage devices
Using best practices is important to ensure that the mirror can keep up during nor-
mal operation and especially when you do log-intensive operations like index rebuilds
or reorganizations. This will also ensure that you can comfortably run your workload
on the mirror hardware for an extended period.
Make sure that both the principal and mirror are running a 64-bit version of Win-
dows Server 2008 or better. Windows Server 2008 R2 will be 64-bit only; and it is likely
that the next version after
SQL
Server 2008 will be 64-bit only; therefore, time is run-
ning out on the 32-bit era. Improved memory management alone is a great reason to
switch to a 64-bit version.
You should choose a 64-bit version of the Enterprise Edition of
SQL
Server 2008,
because Enterprise Edition has several valuable enhancements (such as parallel log
restore and log stream compression) that are important for database mirroring.
SQL
Server 2008 native backup compression is helpful when you are initially setting up a
mirror, because your backups and restores will be smaller and will usually complete
more quickly. The compressed backup files will be easier to move from the principal
to the mirror (because they are smaller).
SQL
Server 2008 also offers automatic page
repair for database mirroring.
SQL
Server 2005 database mirroring also works well,
although it lacks the enhancements that were added in
SQL
Server 2008.
Both sides of the partnership should be running the same build of
SQL
Server, that
is, the same Service Pack and Cumulative Update level. If you want automatic failover,
you must have a witness instance, which should be on the same build of
SQL
Server as
the principal and mirror.
You also should standardize on common drive sizes, drive letters, and paths for cer-
tain
SQL
Server uses, such as data files, transaction logs, tempdb, backups, and so on.
For example, you might decide to use P:, Q:, R:, and S: for data files; L: for your trans-
action log; T: for tempdb; and G: and H: for database backups, for both the principal
and mirror sides of the mirroring partnership. This is important, because if you
decide to add a new data file to your principal, the G: drive, for example, but there is
no identical drive letter and path on the mirror, your database mirroring state will be
suspended (and the transaction log will not be truncated) until you correct the situa-
tion. Backup drives should also have the same drive letters, because if you end up run-
ning on the mirror hardware for an extended period, you would want to be running
your normal full and transaction log backup routine on the mirror side (which is now
the principal). Having identical drive letters and paths makes this much easier. Even
though tempdb cannot be mirrored, you still should include it in your drive letter
standardization efforts, for consistency’s sake, because that will help you make sure
that both instances are configured identically.
Licensed to Kerri Ross <>
Please purchase PDF Split-Merge on www.verypdf.com to remove this watermark.