Tài liệu Lab 1.2.3 Review of Basic Router Configuration with RIP doc
Bạn đang xem bản rút gọn của tài liệu. Xem và tải ngay bản đầy đủ của tài liệu tại đây (210.82 KB, 10 trang )
1 - 10 CCNA 3: Switching Basics and Intermediate Routing v 3.0 - Lab 1.2.3 Copyright 2003, Cisco Systems, Inc.
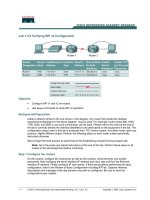
Lab 1.2.3 Review of Basic Router Configuration with RIP
Objective
• Cable and configure workstations and routers
• Setup IP addressing scheme using Class B networks
• Configure Routing Information Protocol (RIP) on routers
Background / Preparation
Cable a network similar to the one shown in the diagram. Any router that meets the interface
requirements displayed on the above diagram may be used. For example, router series 800, 1600,
1700, 2500 and 2600 or any such combination can be used. Please refer to the chart at the end of
the lab to correctly identify the interface identifiers to be used based on the equipment in the lab. The
configuration output used in this lab is produced from 1721 series routers. Any other router used may
produce slightly different output. Perform the following steps on each router unless specifically
instructed otherwise.
Note: Go to the erase and reload instructions at the end of this lab. Perform those steps on all
routers in this lab assignment before continuing.
General Configuration Tips
a. Use the question mark (?) and arrow keys help to enter commands.
b. Each command mode restricts the set of available commands. If there is difficulty entering a
command, check the prompt and then enter the question mark (?) for a list of available
commands. The problem might be a wrong command mode or using the wrong syntax.
c. To disable a feature, enter the keyword no before the command; for example, no ip routing.
2 - 10 CCNA 3: Switching Basics and Intermediate Routing v 3.0 - Lab 1.2.3 Copyright 2003, Cisco Systems, Inc.
d. Save the configuration changes to NVRAM so that the changes are not lost if there is a system
reload or power outage.
Router Command Modes
Command Mode Access Method
Router Prompt
Displayed
Exit Method
User EXEC Log in.
Router>
Use the logout
command.
Privileged EXEC From user EXEC mode, enter
the enable command.
Router#
To exit to user EXEC
mode, use the
disable, exit, or
logout command.
Global configuration From the privileged EXEC
mode, enter the configure
terminal command.
Router(config)#
To exit to privileged
EXEC mode, use the
exit or end
command, or press
Ctrl-z.
Interface configuration From the global configuration
mode, enter the interface
type number command, such
as interface serial 0.
Router(config-
if)#
To exit to global
configuration mode,
use the exit
command.
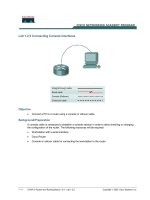
Step 1 Basic router configuration
Connect a rollover cable to the console port on the router and the other end to the PC with a DB9 or
DB25 adapter to a COM port. This should be completed prior to powering on of any devices.
Step 2 Start HyperTerminal program
a. Turn on the computer and router.
b. From the Windows taskbar, locate the HyperTerminal program:
Start > Programs > Accessories > Communications > HyperTerminal
3 - 10 CCNA 3: Switching Basics and Intermediate Routing v 3.0 - Lab 1.2.3 Copyright 2003, Cisco Systems, Inc.
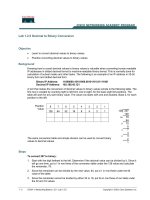
Step 3 Name the HyperTerminal Session
a. At the “Connection Description” popup, enter a name in the connection Name: field and select
OK.
Step 4 Specify the computer connecting interface
a. At the “Connect To” popup, use the drop down arrow in the Connect using: field to select COM1
and select OK.
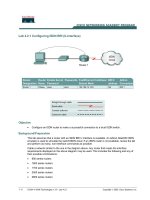
Step 5 Specify the interface connection properties
a. At the “COM1 Properties” popup, use the drop down arrows to select:
Bits per second: 9600
Data bits: 8
Parity: None
Stop bits: 1
Flow control: none
b. Then select OK.
4 - 10 CCNA 3: Switching Basics and Intermediate Routing v 3.0 - Lab 1.2.3 Copyright 2003, Cisco Systems, Inc.
c. When the HyperTerminal session window comes up, turn on the router or if router is already on
and press the Enter key. There should be a response from the router.
If the router responds, then the connection has been successfully completed.
Step 6 Closing the Session
a. To end the console session from a HyperTerminal session, select:
File > Exit
b. When the HyperTerminal disconnect warning popup appears. Select Yes.
5 - 10 CCNA 3: Switching Basics and Intermediate Routing v 3.0 - Lab 1.2.3 Copyright 2003, Cisco Systems, Inc.
c. The computer will then ask if the session is to be saved. Select Yes.
Step 7 Reopen the HyperTerminal connection, as shown in Step 2
a. At the “Connection Description” popup, select Cancel.
b. To open the saved console session from HyperTerminal, select:
File > Open
c. The saved session will now appear and by double-clicking on the name, the connection will open
without reconfiguring it each time.
Step 8 Configure the hostname and passwords on the router Gadsden
a. Enter enable at the user mode prompt.
Router>enable
Router#configure terminal
Router(config)#hostname GAD
GAD(config)#enable password cisco
GAD(config)#enable secret class
GAD(config)#line console 0
GAD(config-line)#password cisco
GAD(config-line)#login
GAD(config-line)#line vty 0 4