Tài liệu Creating and Managing Microsoft .NET Remoting Objects pptx
Bạn đang xem bản rút gọn của tài liệu. Xem và tải ngay bản đầy đủ của tài liệu tại đây (536.69 KB, 53 trang )
4
Creating
and Managing
Microsoft .NET
Remoting Objects
CERTIFICATION OBJECTIVES
4.01 Overview of .NET Remoting
4.02 Create a .NET Remoting Object
Using a TCP Channel
4.03 Create a .NET Remoting Object
Using an HTTP Channel
4.04 Client-Activated Objects
4.05 Asynchronous Methods
✓
Two-Minute Drill
Q&A
Self Test
CertPrs8 / MCAD/MCSD XML Web Services and Server Components Development with Visual Basic .NET / Lind / 222653-6 /
Chapter 4
P:\010Comp\CertPrs8\653-6\ch04.vp
Wednesday, October 30, 2002 9:42:51 AM
Color profile: Generic CMYK printer profile
Composite Default screen
2
Chapter 4: Creating and Managing Microsoft .NET Remoting Objects
CertPrs8 / MCAD/MCSD XML Web Services and Server Components Development with Visual Basic .NET / Lind /
222653-6 / Chapter 4
I
n this chapter, you will explore the distributed object system called .NET Remoting that is
built into the .NET Framework. The short description of .NET Remoting is that it enables
you to interact with software objects that are running under the Common Language
Runtime on a remote host on the network as if it were a local software object running in the
same Common Language Runtime.
CERTIFICATION OBJECTIVE 4.01
Overview of .NET Remoting
The process for using software components (objects) was traditionally one where
you as a developer had to code the location of the component and how you were
to use that component. There are two distinct ways to use a component in an
application—in process and out of process. In process is when a component is
executing inside the same application domain as the application that is using the
component. All calls to the component are local to the application. Out of process
is when the component is located in a different execution process, either on the l
ocal host or on a remote host. The client application uses a proxy component that
encapsulates the out-of-process component.
The system called .NET Remoting is the .NET Framework’s method for providing
built-in support for out-of-process components. In this section, you will learn about the
building blocks of .NET Remoting—server objects, the channel formatter, well-known
objects, and how to register the objects as well as the application communication.
The exam will test your knowledge on how to design, build, configure, and use
.NET remote software components. The language that is used in the exam is Visual
Basic .NET, but the questions are focused on the concepts rather than on the language.
Communication Issues
The process that a .NET application executes in is called an application domain. The
boundaries of this application domain are such that the application cannot access
any resources directly through that boundary.
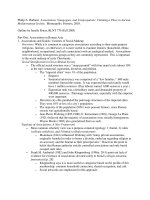
In order for an application located in one application domain to communicate
with another application in a separate application domain, there must be some
communications facility between the two applications, as you can see in Figure 4-1
P:\010Comp\CertPrs8\653-6\ch04.vp
Wednesday, October 30, 2002 9:42:51 AM
Color profile: Generic CMYK printer profile
Composite Default screen
The problem with the architecture in Figure 4-1 is that the developer must fully
define the communication and thus know at design time where the remote object is
located and how the network is configured to allow for communication. The first
attempt to solve this communications dilemma was to define a protocol that
allowed two processes to communicate through process boundaries. The generic
name for this protocol is Remote Procedure Call (RPC), and there are a number
of implementations of the RPC protocol. Microsoft uses Distributed Component
Object Model (DCOM) to refer to their version, for example, but DCOM is not
compatible with the RPC used by CORBA.
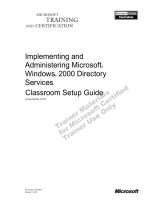
DCOM uses a proprietary binary protocol to communicate between the different
processes. To alleviate the need for the developer to know the communication code,
DCOM uses a proxy in the client process that encapsulates the remote process and a
stub in the server process that encapsulates the client—the proxy and stub are classes
that encapsulate the networking code. In Figure 4-2, you can see where the proxy
and stub are inserted.
Overview of .NET Remoting
3
CertPrs8 / MCAD/MCSD XML Web Services and Server Components Development with Visual Basic .NET / Lind / 222653-6 /
Chapter 4
FIGURE 4-1
Communication between two application domains
P:\010Comp\CertPrs8\653-6\ch04.vp
Wednesday, October 30, 2002 9:42:51 AM
Color profile: Generic CMYK printer profile
Composite Default screen
DCOM is a very secure protocol, but it is also proprietary and closed, making
DCOM a Microsoft-only protocol that is tied to the Windows operating system.
DCOM uses a number of TCP/IP ports in order to work and thus poses a security
threat if DCOM is used through a firewall, because those extra ports will have to
enabled in the firewall.
The answer to these issues (proprietary nature, and security) is to use standard
protocols that can be used securely on the Internet for the communication. That is
what .NET Remoting uses for communication. In Table 4-1, you can see how .NET
Remoting and DCOM compare.
You can expect to need to know some things about DCOM for the exam,
such as determining what is the best technology to use in a given situation.
Remember that DCOM needs multiple ports open on the firewall for access
on the Internet.
4
Chapter 4: Creating and Managing Microsoft .NET Remoting Objects
CertPrs8 / MCAD/MCSD XML Web Services and Server Components Development with Visual Basic .NET / Lind /
222653-6 / Chapter 4
FIGURE 4-2
The DCOM model
P:\010Comp\CertPrs8\653-6\ch04.vp
Wednesday, October 30, 2002 9:42:52 AM
Color profile: Generic CMYK printer profile
Composite Default screen
Overview of .NET Remoting
5
CertPrs8 / MCAD/MCSD XML Web Services and Server Components Development with Visual Basic .NET / Lind / 222653-6 /
Chapter 4
The .NET Remoting Architecture
The objects (building blocks) that are used in the .NET Remoting architecture
appear in the following list:
■
Server object Located at the server, provides the service to the client.
■
Channel Connects the server and the client. Used to send request messages
from the client and response messages from the server.
■
Formatter Performs the encoding and decoding of the messages sent
between client and server.
■
Registration of well-known objects The server object is registered to make
it known on the network.
■
Configuration of remoting The server object can also be made known on
the network by configuration at the client rather than through registration.
■
Activation The client activates the server object.
In the following sections, you will learn more about these objects.
Server Object
Before you start coding the server object, you need to determine how the server
object will be marshaled during its remoting. The term marshal refers to the process
.NET Remoting DCOM
No built-in security—relies on other components
to provide the security.
DCOM is secure and can use encrypted
transmissions.
There is a many-to-one relationship between
clients and the server.
There is a one-to-one relationship between client
and server.
Open architecture that can be expanded and
extended at will.
Closed architecture.
The client manages the lifetime of the server. The server manages its own life-time—resulting in
the server having to ask the client if it can unload.
TABLE 4-1
.NET Remoting Versus DCOM
P:\010Comp\CertPrs8\653-6\ch04.vp
Wednesday, October 30, 2002 9:42:52 AM
Color profile: Generic CMYK printer profile
Composite Default screen
6
Chapter 4: Creating and Managing Microsoft .NET Remoting Objects
CertPrs8 / MCAD/MCSD XML Web Services and Server Components Development with Visual Basic .NET / Lind /
222653-6 / Chapter 4
of packaging up method calls, with parameters and return values, and passing them
across process boundaries. You can select from one of the two marshaling methods—
by reference and by value. You use the by reference method when you want to send a
reference to the object rather than a copy of the object to the client. By value is the
opposite—a copy of the object is sent to the client.
Many server objects cannot or should not be copied and moved to some other
process for execution. Extremely large objects with many methods can be poor
choices for copying, or passing by value, to other processes. Usually, a client needs
only the information returned by one or a few methods on the server object.
Copying the entire server object, including what could be vast amounts of internal
information or executable structures unrelated to the client’s needs, would be a waste
of bandwidth as well as of client memory and processing time. In addition, many
objects expose public functionality but require private data for internal execution.
Copying these objects could enable malicious clients to examine internal data,
creating the potential for security problems. Finally, some objects use data that
simply cannot be copied in any understandable way. A FileInfo object, for example,
contains a reference to an operating system file, which has a unique address in the
server process’s memory. You can copy this address, but it will never make sense in
another process.
The alternative is that the server process passes the client process a reference to the
server object, not a copy of the object. Clients can use this reference to call the server
object. These calls do not execute in the client process. Instead, the remoting system
collects all information about the call and sends it to the server process (marshals),
where the call is made to the server object on the client’s behalf. The result of the
call is then sent back to the client. Thus, resources are used for only the critical
information—the call, call arguments, and any return values or exceptions.
Remember that operating system resources should always be marshaled
by reference.
To configure the server object to be marshaled by reference, your class inherits
from System.MarshalByRefObject.
Public Class RemoteHello
Inherits MarshalByRefObject
P:\010Comp\CertPrs8\653-6\ch04.vp
Wednesday, October 30, 2002 9:42:52 AM
Color profile: Generic CMYK printer profile
Composite Default screen
...
End Class
To select the marshal by value model, the class does not inherit from
System.MarshalByRefObject, as in this example.
Public Class RemoteHello
...
End Class
If the remote class is not derived from
MarshalByRefObject
, the object
will be passed by value.
Channel
Applications in the .NET Framework communicate using either HTTP or TCP
channels. When a client calls a method on a remote object, the parameters as
well as other details related to the call are transported through the channel to the
remote object.
The HTTP channel uses the SOAP protocol to pass messages between the client
and the server. These are the features of the HTTP channel:
■
It provides communication between client and server using the HTTP
protocol.
■
It provides encoding of data in SOAP.
■
The server receives HTTP requests and sends HTTP responses in ASP.NET
and on a TCP socket (port 80 by default).
■
It opens by default a maximum of two concurrent connections on the server.
This number can be adjusted.
The TCP channel uses a binary stream to pass SOAP-encoded messages between
client and server; these are the features of the TCP channel:
It provides communication between client and server using the TCP protocol.
■
It provides encoding of data in a binary stream and SOAP.
■
It opens as many connections as there are threads.
Overview of .NET Remoting
7
CertPrs8 / MCAD/MCSD XML Web Services and Server Components Development with Visual Basic .NET / Lind / 222653-6 /
Chapter 4
P:\010Comp\CertPrs8\653-6\ch04.vp
Wednesday, October 30, 2002 9:42:52 AM
Color profile: Generic CMYK printer profile
Composite Default screen
8
Chapter 4: Creating and Managing Microsoft .NET Remoting Objects
CertPrs8 / MCAD/MCSD XML Web Services and Server Components Development with Visual Basic .NET / Lind /
222653-6 / Chapter 4
If you are developing a number of applications using .NET Remoting, it is
easy to make the mistake of using an HTTP Channel to connect to a server
application domain that listens with a TCP Channel. If you do, the client will
receive the following exception: “The underlying connection was closed: An
unexpected error occurred on a receive.” If you receive this exception, you
should check for mismatched channels.
To support the channels, you will need to import the namespace System.Runtime
.Remoting.Channels, as well as one of the following namespaces: for the HTTP
channel, System.Runtime.Remoting.Channels.Http, or for the TCP channel,
System.Runtime.Remoting.Channels.Tcp.
To use a channel, you need to create an object based on the channel object, as in
this example for a TCP channel:
Imports System.Runtime
Imports System.Runtime.Remoting
Imports System.Runtime.Remoting.Channels.Tcp
...
Dim chan as TCPChannel
chan = new TCPChannel()
You then register the channel using the
System.Runtime.Remoting.ChannelServices.RegisterChannel() method as in
this example:
...
ChannelServices.RegisterChannel(chan)
...
The equivalent code for an HTTP channel is as follows:
Imports System.Runtime
Imports System.Runtime.Remoting
Imports System.Runtime.Remoting.Channels.Http
...
Dim chan as HTTPChannel
chan = new HTTPChannel()
ChannelServices.RegisterChannel(chan)
P:\010Comp\CertPrs8\653-6\ch04.vp
Wednesday, October 30, 2002 9:42:53 AM
Color profile: Generic CMYK printer profile
Composite Default screen
Overview of .NET Remoting
9
CertPrs8 / MCAD/MCSD XML Web Services and Server Components Development with Visual Basic .NET / Lind / 222653-6 /
Chapter 4
Formatter
The role of the formatter is to encode and decode the messages that are sent between
the client and the server on the channel. Some default formatters are based on the
channel that is selected, as is shown in Table 4-2.
The SOAP formatter is found in the following class:
System.Runtime.Serialization.Formatters.SOAP.SoapFormatter.
And the binary formatter is found here:
System.Runtime.Serialization.Formatters.Binary.BinaryFormatter.
Registration of Well-Known Objects
The server object needs to be known to the network, and that task is performed by
calling the RegisterWellKnownServiceType() method of System.Runtime
.RemotingConfiguration. This method is called with information about the server
object as the parameters, as you can see in the following code segment:
RemotingConfiguration.RegisterWellKnownServiceType(Type.GetType
_
("RemotingSamples.HelloServer, object"), "SayHej", _
WellKnownObjectMode.SingleCall)
After calling RegisterWellKnownServiceType(), the server object should wait for a
request from a client, a blocking call.
Channel Default Formatter
HTTP SOAP
TCP Sockets
TABLE 4-2
The Default Formatters
P:\010Comp\CertPrs8\653-6\ch04.vp
Wednesday, October 30, 2002 9:42:53 AM
Color profile: Generic CMYK printer profile
Composite Default screen
10
Chapter 4: Creating and Managing Microsoft .NET Remoting Objects
CertPrs8 / MCAD/MCSD XML Web Services and Server Components Development with Visual Basic .NET / Lind /
222653-6 / Chapter 4
Configuration of Remoting
An alternative to using the preceding method is to use a text file that contains the
information on where the server object can be found. The following example shows
the structure of the configuration file that is used by the server object:
Name#<Application_Name>
WellKnownObject#<Full_Type_Name>#<Assembly_Name>#<Full_Type>
#<Activation_Mode>
Channel#<Channel_Assembly_Name>#<Channel_Full_type_name>
#[Port=<port_number>]
The Server calls the method
System.Runtime.Remoting.RemotingServices.RemotingConfiguration.Configure()
passing the name of the configuration file to the method. The server should now
wait for a request from the client.
The client program can also use the same method to control where the server
object can be found. The following configuration file is used by the client:
Name#<application_name>
Assembly#<Assembly_Name>#<Remote_Application_Name>
#<Full_Type_Name>=<Object_URI>
RemoteApplication#<Remote_Application_Name>#<Remote_Application_URI>
Channel#<Channel_Assembly_Name>#<Channel_Full_type_Name>
#[port-<Port_Number>]
At this point, the client application is all set to call the server application.
Activation
The server object has two distinct ways of being activated—SingleCall and
Singleton. These activation modes can be defined as follows:
■
SingleCall mode This mode creates a new instance of the server object for
every client connection. Use this mode for server objects that don’t share data.
■
Singleton mode This mode is where one server object is used by all clients.
The Singleton mode is used when the data is to be shared between all clients.
The client application uses the System.Activator.GetObject() method to get a proxy
that represents the remote object. The same call is used for both the Singleton and
SingleCall modes. The Type parameter indicates the activation type of the remote object,
and the URL is the location of the object as shown in the following code segment:
System.Activator.GetObject(Type, URL)
P:\010Comp\CertPrs8\653-6\ch04.vp
Wednesday, October 30, 2002 9:42:53 AM
Color profile: Generic CMYK printer profile
Composite Default screen
Overview of .NET Remoting
11
CertPrs8 / MCAD/MCSD XML Web Services and Server Components Development with Visual Basic .NET / Lind / 222653-6 /
Chapter 4
A second way of activating the remote object is to use the System.Activator
.GetInstance() method. The client must be configured for this practice to work.
Given that the client is configured to use the remoting object RemHello, the remote
object can be activated using either of the following lines:
remObj As RemHello = new RemHello()
or
remObj = System.Activator.GetInstance(TypeOf RemHell)
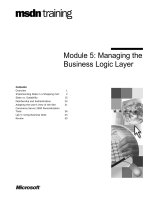
Now put it all together so that you can see how all these parts fit in the .NET
Remoting architecture. Figure 4-3 shows you how the parts interact.
The proxy that is located in the client environment is also called a transparent
proxy because the client process is not aware that the method calls to the remote
object actually pass through the proxy. The transparent proxy looks exactly like the
remote object to the client application. There is a real proxy (called the RealProxy)
that actually performs the communication between the client and the server. In
Figure 4-4, you can see the different objects and their communication.
FIGURE 4-3
The .NET Remoting Interactions
P:\010Comp\CertPrs8\653-6\ch04.vp
Wednesday, October 30, 2002 9:42:53 AM
Color profile: Generic CMYK printer profile
Composite Default screen
That is all the theory about .NET Remoting. Now you are going to create a
couple of remote servers and then consume them.
CERTIFICATION OBJECTIVE 4.02
Create a .NET Remoting Object Using a
TCP Channel
Start by building a Hello World .NET Remoting server—this particular server will
use a TCP channel.
12
Chapter 4: Creating and Managing Microsoft .NET Remoting Objects
CertPrs8 / MCAD/MCSD XML Web Services and Server Components Development with Visual Basic .NET / Lind /
222653-6 / Chapter 4
FIGURE 4-4
The remoting communication process
P:\010Comp\CertPrs8\653-6\ch04.vp
Wednesday, October 30, 2002 9:42:53 AM
Color profile: Generic CMYK printer profile
Composite Default screen
EXERCISE 4-1
A .NET Remoting Server Using a TCP Channel
This exercise is built using a text editor and the command-line compiler for
Visual Basic .NET.
1.
Open the Visual Studio .NET command prompt from Start | Programs |
Microsoft Visual Studio .NET | Microsoft Visual Studio .NET Tools | Visual
Studio .NET Command Prompt.
2.
Change to the VB directory on the C: drive.
Setting environment for using Microsoft Visual Studio .NET tools.
(If you also have Visual C++ 6.0 installed and wish to use its tools
from the command line, run vcvars32.bat for Visual C++ 6.0.)
C:\>cd \VB
C:\VB>
3.
Create a new directory named Hello and change to that directory.
C:\VB>md Hello
C:\VB>cd Hello
C:\VB\Hello>
4.
Using your favorite editor (Notepad is used in this example), create a Visual
Basic .NET source file named HelloObj.vb. When you are prompted to
create a new file, click Yes.
C:\VB\Hello>Notepad HelloObj.vb
5.
Create the remote object by defining a new class as follows:
' HelloObj.vb
Imports System
Namespace HelloWorld
Public Class HelloServer
Inherits MarshalByRefObject
' The constructor only writes something on the console
Public Sub New()
' Uncomment the following line to see diagnostics
' System.Console.WriteLine("Building Hello...")
End Sub
CertPrs8 / MCAD/MCSD XML Web Services and Server Components Development with Visual Basic .NET / Lind / 222653-6 /
Chapter 4
Create a .NET Remoting Object Using a TCP Channel
13
CertPrs8 / MCAD/MCSD XML Web Services and Server Components Development with Visual Basic .NET / Lind / 222653-6 /
Chapter 4
P:\010Comp\CertPrs8\653-6\ch04.vp
Wednesday, October 30, 2002 9:42:54 AM
Color profile: Generic CMYK printer profile
Composite Default screen
' This is where we do some work greeting our caller
Public Function HelloMethod(str As String) As String
' Uncomment the following line to see diagnostics printed
' Print diagnostics on the console
' Console.WriteLine("Saying Heja to " + str)
' Return the greeting to the client
Return "Hello " + str + " nice to see you in my World!"
End Function
End Class
End Namespace
The class contains a default constructor and one method (HelloMethod())
that takes a String as a parameter and returns a String to the caller. The
String returned is a greeting with the String parameter concatenated into it.
6.
Save the HelloObj.vb source file.
7.
Compile the source file into a library using the vbc.exe command-line
compiler.
C:\VB\Hello>vbc /t:library HelloObj.vb
Microsoft (R) Visual Basic .NET Compiler version 7.00.9466
for Microsoft (R) .NET Framework version 1.00.3705.209
Copyright (C) Microsoft Corporation 1987-2001. All rights reserved.
C:\VB\Hello>
The result is that a library (HelloObj.dll) is created in the C:\VB\Hello directory.
I have commented out the two lines that write diagnostics in the console. You would
uncomment those lines (and recompile) to see what is going on.
EXERCISE 4-2
Build the Remote Server
The next step is to build the remote server that will use our HelloObj.dll library
to give us HelloWorld functionality:
1.
Open the Visual Studio .NET Command Prompt.
2.
Navigate to the C:\VB\Hello directory.
3.
Using you favorite editor, create a new Visual Basic .NET source file, named
HelloServer.vb.
4.
Enter the following code in the HelloWorld.vb source file:
14
Chapter 4: Creating and Managing Microsoft .NET Remoting Objects
CertPrs8 / MCAD/MCSD XML Web Services and Server Components Development with Visual Basic .NET / Lind /
222653-6 / Chapter 4
P:\010Comp\CertPrs8\653-6\ch04.vp
Wednesday, October 30, 2002 9:42:54 AM
Color profile: Generic CMYK printer profile
Composite Default screen
' HelloServer.vb
Imports System
Imports System.Runtime.Remoting
Imports System.Runtime.Remoting.Channels
Imports System.Runtime.Remoting.Channels.Tcp
Namespace HelloWorld
Public Class RemoteHello
<STAThread> _
Public Shared Sub Main()
' Declare and create the channel object
Dim chan As TcpServerChannel
' Make the TCP channel wait on port 4242
chan = New TcpServerChannel(4242)
' Register the channel
channelServices.RegisterChannel(chan)
' Register the Remote object
RemotingConfiguration.RegisterWellKnownServiceType( _
Type.GetType("HelloWorld.HelloServer, HelloObj"), _
"SayHello", WellKnownObjectMode.Singleton)
' We must wait here, so ask the user to press the any key
Console.WriteLine("Press <enter> to stop the server.......")
Console.ReadLine()
End Sub
End Class
End Namespace
The code that performs the work here is the line
chan = New TcpServerChannel(4242)
that defines the port to be 4242 and then registers the channel
channelServices.RegisterChannel(chan)
and registers the server by calling
RemotingConfiguration.RegisterWellKnownServiceType( _
Type.GetType("HelloWorld.HelloServer, HelloObj"), _
SayHello", WellKnownObjectMode.Singleton)
5.
Compile the server using the following command-line compile command.
vbc /r:System.Runtime.Remoting.dll /r:HelloObj.dll HelloServer.vb
Create a .NET Remoting Object Using a TCP Channel
15
CertPrs8 / MCAD/MCSD XML Web Services and Server Components Development with Visual Basic .NET / Lind / 222653-6 /
Chapter 4
P:\010Comp\CertPrs8\653-6\ch04.vp
Wednesday, October 30, 2002 9:42:54 AM
Color profile: Generic CMYK printer profile
Composite Default screen
Visual Basic .NET requires that the libraries that are part of the application be
added on the command line. This way, the Server application is correctly compiled.
If you want to see the server in action, you can execute it from the command line
at this point; it will not do anything except prompt us to press
ENTER
to exit. Go
ahead and exit from the server now.
Next you need a client application that uses the .NET Remoting server.
EXERCISE 4-3
Build a Client Application Using a TCP Channel
The client application is built in the same directory as the server:
1.
Open a Visual Studio .NET command prompt.
2.
Navigate to the C:\VB\Hello folder.
3.
Using your favorite editor, create a new Visual Basic .NET source file and
call it HelloClient.vb.
4.
Enter the following code in the source file:
Imports System
Imports System.Runtime.Remoting
Imports System.Runtime.Remoting.Channels
Imports System.Runtime.Remoting.Channels.TCP
Namespace HelloWorld
Public Class Client
Shared Sub Main
Dim chan As New TCPChannel()
ChannelServices.RegisterChannel(chan)
Dim obj As HelloServer
obj = CType(Activator.GetObject(Type.GetType _
("HelloWorld.HelloServer,HelloObj"), _
"tcp://localhost:4242/SayHello"),
HelloServer)
If obj Is Nothing Then
System.Console.WriteLine("Could not locate server")
Else
Console.WriteLine(obj.HelloMethod("Kornette"))
End If
End Sub
16
Chapter 4: Creating and Managing Microsoft .NET Remoting Objects
CertPrs8 / MCAD/MCSD XML Web Services and Server Components Development with Visual Basic .NET / Lind /
222653-6 / Chapter 4
P:\010Comp\CertPrs8\653-6\ch04.vp
Wednesday, October 30, 2002 9:42:54 AM
Color profile: Generic CMYK printer profile
Composite Default screen
Create a .NET Remoting Object Using a TCP Channel
17
CertPrs8 / MCAD/MCSD XML Web Services and Server Components Development with Visual Basic .NET / Lind / 222653-6 /
Chapter 4
End Class
End Namespace
5.
Build the client application by running the following command-line
compiler.
vbc /r:System.Runtime.Remoting.dll /r:HelloObj.dll
HelloClient.vb
Now you can test your very first .NET Remoting application.
EXERCISE 4-4
Use the .NET Remoting Server and Client
1.
Open two Visual Studio .NET command prompts.
2.
Navigate to C:\VB\Hello in both of the command prompts.
3.
In one command prompt window start the Server by entering HelloServer
followed by
ENTER
. The result is shown here:
4.
Switch to the second command prompt window and start the client by
typing HelloClient followed by
ENTER
; the result should be as shown next:
P:\010Comp\CertPrs8\653-6\ch04.vp
Wednesday, October 30, 2002 9:42:54 AM
Color profile: Generic CMYK printer profile
Composite Default screen
5.
The server process should indicate that you said Hello to a client as is shown next:
That concludes the TCP channel exercises. Next you are going to build a more
involved application using the HTTP channel.
CERTIFICATION OBJECTIVE 4.03
Create a .NET Remoting Object Using an
HTTP Channel
This section will explore the use of Internet Information Services (IIS) and the
HTTP channel and how you can build .NET Remoting components using the
Visual Studio .NET.
Projects that will be used for remoting are started as class libraries. That way the
project template will contain the needed settings. Build the Server first.
EXERCISE 4-5
Build a Remote Object Using an HTTP Channel
Develop a remote server object by following these steps.
1.
Start Visual Studio .NET.
2.
Select a Visual Basic Project from the Project Type menu.
3.
Select Class Library from the Templates menu.
18
Chapter 4: Creating and Managing Microsoft .NET Remoting Objects
CertPrs8 / MCAD/MCSD XML Web Services and Server Components Development with Visual Basic .NET / Lind /
222653-6 / Chapter 4
P:\010Comp\CertPrs8\653-6\ch04.vp
Wednesday, October 30, 2002 9:42:54 AM
Color profile: Generic CMYK printer profile
Composite Default screen
4.
Name the new project HelloAgain. The New project dialog should look
like this:
5.
Click OK to create the project. The result is a project that contains on Visual
Basic .NET source file named Class1.vb with one class named Class1. You
will need to change the name of the file and the class to better reflect the
purpose of the projects.
6.
Rename the Class1.vb file to Hello.vb.
7.
Change the name of the class in the Hello.vb file to Hello in the code designer.
8.
Inherit the Hello class from the System.MarshalByRefObject class.
9.
Create a default constructor for the Hello class. The code should look as
follows:
Public Class Hello
Inherits System.MarshalByRefObject
Public Sub New()
' Default constructor
End Sub
End Class
Create a .NET Remoting Object Using an HTTP Channel
19
CertPrs8 / MCAD/MCSD XML Web Services and Server Components Development with Visual Basic .NET / Lind / 222653-6 /
Chapter 4
P:\010Comp\CertPrs8\653-6\ch04.vp
Wednesday, October 30, 2002 9:42:54 AM
Color profile: Generic CMYK printer profile
Composite Default screen
20
Chapter 4: Creating and Managing Microsoft .NET Remoting Objects
CertPrs8 / MCAD/MCSD XML Web Services and Server Components Development with Visual Basic .NET / Lind /
222653-6 / Chapter 4
The method that will be the actual service is the Greeting function. The
Greeting function should return a greeting that is personalized. Add the
Greeting method as follows:
Public Function Greeting(ByVal name As String) As String
Return String.Concat("Hello, ", name)
End Function
10.
Build the class library, and make a note of the directory the Hello.dll file is
located in (\bin).
That is all the work involved in building the entire .NET Remoting object. In
order to make this object available to client applications, you will have to create a
configuration file and locate that configuration file in the same directory as the
class library.
The name of the configuration file is web.config, and that name cannot be
changed. The web.config file contains the configuration for the remote object in an
XML format. The root element is <configuration> as in all configuration files that
are used in the .NET Framework. The service that is configured is <system .runtime
.remoting>, and you need to make an entry under the <application> <service>
element that describes the <Wellknown> service. The following is the procedure for
adding web.config for the HelloAgain .NET Remoting object.
EXERCISE 4-6
Create the Server Configuration
1.
Open the HelloAgain project from Exercise 4-5.
2.
Click the Show All Files button in the Solution Explorer.
3.
Right-click the bin directory in the Solution Explorer, and select Include In
Project from the context menu.
4.
Select the bin directory in the Solution Explorer. Add an XML file to the
project by using the Project | Add New Item… menu, as is shown here:
P:\010Comp\CertPrs8\653-6\ch04.vp
Wednesday, October 30, 2002 9:42:54 AM
Color profile: Generic CMYK printer profile
Composite Default screen
Create a .NET Remoting Object Using an HTTP Channel
21
CertPrs8 / MCAD/MCSD XML Web Services and Server Components Development with Visual Basic .NET / Lind / 222653-6 /
Chapter 4
5.
Change the name of the XML file to web.config.
6.
After you click Open, the XML file is created in the bin directory as is
shown here:
P:\010Comp\CertPrs8\653-6\ch04.vp
Wednesday, October 30, 2002 9:42:55 AM
Color profile: Generic CMYK printer profile
Composite Default screen
22
Chapter 4: Creating and Managing Microsoft .NET Remoting Objects
CertPrs8 / MCAD/MCSD XML Web Services and Server Components Development with Visual Basic .NET / Lind /
222653-6 / Chapter 4
7.
The new item is opened in the XML editor, and the normal XML processing
directive is inserted as is shown next:
8.
Change the content of the web.config file to the following:
<configure>
<system.runtime.remoting>
<application>
<service>
<Wellknown mode="Singleton"
type="HelloAgain.Greeting, Greeting"
objectUrl="Greeting.soap">
</Wellknown>
</service>
</application>
</system.runtime.remoting>
</configure>
The configuration is set to use the Singleton mode. This mode uses one object
that serves all client calls, by contrast with SingleCall mode, in which each client will
have a private object.
Now you have the configuration for the server. The next task is to build the client.
EXERCISE 4-7
Build the Client Application
You will build a Windows Form client to call the .NET Remoting server HelloAgain:
P:\010Comp\CertPrs8\653-6\ch04.vp
Wednesday, October 30, 2002 9:42:55 AM
Color profile: Generic CMYK printer profile
Composite Default screen
Create a .NET Remoting Object Using an HTTP Channel
23
CertPrs8 / MCAD/MCSD XML Web Services and Server Components Development with Visual Basic .NET / Lind / 222653-6 /
Chapter 4
1.
Start a new Windows Application project, naming the project
RemoteHello:
2.
Rename the form from Form1 to frmHello, and change the Text property
to “Remote Hello”.
3.
Open the Project properties and change the startup object to
frmHello.
4.
Add a button to the form, and name the button btnRemoteHello.
Change the Text property to “Remote Click”.
5.
Add a label to the form, and name the label lblRemoteHello.
Change the Text property to ““. The form should look like the following.
P:\010Comp\CertPrs8\653-6\ch04.vp
Wednesday, October 30, 2002 9:42:55 AM
Color profile: Generic CMYK printer profile
Composite Default screen
24
Chapter 4: Creating and Managing Microsoft .NET Remoting Objects
CertPrs8 / MCAD/MCSD XML Web Services and Server Components Development with Visual Basic .NET / Lind /
222653-6 / Chapter 4
6.
Add a reference to the HelloAgain server by choosing Project | Add
Reference…. You need to use the Browse button and find the directory that
the HelloAgain.dll is located in.
P:\010Comp\CertPrs8\653-6\ch04.vp
Wednesday, October 30, 2002 9:42:56 AM
Color profile: Generic CMYK printer profile
Composite Default screen
Create a .NET Remoting Object Using an HTTP Channel
25
CertPrs8 / MCAD/MCSD XML Web Services and Server Components Development with Visual Basic .NET / Lind / 222653-6 /
Chapter 4
7.
Add a reference to the System.Runtime.Remoting.dll library.
8.
Import the following namespaces into the code module for the frmHello form:
Imports System
Imports System.Runtime.Remoting
Imports System.Runtime.Remoting.Channels
Imports System.Runtime.Remoting.Channels.http
Imports HelloAgain
9.
Modify the constructor for the form to initialize the channel.
Public Sub New()
MyBase.New()
'This call is required by the Windows Form Designer.
InitializeComponent()
'Add any initialization after the InitializeComponent() call
Dim ch As HttpChannel = New HttpChannel()
ChannelServices.RegisterChannel(ch)
End Sub
P:\010Comp\CertPrs8\653-6\ch04.vp
Wednesday, October 30, 2002 9:42:56 AM
Color profile: Generic CMYK printer profile
Composite Default screen