Tài liệu Altenative Digital Photography P2 docx
Bạn đang xem bản rút gọn của tài liệu. Xem và tải ngay bản đầy đủ của tài liệu tại đây (2.33 MB, 20 trang )
14
Alternative Digital Photography
Figure 1.21 The image is now open in
the Lightroom Develop module.
Figure 1.22 The image is now con-
verted to grayscale by clicking on
Grayscale in a panel on the right.
and closed as shown. Adjust Exposure, Recovery, Fill Light, Black, and Punch as nec-
essary to have an overall visually pleasing image.
Now for the fun part. You have a large number of sliders (eight in Lightroom 1.1) in
the HSL/Color/Grayscale panel. Moving those back and forth (or typing in numbers
on the right) does the same thing as the Channel Mixer in Lesson 1.5 except that you
can control things with much great precision in Lightroom. In Figure 1.23 we moved
the yellow slider all the way to the right, and the value changes to -100. Notice the
effect on the yellow flowers on the right. They have changed from nearly white to
almost black with only small changes in tone in the rest of the image. You can use all
of the sliders to tweak your image until it looks just as you would like.
15
Creating Black and White from Color
Figure 1.23 The yellow slider is
moved to –100, changing the yellow
flowers on the right to nearly black.
Once you are finished, you can export the image so you can send it to your lab, edit it
further in Photoshop, make a slide show, print it, or create a website all from
Lightroom. For detailed instructions on any of these features, see Appendix B,
“Resource List,” for books to help you with that. If you like the mix that you created,
you can save it as a preset by going to the top menu and selecting Develop > New
Preset and checking the boxes in the pop-up menu to select the controls and
functions that you want your preset to save. Then with future images you can just
select the preset.
Lesson 1.7—Creating Black and White
with Aperture
If you have a Macintosh computer, you have your choice of using Lightroom or
Aperture as a workflow tool. If you are on a PC, this will not work for you, and you
can skip this lesson.
Like Lightroom, Aperture offers a free trial version at Apple’s website. In Aperture, in a
way similar to the previous lesson, you begin by importing your image. Figure 1.24
shows the proper steps: File > Import > Images. Next open the Inspector by clicking
on Window > Show Inspectors (or just hit the i key) as shown in Figure 1.25. Then
open the Monochrome Mixer and click on the checkbox. If the Monochrome Mixer is
not shown, go up to the top bar called Adjustments and click on the plus (+) sign. In
the pop-up menu, select Monochrome Mixer. You can also press Ctrl+M. The image
changes to a grayscale (or monochrome or black-and-white) image. See Figure 1.26
for the example. The Monochrome Mixer’s default preset is shown.
16
Alternative Digital Photography
Figure 1.24 Importing an image into
the Aperture Library so it can be
worked on.
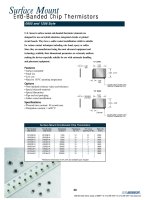
There are a few other built-in presets to simulate the effect of using color filters with
black-and-white film. Figure 1.27 shows how to find the built-in presets. Figures 1.28
through 1.32 show the results of each filter preset.
17
Creating Black and White from Color
Figure 1.25 Open the Inspector in
Aperture.
Figure 1.26 The Monochrome Mixer
in Aperture. Checking the checkbox
turns it on.
Figure 1.27 Open the available presets
by clicking on the double arrows next to
the Presets section.
18
Alternative Digital Photography
Figure 1.28 The image with a red
filter preset applied.
Figure 1.29 The image with an
orange filter preset applied.
19
Creating Black and White from Color
Figure 1.30 The image with a yellow
filter preset applied.
Figure 1.31 The image with a green
filter preset applied.
Using the Monochrome Mixer in Aperture is very similar to using the Channel Mixer
in Photoshop (see Lesson 1.5). The same rules apply. It will usually produce a better
result if the numbers total about 100 in the Monochrome Mixer as well as
Photoshop’s Channel Mixer. If you create a black-and-white (grayscale/monochrome)
style that you like, you can save it in Aperture as a preset. Once you have it set, click
on the little gear to the right of the Monochrome Mixer title and choose Save as Preset
from the pop-up menu that appears.
Comparison of Different Conversion
Techniques
To make it easier to see some of the different conversion techniques all in one place,
we have gathered together many of them on these two pages.
20
Alternative Digital Photography
Figure 1.32 The image with a blue
filter preset applied.
21
Creating Black and White from Color
Figure 1.33 The original
color image.
Figure 1.34 Photoshop Grayscale. Figure 1.35 Photoshop Desaturate. Figure 1.36 Photoshop Lab Color.
Figure 1.37 Photoshop Red Channel. Figure 1.38 Photoshop Green Channel. Figure 1.39 Photoshop Blue Channel.