Tài liệu OCA: Oracle Database 11g Administrator Certified Associate- P18 pptx
Bạn đang xem bản rút gọn của tài liệu. Xem và tải ngay bản đầy đủ của tài liệu tại đây (779.61 KB, 50 trang )
Granting and Revoking Privileges
681
If you grant a system privilege
WITH ADMIN OPTION
and later revoke that privilege, the
privileges created by the grantee will not be revoked. Unlike object privileges, the revo-
cation of system privileges does not cascade. Think of it this way:
WITH GRANT OPTION
includes the keyword
GRANT
and so implies that a revoke cascades, but
WITH
ADMIN OPTION
does not mention
GRANT
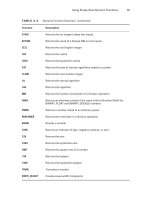
, so a revoke has no effect. Here’s an example. Mary grants the
SELECT ANY TABLE
privilege to new DBA Zachary with
ADMIN OPTION
. Zachary then grants
this privilege to Rex. Later, Zachary gets promoted and leaves the department, so Mary
revokes the
SELECT ANY TABLE
privilege from Zachary. Rex’s privilege remains unaffected.
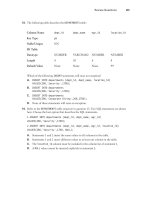
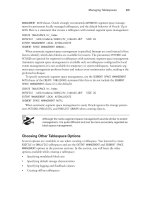
You can see this in Figure 12.5.
FIGURE 12.5 The revoking of system privileges
Zachary
Mary grants to Zachary.
GRANT SELECT ANY TABLE
WITH ADMIN OPTION
Rex
Zachary grants to Rex.
GRANT SELECT ANY TABLE
Rex
Zachary is dropped and
Rex retains privileges.
GRANT SELECT ANY TABLE
The database records only the privilege granted, not who granted it.
This behavior differs from object privileges, because the database does not record both
grantor and grantee for system privileges—only the grantee is recorded.
The data dictionary view
DBA_SYS_PRIVS
lists all the system privileges
granted in the database.
Role Privileges
Role privileges confer on the grantee a group of system, object, and other role privileges.
Users who have been granted a role inherit the privileges that have been granted to that
role. Roles can be password protected, so users may have a role granted to them yet not be
able to use that role in all database sessions. I’ll cover roles and role privileges—including
how to grant them—in the following section, “Creating and Managing Roles.”
95127c12.indd 681 2/17/09 2:43:45 PM
Please purchase PDF Split-Merge on www.verypdf.com to remove this watermark.
682
Chapter 12
N
Implementing Security and Auditing
Creating and Managing Roles
A role is a tool for administering privileges. Privileges can be granted to a role, and then
that role can be granted to other roles and users. Users can thus inherit privileges via roles.
Roles serve no other purpose than to administer privileges.
To create a role, use the
CREATE
ROLE
statement. You can optionally include an
IDENTIFIED BY
clause that requires users to authenticate themselves before enabling the role.
Roles requiring authentication are typically used inside an application, where a user’s activi-
ties are controlled by the application. To create the role
APPL_DBA
, execute the following:
CREATE ROLE appl_dba;
To enable a role, execute a
SET ROLE
statement, like this:
SET ROLE appl_dba IDENTIFIED BY seekwrit;
The data dictionary view
DBA_ROLE_PRIVS
lists all the role privileges
granted in the database.
Granting Role Privileges
As with object and system privileges, you use the
GRANT
statement to confer role privileges on
either a user or another role. Also, like system privileges, the optional keywords
WITH ADMIN
OPTION
allow the grantee to confer these privileges on other users and roles. For example, to
give the
OEM_MONITOR
role to user
charlie
, execute the following:
GRANT oem_monitor TO charlie;
As with the other privileges, you can grant role privileges to the special user
PUBLIC
.
Granting privileges to
PUBLIC
allows anyone with a database account to exercise this privi-
lege. For example, to give all current and future database users use of the
plustrace
role,
execute the following:
GRANT plustrace TO public;
To give the
INDEX ANY TABLE
privilege to the role
APPL_DBA
together with the permission to
allow anyone with the role
APPL_DBA
to grant this privilege to others, execute the following:
GRANT index any table TO appl_dba WITH ADMIN OPTION;
When it comes to granting a role
WITH ADMIN OPTION
, roles behave like system privi-
leges, and subsequent revocations do not cascade.
If the role granted to a user is not the default role, the user must enable the role in the
session to be able to use the role. In the following sections, you will learn to work with
roles in a session.
Enabling Roles
Roles can be enabled—or disabled, for that matter—selectively in each database session.
If you have two concurrent sessions, the roles in effect for each session can be different.
95127c12.indd 682 2/17/09 2:43:45 PM
Please purchase PDF Split-Merge on www.verypdf.com to remove this watermark.
Granting and Revoking Privileges
683
Use the
SET ROLE role_list
statement to enable one or more roles.
role_list
is a comma-
delimited list of roles to enable. This list can include the keyword
ALL
, which enables all the
roles granted to the user. You can optionally append a list of roles to exclude from the
ALL
list by specifying
ALL EXCEPT
exclusion_list
.
If a role has a password associated with it, the keywords
IDENTIFIED BY password
must
immediately follow the role name in the
role_list
.
For example, to enable the password-protected role
HR_ADMIN
, together with the unpro-
tected role
EMPLOYEE
, execute the following:
SET ROLE hr_admin IDENTIFIED BY “my!seekrit”, employee;
To enable all roles except
HR_ADMIN
, run this:
SET ROLE ALL EXCEPT hr_admin;
You can enable as many roles as have been granted to you, up to the
MAX_ENABLED_ROLES
initialization parameter.
Identifying Enabled Roles
The roles that are enabled in your session are listed in the data dictionary view
SESSION_
ROLES
. To identify these enabled roles for your session, run the following:
SELECT role FROM session_roles;
These roles include the roles that have been granted to you, the roles that have been
granted to the special user
PUBLIC
, and the roles that you have inherited by way of other
roles. To identify the roles granted to either user or the special user
PUBLIC
, run the following:
SELECT granted_role FROM user_role_privs
WHERE username IN (USER, ‘PUBLIC’);
The role
DBA
includes the role
SCHEDULER_ADMIN
, which in turn has system privileges
(such as
CREATE ANY JOB
). A user who has been granted the
DBA
role inherits the
SCHED-
ULER_ADMIN
role indirectly. To identify the roles that are both enabled in your session and
granted directly to you or
PUBLIC
but not those roles that you inherited, run this:
SELECT role FROM session_roles
INTERSECT
SELECT granted_role FROM user_role_privs
WHERE username IN (USER, ‘PUBLIC’);
In your sessions, you can disable only these directly granted and public roles.
Disabling Roles
Roles can be disabled in a database session either en masse or by exception. Use the
SET ROLE
NONE
statement to disable all roles. Use the
SET ROLE ALL EXCEPT role_list
statement to
enable all roles except those in the comma-delimited
role_list
.
There is no way to selectively disable a single role. Also, you cannot disable roles that
you inherit by way of another role without disabling the parent role. For example, if you
have been granted the
DBA
,
RESOURCE
, and
CONNECT
roles, you inherit several roles through
95127c12.indd 683 2/17/09 2:43:45 PM
Please purchase PDF Split-Merge on www.verypdf.com to remove this watermark.
684
Chapter 12
N
Implementing Security and Auditing
the
DBA
role when it is enabled. If you want to disable the
SCHEDULER_ADMIN
role you inher-
ited through the
DBA
role, you cannot do that. The options you have are that you can disable
the
DBA
role or you can create a new role similar to the
DBA
role without the
SCHEDULER_
ADMIN
role and use that role.
Setting Default Roles
Roles that are enabled by default when you log on are called default roles. You do not need
to specify a password for default roles and do not have to execute a
SET ROLE
statement
to enable a default role. Change the default roles for a user account with an
ALTER USER
DEFAULT ROLE role_list
statement. The
role_list
can include the keywords
ALL
,
NONE
, and
EXCEPT
, in the same manner as with a
SET ROLE
statement.
Including a password-protected role in the
role_list
defeats the purpose of password
protecting the role because it is automatically enabled without the password. When you cre-
ate a role, you are implicitly granted that role with the admin option, and it is configured as
a default role for your account.
For example, to create the role
EMPLOYEE
, grant it to user
scott
, and configure all of
scott
’s roles except
PLUSTRACE
as default roles, run the following:
CREATE ROLE employee;
GRANT employee TO scott;
ALTER USER scott DEFAULT ROLE ALL EXCEPT plustrace;
Because the creator of a role automatically has that role assigned as a default role, admin-
istrative users (such as
SYS
or
SYSTEM
) who create many roles may need to alter their default
role list. If you attempt to log on with more default roles than allowed by the
MAX_ENABLED_
ROLES
initialization parameter, you will raise an exception, and your logon will fail.
A Password-Protected Role
Lucinda works in HR and needs to be able to modify an employee’s salary after they
have a review and their raise is approved. The HR application ensures that the raise is
approved and falls within corporate guidelines. Although Lucinda needs to be able to
change employee salaries, she should be allowed to do so only from within the HR appli-
cation, because it ensures that business rules are followed.
You wisely choose to use a password-protected role to satisfy these requirements. Update
privilege on the
salary
table is granted to the password-protected role
salary_admin
.
Lucinda is then granted the
salary_admin
role, but she is not told the password for it. The
HR application has the password encoded within it, so when Lucinda runs the HR appli-
cation, unknown to her, a
SET ROLE salary_admin IDENTIFY BY password
statement is
executed, enabling the role and allowing her to change the salary.
If Lucinda tries to execute an
UPDATE
statement on the
salary
table from SQL*Plus, she
will get an insufficient privileges error.
95127c12.indd 684 2/17/09 2:43:46 PM
Please purchase PDF Split-Merge on www.verypdf.com to remove this watermark.
Granting and Revoking Privileges
685
Default Database Roles
When you create a new Oracle 11g database, Oracle creates several roles in the database
based on the options you chose at the database creation. The following are few of the
important roles that are created automatically during database creation:
CONNECT
This role has only one privilege,
CREATE SESSION
.
RESOURCE
This role has the privileges required to create common objects in the user’s
schema.
DBA
This is the most powerful role in the database. Only database administrators
should be given this role. This role has all the system privileges and several administrative
privileges.
SELECT_CATALOG_ROLE
This role gives the user access to query the data dictionary views.
EXECUTE_CATALOG_ROLE
This role gives the user privileges to execute the packages and
procedures in the data dictionary.
DELETE_CATALOG_ROLE
This role gives the user the ability to delete records from the system
audit table (
SYS.AUD$
).
To list all the roles defined in the database, query the data dictionary view
DBA_ROLES
.
To view the system privileges granted to a role, query the
DBA_SYS_PRIVS
dictionary view.
For example, the following query lists the system privileges granted to the
RESOURCE
role:
SQL> SELECT grantee, privilege, admin_option
2 FROM dba_sys_privs
3 WHERE grantee = ‘RESOURCE’
SQL> /
GRANTEE PRIVILEGE ADM
-------------------- -------------------- ---
RESOURCE CREATE TRIGGER NO
RESOURCE CREATE SEQUENCE NO
RESOURCE CREATE TYPE NO
RESOURCE CREATE PROCEDURE NO
RESOURCE CREATE CLUSTER NO
RESOURCE CREATE OPERATOR NO
RESOURCE CREATE INDEXTYPE NO
RESOURCE CREATE TABLE NO
8 rows selected.
SQL>
95127c12.indd 685 2/17/09 2:43:46 PM
Please purchase PDF Split-Merge on www.verypdf.com to remove this watermark.
686
Chapter 12
N
Implementing Security and Auditing
Applying the Principle of Least Privilege
The principle of least privilege states that each user should be given only the minimal privi-
leges needed to perform their job. This principle is a central tenet to the initially closed
philosophy whereby all access is initially closed or unavailable and access is opened on a
need-to-know basis. Highly secure environments typically operate under an initially closed
philosophy. The contrasting philosophy is an initially open philosophy, whereby all access
is by default open to all users and only sensitive areas are closed. Academic or learning
environments typically operate under an initially open philosophy.
Many IT organizations want the most secure policies for production systems, which
calls for the initially closed approach to security. To support the need for administrators
and programmers to quickly learn new technology, these shops frequently create “sand-
box” systems that follow the initially open philosophy. These sandbox systems afford their
limited users the learning benefit of the initially open approach, while not storing or giving
gateway access to any sensitive information elsewhere in the enterprise.
To implement the principle of least privilege on your production or development systems,
you should take several actions, or best practices, while setting up or locking down the
database. Let’s take a look at these:
Protect the data dictionary Ensure that users with the
SELECT ANY TABLE
privilege cannot
access the tables that underlie the data dictionary by setting
O7_DICTIONARY_ACCESSIBILITY =
FALSE
. This is the default setting.
Revoke unnecessary privileges from
PUBLIC
By default, several packages and roles are
granted to the special user
PUBLIC
. Review these privileges, and revoke the
EXECUTE
privi-
lege from
PUBLIC
if these packages are not necessary. Some of these packages include the
following:
UTL_TCP
This permits the grantee to establish a network connection to any waiting
TCP/IP network service. Once a connection is established, arbitrary information can
be sent and received directly from the database to and from the other TCP services on
your network. If your organization is concerned about information exchange over TCP/
IP, revoke the
EXECUTE
privilege on this package from
PUBLIC
. Grant privileges on this
package only to those users who need it.
UTL_SMTP
This permits the grantee to send arbitrary email. If your organization is con-
cerned about information exchange via email, revoke the
EXECUTE
privilege on this pack-
age from
PUBLIC
. Grant privileges on this package only to those users who need it.
UTL_HTTP
This permits the grantee to send and receive arbitrary data via the HTTP
protocol. If your organization is concerned about information exchange via HTTP, revoke
the
EXECUTE
privilege on this package from
PUBLIC
. Grant privileges on this package only
to those users who need it.
UTL_FILE
This permits the grantee to read and write text data to and from arbitrary
operating-system files that are in the designated directories.
UTL_FILE
does not manage
concurrency, so multiple user sessions can step on each other, overwriting changes via
UTL_FILE
. Consider revoking the
EXECUTE
privilege on this package from
PUBLIC
.
95127c12.indd 686 2/17/09 2:43:46 PM
Please purchase PDF Split-Merge on www.verypdf.com to remove this watermark.
Granting and Revoking Privileges
687
DBMS_OBFUSCATION_TOOLKIT
and
DBMS_CRYPTO
These permit the grantee to employ
encryption technologies. In a managed environment using encryption, the keys are
stored and managed. If encryption keys are lost, the encrypted data is undecipherable.
Consider revoking the
EXECUTE
privilege on these packages from
PUBLIC
.
You can revoke the
EXECUTE
privileges like this:
REVOKE EXECUTE ON utl_tcp FROM PUBLIC;
REVOKE EXECUTE ON utl_smtp FROM PUBLIC;
REVOKE EXECUTE ON utl_http FROM PUBLIC;
REVOKE EXECUTE ON utl_file FROM PUBLIC;
REVOKE EXECUTE ON dbms_obfuscation_toolkit
FROM PUBLIC;
REVOKE EXECUTE ON dbms_crypto FROM PUBLIC;
You can query the data dictionary to see what other packages may need to be locked down
by revoking the
EXECUTE
privilege from
PUBLIC
. Here is a query to list the packages, owned
by user
SYS
, that have the
EXECUTE
privilege granted to
PUBLIC
:
SELECT table_name
FROM dba_tab_privs p
,dba_objects o
WHERE p.owner=o.owner
AND p.table_name = o.object_name
AND p.owner = ‘SYS’
AND p.privilege = ‘EXECUTE’
AND p.grantee = ‘PUBLIC’
AND o.object_type=’PACKAGE’;
Limit the users who have administrative privileges Grant administrative privileges to user
accounts cautiously. Some powerful administrative privileges and roles to exercise caution
with include the following:
SYSDBA
This gives the grantee the highest level of privileges with the Oracle Database
software. A clever user with the
SYSDBA
role can circumvent most database security mea-
sures. There is usually no good reason to grant this role to any account except
SYS
, and
the
SYS
password should be both cautiously guarded and changed regularly. Also, guard
operating-system accounts carefully. If you are logged on to the database server using a
privileged operating-system account, you might be able to connect to the database with
SYSDBA
authority and no password by entering
connect / as sysdba
in SQL*Plus.
DBA
This permits the grantee to assign privileges and manipulate data throughout the
database. A clever user with the
DBA
role can circumvent most database security mea-
sures. Grant this role only to those users who need it.
The
ANY
system privileges
SELECT ANY TABLE
,
GRANT ANY ROLE
,
DELETE ANY TABLE
,
and so on, permit the grantee to assign privileges and manipulate data throughout the
95127c12.indd 687 2/17/09 2:43:46 PM
Please purchase PDF Split-Merge on www.verypdf.com to remove this watermark.
688
Chapter 12
N
Implementing Security and Auditing
database. A malicious user with the one of these roles can wreak havoc in your database.
Grant these privileges only to those users who need them.
Do not enable
REMOTE_OS_AUTHENT
The default setting for the initialization parameter
REMOTE_OS_AUTHENT
is
FALSE
. There is rarely a reason to enable this feature. When set to
TRUE
,
this parameter tells the database to trust any client to authenticate externally authenticated
accounts. For example, if you have an externally identified account named
ORACLE
that has
DBA
privileges for use in administrative scripts running on the database server (a common
practice), setting this parameter to
TRUE
will allow someone with a notebook or desktop PC
with a locally created
ORACLE
account to connect to your database with
DBA
credentials and
no password.
Controlling Resource Usage by Users
An Oracle 11g database lets you limit some resources that your user accounts consume.
Disk-space limits are governed by tablespace quotas (discussed in “Assigning Tablespace
and Quotas” earlier in the chapter); CPU and memory limits are implemented with profiles.
CPU and session-oriented resource limits are managed through profiles. Profiles let you
set limits for several resources, including CPU time, memory, and the number of logical
reads performed during a user session or database call. A database call is either a parse,
an execute, or a fetch. Usually, the database implicitly performs these calls for you. You
can explicitly make these database calls from Java, PL/SQL, or Oracle Call Interface (OCI)
programs.
A logical read is a measure of the amount of work that the database performs while
executing SQL statements. Statements that generate more logical reads require the database
to perform more work than statements generating fewer logical reads. Technically, a logi-
cal read is counted for each row accessed via
ROWID
(index access) and for each data block
accessed via a multiblock read (full-table scan or index fast full scan).
To enable resource limit restrictions with profiles, first enable them in the database by
setting the initialization parameter
resource_limit
to
TRUE
, like this:
ALTER SYSTEM SET resource_limit = TRUE SCOPE = BOTH;
To assign resource limits to a profile, use the
CREATE PROFILE
or
ALTER PROFILE
state-
ment with one or more of the kernel resource parameters. The following is an example of
the
CREATE PROFILE
statement, with all the resources that can be controlled. A resource
value of
DEFAULT
indicates that the value is derived from the
DEFAULT
profile. Initially, the
DEFAULT
profile has all the system resources set to
UNLIMITED
.
CREATE PROFILE “TEST1” LIMIT
CPU_PER_SESSION DEFAULT
CPU_PER_CALL DEFAULT
CONNECT_TIME DEFAULT
IDLE_TIME 10
95127c12.indd 688 2/17/09 2:43:46 PM
Please purchase PDF Split-Merge on www.verypdf.com to remove this watermark.
Controlling Resource Usage by Users
689
SESSIONS_PER_USER DEFAULT
LOGICAL_READS_PER_SESSION DEFAULT
LOGICAL_READS_PER_CALL 250000
PRIVATE_SGA 25000
COMPOSITE_LIMIT DEFAULT;
Each resource is explained here:
CONNECT_TIME
This limits any session established by a user having this profile set to the
specified number of minutes. Connection time is sometimes called wall clock time to dif-
ferentiate it from CPU time. When a session exceeds the specified number of minutes, the
database rolls back any uncommitted changes and terminates the session. The next call to
the database raises an exception. You can use the special value
UNLIMITED
to tell the data-
base that there is no limit to a session’s duration. Set this parameter in a
CREATE PROFILE
or
ALTER PROFILE
statement like this:
CREATE PROFILE agent LIMIT CONNECT_TIME 10;
ALTER PROFILE data_analyst LIMIT CONNECT_TIME UNLIMITED;
CPU_PER_CALL
This limits the amount of CPU time that can be consumed by any single
database call in any session established by a user with this profile. The specified value is in
hundredths of a second and applies to a parse, an execute, or a fetch call. These calls are
implicitly performed by the database for any SQL statement executed in SQL*Plus and can
be explicitly called from OCI, Java, and PL/SQL programs. When this limit is breached, the
statement fails and is automatically rolled back, and an exception is raised. The user can
then commit or roll back any uncommitted changes in the transaction. Set this parameter
in a
CREATE PROFILE
or
ALTER PROFILE
statement like this:
CREATE PROFILE agent LIMIT CPU_PER_CALL 3000;
ALTER PROFILE data_analyst LIMIT CPU_PER_CALL UNLIMITED;
CPU_PER_SESSION
This limits the amount of CPU time that can be consumed in any ses-
sion established by a user with this profile. The specified value is in hundredths of a second
and applies to a parse, an execute, or a fetch. When this limit is breached, the current state-
ment fails, the transaction is automatically rolled back, and an exception is raised. The user
can then commit or roll back any uncommitted changes in the transaction before logging
off. Set this parameter in a
CREATE PROFILE
or
ALTER PROFILE
statement like this:
CREATE PROFILE agent LIMIT CPU_PER_CALL 30000;
ALTER PROFILE data_analyst LIMIT CPU_PER_CALL UNLIMITED;
IDLE_TIME
This limits the duration of time between database calls to the specified number
of minutes. If a user having this profile exceeds this setting, the next statement fails, and
the user is allowed to either commit or roll back any uncommitted changes before logging
off. Long-running statements are not affected by this setting. Set
IDLE_TIME
in a
CREATE
PROFILE
or
ALTER PROFILE
statement like this:
CREATE PROFILE agent LIMIT IDLE_TIME 10;
ALTER PROFILE daemon LIMIT IDLE_TIME UNLIMITED;
95127c12.indd 689 2/17/09 2:43:46 PM
Please purchase PDF Split-Merge on www.verypdf.com to remove this watermark.
690
Chapter 12
N
Implementing Security and Auditing
LOGICAL_READS_PER_CALL
This caps the amount of work that any individual database call
performs to the specified number of logical reads. The database call is either a parse, an
execute, or a fetch. If the limit is exceeded, the database rolls back the statement, returns an
error to the calling program, and allows the user to either commit or roll back any uncom-
mitted changes. Logical reads are computed as the sum of consistent gets plus current mode
gets. Set this parameter in a
CREATE PROFILE
or
ALTER PROFILE
statement like this:
CREATE PROFILE agent LIMIT LOGICAL_READS_PER_CALL 2500;
ALTER PROFILE data_analyst LIMIT LOGICAL_READS_PER_CALL 1000000;
LOGICAL_READS_PER_SESSION
This limits the amount of database work that a user’s ses-
sion can consume to the specified number of logical reads. When the limit is exceeded, the
current statement fails and an exception is raised, and the user must either commit or roll
back the transaction and end the session. Logical reads are computed as the sum of consis-
tent gets plus current mode gets. Set this parameter in a
CREATE PROFILE
or
ALTER PROFILE
statement like this:
CREATE PROFILE agent LIMIT LOGICAL_READS_PER_SESSION 250000;
ALTER PROFILE data_analyst
LIMIT LOGICAL_READS_PER_SESSION 35000000;
PRIVATE_SGA
This limits the amount of system global area (SGA) memory in bytes that
a user connecting with shared servers (via a multithreaded server [MTS]) can allocate to
the persistent area in the program global area (PGA). This area contains bind information
among other items. Set this parameter in a
CREATE PROFILE
or
ALTER PROFILE
statement
like this:
CREATE PROFILE agent LIMIT PRIVATE_SGA 2500;
ALTER PROFILE data_analyst LIMIT PRIVATE_SGA UNLIMITED;
SESSIONS_PER_USER
This restricts a user with this profile to the specified number of
database sessions. This setting can be useful to discourage DBAs from all connecting to a
shared administrative account to do their work when corporate policy indicates that they
should be connecting to their individual accounts. Set this parameter in a
CREATE PROFILE
or
ALTER PROFILE
statement like this:
CREATE PROFILE admin_profile LIMIT SESSIONS_PER_USER 2;
ALTER PROFILE data_analyst LIMIT SESSIONS_PER_USER 6;
COMPOSITE_LIMIT
This limits the number of service units that can be consumed dur-
ing a user session. Service units are calculated as the weighted sum of
CPU_PER_SESSION
,
LOGICAL_READS_PER_SESSION
,
CONNECT_TIME
, and
PRIVATE_SGA
values. The weightings
are established with the
ALTER RESOURCE COST
statement and can be viewed from the
RESOURCE_COST
data dictionary view. This
COMPOSITE_LIMIT
allows you to cap the resource
consumption of user groups in more complex ways than a single resource limit. Set this
parameter in a
CREATE PROFILE
or
ALTER PROFILE
statement like this:
CREATE PROFILE admi_profile LIMIT COMPOSITE_LIMIT UNLIMITED;
ALTER PROFILE data_analyst LIMIT COMPOSITE_LIMIT 100000;
95127c12.indd 690 2/17/09 2:43:46 PM
Please purchase PDF Split-Merge on www.verypdf.com to remove this watermark.
Controlling Resource Usage by Users
691
To enforce the resource limits established with profiles, you must enable them by setting
the initialization parameter
RESOURCE_LIMIT
to
TRUE
. The default setting is
FALSE
. Set this
parameter with the
ALTER SYSTEM
statement, like this:
ALTER SYSTEM SET resource_limit = TRUE SCOPE=BOTH;
You can also use profiles to manage passwords, which is discussed in the next section.
Implementing Password Security Features
For users who are configured for database authentication, password-security rules are
enforced with profiles and password complexity rules with verification functions. Profiles
have a set of standard rules that define how long a password can remain valid, the elapsed
time, the number of password changes before a password can be reused, the number of failed
login attempts that will lock the account, and how long the account will remain locked.
If you want a parameter to inherit the setting from the
DEFAULT
profile, set the param-
eter’s value to the keyword
DEFAULT
. Explicitly assign password rules to a profile using the
CREATE PROFILE
or
ALTER PROFILE
statement. The following is an example of the
CREATE
PROFILE
statement, with all the password features that can be controlled:
CREATE PROFILE “TEST2” LIMIT
PASSWORD_LIFE_TIME 60
PASSWORD_GRACE_TIME 7
PASSWORD_REUSE_MAX 2
PASSWORD_REUSE_TIME 4
PASSWORD_LOCK_TIME DEFAULT
FAILED_LOGIN_ATTEMPTS 5
PASSWORD_VERIFY_FUNCTION DEFAULT;
Each option is discussed in detail here with examples:
FAILED_LOGIN_ATTEMPTS
and
PASSWORD_LOCK_TIME
The
FAILED_LOGIN_ATTEMPTS
param-
eter specifies how many times in a row the user can fail password authentication. If this
limit is breached, the account is locked for
PASSWORD_LOCK_TIME
days. If the
PASSWORD_
LOCK_TIME
parameter is set to
UNLIMITED
and a user exceeds
FAILED_LOGIN_ATTEMPTS
, the
account must be manually unlocked. You can set these parameters in a
CREATE PROFILE
or
ALTER PROFILE
statement like this:
-- lock account for 10 minutes if 3 consecutive logins fail
CREATE PROFILE agent LIMIT
FAILED_LOGIN_ATTEMPTS 3
PASSWORD_LOCK_TIME 10/1440;
-- remove failed login restrictions
ALTER PROFILE student LIMIT FAILED_LOGIN_ATTEMPTS UNLIMITED;
95127c12.indd 691 2/17/09 2:43:46 PM
Please purchase PDF Split-Merge on www.verypdf.com to remove this watermark.
692
Chapter 12
N
Implementing Security and Auditing
-- manually unlock an account
ALTER USER scott ACCOUNT UNLOCK;
The default value for
FAILED_LOGIN_ATTEMPTS
in Oracle 11g is 10 and for
PASSWORD_LOCK_
TIME
is 1 day.
PASSWORD_LIFE_TIME
and
PASSWORD_GRACE_TIME
The
PASSWORD_LIFE_TIME
parameter
specifies the maximum number of days that a password can remain in force, and
PASSWORD_
GRACE_TIME
is the number of days after the first successful login following password expira-
tion during which the user will be reminded to change their password but allowed to log
in. After the
PASSWORD_GRACE_TIME
limit is reached, the user must change their password. If
you set
PASSWORD_LIFE_TIME
to a value and set
PASSWORD_GRACE_TIME
to
UNLIMITED
, users
will be reminded to change their password every time they log in but never forced to actu-
ally do so. You can set these two parameters in a
CREATE PROFILE
or
ALTER PROFILE
state-
ment like this:
-- limit the password lifetime to 90 days
-- during the last 14 days the user will be reminded
-- to change the password
CREATE PROFILE agent LIMIT
PASSWORD_LIFE_TIME 90 - 14
PASSWORD_GRACE_TIME 14;
-- set no limit to password lifetime
ALTER PROFILE student LIMIT
PASSWORD_LIFE_TIME UNLIMITED
PASSWORD_GRACE_TIME DEFAULT;
The default value for
PASSWORD_LIFE_TIME
in Oracle 11g is 180 days and for
PASSWORD_
GRACE_TIME
is 7 days.
PASSWORD_REUSE_TIME
and
PASSWORD_REUSE_MAX
The
PASSWORD_REUSE_TIME
parameter
specifies the minimum number of days that must transpire before a password can be reused.
PASSWORD_REUSE_MAX
specifies the minimum number of password changes that must occur
before a password can be reused. If you specify a value for one of these two parameters and
UNLIMITED
for the other, passwords can never be reused. If you set both
PASSWORD_REUSE_
TIME
and
PASSWORD_REUSE_MAX
to
UNLIMITED
(the default), these parameters are essentially
disabled. You can set these password parameters in a
CREATE PROFILE
or
ALTER PROFILE
statement like this:
-- require at least 4 password changes and 1 year
-- before a password may be reused.
CREATE PROFILE agent LIMIT
PASSWORD_REUSE_TIME 365
PASSWORD_REUSE_MAX 4;
95127c12.indd 692 2/17/09 2:43:46 PM
Please purchase PDF Split-Merge on www.verypdf.com to remove this watermark.
Controlling Resource Usage by Users
693
-- remove password reuse constraints
ALTER PROFILE student LIMIT
PASSWORD_REUSE_TIME UNLIMITED
PASSWORD_REUSE_MAX UNLIMITED;
Setting Password Lock Time to Two Hours
Several password attributes are durations expressed in days. These durations are nor-
mally set with integer values, such as 1, 15, 30, 90, or 365 days.
The default password lock time for Oracle 11g is 1 day, and the unit used to express the
lock time is in days. A few of the clients I worked for needed the password lock to go away
after two hours if the user tried to enter incorrect password too many times. How do you
set the value in hours or minutes when the unit is in days?
All these password profile attributes take fractional values as well; hence, you can represent
hours and minutes. Since there are 1,440 minutes in a day, you can represent 5 minutes as
5/1440 days and represent 5 seconds as 5/86400 days. The following code sets the pass-
word lock time to two hours:
ALTER PROFILE student LIMIT PASSWORD_LOCK_TIME 2/24;
You can represent the value using decimal numbers; for example, the following code sets
the password lock time to six hours:
ALTER PROFILE student LIMIT PASSWORD_LOCK_TIME .25;
Using a fractional number of days is a great way to try combinations of values and
observe the results of setting these password rules.
PASSWORD_VERIFY_FUNCTION
The
PASSWORD_VERIFY_FUNCTION
parameter lets you codify
additional rules that will be verified when a password is changed. These rules usually verify
password complexity such as minimal password length or check that a password does not
appear in a dictionary. The PL/SQL function used in the
PASSWORD_VERIFY_FUNCTION
param-
eter must be created under the user
SYS
and must have three parameters of type
VARCHAR2
.
These parameters must contain the username in the first parameter, the new password in the
second, and the old password in the third. You can set this parameter in a
CREATE PROFILE
or
ALTER PROFILE
statement like this:
-- use a custom password function
CREATE PROFILE agent LIMIT PASSWORD_VERIFY_FUNCTION my_function;
95127c12.indd 693 2/17/09 2:43:46 PM
Please purchase PDF Split-Merge on www.verypdf.com to remove this watermark.
694
Chapter 12
N
Implementing Security and Auditing
-- disable use of a custom function
ALTER PROFILE student LIMIT PASSWORD_VERIFY_FUNCTION DEFAULT;
Implementing a Corporate Password-Security Policy
Many companies have security policies requiring that several password complexity rules
be followed. For your Oracle 11g database, these rules can be incorporated into a pass-
word verify function. This real-world scenario highlights an example of three password
complexity requirements and how they are satisfied through a password verify function
named
MY_PASSWORD_VERIFY
.
The first rule specifies that the password must be at least six characters in length. The
second rule disallows passwords containing some form of either the username or the
word password. The third rule requires the password to contain at least one alphabetic
character, at least one digit, and at least one punctuation character. If the new password
fails any of these tests, the function raises an exception, and the password change fails.
After creating this function as user
SYS
, assign it to a profile, like this:
ALTER PROFILE student LIMIT password_verify_function my_password_verify;
Any user having the
student
profile will need to abide by the password rules enforced by
the
my_password_verify
function:
CREATE OR REPLACE FUNCTION my_password_verify
(username VARCHAR2
,password VARCHAR2
,old_password VARCHAR2
) RETURN BOOLEAN
IS
BEGIN
-- Check for the minimum length of the password
IF LENGTH(password) < 6 THEN
raise_application_error(-20001
,’Password must be at least 6 characters long’);
END IF;
-- Check that the password does not contain any
-- upper/lowercase version of either the user name
-- or the keyword PASSWORD
95127c12.indd 694 2/17/09 2:43:46 PM
Please purchase PDF Split-Merge on www.verypdf.com to remove this watermark.
Auditing Database Activity
695
IF ( regexp_like(password,username,’i’)
OR regexp_like(password,’password’,’i’)) THEN
raise_application_error(-20002
,’Password cannot contain username or PASSWORD’);
END IF;
-- Check that the password contains at least one letter,
-- one digit and one punctuation character
IF NOT( regexp_like(password,’[[:digit:]]’)
AND regexp_like(password,’[[:alpha:]]’)
AND regexp_like(password,’[[:punct:]]’)
) THEN
raise_application_error(-20003
,’Password must contain at least one digit ‘||
‘and one letter and one punctuation character’);
END IF;
-- password is okey dokey
RETURN(TRUE);
END;
/
Oracle 11g provides the PL/SQL code to create a password complexity verify function.
The script is called
utlpwdmg.sql
and is in the
$ORACLE_HOME/rdbms/admin
directory. The
name of the function created using this script is called
verify_function_11g
.
Auditing Database Activity
Auditing involves monitoring and recording specific database activity. An Oracle 11g data-
base supports four levels of auditing:
Statement
ÛN
Privilege
ÛN
Object
ÛN
Fine-grained access
ÛN
95127c12.indd 695 2/17/09 2:43:46 PM
Please purchase PDF Split-Merge on www.verypdf.com to remove this watermark.
696
Chapter 12
N
Implementing Security and Auditing
These afford you two locations for recording these activities. Audit records can be stored
in either of these locations.
Database
ÛN
Operating-system files
ÛN
You tell the Oracle Database where to record audit trail records by setting the initializa-
tion parameter
audit_trail
. The default is
DB
, as in
AUDIT_TRAIL=DB
, which tells the data-
base to record audit records in the database.
AUDIT_TRAIL=DB,EXTENDED
tells the database
to record audit records in the database together with bind variables (
SQLBIND
) and the SQL
statement triggering the audit entry (
SQLTEXT
).
AUDIT_TRAIL=OS
tells the database to record
audit records in operating-system files. You cannot change this parameter in memory, only
in your pfile or spfile. For example, the following statement will change the location of
audit records in the spfile:
ALTER SYSTEM SET audit_trail=DB SCOPE=SPFILE;
The
audit_trail
parameter can also have values
XML
and
XML,EXTENDED
. With these two
options, audit records are written to OS files in XML format. The value of
NONE
disables
auditing.
After changing the
audit_trail
parameter, you will need to bounce (shut down and
start up) your database instance for the change to take effect.
When recorded in the database, most audit entries are recorded in the
SYS.AUD$
table.
On Unix systems, operating-system audit records are written into files in the directory
specified by the initialization parameter
audit_file_dest
(which is set to
$ORACLE_BASE/
admin/$ORACLE_SID/adump
if the database is created using DBCA). On Windows systems,
these audit records are written to the Event Viewer log file.
The four levels of auditing are described in the following sections.
Certain database activities are always recorded in the OS audit files.
Database connections using administrator privileges such as
SYSDBA
and
SYSOPER
are recorded. Database startup and shutdown are also recorded
in the OS audit files.
Managing Statement Auditing
Statement auditing involves monitoring and recording the execution of specific types of
SQL statements. In the following sections, you will learn how to enable and disable state-
ment auditing as well as identify what statement auditing options are enabled.
Enabling Statement Auditing
You enable auditing of specific SQL statements with an
AUDIT
statement. For example, to
audit the SQL statements
CREATE TABLE
,
DROP TABLE
, and
TRUNCATE TABLE
, use the
TABLE
audit option like this:
AUDIT table;
95127c12.indd 696 2/17/09 2:43:46 PM
Please purchase PDF Split-Merge on www.verypdf.com to remove this watermark.
Auditing Database Activity
697
To record audit entries for specific users only, include a
BY
USER
clause in the
AUDIT
state-
ment. For example, to audit
CREATE
,
DROP
, and
TRUNCATE TABLE
statements for user
juanita
only, execute the following:
AUDIT table BY juanita;
Frequently, you want to record only attempts that fail—perhaps to look for users who
are probing the system to see what they can get away with. To further limit auditing to only
these unsuccessful executions, use a
WHENEVER
clause like this:
AUDIT table BY juanita WHENEVER NOT SUCCESSFUL;
You can alternately specify
WHENEVER SUCCESSFUL
to record only successful statements.
If you do not include a
WHENEVER
clause, both successful and unsuccessful statements trigger
audit records.
You can further configure non-DDL statements to record one audit entry for the trigger-
ing session or one entry for each auditable action during the session. Specify
BY ACCESS
or
BY SESSION
in the
AUDIT
statement, like this:
AUDIT INSERT TABLE BY juanita BY ACCESS;
There are many auditing options other than
TABLE
or
INSERT TABLE
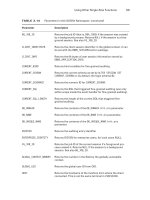
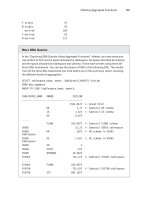
. Table 12.1 shows
all the statement-auditing options.
TABLE 12.1 Statement-Auditing Options
Statement-Auditing Option Triggering SQL Statements
ALTER SEQUENCE ALTER SEQUENCE
ALTER TABLE ALTER TABLE
COMMENT TABLE COMMENT ON TABLE
COMMENT ON COLUMN
DATABASE LINK CREATE DATABASE LINK
DROP DATABASE LINK
DELETE TABLE DELETE
EXECUTE PROCEDURE
Execution of any procedure or function or access to any cur-
sor or variable in a package
GRANT PROCEDURE GRANT
on a function, package, or procedure
GRANT SEQUENCE GRANT
on a sequence
GRANT TABLE GRANT
on a table or view
95127c12.indd 697 2/17/09 2:43:46 PM
Please purchase PDF Split-Merge on www.verypdf.com to remove this watermark.
698
Chapter 12
N
Implementing Security and Auditing
Statement-Auditing Option Triggering SQL Statements
INDEX CREATEINDEX
INSERT TABLE INSERT
into table or view
LOCK TABLE LOCK
NOT EXISTS
All SQL statements
PROCEDURE CREATE FUNCTION
DROP FUNCTION
CREATE PACKAGE
CREATE PACKAGE BODY
DROP PACKAGE
CREATE PROCEDURE
DROP PROCEDURE
PROFILE CREATE PROFILE
ALTER PROFILE
DROP PROFILE
ROLE CREATE ROLE
ALTER ROLE
DROP ROLE
SET ROLE
SELECT SEQUENCE SELECT
on a sequence
SELECT TABLE SELECT
from table or view
SEQUENCE CREATE SEQUENCE
DROP SEQUENCE
SESSION LOGON
SYNONYM CREATE SYNONYM
DROP SYNONYM
SYSTEM AUDIT AUDIT
NOAUDIT
SYSTEM GRANT GRANT
REVOKE
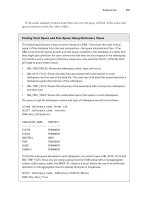
TABLE 12.1 Statement Audit Options (continued)
95127c12.indd 698 2/17/09 2:43:47 PM
Please purchase PDF Split-Merge on www.verypdf.com to remove this watermark.
Auditing Database Activity
699
Statement-Auditing Option Triggering SQL Statements
TABLE CREATE TABLE
DROP TABLE
TRUNCATE TABLE
TABLESPACE CREATE TABLESPACE
ALTER TABLESPACE
DROP TABLESPACE
TRIGGER CREATE TRIGGER
ALTER TRIGGER
(to enable or disable)
ALTER TABLE
(to enable all or disable all)
UPDATE TABLE UPDATE
on a table or view
USER CREATE USER
ALTER USER
DROP USER
VIEW CREATE VIEW
DROP VIEW
Identifying Enabled Statement-Auditing Options
You can identify the statement-auditing options that have been enabled in your database by
querying the
DBA_STMT_AUDIT_OPTS
data dictionary view. For example, the following example
shows that
SESSION
auditing is enabled for all users,
NOT EXISTS
auditing is enabled for all
users, and
TABLE
auditing
WHENEVER NOT SUCCESSFUL
is enabled for user
juanita
:
SELECT audit_option, failure, success, user_name
FROM dba_stmt_audit_opts
ORDER BY audit_option, user_name;
AUDIT_OPTION FAILURE SUCCESS USER_NAME
-------------------- ---------- ---------- -------------
CREATE SESSION BY ACCESS BY ACCESS
NOT EXISTS BY ACCESS BY ACCESS
TABLE BY ACCESS NOT SET JUANITA
TABLE 12.1 Statement Audit Options (continued)
95127c12.indd 699 2/17/09 2:43:47 PM
Please purchase PDF Split-Merge on www.verypdf.com to remove this watermark.
700
Chapter 12
N
Implementing Security and Auditing
Oracle Database 11g comes with the following auditing enabled by default:
ALTER ANY PROCEDURE
ÛN
ALTER ANY TABLE
ÛN
ALTER DATABASE
ÛN
ALTER PROFILE
ÛN
ALTER SYSTEM
ÛN
ALTER USER
ÛN
CREATE ANY JOB
ÛN
CREATE ANY LIBRARY
ÛN
CREATE ANY PROCEDURE
ÛN
CREATE ANY TABLE
ÛN
CREATE EXTERNAL JOB
ÛN
CREATE PUBLIC DATABASE LINK
ÛN
CREATE SESSION
ÛN
CREATE USER
ÛN
DROP ANY PROCEDURE
ÛN
DROP ANY TABLE
ÛN
DROP PROFILE
ÛN
DROP USER
ÛN
EXEMPT ACCESS POLICY
ÛN
GRANT ANY OBJECT PRIVILEGE
ÛN
GRANT ANY PRIVILEGE
ÛN
GRANT ANY ROLE
ÛN
ROLE
ÛN
SYSTEM AUDIT
ÛN
You can enable administrator auditing by setting the initialization param-
eter
AUDIT_SYS_OPERATIONS=TRUE
. All the activities performed connected
as
SYS
or
SYSDBA
/
SYSOPER
privileges are recorded in the OS audit trail.
Disabling Statement Auditing
To disable auditing of a specific SQL statement, use a
NOAUDIT
statement, which allows the
same
BY
and
WHENEVER
options as the
AUDIT
statement. If you enable auditing for a specific
user, specify that user in the
NOAUDIT
statement as well. However, it is not necessary to
include the
WHENEVER NOT SUCCESSFUL
clause in the
NOAUDIT
statement.
For example, to disable the three audit options in the previous section, execute the fol-
lowing three statements:
NOAUDIT session;
NOAUDIT not exists;
NOAUDIT table BY juanita;
Examining the Audit Trail
Statement, privilege, and object audit records are written to the
SYS.AUD$
table and made
available via the data dictionary views
DBA_AUDIT_TRAIL
and
USER_AUDIT_TRAIL
. These
data dictionary views cannot contain values for every record because this view is used for
95127c12.indd 700 2/17/09 2:43:47 PM
Please purchase PDF Split-Merge on www.verypdf.com to remove this watermark.