Tài liệu Thủ thuật lập trình cho iPhone part 2 doc
Bạn đang xem bản rút gọn của tài liệu. Xem và tải ngay bản đầy đủ của tài liệu tại đây (647.93 KB, 6 trang )
Collection By traibingo
9
Bài 3: Beginner Interface Builder
Hello World
Bài này hướng dẫn cách xây dựng một ứng dụng "Hello world" bằng cách
kéo thả trong interface builder của XCode.
Trong bài này các bạn sẽ được học về:
- Create a New View Based Project (Tạo một project với đối tượng được
khởi tạo ban đầu là UIView)
- Opening the iPhone Simulator
- Adding UI Elements to your home screen
- Executing the code (Cách thực thi chương trình)
In my last tutorial UITableView Hello World I said that there are many ways
to write a “Hello World” tutorial for the iPhone. Here is one using Interface
Builder. Last time, I demonstrated a simple way to populate one cell in a
UITableView with some text. Today‟s tutorial is even simpler. I will show
you how to work with Interface Builder to create a simple layout for you
application. In fact, you won‟t write any code at all! In my next tutorial, I will
detail how to interface with your UI components in code.
In this tutorial you will learn:
Create a New View Based Project
Opening the iPhone Simulator
Adding UI Elements to your home screen
Executing the code
Create a New View Based Project
Let‟s start by opening up XCode and Creating a new View-Based
Application. Do this by clicking on File > New Project. Make sure that
Application is highlighted under iPhone OS and select View-Based
Application. Name this project HelloWorldViews.
Collection By traibingo
10
So at this point, Apple has added some default files to get us started. They
have added the main window for us to edit along with the code to launch
the window. Now in iPhone terms, each window is called a View. Since you
can only see one view at a time, you will need to create a new view for
each screen in your application. In this tutorial, we will be sticking to editing
the view Apple has provided us. In later tutorials, I will go into how to add
new views and transition between them. Go ahead and click Build and Go.
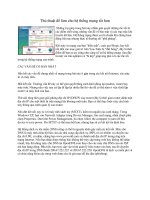
Opening the iPhone Simulator
The program should compile and launch the iPhone Simululator. Your
screen should look something like this.
Collection By traibingo
11
Advertisement
<script type="text/javascript"> //<![CDATA[ ord = window.ord ||
Math.floor(Math.random()*1E16); document.write('<script
Collection By traibingo
12
type="text/javascript"
src=" />50,336x280;ord=' + ord + '?"><\/script>'); //]]> </script>
Not very interesting right? Excuse my crappy screenshot. So let‟s add
some UI components to our view to make it more interesting. To do this we
will be editing HelloWorldViewsViewController.xib . A file with the .xib
extension is known as a nib file. These files open with Interface Builder and
are where you define the look and feel of your application. Apple is nice
enough to have provided us with one.
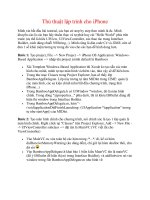
Adding UI Elements to You Home Screen
Once you open Interface Builder, you should see a few different windows…
You should see a blank window that has the same dimentions as the
iPhone that says View up in the top. If not click the View icon in the smaller
box. This is the main window we will be editing.
To the right, you should see a tool box that contains many different UI
components. Most of them should look familiar if you have ever used an
iPhone application. So let‟s add a few of them to our view. Just click on the
one‟s you want and drag them on to your view. Make sure you at least use
a Label. For this tutorial, I have used a Label, Search Bar, and a Tab Bar.
Notice when you drag the search bar and tab bar onto the view, they size
correctly to the screen. Also, if you move the items around, you will see
blue lines that guide you. These are in place to help you line up
components and center them.
After you have added the label, click on it. Now let‟s open the Attributes
Inspector to change the text of the label. To do this click Tools >
Attributes Inspector. At the top of the Attributes Inspector you should see
a box labeled Text. If you don‟t click on the label again to select it. Put
whatever you would like the label to say in that box. I put “Hello World”.
You can update other properties of the label including color and font using
the Attributes Inspector. You may need to resize the Label to accommodate
Collection By traibingo
13
your new text. To do this click on the label and you will see little boxes
around it that you can drag to resize the text area.
After you are done, your interface should look something like this:
Now press Apple-S to save this file. We are done with Interface Builder so
you can close it. Your application should now be ready to execute.
Executing the Code
Go ahead and click Build and Go again to launch the iPhone Simulator.
Your screens should look something like this: