18 cấu hình VPN client to site kết hợp radius
Bạn đang xem bản rút gọn của tài liệu. Xem và tải ngay bản đầy đủ của tài liệu tại đây (2.42 MB, 22 trang )
Cấu hình VPN Client to Site kết hợp Radius
Cấu hình VPN Client to Site kết hợp Radius
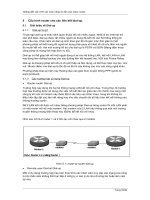
Kết nối VPN vốn đã khá phổ biến, tuy nhiên, nó lại chưa thật sự an toàn. Để tăng tính bảo mật cho hệ
thống, bài viết sẽ giới thiệu các bước cấu hình kết nối VPN Client to Site kết hợp với Radius Server.
Cấu hình VPN Client to Site kết hợp Radius
Thực hiện trên máy DC (BKNP-DC08-01)
Trong phòng ban IT cho phép các Group và User được phép VPN Client to Site
Start > Programs > Administrative Tools > Active Directory Users and Computers
Kiểm tra các OU, Group, User
Tạo thư mục và chia sẻ thư mục
Thực hiện trên Radius Server (BKNP-SRV08-02)
Join máy Radius Server vào Domain vàCài đặt Radius Server
Login bknpower\administrator
Start > Programs > Administrative Tools > Server Manager
Tại cửa sổ “Server Manager”, nhấn chuột phải vào Roles > chọn Add Roles
Tại cửa sổ “Select Server Roles”, chọn “Network Policy and Access Services”, chọn Next để tiếp tục
Tại cửa sổ “Network Policy and Access Services”, chọn Next.
Tại cửa sổ “Network Policy Server”,chọn Network Policy Server, chọn Next để tiếp tục
Tại cửa sổ “Confirm Installation Selections”, chọn Install để thực hiện cài đặt
Tại cửa sổ “Installation Progress”, quá trình cài đặt diễn ra
Tại cửa sổ “Installtion Resuts”, chọn Close để kết thúc việc cài đặt
Cấu hình Radius Server
Start > Programs > Administrative Tools > Network Policy Server
Tại cửa sổ “Network Policy Server”, RADIUS Clients and Servers > nhấn chuột phải vào RADIUS Clients > chọn New
RADIUS Client
Tại cửa sổ “New RADIUS Client”, trong phần Name and Address:
Friendly name: RADIUS Client
Address (IP or DNS): 192.168.1.1
Shared secret: 123456a@ | Confrim shared secret: 123456a@
> Chọn OK
Cài đặt dịch vụ VPN Server thực hiện trên máy BKNP-SRV08-01
Start > Programs > Administrative Tools > Server Manager
Tại cửa sổ “Server Manager” nhấn chuột phải vào Roles > chọn Add Roles
Tại cửa sổ “Before You Begin”, chọn Next.
Tại cửa sổ “Select Server Roles”, chọn “Network Policy and Access Service” > chọn Next.
Tại cửa sổ “Network Policy and Access Serices”, chọn Next.
Tại cửa sổ “Select Role Services”, chọn “Routing and Remote Access Services”, chọn Next.
Tại cửa sổ “Confirm Installation Selections”, chọn Install để thực hiện quá trình cài đặt
Quá trình cài đặt diễn ra
Tại cửa sổ “Installation Results”, chọn Close.
Cấu hình dịch vụ VPN
Start > Programs > Administrative Tools > Routing and Remote Access
Tại cửa sổ “Routing and Remote Access”, nhấn phải chuột vào BKNP-SRV08-01 (local) chọn Configure and Enable
Routing and Remote Access
Tại cửa sổ “Welcome to the Routing and Remote Access Server Setup Wizard”, chọn Next.
Tại cửa sổ “Configuretion”, chọn “Remote access (dial-up or VPN) > chọn Next để tiếp tục
Tại cửa sổ “Routing Access”, chọn VPN > chọn Next.
Tại cửa sổ “VPN Connection”, chọn card mạng external, chọn Next.
Tại cửa sổ “IP address Assignment”, chọn “From a specified range of addresses” > chọn Next để tiếp tục
Tại cửa sổ “Address Range Asignment”, chọn New…
Tại cửa sổ “ New IPv4 Address Range”, nhập dải mạng cần cấp phát > chọn OK để tiếp tục
Tại cửa sổ “Address Range Assignment”, chọn Next.
Tại cửa sổ “Managing Mutiple Remote Access Servers”, chọn “Yes, set up this server to work with a RADIUS
server” >chọn Next.
Tại cửa sổ “RADIUS Server Selection”, trong phần Primany RADIUS server : nhập tên địa chỉ ip của RADIUS server và
trong phần Shared secret : nhập password giống bên phần thiết lập cấu hình RADIUS Server : 123456a@
Tại cửa sổ “Completing the Routing and Remote Access Server Setup Wizard”, chọn Finish để kết thúc quá trình cài đặt
Tại cửa sổ “Routing and Remote Access”, chọn OK
Tạo kêt nối VPN thực hiện trên máy Client (BKNP-WRK-01)
Nhấn chuột phải vào Network, chọn Properties > chọn Set up a new connection or network
Tại cửa sổ “Set Up a Connection or Network”, chọn Connect to a workplace, chọn Next để tiếp tục
Tại cửa sổ “Connect to a Workplace”, chọn Use my Internet connection (VPN)
Chọn I’ll Set up an Internet connect later
Nhập địa IP Publish của công ty vào phần Internet address, nhập tên mô tả cho card mạng kết nối VPN, chọn Next.
Nhập thông tin user name và password của user được phép kết nối VPN, chọn Create để tạo đường truyền kết nối
Tại cửa sổ “Connect Ket Noi VPN”, chọn Connect
Quá trình kết nối diễn ra
Star > CMD > gõ lệnh: ipconfig để kiểm tra IP được được cấp phát
Gõ lệnh Ping tới địa chỉ IP của DC (BKNP-DC08-01)
Truy cập vào thư mục chia sẻ
BÀI VIẾT CÙNG CHUYÊN MỤC