22 cấu hình DFS replication trên windows server 2008
Bạn đang xem bản rút gọn của tài liệu. Xem và tải ngay bản đầy đủ của tài liệu tại đây (2.51 MB, 23 trang )
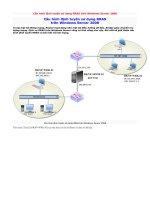
Cấu hình DFS Replication trên Windows Server 2008
Bài viết cấu hình DFS trên Windows Server 2008 đã đưa ra những cấu hình cơ bản và thực tế nhất về DFS. Trong bài viết này
sẽ giới thiệu về cấu hình đồng bộ thư mục qua DFS trên Windows Server 2008
Cấu hình DFS Replication trên Windows Server 2008
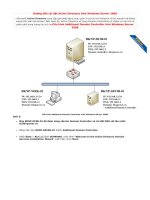
1. Cài đặt dịch vụ DFS trên DC (BKNP-DC08-01)
Start > Programs > Administrative Tools > Server Manager
Tại cửa sổ “Server Manager”, chọn Roles > Add Roles
Trong cửa sổ “Before You Begin”, chọn Next.
Tại cửa sổ “Select Server Roles”, chọn File Services > chọn Next.
Tại cửa sổ “Select Role Serives”, chọn Distributed File System > chọn Next.
Tại cửa sổ “Create a DFS Namespace”, chọn Create a namespace now, using this wizard, nhập tên Namespace: Data
Tại cửa sổ “Select Namespace Type”, chọn Next.
Tại cửa sổ “Configure Namespace”, chọn Next để tiếp tục
Tại cửa sổ “Confirm Installation Selections”, chọn Install để thực hiện quá trình cài đặt
Tại cửa sổ “Installation Progress”, quá trình cài đặt diễn ra
Tại cửa sổ “Installation Results”, chọn Close để kết thúc quá trình cài đặt
Tạo thư mục ProjectDocs trên ổ C máy BKNP-SRV01-01
2. Cài đặt dịch vụ DFS trên cả 2 Server BKNP-SRV08-01 và BKNP-SRV08-02
Start > Administrative Tools > Server Manager
Tại cửa sổ “Server Manager”, chọn Roles > Add Roles
Tại cửa sổ “Before You Begin”, chọn Next.
Tại cửa sổ “Select Server Roles”, chọn File Service > chọn Next.
Tại cửa sổ “Select Role Services”, chọn Distributed File System, chọn Next để tiếp tục
Tại cửa sổ “Create a DFS Namespace”, chọn Create a namespace later using the DFS Manager snap-in in Server Manager >
chọn Next.
Tại cửa sổ “Confirm Installation Selections”, chọn Install để cài đặt
Tại cửa sổ “Installation Progress”, quá trình cài đặt diễn ra
Tại cửa sổ “Installation Results”, chọn Close để kết thúc quá trình cài đặt DFS
3. Cấu hình dịch vụ DFS trên máy BKNP-SRV08-01
Start > Programs > Administrative Tools > DFS Management
Tại cửa sổ “DFS Management”, chuột phải Replication > New Replication Group
Tại cửa sổ “Replication Group Type”, chọn Replication group for data collection > chọn Next.
Tại cửa sổ “Name and Domain”, trong ô Name of replication group điền tên: ProjectDocs, chọn Next để tiếp tục
Tại cửa sổ Branch Server, trong ô Name chọn Browse… > tìm máy BKNP-SRV08-01 >chọn Next để tiếp tục
Tại cửa sổ “Replicated Folders”, chọn Add…
Tại cửa sổ “Add Folder to Replicate”, chọn Browse…
Tại cổ sở “Browse For Folder”, chọn thư mục ProjectDocs > chọn OK
Tại cửa sổ “Add Folder to Replicate”, chọn OK
Tại cửa sổ “Replicated Folders”, chọn Next.
Tại cửa sổ “Hub Server”, chọn Browse… > chọn máy server BKNP-SRV08-02 để đồng bộ thư mục ProjectDocs > chọnNext.
Tại cửa sổ “Target Folder on Hub Server”, chọn Browse tới ổ đĩa C để đồng bộ, chọn Next để tiếp tục
Tại cửa sổ “Replication Group Schedule and Bandwidth”, chọn Replicate continuously using the specified bandwidth > trong
phần Bandwidth: chọn Full > chọn Next.
Tại cửa sổ “Review Settings and Create Replication Group”, chọn Create
Tại cửa sổ “Confirmation”, quá trình tạo Replication Group thành công > chọn Close
Tại cửa sổ “DFS Management”, chọn ProjectDocs, chọn Tab Replicated Folders, nhấn chuột phải vào ProjectDocs, chọnShare
and Publish in Namespace…
Tại cửa sổ “Publishing method”, chọn Share and publish the replicated folder in a namespace > chọn Next.
Tại cửa sổ “Share Replicated Folders”, bôi đen cả hai máy server, chọn Next để tiếp tục
Tại cửa sổ “Namespace Path”, chọn Next.
Tại cửa sổ “Review Settings and Share Replicated Folder”, chọn Share
Tại cửa sổ “Confirmation”, quá trình cài đặt xong, chọn Close
4. Kiểm tra trên máy Server BKNP-SRV08-02
Vào ổ C kiểm tra thư mục ProjectDocs đã đồng bộ
BÀI VIẾT CÙNG CHUYÊN MỤC