Tài liệu DSP Builder Installation and Licensing pdf
Bạn đang xem bản rút gọn của tài liệu. Xem và tải ngay bản đầy đủ của tài liệu tại đây (245.32 KB, 22 trang )
101 Innovation Drive
San Jose, CA 95134
www.altera.com
DSP Builder
Installation and Licensing
Software Version: 9.0
Document Date: March 2009
Copyright © 2009 Altera Corporation. All rights reserved. Altera, The Programmable Solutions Company, the stylized Altera logo, specific device designations, and all other
words and logos that are identified as trademarks and/or service marks are, unless noted otherwise, the trademarks and service marks of Altera Corporation in the U.S. and other
countries. All other product or service names are the property of their respective holders. Altera products are protected under numerous U.S. and foreign patents and pending ap-
plications, maskwork rights, and copyrights. Altera warrants performance of its semiconductor products to current specifications in accordance with Altera's standard warranty,
but reserves the right to make changes to any products and services at any time without notice. Altera assumes no responsibility or liability arising out of the application or use of
any information, product, or service described herein except as expressly agreed to in writing by Altera Corporation. Altera customers are advised to obtain the latest version of
device specifications before relying on any published information and before placing orders for products or services
.
MNL-01039-2.0
© March 2009 Altera Corporation DSP Builder Installation and Licensing
Contents
Chapter 1. Introduction
System Requirements . . . . . . . . . . . . . . . . . . . . . . . . . . . . . . . . . . . . . . . . . . . . . . . . . . . . . . . . . . . . . . . . . . . . 1–1
Chapter 2. DSP Builder Installation
Obtaining & Installing DSP Builder . . . . . . . . . . . . . . . . . . . . . . . . . . . . . . . . . . . . . . . . . . . . . . . . . . . . . . . . 2–1
Downloading DSP Builder . . . . . . . . . . . . . . . . . . . . . . . . . . . . . . . . . . . . . . . . . . . . . . . . . . . . . . . . . . . . . 2–1
Installing DSP Builder on Windows . . . . . . . . . . . . . . . . . . . . . . . . . . . . . . . . . . . . . . . . . . . . . . . . . . . . . 2–1
Installing DSP Builder on Linux . . . . . . . . . . . . . . . . . . . . . . . . . . . . . . . . . . . . . . . . . . . . . . . . . . . . . . . . . 2–2
Manual Configuration of the MATLAB Environment . . . . . . . . . . . . . . . . . . . . . . . . . . . . . . . . . . . . 2–3
DSP Builder Directory Structure . . . . . . . . . . . . . . . . . . . . . . . . . . . . . . . . . . . . . . . . . . . . . . . . . . . . . . . . 2–5
Using Previous Versions of DSP Builder . . . . . . . . . . . . . . . . . . . . . . . . . . . . . . . . . . . . . . . . . . . . . . . . . 2–5
Previous Versions . . . . . . . . . . . . . . . . . . . . . . . . . . . . . . . . . . . . . . . . . . . . . . . . . . . . . . . . . . . . . . . . . . 2–6
DSP Builder Start Up Dependencies . . . . . . . . . . . . . . . . . . . . . . . . . . . . . . . . . . . . . . . . . . . . . . . . . . . . . 2–6
MATLAB Issues . . . . . . . . . . . . . . . . . . . . . . . . . . . . . . . . . . . . . . . . . . . . . . . . . . . . . . . . . . . . . . . . . . . . . . . . . 2–7
Directory Path Names in MATLAB Scripts . . . . . . . . . . . . . . . . . . . . . . . . . . . . . . . . . . . . . . . . . . . . . . . 2–7
Slow Library Browser in R2008a . . . . . . . . . . . . . . . . . . . . . . . . . . . . . . . . . . . . . . . . . . . . . . . . . . . . . . . . 2–7
Using Multiple Versions of MATLAB . . . . . . . . . . . . . . . . . . . . . . . . . . . . . . . . . . . . . . . . . . . . . . . . . . . . 2–8
Standard Blockset . . . . . . . . . . . . . . . . . . . . . . . . . . . . . . . . . . . . . . . . . . . . . . . . . . . . . . . . . . . . . . . . . . 2–8
Advanced Blockset . . . . . . . . . . . . . . . . . . . . . . . . . . . . . . . . . . . . . . . . . . . . . . . . . . . . . . . . . . . . . . . . . 2–8
Using 32-bit MATLAB on 64-bit Machines . . . . . . . . . . . . . . . . . . . . . . . . . . . . . . . . . . . . . . . . . . . . . . . . 2–8
Setting Up Licensing . . . . . . . . . . . . . . . . . . . . . . . . . . . . . . . . . . . . . . . . . . . . . . . . . . . . . . . . . . . . . . . . . . . . . 2–9
Appending the License to Your license.dat File . . . . . . . . . . . . . . . . . . . . . . . . . . . . . . . . . . . . . . . . . . . 2–9
Specifying the License File Location . . . . . . . . . . . . . . . . . . . . . . . . . . . . . . . . . . . . . . . . . . . . . . . . . . . . . 2–9
Upgrading From the Previous Release . . . . . . . . . . . . . . . . . . . . . . . . . . . . . . . . . . . . . . . . . . . . . . . . . . . . 2–10
Appendix A. Upgrading From a Pre-v7.1 Release
Upgrading Your Existing Models . . . . . . . . . . . . . . . . . . . . . . . . . . . . . . . . . . . . . . . . . . . . . . . . . . . . . . . . . A–1
Limitations of the Upgrade Model Utility . . . . . . . . . . . . . . . . . . . . . . . . . . . . . . . . . . . . . . . . . . . . . . . . . . A–2
Non-synthesizable Simulink components . . . . . . . . . . . . . . . . . . . . . . . . . . . . . . . . . . . . . . . . . . . . . . . A–4
Using a Simulink Library Forwarding Table . . . . . . . . . . . . . . . . . . . . . . . . . . . . . . . . . . . . . . . . . . . . . A–4
Updating the MegaCore Functions in your Design . . . . . . . . . . . . . . . . . . . . . . . . . . . . . . . . . . . . . . . . . . A–4
Additional Information. . . . . . . . . . . . . . . . . . . . . . . . . . . . . . . . . . . . . . . . . . . . . . . . . . . . . . . . . . . . . . . . . . . Info–1
Revision History . . . . . . . . . . . . . . . . . . . . . . . . . . . . . . . . . . . . . . . . . . . . . . . . . . . . . . . . . . . . . . . . . . . . . Info–1
How to Contact Altera . . . . . . . . . . . . . . . . . . . . . . . . . . . . . . . . . . . . . . . . . . . . . . . . . . . . . . . . . . . . . . . . Info–1
Typographic Conventions . . . . . . . . . . . . . . . . . . . . . . . . . . . . . . . . . . . . . . . . . . . . . . . . . . . . . . . . . . . . . Info–1
iv Contents
DSP Builder Installation and Licensing © March 2009 Altera Corporation
© March 2009 Altera Corporation DSP Builder Installation and Licensing
1. Introduction
This document describes the requirements and procedures for installing the DSP
Builder software which is available from the Download Center of the Altera website,
and the Altera Complete Design Suite which is available by request on a DVD-ROM.
System Requirements
DSP Builder is integrated with the MATLAB/Simulink tools from The MathWorks
and with the Altera Quartus
®
II software both of which must be available on your
workstation before you install DSP Builder.
f For system requirements and installation instructions, refer to Quartus II Installation &
Licensing for Windows and Linux Workstations on the Altera Literature website.
1 DSP Builder is supported on 32-bit or 64-bit Windows XP, 32-bit or 64-bit Linux
workstations, and 32-bit Windows Vista workstations, but not on 64-bit Windows
Vista workstations.
Table 1–1
lists the tool dependencies for the v9.0, v8.1, and v8.0 releases.
Table 1–1. DSP Builder Tool Dependencies
Tool Software Version
DSP Builder 9.0 8.1 8.0 or 8.0 SP1
Quartus II 9.0 8.1 8.0 or 8.0 SP1
The MathWorks
(MATLAB/Simulink)
(1), (2), (3)
R2007b, R2008a,
R2008b, or R2009a
R2007b, R2008a, or
R2008b
R2006a, R2006b,
R2007a, R2007b, or
R2008a
ModelSim
®
6.4a 6.3g 6.1d to 6.1g
Notes to Table 1–1:
(1) Only 32-bit versions of The MathWorks release are currently supported.
(2) DSP Builder does not work with MATLAB in read only mode. If error messages are issued while creating board
components during the DSP Builder installation, re-install MATLAB with the READ ONLY option unchecked.
(3) The DSP Builder Advanced blockset uses Simulink fixed-point types for all operations and requires licensed
versions of the Simulink Fixed Point blockset and Fixed-Point Toolbox. The Signal Processing Blockset and
Communications Blockset are also recommended and are used in the demonstration designs.
1–2 Chapter 1: Introduction
System Requirements
DSP Builder Installation and Licensing © March 2009 Altera Corporation
© March 2009 Altera Corporation DSP Builder Installation and Licensing
2. DSP Builder Installation
Obtaining & Installing DSP Builder
Before you can use DSP Builder, you must obtain the files and install them on your
computer. DSP Builder can be installed from the Altera Complete Design Suite DVD,
or downloaded from the Altera web site.
1 The MATLAB, Simulink and Quartus II software must be installed before you install
DSP Builder. DSP Builder is installed into the directory containing the corresponding
version of the Quartus II software and you must have write access privileges to this
location.
The following instructions describe downloading and installing DSP Builder. If you
already have installed DSP Builder from the DVD, skip to “DSP Builder Directory
Structure” on page 2–5.
Downloading DSP Builder
If you have Internet access, you can download DSP Builder from Altera’s web site at
www.altera.com. Follow the instructions below to download DSP Builder from the
Internet:
1. Point your web browser to www.altera.com/support/software/download.
2. Click on DSP Builder and then the link to Download DSP Builder.
3. Fill out the registration form and click Submit Request.
4. Read the Altera license agreement. Turn on the I have read the license agreement
check box and click Proceed to Final Step.
5. Follow the instructions on the download and installation page to download the
executable and save it to your hard disk.
6. If you have downloaded the Linux version of DSP Builder, you need to untar the
downloaded file using the following command:
tar xvf 90_dsp_builder_linux.tar
1 If you do not have Internet access, contact your local Altera representative to obtain
the Altera Complete Design Suite DVD.
Installing DSP Builder on Windows
Follow these steps to install DSP Builder on a computer running a supported version
of the Windows operating system:
1. Close the following software if it is running on your computer:
■ The Quartus II software
■ The MATLAB and Simulink tools
■ The ModelSim simulator
2–2 Chapter 2: DSP Builder Installation
Obtaining & Installing DSP Builder
DSP Builder Installation and Licensing © March 2009 Altera Corporation
2. Choose Run (Windows Start menu).
3. Type <path>\DSPBuilder-v9.0.exe, where <path> is the location of the
downloaded file.
4. Click OK. The DSP Builder v9.0 - InstallShield Wizard dialog box appears.
1 If an existing installation of DSP Builder v9.0 is detected, you must
de-install it before repeating steps 3 and 3 to install the latest version.
5. Follow the on-line instructions to install a new copy of the product. You are
prompted for the locations of the Quartus II and MATLAB software you want to
use with DSP Builder. You can also choose whether to install the standard,
advanced or both blocksets.
1 MATLAB is invoked in a minimized window during the install. The
transcript may include a number of entity creation error messages but these
can be ignored and all components should be correctly initialized.
Installing DSP Builder on Linux
You must have an existing MATLAB/Simulink installation. If you have write access
privileges to this installation, you can setup DSP Builder for all users of MATLAB. In
this case, the install program updates the pathdef.m and classpath.m files in the
MATLAB install directory.
If you do not have write access privileges to the MATLAB/Simulink installation, you
can setup DSP Builder to use a shared MATLAB installation using local configuration
information in the matlab subdirectory below your home directory.
Follow these steps to install DSP Builder on a computer running a supported version
of the Linux operating system:
1. Close the following software if it is running on your computer:
■ The Quartus II software
■ The MATLAB and Simulink tools
■ The ModelSim simulator
1 If you have an existing installation of DSP Builder v9.0, you should remove
the existing dsp_builder and dspba directories before running the install
script.
2. Type <path>/install setup_matlab, where <path> is the location of the
downloaded files.
1 If you use the setup_matlab option, the QUARTUS_ROOTDIR
environment variable must be set to the location of the Quartus II software
and both the Quartus II and MATLAB bin directories must be on the path.
If you omit setup_matlab, the files are unzipped into the Quartus II
install directory but MATLAB configuration is not attempted.
f For information about QUARTUS_ROOTDIR, refer to Quartus II
Installation & Licensing for Windows and Linux Workstations.
Chapter 2: DSP Builder Installation 2–3
Obtaining & Installing DSP Builder
© March 2009 Altera Corporation DSP Builder Installation and Licensing
3. Follow the on-line instructions to install a new copy of the product. You are
prompted for the location of the Quartus II software you want to use with DSP
Builder. The location specified by the QUARTUS_ROOTDIR environment
variable is used as the default.
The standard and advanced blocksets are both installed by default when you use
the Linux install script. However, you can specify the option dspb_only to
install only the standard blockset or dspba_only to install only the advanced
blockset. You can also use the auto option to install both blocksets using
default locations without prompting for the location of the Quartus II software.
1 The MATLAB path, libraries and classpath are set up using scripts written
to your local matlab subdirectory.
Manual Configuration of the MATLAB Environment
The install program unzips the dsp_builder.tgz archive into the specified Quartus II
install directory. You can perform this operation manually by copying the archive file
into the directory above the Quartus II install directory and running the following
command:
gtar -xzf dsp_builder.tgz
1 gtar and gzip executables are provided with the archive file for this purpose in case
there are compatibility issues with the default executables.
Setting the MATLAB Path
If you use the setup_matlab option, the install program creates a startup.m
script in $HOME/matlab. This script is automatically executed to set the MATLAB
path and classpath when you start MATLAB.
Alternatively you can set the MATLAB path by clicking Set Path on the File menu in
MATLAB and adding the following paths for the standard blockset:
<install directory>/dsp_builder/bin
<install directory>/dsp_builder/bin/matlab
<install directory>/dsp_builder/bin/mdllibrary
<install directory>/dsp_builder/bin/post2008a
Similarly, set the following paths for the advanced blockset:
<install directory>/dspba/Blocksets
<install directory>/dspba/Blocksets/BaseBlocks
<install directory>/dspba/Blocksets/BaseBlocks/post2008a
<install directory>/dspba/Blocksets/FFTBlocks
<install directory>/dspba/Blocksets/Filters
<install directory>/dspba/Blocksets/ModelBus
<install directory>/dspba/Blocksets/ModelPrim
<install directory>/dspba/Blocksets/WaveformSynthesis
<install directory>/dspba/Docs/Help
2–4 Chapter 2: DSP Builder Installation
Obtaining & Installing DSP Builder
DSP Builder Installation and Licensing © March 2009 Altera Corporation
1 The post2008a directories must be in the path for MATLAB R2008a or
later. For MATLAB R2007b or earlier the path should include pre2008a
directories.
You can optionally add paths to each of the directories that contain example design
models if you want to open them from your current working directory.
Setting the Classpath
The startup.m file created by the install program also updates the static classpath to
include the dspb_sblocks.jar file. Alternatively, you can copy classpath.txt from
/toolbox/local/ in the MATLAB installation into a local directory, changing it to
include <install directory>/dsp_builder/bin/dspb_sblocks.jar, and then invoking
MATLAB from this local directory.
1 You can check the classpath by running javaclasspath in MATLAB to confirm that
the dspb_sblocks.jar file is on the static classpath.
Setting LD_LIBRARY_PATH
The LD_LIBRARY_PATH environment variable must be set for the C++ shared
libraries to work properly. If it is not set correctly, MATLAB issues error messages of
the form:
Invalid MEX-file .mexglx
If you set LD_LIBRARY_PATH globally it may affect other programs and it is best to
set it either in a script that you use to invoke MATLAB or by creating a .matlab7rc.sh
in your home directory.
This file is created automatically if you use the setup_matlab option when you
install DSP BUILDER. Alternatively, you can copy the original version of this file
from /bin/ in the MATLAB installation into your home directory and edit this copy to
include the required paths.
The required paths are <install directory>/linux for the Quartus II software, <install
directory>/dsp_builder/bin for the DSP Builder standard blockset, and <install
directory>/dspba/Blocksets/BaseBlocks/post2008a for the DSP Builder advanced
blockset (or <install directory>/dspba/Blocksets/BaseBlocks/pre2008a for version
R2007b of MATLAB).
The matlab7rc.sh file is divided into sections for each operating system. For 32-bit
Linux, the relevant section is marked:
#
;;
glnx86)
#
If you add the required paths to LDPATH_SUFFIX, MATLAB adds them to the end of
the LD_LIBRARY_PATH variable when it starts up.
1 You can check that the library path has been set correctly by using the following
command in MATLAB:
getenv('LD_LIBRARY_PATH')
Chapter 2: DSP Builder Installation 2–5
Obtaining & Installing DSP Builder
© March 2009 Altera Corporation DSP Builder Installation and Licensing
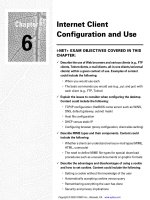
DSP Builder Directory Structure
The DSP Builder installation program copies files into the directories shown in
Figure 2–1 where <path> is the installation directory which contains the Quartus II
software. The default installation directory is c:\altera\<version>\quartus on
Windows or /opt/altera<version>/quartus on Linux.
After installing DSP Builder, the Altera DSP Builder Blockset and/or the Altera DSP
Builder Advanced Blockset libraries are available in the Simulink library browser in
the MATLAB software.
Using Previous Versions of DSP Builder
The DSP Builder install program searches for an existing installation of DSP Builder
before it installs a new version. If an existing installation is found, the program
prompts you to update the existing installation or install a new copy of the product. If
you choose to update an existing product, you can modify, repair or remove the old
version.
1 Do not attempt to modify or repair a previous version of DSP Builder using the v8.1
install program. These products can only be modified using a corresponding installer.
Figure 2–1. DSP Builder Directory Structure
<path>
Installation directory containg the Quartus II software.
dsp_builder
Contains the DSP Builder standard toolset.
bin
Contains binary files, m-scripts and the Simulink Library for the standard blockset.
DesignExamples
Contains a wide variety of demonstration designs that use the standard blockset.
docs
Contains documentation, including PDF manuals and the on-line help files
for each standard block that are displayed in the MATLAB Help window.
func_sim
Contains files for fast functional simulation.
legacy
Contains files required for upgrading legacy designs.
lib
Contains library files.
dspba
Contains the DSP Builder advanced toolset.
Blocksets
Contains binary files, m-scripts and the Simulink Library for the advanced blockset.
Docs
Contains documentation, including PDF manuals and the on-line help files
for each advanced block that are displayed in the MATLAB Help window.
Examples
Contains a wide variety of demonstration designs that use the advanced blockset.
2–6 Chapter 2: DSP Builder Installation
Obtaining & Installing DSP Builder
DSP Builder Installation and Licensing © March 2009 Altera Corporation
Previous Versions
A previous version of DSP Builder cannot co-exist with v8.1 in the same version of
MATLAB. However, you can register each version of DSP Builder with different
versions of MATLAB as described in “Using Multiple Versions of MATLAB” on
page 2–8.
1 DSP Builder must be used with a matching version of the Quartus II software. Ensure
that you also change the value of your QUARTUS_ROOTDIR environment variable if
you are switching between versions.
DSP Builder Start Up Dependencies
Before version 6.0, DSP Builder did not have any explicit dependencies on the
Quartus II software. Signal Compiler could be started in DSP Builder provided
there was a version of the Quartus II software registered on the computer where DSP
Builder was running. From the version 6.0 release, DSP Builder is built using the
Quartus II libraries to share functionality that exists in the Quartus II software. This,
however, places explicit dependencies on the Quartus II versions.
DSP Builder is Simulink dependent. After installing DSP Builder, you need to register
it inside MATLAB to enable the DSP Builder features. You can then create DSP
designs using DSP Builder blocks and run Simulink simulations without any
requirements on the Quartus II software.
However, when you want to generate VHDL for the DSP design and to fit the design
onto an FPGA, DSP Builder requires the Quartus II synthesis, and Fitter tools.
The Signal Compiler tool inside DSP Build can only be started with a matching
version of the Quartus II software and explicitly depends on the correct version
libraries and dynamic link library (.dll) files in the Quartus II software installation.
The Signal Compiler dialog box does not display without a matching version of the
Quartus II software.
If Signal Compiler does not run properly, you can follow the steps given below to
check whether a compatible version of the Quartus II software is registered when DSP
Builder is run.
1. After installing DSP Builder inside MATLAB, type ver in the MATLAB command
window. The DSP Builder version and build numbers are displayed under DSP
Builder - Altera Corporation.
2. Open a DOS command prompt and type either env or set to display the
environment settings. Check that the environment variable QUARTUS_ROOTDIR
points to the correct Quartus II software installation.
3. Check the PATH environment variable to ensure that the correct version of the
Quartus II software is in the path.
1 PATH must point to %QUARTUS_ROOTDIR%\bin even if you use the
64-bit version of the Quartus II software. This path is used to locate 32-bit
dynamic link library (.dll) files required by DSP Builder which cannot be
found if %QUARTUS_ROOTDIR%\bin64 is included in the path before
the %QUARTUS_ROOTDIR%\bin directory.
Chapter 2: DSP Builder Installation 2–7
MATLAB Issues
© March 2009 Altera Corporation DSP Builder Installation and Licensing
4. When Cygwin is installed, make sure that it is listed after Quartus in the path.
Correct environment settings in Cygwin do not guarantee that Signal
Compiler starts properly, as DSP Builder relies on DOS settings rather than
Cygwin. (When MATLAB is started from a Cygwin command prompt window,
system env in the MATLAB command window only reflects the Cygwin
settings.)
5. If there are any other operation systems, such as WinVar, installed on top of
Windows, make sure that they are listed after Quartus in the PATH environment
variable.
MATLAB Issues
DSP Builder can be used with The MathWorks releases listed in Table 1–1 on
page 1–1.
Directory Path Names in MATLAB Scripts
Commands invoked from within a m-script cannot resolve a UNC path to a remote
file system. An error is issued when you attempt to run a MATLAB script that uses a
UNC path.
This affects Signal Compiler, MegaCore function, HDL import, functional simulation,
hardware-in-the-loop and the State Machine Table block.
This issue can be avoided by mapping the network UNC path to a local drive.
Slow Library Browser in R2008a
The Simulink Library Browser is very slow when opening the DSP Builder Advanced
Blockset library in release R2008a. This problem is caused because the library browser
loads and rescales multiple copies of the high definition .jpg background images used
by the blocks in the advanced blockset. This problem has been fixed in R2008b.
You can workaround this problem for R2008a by rescaling the background .jpg
images in <install directory>\quartus\dspba\Blocksets\BaseBlocks and saving
them with a lower resolution.
1 You can optionally replace the background images by your own custom images. For
example, a plain background would give the fastest load time in the library browser.
For an example of how you can change the background icon for a block, refer to the
description of the Edit Params block in the DSP Builder Advanced Blockset Reference
Manual.
2–8 Chapter 2: DSP Builder Installation
MATLAB Issues
DSP Builder Installation and Licensing © March 2009 Altera Corporation
Using Multiple Versions of MATLAB
You specify the MATLAB installation that you want to use with DSP Builder during
DSP Builder installation. If you have more than one MATLAB installation (for
example, release R2007b and R2008a) you can register DSP Builder with another
version using the following procedure:
Standard Blockset
1. Open a command prompt and change directory to the standard blockset
installation:
cd <DSP Builder Install Path>dsp_builder
2. Run the following command to register the DSP Builder blocksets with the
required MATLAB installation:
setupMatlabClassPath install <MATLAB Install Path> <DSP Builder
Install Path>\dsp_builder
1 You must use quotes if the DSP Builder install path or MATLAB install
path include spaces.
Advanced Blockset
1. Open MATLAB and change directory to the advanced blockset installation:
cd <DSP Builder Install Path>dspba
2. Run the following command in the MATLAB command window to register the
DSP Builder advanced blockset with the current MATLAB installation:
alt_adv_dspb_install
Using 32-bit MATLAB on 64-bit Machines
DSP Builder currently only supports 32-bit versions of MATLAB. However, if you
have a 64-bit MATLAB installation on a 64-bit Linux machine, you can run MATLAB
with the -glnx86 option to run in 32-bit mode compatible with DSP Builder. On a
64-bit Widows machine, you must install the 32-bit version of MATLAB to run DSP
Builder.
You can check the MATLAB version by running the MATLAB mexext utility which
returns the values shown in Table 2–1.
Table 2–1. Return Values for the MATLAB mexext Utility
MATLAB Version Return Value
32-bit Linux mexglx
64-bit Linux mexa64
32-bit Windows mexw32
64-bit Windows mexw64
Chapter 2: DSP Builder Installation 2–9
Setting Up Licensing
© March 2009 Altera Corporation DSP Builder Installation and Licensing
Setting Up Licensing
Before using DSP Builder, you must request a license file from the Altera website at
www.altera.com/licensing and install it on your computer. When you request a
license file, Altera e-mails you a license.dat file that enables HDL file and Tcl script
generation.
If you do not have a DSP Builder license file, you can create models with DSP Builder
blocks but you cannot generate HDL files or Tcl scripts.
1 Before you set up licensing for DSP Builder, you must already have the Quartus II
software installed on your computer with licensing set up.
To install your license, you can either append the license to your existing license.dat
file or you can specify an additional license file location.
Appending the License to Your license.dat File
To install your license, perform the following steps:
1. Close the following software if it is running on your computer:
■ The Quartus II software
■ The LeonardoSpectrum software
■ The Synplify software
■ The MATLAB and Simulink tools
■ The ModelSim simulator
■ The Precision RTL synthesis software
2. Open the DSP Builder license file in a text editor. The file should contain one
FEATURE line, spanning two lines.
3. Open your Quartus II license.dat file in a text editor.
4. Copy the FEATURE line from the DSP Builder license file and paste it into the
Quartus II license file.
1 Do not delete any FEATURE lines from the Quartus II license file.
5. Save the Quartus II license file.
1 When using editors such as Microsoft Word or Notepad, ensure that the file does not
have any extra extensions appended to it after you save (for example, license.dat.txt
or license.dat.doc). Verify the file name at the system command prompt.
Specifying the License File Location
DSP Builder looks for its license file in the same location as the Quartus II software. If
the LM_LICENSE_FILE variable is used in the Quartus II software, you can modify
this variable to specify an additional location for the DSP Builder license file.
Alternatively, you can add the additional location to the license file search path
specified in the Quartus II License Setup Options.
2–10 Chapter 2: DSP Builder Installation
Upgrading From the Previous Release
DSP Builder Installation and Licensing © March 2009 Altera Corporation
Upgrading From the Previous Release
You can upgrade your designs from the v8.1 release by simply opening them with
version 9.0 and saving the model files.
This procedure does not automatically update any MegaCore function blocks in your
design but the previous versions are compatible provided that the previous version of
the MegaCore IP library is still installed on your system.
1 You cannot upgrade from a pre-v7.1 release using the v9.0 release. If you have a
pre-v7.1 design, it must be upgraded to v7.2 before you can upgrade the v7.2 design
to v8.x or v9.0. For information about upgrading to v7.2 refer to “Upgrading From a
Pre-v7.1 Release” on page A–1.
© March 2009 Altera Corporation DSP Builder Installation and Licensing
A. Upgrading From a Pre-v7.1 Release
Upgrading Your Existing Models
You must have DSP Builder v7.1, v7.1 SP1, v7.2, v7.2 SP1, v7.2 SP2, or v7.2 SP3, and a
previous release (v6.1, v6.1 SP1, v7.0 or v7.0 SP1) of DSP Builder registered in
MATLAB before you can upgrade your pre-v7.1 design models.
1 You cannot upgrade from a pre-v7.1 release directly to v8.0, v8.0 SP1, or v9.0.
To upgrade a existing design, perform the following steps:
1. Use the MATLAB browser to navigate into the design directory for the old design.
1 The Altera DSP Builder Blockset must be opened in the Simulink library
browser before you can upgrade a design.
2. Open the top-level model in the design.
1 If your design consists of custom library components and a separate
testbench model, it is best to upgrade the testbench before any custom
library components.
3. In the Edit menu, choose Update Diagram (or use the Ctrl+D shortcut) to ensure
your design is up-to-date and correct the design if any errors or warnings are
issued. For example, if there are any warning that a block’s sample time is
back-inherited theses should be corrected by removing the -1 setting of its sample
time parameter.
4. Enter the following command at the MATLAB prompt:
alt_upgradeModel <model name> option1 option2
Any number of the available options can be used in any order. Table A–1 describes
the available options.
Table A–1. Options to the altUpgradeModel Command
Option Description
UnlockLibraries Causes libraries to be recursively unlocked and modified if referenced from the
upgraded design. Already-unlocked libraries are always upgraded.
RemoveSubsystemAltBusBlocks Upgrades the model and also deletes any unnecessary AltBus input blocks
connected to subsystem inputs and AltBus blocks connected to subsystem
outputs. In general, it is no longer necessary to have AltBus blocks connected to
every subsystem input or output and removing them means that bit widths can be
propagated into subsystems. However, the bit width specified on an AltBus block
may be used to reshape the inputs and outputs from the system and removing
these blocks may cause the behavior to change and in some cases may cause
unresolvable propagation loops.
Verbose Displays information about each block as it is upgraded or removed.
A–2 Appendix A: Upgrading From a Pre-v7.1 Release
Limitations of the Upgrade Model Utility
DSP Builder Installation and Licensing © March 2009 Altera Corporation
5. Save your design and close it (including any libraries that may have changed).
The design is reloaded and all libraries are correctly initialized when it is
reopened.
A copy of the model is backed up to a backup subdirectory and all blocks in the
model updated to use the new v8.0 Altera DSP Builder Blockset. If a backup
subdirectory already exists, a new subdirectory is created by appending an integer
(for example backup1).
1 You cannot revert a design model to a previous version after you have
updated it to v8.0. If you want to use an older version of DSP Builder, you
should use the version saved in the backup subdirectory.
f For more information about upgrading from a pre-v7.1 release, refer to the DSP
Builder Release 6.1 to 7.1 Migration Training presentation which can be accessed from
the DSP Builder Support page on the Altera website.
Limitations of the Upgrade Model Utility
The blocks in your model are upgraded to use the corresponding block in the new
v8.0 blockset. However some blocks may be obsolete or require manual intervention
to complete the conversion process.
<zz.Hotlink>Table Table A–2 lists some of the issues which may require attention.
Table A–2. Model Upgrade Issues (Part 1 of 2)
Issue Action
PLL output clocks cannot
be named
In previous versions of DSP Builder, it was possible to have a PLL block and multiple ClockAltr
blocks which represented PLL outputs. The PLL output clocks took the names of the clock
blocks. This feature is no longer supported and cannot be automatically fixed. The PLL output
clocks are now named <PLL name>_clk<output index>. All source blocks and rate change
blocks referencing clock pins must be manually edited to reference these PLL clock output
pins.
PLL period multiply and
divide values must be
integers
In pre-7.1 versions, the multiply and divide values could have non-integer values and could be
specified using MATLAB variables. You must now specify the clock period ratio directly as an
integer period multiplier and an integer period divider. MATLAB variables cannot be used.
The PLL output clock period
is incorrect after upgrade
Occasionally, the PLL parameters are upgraded incorrectly. Open the PLL parameter dialog and
enter the correct values for the period multipliers and dividers.
When upgrading a design
with a PLL, extra clock
blocks are created for each
distinct sample time
The extra Clock and Clock_Derived blocks should be removed, and any blocks referencing them
manually corrected to reference the PLL-driven clocks. Note that the numbering of these clock
pins will not in general match the numbering of the PLL clocks.
The PLL input clock
frequency information is
lost during the upgrade
process
Typically, you may want to create a new Clock block replicating this information, as the base
clock pin generated by the upgrade script is unlikely to be the correct driving clock domain. For
example, if the PLL specified an input clock frequency of 50 MHz, add a Clock block and
configure it to a clock period of 20ns and sample time 20e-9.
Clock blocks do not support
rate change divider
In pre-7.1 versions, the ClockAltr blocks supported a rate change option (Addition Clock
Divider) which could be used to generate a slower clock signal. This feature is no longer
supported. If you want to generate different frequency clocks internally, you must add a PLL
block driven from the required input clock.
Appendix A: Upgrading From a Pre-v7.1 Release A–3
Limitations of the Upgrade Model Utility
© March 2009 Altera Corporation DSP Builder Installation and Licensing
Error assigning clock for
Dual-Clock FIFO block
Under some circumstances - noted by the message “No clock specified for {write/read} port, ”
you may have to manually select clocks after upgrading designs containing the Dual-Clock FIFO
block.
Error assigning PLL clock
for Multi-Rate DFF block
When upgrading a Multi-Rate DFF block connected to a PLL clock, an error is issued of the
form: “Cannot upgrade clock in block foo/Multi-Rate DFF. Original clock source: PLL CLOCK0.”
The blocks must be manually corrected to reference the PLL clock.
Unnecessary clock
specification for source
blocks
In general, source blocks do not need to specify a clock domain, if it can be inferred from the
blocks they are driving. However, the upgrade path always specifies a clock if it is not the base
clock. Your multi-clock design may be easier to maintain if, after upgrading, you manually turn
off Specify Clock for source blocks – especially constant, VCC and GND blocks – wherever
possible.
Errors issued if a constant,
GND or VCC block is driving
a block with a different
sample time
These errors can usually be fixed by turning off Specify Clock on the constant block. If the
block is fed into several clock domains, you also need to add a Tsamp block before each one.
The BP block does not
support sample time mode
A warning is issued if your design includes a Bus Probe (BP) block which was set to display the
sample time because this option is no longer supported.
Phase selection has been
standardized across all
blocks
This may result in behavioral change when upgrading blocks that use phase selection.
The Multi Channel Display
and Extract blocks are not
supported
These blocks are no longer supported and should be removed before running the upgrade
script. You can use the Avalon-ST Packet Format Converter block directly in place of these
blocks. To prevent HDL being generated, insert Output blocks followed by Non-synthesizable
Input blocks on the inputs to the Avalon-ST Packet Format Converter block.
HIL designs must be
recompiled
For designs with Hardware in the Loop, you must recreate the Quartus II project and recompile
the HIL revision after upgrading.
Changes to rounding
method used for the
MATLAB arrays used to
initialize the LUT and RAM
blocks
The rounding method used when the data values specified by an initializing MATLAB array are
not exactly expressible in the chosen data type has changed. This means for example, that if
you specified the data type as Unsigned Integer and the value as 1.9 in a pre-7.1 version this
value was rounded up to 2; it is now rounded down to 1. You should the check the outputs from
LUT or RAM blocks if an error is issued stating that the values cannot be exactly represented in
the selected data format and choose revised initialization values that can be represented exactly
if the outputs are not as expected.
Black box subsystem are
not upgraded
Altbus blocks used as black box inputs or outputs must be manually changed to HDL Input and
HDL Output blocks and a HDL Entity block added to specify the HDL file and clock/reset ports.
An error is issued for any
block name which has a ‘/’
character
Rename any block containing a ‘/’ character in its name.
AltBus blocks within
subsystems which function
as input pins not updated
correctly
Move the input pins to the top level or replace them by Input blocks. (It is better to replace
these AltBus blocks before upgrading to ensure that the clock signals are set correctly.)
Device Programmer block
is not supported
Remove the Device Programmer block before running the upgrade program. Use Signal
Compiler or a HIL block to program the DSP development board.
The External RAM block is
not upgraded
This block is outside the DSP Builder system and is not automatically updated. You must
manually replace any pre-7.1 External RAM blocks in your designs with the latest version.
Table A–2. Model Upgrade Issues (Part 2 of 2)
Issue Action
A–4 Appendix A: Upgrading From a Pre-v7.1 Release
Updating the MegaCore Functions in your Design
DSP Builder Installation and Licensing © March 2009 Altera Corporation
Non-synthesizable Simulink components
In pre-7.1 versions, it was possible to connect non-synthesizable blocks within a DSP
builder system which would be automatically ignored by Signal Compiler. For
example, a design may have included Simulink assertion blocks that halted the
simulation if the output on a particular pin changed. It is now not possible to connect
to blocks that accept doubles only; therefore it may be necessary to add
non-synthesizable output blocks before such blocks.
Using a Simulink Library Forwarding Table
You can use a Simulink library forwarding table to update models with changes in the
names or locations of the library blocks that they reference. Using this feature, all of
the links in the upgraded version of the old file can be quickly and easily changed to
point to a different library.
f For more information, refer to Making Backward-Compatible Changes to Libraries in the
MATLAB Simulink help.
Updating the MegaCore Functions in your Design
After you have upgraded designs containing MegaCore functions, the MegaCore
blocks should be regenerated to ensure they are up-to-date. This can be done either by
individually double-clicking on each block, (changing the parameters, if required)
and clicking the Generate option, or by entering the following command at the
MATLAB prompt:
alt_dspbuilder_refresh_megacore
This command automatically regenerates all the MegaCore functions in the upgraded
design, using the existing parameterizations.
© March 2009 Altera Corporation DSP Builder Installation and Licensing
Additional Information
Revision History
The following table displays the revision history for this user guide.
How to Contact Altera
For the most up-to-date information about Altera products, refer to the following
table.
Typographic Conventions
This document uses the typographic conventions shown in the following table.
Date Version Changes Made
March 2009 2.0 Updated for v9.0 and added install procedures for Linux operating systems.
November 2008 1.0 Installation and licensing issued as a separate document for software version 8.1
Contact Note 1
Contact
Method Address
Technical support Website www.altera.com/support
Technical training Website www.altera.com/training
Product literature Website www.altera.com/literature
Non-technical support (General) Email
(Software Licensing) Email
Note to Table:
(1) You can also contact your local Altera sales office or sales representative.
Visual Cue Meaning
Bold Type with Initial Capital
Letters
Indicates command names, dialog box titles, dialog box options, and other GUI
labels. For example, Save As dialog box.
bold type Indicates directory names, project names, disk drive names, file names, file name
extensions, and software utility names. For example, \qdesigns directory, d: drive,
and chiptrip.gdf file.
Italic Type with Initial Capital Letters Indicates document titles. For example, AN 519: Stratix IV Design Guidelines.
Italic type Indicates variables. For example, n + 1.
Variable names are enclosed in angle brackets (< >). For example, <file name> and
<project name>.pof file.
Initial Capital Letters Indicates keyboard keys and menu names. For example, Delete key and the Options
menu.
Info–2 Additional Information
Typographic Conventions
DSP Builder Installation and Licensing © March 2009 Altera Corporation
“Subheading Title” Quotation marks indicate references to sections within a document and titles of
Quartus II Help topics. For example, “Typographic Conventions.”
Courier type Indicates signal, port, register, bit, block, and primitive names. For example, data1,
tdi, and input. Active-low signals are denoted by suffix n. Example: resetn.
Indicates command line commands and anything that must be typed exactly as it
appears. For example, c:\qdesigns\tutorial\chiptrip.gdf.
Also indicates sections of an actual file, such as a Report File, references to parts of
files (for example, the AHDL keyword SUBDESIGN), and logic function names (for
example, TRI).
1., 2., 3., and
a., b., c., and so on.
Numbered steps indicate a list of items when the sequence of the items is important,
such as the steps listed in a procedure.
■ ■ Bullets indicate a list of items when the sequence of the items is not important.
1 The hand points to information that requires special attention.
c
A caution calls attention to a condition or possible situation that can damage or
destroy the product or your work.
w
A warning calls attention to a condition or possible situation that can cause you
injury.
r The angled arrow instructs you to press the Enter key.
f The feet direct you to more information about a particular topic.
Visual Cue Meaning