Tài liệu Creating Applications with Mozilla-Chapter 11. Localization-P2 ppt
Bạn đang xem bản rút gọn của tài liệu. Xem và tải ngay bản đầy đủ của tài liệu tại đây (36.47 KB, 16 trang )
Chapter 11. Localization-P2
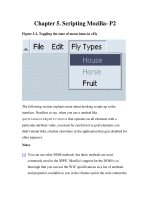
As you can see from their names and their locations in the chrome, each
bundle serves a different purpose. They include a file that contains the bulk
of the strings for the browser (navigator.properties), a file that
includes branding strings, and a couple of files for regional information. This
model is useful if you need to output many strings to the UI from your
source code and would like to organize them into meaningful groups.
11.3.1. Inside a Bundle
A string bundle (.properties) file has a very simple format. It contains
one or more lines that have the identifier associated with the localizable
string. The format of a string bundle string with an identifier is:
Identifier=String
The format for comments in a bundle file requires the hash notation (#).
Comments are useful for notifying translators of the context of strings, or
flagging a string that should be left as is and not localized. Comments in
properties files are formatted in the following manner.
# DO NOT TRANSLATE
applicationTitle=xFly
Spaces in bundles are treated literally spaces between words are observed,
with the exception of the start and the end of the string.
The next section shows the methods and properties specific to the
<stringbundle> element that are available to you when you use it. The
implementations are contained in the binding for the element.
11.3.2. String Bundle Methods and Properties
Defining your bundle in XUL and then creating the file with the values is
only half the story. This section shows how to extract the values from the
bundle and place them in UI. The language of choice in these examples is
JavaScript. This process is necessary when you have to change values in the
UI because DTD entities can not be updated dynamically.
11.3.2.1. Methods
Our bundle is defined in XUL like this:
<stringbundle id="bundle_xfly"
To access the methods of the bundle object in your script, you have to get a
handle on the XUL element by using its id. First declare the variable
globally that will be holding the bundle:
var xFlyBundle;
Then assign the variable to the bundle. A good place to do this is in the load
handler function of your XUL window, or in the constructor for your
binding if you are using it from there:
xFlyBundle =
document.getElementById("bundle_xfly");
Now that you have access to the bundle, you can use the available methods
to retrieve the strings. The two main functions are getString and
getFormattedString.
11.3.2.1.1. getString
The most straightforward string access method, getString, takes one
parameter (namely the identifier of the string) and returns the localizable
string value for use in the UI:
var readonly =
xFlyBundle.getString(`readonlyFile');
alert(readonly);
The string bundle entry looks like this:
readonlyfile=This file is read only
11.3.2.1.2. getFormattedString
This function takes an extra parameter an array of string values, which are
substituted into the string in the bundle. Then the full string with the
substituted values is returned:
var numFiles = numberInEditor
numFilesMsg =
xflyBundle.getFormattedString("numFilesMessage",
[numFiles]);
You can have more than one value replaced in the string, each one delimited
within the square brackets by using a comma:
fileInfo =
xflyBundle.getFormattedString("fileInformation",
[fileName, fileSize]);
The string bundle entry looks like this:
flyFileInformation=The file is called %1$s and its
size is %2$s
The %x numerical value refers to the ordering of the values to be substituted
in the string. The type of the value is determined by the dollar ($) symbol. In
this case, there are two possibilities $s is a string value and $d is an
integer value.
11.3.2.2. Properties
Some binding properties that are exposed to your script accompany the
methods. These properties are not often needed for routine retrieval of string
values, but are useful to know nonetheless if you ever need to discover or
share the meta information related to your bundle and locale.
11.3.2.2.1. stringBundle
This property is the string bundle object that queries the
nsIStringBundleService interfaces and initializes the XPCOM interface,
making methods available to it. It is the direct way of getting a string from a
bundle:
var appBundle =
document.getElementById("bundle_app");
return
appBundle.stringBundle.GetStringFromName("chapter11
");
11.3.2.2.2. src
This property is the attribute used to get and set the properties file that will
be used as a string bundle:
var appBundle =
document.getElementById("bundle_app");
dump("You are using the properties file " +
appBundle.src);
11.3.3. Creating Your Own Bundle
The implementation for setting up your string bundle just described is
hidden from the XUL author. You only need to point at the bundle you want
to use by using the source attribute. There is however, an alternative way to
do this if you do not favor using <stringbundle> or would like to
extend that binding.
The alternative is to use utility routines that come bundled with Mozilla and
are contained in a string resources JavaScript file: strres.js. With this
file, creating a bundle is a three-step process.
1. Include the JavaScript file:
<script type="application/x-javascript"
1. Set up your bundle:
var bundle =
srGetStrBundle("chrome://mypackage/locale/mypackage
.properties");
1. Access the strings:
var greeting = bundle.GetStringFromName(
"hello" );
The result retrieves the string corresponding to "hello" in your bundle file
and is the equivalent of the getString call when using the XUL bundle
method.
If your chrome is independent of Mozilla's chrome and you do not want to
use their UI files, you can create the bundle directly by using the
nsIStringBundleService XPCOM interface, as seen in Example 11-4
.
Example 11-4. Creating the bundle via XPConnect
var src =
'chrome://packagexfly/content/packagebundle.propert
ies';
var localeService =
Components.classes["@mozilla.org/intl/nslocaleservi
ce;1"]
.getService(Components.interfaces.nsILocaleService)
;
var appLocale =
localeService.GetApplicationLocale( );
var stringBundleService =
Components.classes["@mozilla.org/intl/stringbundle;
1"]
.getService(Components.interfaces.nsIStringBundleSe
rvice);
bundle = stringBundleService.CreateBundle(src,
appLocale);
The first step is to get the application locale the language that is currently
registered with the chrome service. This is done via the
nsILocalService component. The nsIStringBundleService is then
initialized and the CreateBundle method is called, returning an instance
of nsIStringBundle that provides access to the methods for querying strings.
11.4. Programming and Localization
This section provides little nuggets of information, not necessarily related,
that show how to work around common problems when programming
locale-related information in your application. It strays a little from the main
path of string replacement and translation, and the topics vary from
recommended naming conventions for your string identifiers to locale in
XBL bindings and what tools you can use to be more productive.
11.4.1. Naming Conventions
The decision of what to call your code internals emerged more than once in
this book. In Chapter 8
, you decided the name of the component IDL
interface IDL file and its associated implementation. In locale, it is the entity
names and string identifiers contained in bundles.
Naming conventions in localization are useful because they provide some
context to the translator. In this spirit, it is good for the reference to be as
descriptive as possible. You can choose your route for naming or stick with
the way that Mozilla does it. Examining the files in the Mozilla source base,
common naming conventions for entities include the following:
id.label
id.tooltip
id.text
id.accesskey
id.commandkey
Certain XUL widgets can contain multiple localizable resources, including a
text label or description, a tooltip, and an accesskey. A
button is a prime example:
<button id="flyBtn" label="&flyBtn.label;"
accesskey="&flyBtn.accesskey;"
tooltip="&flyBtn.tooltip;" />
The naming convention is consistent, using the value of the id attribute
appended by the name of the UI feature. The attribute and name are
delimited by a period. Not only does using this value flag the resource as
being associated with a certain widget, but it also permits logical grouping in
the DTD:
<!ENTITY flyBtn.label "Fly Away">
<!ENTITY flyBtn.accesskey "f">
<!ENTITY flyBtn.tooltip "Click here to take to the
air">
Naming string identifiers in bundle files fits less into a pattern like that in
DTDs, and in the Mozilla, source files may appear random. If a pattern must
be found, you could look at two things: filenames and identifier descriptions.
In a filename, the association of a single .properties file is with a
logical part of the application. If a string appears in a certain dialog or
window, you know where to go to translate the strings or add more strings.
Example files in the Mozilla tree worth examining include
editor.properties, commonDialogs.properties, and
wizardManager.properties.
With identifier descriptions, the text used on the identifier describes what the
text actually refers to. The goal is to be as descriptive as possible by using as
brief text as possible:
dontDeleteFiles=Don't Delete Files
The descriptor is the same as the value, although in a different format. The
opportunity was taken here to be as descriptive as possible.
11.4.2. Breaking Up the Text
Under certain circumstances, you may need to pop up your own alert
messages as XUL dialogs. Some messages may involve multiple lines of
text that need to be put on new lines. There is no natural delimiter that
breaks up the text contained within <description> or <label>
elements in XUL, so following are a couple of tricks to get around this
problem.
11.4.2.1. Method 1: Multiple <description> elements
First, create the placeholder in your XUL where the generated elements will
be inserted:
<vbox id="main-message" flex="1" style="max-width:
40em;"/>
<! insert elements here >
</vbox>
The script in Example 11-5
generates the needed text elements, fills in the
text, and appends all the items to the containing box.
Example 11-5. Using multiple <description> elements
var text = window.arguments[0];
var holder = document.getElementById("main-
message");
var lines = text.split("\n");
for (var i = 0; i < lines.length; i++) {
var descriptionNode =
document.createElement("description");
var linetext = document.createTextNode(lines[i]);
descriptionNode.appendChild(linetext);
holder.appendChild(descriptionNode);
}
The text is passed into the window that is used for the message. It presumes
that the \n delimiter is used to signify a new line in the text and is split thus.
Then it loops through each line, creating a description element for each line
and populating it with a text node with the message inside. Then each
element is appended to the main container that lives in the XUL file.
11.4.2.2. Method 2: HTML <br> tag
For this example, create the XUL placeholder similar to the example in
Method 1, and then slot the script in Example 11-6
into your load handler.
Example 11-6. Using the HTML break tag
var text = window.arguments[0];
var holder = document.getElementById("main-
message");
var lines = text.split("\n");
var descriptionNode =
document.createElement("description");
for (var i = 0; i < lines.length; i++) {
var linetext = document.createTextNode(lines[i]);
var breakNode =
document.createElement("html:br");
descriptionNode.appendChild(linetext);
descriptionNode.appendChild(breakNode);
}
holder.appendChild(descriptionNode);
This way is similar to the code in Example 11-5
, with some notable
differences. First, there is only one <description> element created
outside the loop for each new line. In that loop, the break occurs when an
HTML <br> element is inserted after a piece of text.
With both methods, you need to put some sort of width constraint on the
window at the level where you want the text to wrap. Method 1 is
recommended because it is a true XUL solution, but the second method is
also a good example of mixed markup in a XUL document (HTML).
11.4.3. Anonymous Content and Locale
Entities are everywhere. Well, not quite everywhere. However, as entity
references and DTD constructs are part of the XML language, they can be
used for localization purposes in other files in your package, such as RDF
and XBL files.
In the case of XBL, it is common for binding content to inherit its locale
information from the base widget. Take the Example 11-7
as a case in point.
Here is the bound element in the XUL document; the binding for the bound
element is shown:
<article id="artheader" class="articleheader"
title="Common Garden Flies" author="Brad
Buzzworth"/>
The attributes of note here are title and author, both user-defined,
because they contain the localizable values that will be used in the binding.
Example 11-7. Binding with attribute inheritance
<binding id="articleheader">
<content>
<xul:hbox flex="1">
<xul:label class="flybox-homeheader-text"
xbl:inherits="value=title"/>
<xul:spacer flex="1"/>
<xul:label class="flybox-homeheader-text"
xbl:inherits="value=author"/>
</xul:hbox>
</content>
<implementation>
<property name="title">
<setter>
<![CDATA[
this.setAttribute('title',val); return
val;
]]>
</setter>
<getter>
<![CDATA[
return this.getAttribute('title');
]]>
</getter>
</property>
<property name="author">
<setter>
<![CDATA[
this.setAttribute('author',val); return
val;
]]>
</setter>
<getter>
<![CDATA[
return this.getAttribute('author');
]]>
</getter>
</property>
</implementation>
</binding>
The binding in Example 11-7
illustrates a binding whose content inherits its
locale from the bound element. The attributes used on the bound element,
namely title and author, are descriptive, enabling the author to be
specific about what they are setting a value to. The rest is taken care of in the
binding, where the inherits attribute sets the value on the anonymous
content to the value of the more descriptive attributes on the bound element.
You can retrieve the values or set them by using the getter and setter.
Localization Tools
To translate your XUL interface strings, just change the text that
corresponds to your entity reference or string bundle value. For a small
application, this step should be simple, but for large applications, it can be a
big task.
The good news is that tools are available to help localize your applications.
The most popular tool is MozillaTranslator, which is discussed in more
detail in Appendix B
.
There is also a handy command line utility for Unicode conversion called
nsconv, bundled in the Mozilla bin folder in any distribution. (If you are
unfamiliar with Unicode, the section Section 11.6.1
later in this chapter
provides more information.) Although it is broken at the time of this writing,
it is worth mentioning. Let's look at a simple conversion of ASCII text to
UTF-8:
<!ENTITY PrintPreviewCmd.label "Print Preview">
Replace the string in the entity with the Spanish version:
<!ENTITY PrintPreviewCmd.label "Presentación
preliminar ">
Then run the conversion.
> nsconv -f ascii -t utf-8 foo.dtd bar.dtd
The accented characters are converted into the Unicode for you:
<!ENTITY PrintPreviewCmd.label "Presentación
preliminar ">
Using the NCR or CER value as well is also acceptable, if appropriate. A
NCR is an entity that contains a hex (a) or decimal (a) value,
while a CER is also an entity containing an abbreviation (é). This
assumes, though, that you know what the code is! String bundles accept only
one form of encoding, which is known as escape-unicode. If using
nsconv, the name for this encoding is x-u-escaped.
Various third-party conversion tools that do the same thing are available. A
freeware editor called Unipad that lets you import multiple types of native
encoding documents and then save as Unicode. Unipad is available from