Tài liệu MASTERING SQL SERVER 2000- P9 pdf
Bạn đang xem bản rút gọn của tài liệu. Xem và tải ngay bản đầy đủ của tài liệu tại đây (1.38 MB, 50 trang )
W
e’re going to go out on a limb here and assume that you own stuff—
such as clothes, food, VCRs, tools, etc. Most people keep the stuff they
own in their homes, but where? Do you just randomly throw your
stuff in your house and hope you can find it again later? Of course
not—you store your belongings in containers, such as cabinets or dressers, so that you
can find your belongings when you need them. Now go one step further: Do you
keep all of your stuff in the same container? Imagine the chaos that would ensue if
you kept your tools, food, and clothes in the same cabinet—you would not be able to
find anything when you needed it. These principles hold true with SQL Server.
The stuff you own in SQL Server is things such as tables, views, stored procedures,
and other objects. Much like with your clothes, food, tools, etc., you need containers
to store those objects in—with SQL Server, those containers are databases. Again, go
one step further: Do you want to keep all of your objects in the same database? Defi-
nitely not. Just as when you store all of your personal belongings in the same cabinet,
you would have a terrible time sorting out all of the data if it was all in one database.
That is why you need to have more than one database, each dedicated to a specific
task, such as an accounting database to hold all of the accounting objects and data, or
a sales database for the sales objects and data.
It makes sense, then, that before you start creating objects, such as tables and
views, you must create the database that will contain those objects. That is what this
chapter deals with: creating, configuring, and administrating databases. We’ll start by
reviewing the basics of how a database works.
Database Basics
As with anything, you need to understand the basics before you can jump into the
more advanced topics—this is especially true with databases. As we mentioned in
Chapter 3, a database is a series of files on your hard disk. These files are just space
that has been preallocated on the hard disk for storing other SQL Server objects, such
as tables and views. These files on the hard disk can be one of three types: a primary
data file, a secondary data file, and a transaction log file.
The primary data file (with an .MDF extension) is the first file created for the data-
base. This file can be used to store two types of objects: user and system objects. User
objects are such things as tables, views, stored procedures, and the like that are used to
modify or store information that has been input by a user. System tables contain infor-
mation that SQL Server needs to keep your database functioning, such as table names,
index locations, database user accounts, and information about other system objects.
The system tables must reside in the primary data file, but the user information and
other objects can be moved to secondary data files.
2627ch10.qxt 8/22/00 10:45 AM Page 370
Please purchase PDF Split-Merge on www.verypdf.com to remove this watermark.
371
When you run out of room on the hard disk that contains the primary data file,
you can create a secondary data file (with an .NDF extension) on a separate hard disk.
Once you have created the secondary file, you can use it to store user data, such as
tables, indexes, and views, but not system objects (those reside only in the primary
data file). The third type of file requires a little more explanation than the data files.
The third type of file is the transaction log file, and it functions much like a constant
online backup by storing transactions. A transaction is a group of data modification
commands (for example, INSERT, UPDATE, and DELETE) that is contained in a BEGIN
TRAN…COMMIT block and executed as a unit, meaning that all of the commands in
the transaction are applied to the database, or none of them are. There are two types of
transactions that SQL Server understands: implicit and explicit. An implicit transaction
occurs when you send a data modification command to SQL Server without specifi-
cally encasing it in a BEGIN TRAN…COMMIT block—SQL Server will add the block for
you. An explicit transaction occurs when you specifically type the BEGIN TRAN and
COMMIT statements at the beginning and end of your statement block. A typical
explicit transaction might look as follows:
BEGIN TRAN
INSERT RECORD
DELETE RECORD
COMMIT TRAN
SQL Server sees the INSERT and DELETE commands as a single unit of modifica-
tion—either they both happen or neither happens, or in SQL Server terminology,
they are either rolled forward or rolled back. The DELETE cannot happen without the
INSERT and vice versa. Every command in SQL Server that modifies data is considered
a transaction, each having a BEGIN and COMMIT statement, whether or not you put
them there (if you don’t add the BEGIN and COMMIT, SQL Server will).
You might expect each of these transactions to be written directly to the database
file, but that is not the case. When a user tries to modify a record in a database, SQL
Server locates the data page (pages are discussed in Chapter 3) in the database that
contains the record to be changed. Once located, the page in question is loaded into
memory—specifically, it is loaded into a special area of memory called the data cache,
which SQL Server uses to store data that is to be modified. All of the changes to the
page are now made in memory (or RAM, random access memory), because RAM is
about 100 times faster than hard disk, and speed is of the essence.
NOTE As discussed in Chapter 3, a page is 8KB and is the smallest unit of storage in a
SQL Server database.
DATABASE BASICS
Digging into SQL
Server
PART
III
2627ch10.qxt 8/22/00 10:45 AM Page 371
Please purchase PDF Split-Merge on www.verypdf.com to remove this watermark.
CHAPTER 10 • DATABASES
372
Leaving those changed records in RAM is a bad idea, though, because RAM is
considered volatile, which means that all of the contents of RAM are erased every
time the computer loses power. If the machine were to lose power, you would lose
all of the changes in the data cache. So rather than leaving those changes at the
mercy of RAM, SQL Server writes the changes made in the data cache to the transac-
tion log at the same time. Now you have a copy of the data in RAM and on the hard
disk in the transaction log file. If the server were to lose power now, all of the
changes stored in the data cache would be erased, but you could still recover them
from the transaction log. In that sense, the transaction log is like a constant online
backup of the data cache.
So why not just write all of the changes from data cache directly to the database
file? Why put the transaction log in the middle? Imagine what would happen to your
database if your server were to crash right in the middle of writing changes from
memory to the data file if there were no transaction log. The transaction would be
partially written to disk, and the original transaction would be erased from memory
with no hope of recovery. However, because the transaction is written to the transac-
tion log first, if the server crashes, the original transaction is preserved, and partial
transactions are not written to the database.
In fact, if a crash occurs, SQL Server reads the transaction logs for each database
looking for completed transactions that have not been applied to the data file. If SQL
Server finds any, it rolls them forward, writing them to the data file. Any uncom-
pleted transactions (a BEGIN TRAN with no corresponding COMMIT) are rolled back
or deleted from the transaction log. This way, you can recover your databases right up
to the minute of a crash.
Because of the benefits that you gain from transaction logs, they are required for
each database—you cannot have a primary data file without a transaction log. The
transaction log file (with an .LDF extension) should be placed on a separate physical
hard disk than the data file. If the hard disk with the data file crashes, you still have
the transaction log file and the last good backup to re-create the data file on a new
hard disk. The transaction log file should be approximately 10 to 25% of the size of
the data files to accommodate the transactions made during the day. If your users do
not make many modifications to the data, you can go with a smaller transaction log
(10% being the minimum), whereas if your users are constantly modifying the data,
you should make the transaction log file larger (maybe even up to 30%).
NOTE Because all of the changes are written to the transaction log before they are
written to the data file, the transaction log is referred to as a write ahead log.
2627ch10.qxt 8/22/00 10:45 AM Page 372
Please purchase PDF Split-Merge on www.verypdf.com to remove this watermark.
373
Now that you know how these files work, you need to know how big to make
them. Let’s look at capacity planning.
Planning for Capacity
Perhaps you’ve heard the old adage waste not, want not. That rings true regarding
hard-disk space on your SQL Server. Because databases are files that are stored on your
hard disk, you can actually waste hard-disk space if you make them too big. If you
make your database files too small, though, SQL Server will have to expand the data-
base file, or you may need to create a secondary data file to accommodate the extra
data—a process that can slow users down. Neither of these options is very appealing,
so you need to find a happy balance between too big and too small, which is going to
require a little math. Here are the general steps to estimate the size of your database:
1. Calculate the record size of the table in question. You get this by adding the size
of each column in the table.
2. Divide 8092 by the row size from step 1 and round down to the nearest number.
The figure 8092 is the actual amount of data a single data page can hold, and
you round down because a row cannot be split across pages.
3. Divide the number of rows you expect to have by the result from step 2. This
will tell you how many data pages will be used for your table.
4. Multiply the result from step 3 by 8192—the size of a data page in bytes. This
will tell you exactly how many bytes your table will take on the disk.
In Chapter 11, you will learn how to plan a database—deciding what tables to put
in it, what datatypes to use, and how big the fields in the tables should be—so we’ll
forego that discussion here. In this section we’re going to assume that the planning
phase is complete and create a sales database that will contain three tables: one for
customer information, one for product information, and one for order detail informa-
tion. To calculate the size of your new database, let’s apply the following steps to the
customers table to discern how big it will be with 10,000 records:
1. Assuming you have already planned your database, add all of the field sizes in
the customers table together. Here is the table layout (you should get 125 bytes):
custid int (note: this is 4 bytes of storage)
fname varchar(20)
lname varchar(20)
address varchar(50)
PLANNING FOR CAPACITY
Digging into SQL
Server
PART
III
2627ch10.qxt 8/22/00 10:45 AM Page 373
Please purchase PDF Split-Merge on www.verypdf.com to remove this watermark.
CHAPTER 10 • DATABASES
374
city varchar(20)
state char(2)
zip char(9)
2. Divide 8092 by 125 and round down to the nearest number to find out how
many of these rows can fit on a single data page. You must round down in every
case because a row cannot span a page. The answer should be 64.
3. Divide 10,000 (the estimated number of rows in the table) by the number of
rows on a page (64) and round up to the nearest number. You round up here
because a partial row will be moved to a whole new page—there is no such
thing as a partial page of storage. The answer should be 157.
4. Multiply 157 (the number of pages required to hold 10,000 records) by 8192
(the size of a page on disk). This should be 1,570,000 bytes.
So, with 10,000 records, the customers table in your sales database would require
approximately 1.5MB of hard-disk space. By repeating these steps for each table in the
database, you can figure out approximately how much space to allocate to the data-
base when you first create it.
With all of the math out of the way, you are ready to start creating a database.
Creating Databases
We discussed earlier that a database is comprised of at least two files: first, the primary
data file (with an .MDF extension) and the transaction log file (with an .LDF exten-
sion). There may also be a need for secondary data files if the hard disk that contains
the primary data file fills up, but we will discuss those later in this chapter.
To get started with the database, you only need to create the primary data file and
transaction log file. There are three different ways to go about it:
• By using the Create Database Wizard
• Graphically with Enterprise Manager
• Via Transact-SQL code
We’ll look at each method here, starting with the Create Database Wizard.
TIP New databases are actually a copy of the Model database, because Model has all of
the system objects necessary for any database to function. This means that if you want any
standard objects in all of your databases (for example, a database user account), if you add
the object to the Model database, the object will automatically exist in all new databases.
2627ch10.qxt 8/22/00 10:45 AM Page 374
Please purchase PDF Split-Merge on www.verypdf.com to remove this watermark.
375
Using the Create Database Wizard
Wizards, if you are not familiar with them, are a series of step-by-step screens that
help you accomplish a task with which you may not be familiar. Although Wizards
are most useful for the novice, they can also be a great help to the seasoned adminis-
trator. Wizards not only provide you with a step-by-step process for accomplishing a
task, they also perform all of the menial work involved, allowing you to focus on the
more advanced tasks that come later. The Create Database Wizard is no exception; we
will use it here to create a simple trial database, just to get the feel of the Wizard:
1. If you are not in Enterprise Manager, open it now by selecting it from the SQL
Server 2000 group in Programs on the Start menu.
2. On the Tools menu, select Wizards.
3. Expand Database and select Create Database Wizard. Click OK to start the
Wizard.
4. The opening screen displays a list of what this Wizard is designed to accom-
plish. Click Next to proceed.
5. On the second screen, you are asked for a name for the database and the loca-
tion of the data and log files. For the name, enter Wizard Test and leave the
defaults for the file locations. Click Next.
CREATING DATABASES
Digging into SQL
Server
PART
III
2627ch10.qxt 8/22/00 10:45 AM Page 375
Please purchase PDF Split-Merge on www.verypdf.com to remove this watermark.
CHAPTER 10 • DATABASES
376
6. The third screen prompts you for the size of the data file; enter 5 to make the
file 5MB, then click Next.
7. The next screen gives you the option to have the database file automatically
expand when more space is required for data. Leave the defaults here and click
Next; we’ll discuss file growth shortly.
2627ch10.qxt 8/22/00 10:45 AM Page 376
Please purchase PDF Split-Merge on www.verypdf.com to remove this watermark.
377
8. You are asked for the size of the transaction log file. Remembering that this
should be about 10 to 25% of the size of the data file, you will leave the default
of 1MB and click Next.
9. You are asked if you would like the transaction log to automatically expand.
Click Next to accept the defaults.
CREATING DATABASES
Digging into SQL
Server
PART
III
2627ch10.qxt 8/22/00 10:45 AM Page 377
Please purchase PDF Split-Merge on www.verypdf.com to remove this watermark.
CHAPTER 10 • DATABASES
378
10. The final screen gives a list of the options that you have chosen. Verify that
these are what you want and click Finish to create your database.
11. When asked if you would like to create a maintenance plan for the database,
click No. You will learn how to create a maintenance plan in Chapter 17.
2627ch10.qxt 8/22/00 10:45 AM Page 378
Please purchase PDF Split-Merge on www.verypdf.com to remove this watermark.
379
12. To verify that the Wizard Test database exists, expand Databases under your
server and click Wizard Test (if it exists). You should see an information screen
pop up in the contents pane (on the right). You may need to refresh the tree-
view in the left pane by right-clicking your server and selecting Refresh to see
the new database.
Using the Create Database Wizard is probably the simplest way to create a data-
base, but because there are eight screens to deal with, this method takes a little longer
than the next method, using Enterprise Manager.
Creating Databases with Enterprise Manager
The next easiest way to create a database in SQL Server is through Enterprise Manager.
This method does not detail each step of database creation and is therefore considered
to be a slightly more advanced method than using the Wizard. Using Enterprise Man-
ager to create a database is also a little faster than using the Wizard because there are
only three screens with which to deal. To help you get the feel of using Enterprise Man-
ager for creating databases, we will use this next series of steps to create a sales database
that can later be filled with tables, views, and other objects for a sales department:
1. Open Enterprise Manager from the SQL Server 2000 group in Programs on the
Start menu and expand your server; then expand the Databases icon.
CREATING DATABASES
Digging into SQL
Server
PART
III
2627ch10.qxt 8/22/00 10:45 AM Page 379
Please purchase PDF Split-Merge on www.verypdf.com to remove this watermark.
CHAPTER 10 • DATABASES
380
2. Right-click Databases and select New Database.
3. On the General Tab, enter Sales in the Name box.
4. At the bottom of the General tab, leave Server Default for collation and move to
the Data Files tab. The collation setting changes how SQL Server stores charac-
ters in your tables.
5. Notice that the filename text box has been filled in for you. In the Initial Size
field, enter 10.
6. Make certain Automatically Grow File is selected—this will allow the data file to
automatically expand when more space is needed.
7. Leave file growth at 10%. This means that the data file will grow 10% at a time;
for example, if the file was 100MB, it would grow by 10MB.
8. Maximum File Size should be restricted to 15MB, meaning that the data file
will not automatically grow past 15MB. If you set it to Unrestricted File
Growth, the data file could fill the entire hard drive, which could make your
computer crash if the data file is on the same hard disk as other programs (such
as the Windows 2000 operating system).
2627ch10.qxt 8/22/00 10:45 AM Page 380
Please purchase PDF Split-Merge on www.verypdf.com to remove this watermark.
381
9. Click the Transaction Log tab and notice that the name here is filled out as well.
10. Since the transaction log should be about 10 to 25% of the size of the data files,
you will set the initial size to 2.
11. Make sure that Automatically Grow File is selected and leave the growth at 10%.
These settings have the same effect as the growth settings on the data files.
12. Set the Maximum File Size to 3MB.
CREATING DATABASES
Digging into SQL
Server
PART
III
2627ch10.qxt 8/22/00 10:45 AM Page 381
Please purchase PDF Split-Merge on www.verypdf.com to remove this watermark.
CHAPTER 10 • DATABASES
382
13. Click OK to create the database.
14. To verify that the new database exists, right-click the Databases icon in the left
pane and select Refresh, then notice the Sales database under Databases. The
contents pane should display all of the database statistics.
2627ch10.qxt 8/22/00 10:45 AM Page 382
Please purchase PDF Split-Merge on www.verypdf.com to remove this watermark.
383
TIP When you create a new object in SQL Server, you may not see it in the contents
(right) pane right away. Right-clicking the level just above where your new object should
be and selecting Refresh will force SQL Server to reread the system tables and display any
new objects in your database.
The sales database is now ready to be filled with other objects (for example, tables
or views), and it didn’t take long to create at all. However, imagine how long it would
take to create a 700GB database. This is a task that you should schedule for off hours,
and the only way to schedule database creation is by using the third and final method
for creating a database: Transact-SQL.
Creating Databases with Transact-SQL
Although using Enterprise Manager is an effective and easy way to create a database,
there is no way to schedule the creation of the database for a later time using the
graphic method. “Why would I want to schedule it?” you ask. In the last section, you
created a small database that took just a few minutes to create, but imagine how long
it would take to create a 700GB database—several hours, to be sure. That is not an
activity you would want to engage in during business hours because it would slow
your users down tremendously. You can, however, combine your forthcoming knowl-
edge of scheduling tasks in SQL Server with the T-SQL (a shortened form of Transact-
SQL) code for creating databases to schedule the creation of massive databases during
off hours. The syntax for the CREATE DATABASE statement looks as follows:
CREATE DATABASE database_name
ON [PRIMARY]
(
NAME=logical_file_name,
FILENAME=’os_file_name’,
SIZE=size (in MB or KB),
MAXSIZE=maximum_size (in MB or KB) or UNLIMITED (fill all available space),
FILEGROWTH=growth_increment (in MB or KB)
)
LOG ON
(
NAME=logical_file_name,
FILENAME=’os_file_name’,
SIZE=size (in MB or KB),
MAXSIZE=maximum_size (in MB or KB) or UNLIMITED,
CREATING DATABASES
Digging into SQL
Server
PART
III
2627ch10.qxt 8/22/00 10:45 AM Page 383
Please purchase PDF Split-Merge on www.verypdf.com to remove this watermark.
CHAPTER 10 • DATABASES
384
FILEGROWTH=growth_increment (in MB or KB)
)
[ FOR LOAD | FOR ATTACH ]
Here’s an explanation for each of the items in the above listing:
database_name: This is the name of the new database and can be up to
128 characters.
ON: This option specifies the filegroup on which to create a data file. A file-
group is a logical grouping of secondary data files that can be used to control
placement of user objects (such as tables and indexes). The PRIMARY option
that comes after the ON argument is used to specify the PRIMARY filegroup,
which is the default for all files created and the only filegroup that can contain
the primary data file.
NAME: This option specifies the logical name of the database, which will be
used to reference the database in Transact-SQL code. This option is not required
when FOR ATTACH is used.
FILENAME: This is the name and path of the database file as it is stored on
the hard disk. This must be a local directory (not over the network) and cannot
be compressed.
SIZE: This is the initial size of the data files. It can be specified in MB or KB.
If you do not provide a size for a primary data file, SQL Server will generate a
file that is the same size as the Model system database. If a size is not provided
for a secondary file, SQL Server automatically makes it 1MB.
MAXSIZE: This is the maximum size that the database is allowed to reach
automatically. This can also be in MB or KB, or UNLIMITED can be specified,
thus instructing SQL Server to expand the data file to fill the entire hard disk.
FILEGROWTH: This is the increment in which to expand the file. It is spec-
ified in either MB, KB, or percent (%). If none of these symbols are used, MB is
assumed.
LOG ON: This specifies where the log files are to be created and their size. If
LOG ON is not specified, SQL Server will create a log file that is 25% of the size
of all data files, and that has a system generated name and is placed in the
same directory as the data files. It is best to use LOG ON to place the transac-
tion log file on a separate physical hard disk from the data files so that, in the
event of a system crash, you will be able to access all of the transactions that
occurred before the disaster.
FOR LOAD: This option is for backward compatibility only. It was used in
restore processes to re-create a database without initializing it on disk (initializ-
2627ch10.qxt 8/22/00 10:45 AM Page 384
Please purchase PDF Split-Merge on www.verypdf.com to remove this watermark.
385
ing was the process of preparing the database file to accept data). This is no
longer needed since the SQL Server restore process now re-creates databases in
this fashion by default.
FOR ATTACH: This is used to attach a set of database files that were created
on a different server or have been detached from the current system. Attaching
is the process of adding a new record in the sysdatabases table on the Master
database to inform SQL Server where each file is and how it is to be used. This
should be used when 16 or more data files need to be attached to the current
server. For less than 16 data files, use the sp_attach_db stored procedure.
Use the following steps to create a database with T-SQL code (we’ll use this to test
dropping databases later in this chapter):
1. Open Query Analyzer and log in using Windows NT Authentication.
2. To create a 10MB database named DoomedDB on the C drive with a 2MB log
file, execute the following code (note that you should replace the C:\ with the
drive on which you installed SQL Server):
CREATE DATABASE DoomedDB
ON PRIMARY
(name = DoomedDB,
filename = ‘c:\Program Files\Microsoft SQL Server\data\DoomedDB.mdf’,
size = 10MB,
maxsize = 15MB,
filegrowth = 1MB)
LOG ON
(name = DoomedLog,
filename = ‘c:\Program Files\Microsoft SQL Server\data\DoomedLog.ldf’,
size = 2MB,
maxsize = 3MB,
filegrowth = 10%)
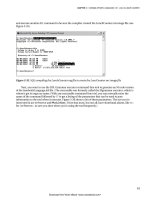
3. In the results pane (on the bottom) in Query Analyzer, you should see two mes-
sages stating that the data and log files have been allocated space on your hard
disk. To verify that this database has been created, open Enterprise Manager and
expand your server and then databases. Notice DoomedDB in the list of avail-
able databases.
CREATING DATABASES
Digging into SQL
Server
PART
III
2627ch10.qxt 8/22/00 10:45 AM Page 385
Please purchase PDF Split-Merge on www.verypdf.com to remove this watermark.
CHAPTER 10 • DATABASES
386
Now that your database is created, there are a few configuration changes that you
can make to modify the way your database works.
Modifying Databases
As noted earlier, new databases are copies of the Model database. This means that all
new databases have a standard set of options that control their behavior. These
options may need to be changed according to the function of the database.
Not only do you need to change the options that control the database, you may
need to change the size of the database as well, expanding it or shrinking it. If you
expand the database, you may need to expand it to another physical hard disk, which
means adding secondary data files or transaction log files to the database. These sec-
ondary files may need to be added to filegroups so that you have better control over
object placement.
In this section we are going to discuss what may be necessary to make your data-
bases behave the way you need them to, how to change the size of the database, and
how to add files and filegroups.
2627ch10.qxt 8/22/00 10:45 AM Page 386
Please purchase PDF Split-Merge on www.verypdf.com to remove this watermark.
387
Setting Database Options
If you have ever bought a new car or at least watched commercials for new cars, you
know that cars come with options. Options on a car include the radio and anti-lock
brakes—things that would not ordinarily come with a floor-model car. Such options
make the car behave differently. SQL Server databases also have options that you can
set to make the database behave differently. So before you jump in and start using
your database, you may want to consider setting some of those options.
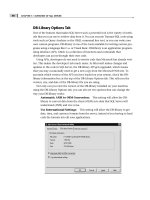
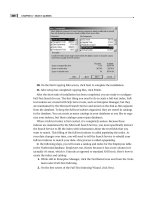
Most of these database options can be set using Enterprise Manager. If you right-
click one of your databases, select Properties, and then select the Options tab, you will
see what is shown in Figure 10.1.
FIGURE 10.1
The Options tab
Here is a list of what those options are for and when you should use each one:
Restrict Access: This option will allow you to control which users can
access a database. There are two options:
Members of db_owner, dbcreator, or sysadmin: There is a special
group in each database called db_owner whose members have administra-
tive control over the database of which they are members. Dbcreator is
MODIFYING DATABASES
Digging into SQL
Server
PART
III
2627ch10.qxt 8/22/00 10:45 AM Page 387
Please purchase PDF Split-Merge on www.verypdf.com to remove this watermark.
CHAPTER 10 • DATABASES
388
another special group with privileges inside a database. Sysadmin is a special
group that has administrative control over every database on the server.
When this option is checked, only members of these three groups can access
the database. People already using the database won’t be disconnected, but
as soon as they exit, they can’t come back in. Use this option during initial
database development or when you need to change the structure of one of
the objects in the database, such as adding a column to a table.
Single User: When checked, this option changes the database to allow
only one user at a time to connect. That one user could be anybody, but
since you are the one setting the option, it should be you. You should set
this option just before restoring or renaming a database since you don’t
want anyone, including other members in the db_owner role, trying to use
the database during these activities.
Read-Only: Exactly like it sounds, this option makes a database read-only—
no writing can occur. There are a few notable side effects to this option. First,
read-only databases are skipped during autorecovery, a process at system
startup that verifies that all committed transactions have been written to all
databases. Second, SQL Server places locks on data that is being read in a stan-
dard database so that users do not try to modify data that is being read by other
users. However, since no writing can occur on a read-only database, no locks
are placed on the data, which can accelerate data access. Because of this, read-
only is a good option to set on databases that do not change often, such as an
archive database or a decision-support database.
ANSI NULL Default: When you create a table in SQL Server, you can spec-
ify whether the columns in the table can be empty—a condition referred to as
null. If you do not specify nullability on your columns when you create or
modify a table, and if this option is not checked, your column will not allow
null values. If this option is checked and you do not specify nullability on your
columns when you create or modify a table, they will accept null values. This
option is a matter of personal preference; if most of your columns should not
contain null values, you should leave this option off—the default setting.
Recursive Triggers: Triggers are watchdogs for your tables. They can be
defined to fire (activate) whenever someone inserts, updates, or deletes data, to
make certain that your complex business logic is applied. For example, if you
have a database that has one table with managers and another with employees,
you could create a DELETE trigger on the managers table that would ensure
that you are not trying to delete a manager with employees underneath them
without first assigning another manager to the employees. When checked, this
2627ch10.qxt 8/22/00 10:45 AM Page 388
Please purchase PDF Split-Merge on www.verypdf.com to remove this watermark.
389
option will allow triggers to fire other triggers. For example, a user could update
an orders table, which fires a trigger on a customers table. The trigger from the
customers table could update the orders table. If this option is set to True, the
original trigger (on the orders table) would fire again; if this option is set to
False, the original trigger would not fire again. This option is for very complex
logic and should be used only when you fully understand all of your triggers
and tables.
Select Into/Bulk Copy: Earlier you learned that all transactions that make
modifications to a database are written to the transaction log before they are
written to the database. Imagine, though, if you were trying to import 500MB
of text into a 500MB database. Since the transaction log is only about 25% of
the size of the database, you would be pumping all that data through a 125MB
log. The log would therefore act as a bottleneck and slow the process to a crawl.
Checking this option instructs SQL Server to bypass the transaction log and
write all modifications directly to the database. You should use this option only
when you are doing massive data imports. If you find that you need to use this
option, you must back up your database immediately afterward since it is in a
vulnerable state and turn this option off as soon as you are finished.
Truncate Log on Checkpoint: Normally your transaction log retains all of
the transactions written to it until you perform a transaction log backup; then
all of the old transactions are purged from the log. To test your database after
you first create it, you will probably fill it with junk data. Because you don’t
care about recovering the test data, you can check this option to clear the trans-
action log completely every time the data is written to the database file. When
your database is complete and being used on a regular basis (referred to as in
production), you should uncheck this option. If you leave this option on, you
will lose the up-to-the-minute recoverability afforded by the transaction log.
Torn Page Detection: The smallest unit of storage in SQL Server is an 8KB
page, but when SQL Server writes a page to hard disk, the page is written 512
bytes at a time because hard disks store information in 512-byte sectors. If a
power failure occurs while SQL is writing a page to disk, you may get only part
of that page on disk, which is called a torn page. When Torn Page Detection is
checked, SQL Server marks each 512-byte sector of a page with a special bit; if
that bit is in the wrong state when the page is read during the autorecovery
process, the page is considered torn and should be removed. The only time to
have this option off is if you have a disk cache with a battery backup that is
specially designed for database servers; otherwise leave this option checked.
MODIFYING DATABASES
Digging into SQL
Server
PART
III
2627ch10.qxt 8/22/00 10:45 AM Page 389
Please purchase PDF Split-Merge on www.verypdf.com to remove this watermark.
CHAPTER 10 • DATABASES
390
Auto Close: When a user connects to a database, it must be opened. When a
database is open, it consumes system resources such as RAM and CPU time.
When this option is checked, it will close the database when the last user dis-
connects from it. Because there is not usually an abundance of available
resources on a desktop system, the default for this option in the Desktop Edi-
tion is set to on. That way a database will be closed when not in use. On all
other versions, this option is unchecked because users would be opening and
closing the database all day and night, and that would slow down your system.
Auto Shrink: SQL Server periodically scans your databases to see whether
they contain more than 25% free space; if so, SQL Server can automatically
reduce the size of your database so that it contains only 25% free space. If this
option is checked (the default in the Desktop Edition), autoshrink can occur; if
this option is unchecked (the default in all other editions), autoshrink does not
occur. It is best to leave this option set to the default since the autoshrink
process can consume system resources on a server, and you don’t want to waste
disk space on a desktop. We’ll discuss how to manually shrink databases on a
server shortly.
Auto Create Statistics: When you send a query to the database server, the
query is intercepted by the query optimizer, whose sole purpose is to find the
fastest way to return a result set. It does this by reading statistics about each
of the columns mentioned in your SELECT statement (these statistics are based
on the number of values in the column you are selecting from that are unique
and the number of duplicates). If this option is checked, SQL Server will auto-
matically create statistics for any column that is part of an index. If this option
is unchecked, you must create your own statistics. Again, it is best to leave this
turned on until you understand SQL Server well enough to outsmart the query
optimizer.
Auto Update Statistics: Setting this option will instruct SQL Server to
automatically update your statistics from time to time. If this is off, you must
update the statistics manually. Uncheck this option if you are low on system
resources (such as RAM or CPU time). You can create a database maintenance
plan that will accomplish this task on a scheduled basis later.
Use Quoted Identifiers: If you are going to use spaces in a table name
(such as Order Details in the Northwind database) or reserved keywords (such as
check or public), you would ordinarily need to encase them in square brackets
([ ]). If this option is checked, you can use double quotation marks (“”) as well.
There are more database options that do not show up on the Options tab. To set
those options, you must use the sp_dboption stored procedure. It looks as follows:
exec sp_dboption ‘option name’, ‘true’
2627ch10.qxt 8/22/00 10:45 AM Page 390
Please purchase PDF Split-Merge on www.verypdf.com to remove this watermark.
391
Here is a list of the remaining options with which you have to work:
ANSI Nulls: When this option is checked, any comparison made with a null
value will yield an answer of null. If this option is unchecked, comparisons of
non-Unicode data with null values yield False, and null-to-null comparisons
yield True. This option is unchecked by default.
ANSI Warnings: You know that it is not possible to divide anything by
zero, but the computer has to be told. If this option is unchecked and you try
to divide by zero or use a null value in a mathematical equation, your answer
will be null, and you will see no error. If this option is checked, you will receive
a warning. This option is unchecked by default.
Concat Null Yields Null: String concatenation combines multiple strings
into one string by using a + operator. For example, Hello my name + is Joe would
return Hello my name is Joe as one string. If this option is checked and you try to
concatenate Hello my name + null, you would get null. If this option is
unchecked and you try to concatenate Hello my name + null, you would get
Hello my name. This option is unchecked by default.
Cursor Close on Commit: A cursor can be thought of as a subset of a result
set. Cursors return single rows of data at a time and therefore make data
retrieval faster in the case of a large result set. If you check this option, cursors
are closed as soon as transactions are committed. It is better to leave this option
unchecked so that cursors stay open until all data modifications are complete.
The cursor can then be closed manually.
Default to Local Cursor: When this option is checked, any cursor created
is local to the procedure that called it, which means that if you execute a stored
procedure (a prewritten query stored on the SQL Server) that creates a cursor,
only that stored procedure can use that cursor. If this option is unchecked (the
default), any other procedure used by the same connection can use the cursor
that was created. Therefore, if Joe executes a stored procedure that creates a cur-
sor, any other procedure that Joe executes can use that cursor when this option
is unchecked. If this option is checked, only the stored procedure that created
the cursor could reference it.
Merge Publish: Replication is used to copy a database to multiple servers
and keep those copies constantly updated. One type of replication is merge
replication, in which users can make changes to all copies of the database on
any server and have those changes replicated to every other copy. This option
is set during the configuration of replication, so you will not actually use it.
However, when it is checked, the database can be merge replicated.
MODIFYING DATABASES
Digging into SQL
Server
PART
III
2627ch10.qxt 8/22/00 10:45 AM Page 391
Please purchase PDF Split-Merge on www.verypdf.com to remove this watermark.
CHAPTER 10 • DATABASES
392
Offline: This option is used to take a database offline, making it inaccessible, so
that it can be duplicated on some type of removable media (such as a CD-ROM).
Published: You won’t set this option—it is set when you enable a database
to be published via replication. Publishing a database means that it can be
copied to other servers, called subscribers.
Subscribed: You won’t set this one either—it is set when you enable a data-
base to subscribe to a published database via replication.
NOTE A few of these options deal with Unicode data, which stores characters using 2
bytes (or 16 bits) instead of the standard single byte (8 bits). This allows you to store
65,536 different characters in Unicode as opposed to the 256 characters that you get with
the standard ANSI character set.
Besides these options, you probably noticed something new to SQL Server 2000—
the listbox at the bottom of the screen labeled Compatibility Level. This is designed
to force your database to behave like one in an earlier version of SQL Server. This is
useful for older applications that have not yet been updated to function with SQL
Server 2000. You will notice three settings here: 60, 65, and 70. The 60 and 65 settings
will cause the SQL Server database to behave just as it would in SQL Server 6 or 6.5.
The 70 setting forces complete compliance with SQL Server 7. Some examples of this
would be as follows:
• In 60 or 65 compatibility mode, a SELECT statement that has a GROUP BY
clause but no ORDER BY clause will be sorted by the columns listed in the
GROUP BY clause. In 70 compatibility mode, no sorting takes place without the
ORDER BY clause.
• In 60/65 mode, table aliases can be used in the SET clause of an UPDATE state-
ment. The 70 mode does not allow table aliases in UPDATE statements—you
must use the table name specified immediately after the UPDATE statement.
• In 60/65 mode, when creating or altering a table with a bit datatype column, if
you do not specify nullability of the column, it is set to NOT NULL (meaning
that it will not accept null values). In 70 mode, the nullability of bit columns is
set by the current session setting.
• In 60/65 mode, you cannot use the ALTER COLUMN clause on ALTER TABLE. In
70 mode, this is perfectly acceptable.
2627ch10.qxt 8/22/00 10:45 AM Page 392
Please purchase PDF Split-Merge on www.verypdf.com to remove this watermark.
393
• In 60/65 mode, if a trigger is without the WITH APPEND option, any existing
trigger of the same type will be overwritten. In 70 mode, the WITH APPEND
option is assumed so any trigger you create will automatically be appended to
any existing trigger, rather than erasing it.
• In 60/65 mode, when a batch or procedure contains an invalid object name, a
warning is issued when the batch is compiled, letting you know that a refer-
enced object does not exist. The 70 mode uses deferred resolution, which means
that SQL Server does not look for the referenced object until the batch is actu-
ally run. Deferred resolution allows you to create a batch or procedure and then
create the objects it references later.
• In 60/65 mode, an empty string (‘’) is interpreted as a single blank character,
which means that DATALENGTH will return a value because it is counting the
number of spaces in the string. In 70 mode, a blank string (‘’) is interpreted as
blank, not as a space, so DATALENGTH will not count the blank string as a
character.
• In 60/65 mode, the CHARINDEX and PATINDEX functions return NULL only
when both required parameters are null values. In 70 mode, these commands
return NULL when any of these parameters are set to NULL.
• In 60/65 mode, if you reference a text- or image-type column in the inserted or
deleted tables, you will receive a null value in return. In 70 mode, references to
text and image columns in the inserted and deleted tables are simply not
allowed.
• In 60/65 mode, the concatenation of null-yields-null-value is off by default,
which means that if you try to combine a value with a null, you will receive an
empty string in return. In 70 mode, the concatenation of null-yields-null is on
by default, meaning that if you combine a value with a null, you will receive
NULL in return.
• In 60/65 mode, you can use SELECT statements in the VALUES list of an INSERT
statement. In 70 mode, SELECT statements are not allowed in the VALUES list of
the INSERT statement.
Each compatibility-level setting also has its own list of reserved keywords:
Keywords in 70 mode: BACKUP, CONTAINS, CONTAINSTABLE, DENY,
FREETEXT, FREETEXTTABLE, PERCENT, RESTORE, ROWGUIDCOL, TOP
Keywords in 60/65 mode: AUTHORIZATION, CASCADE, CROSS, DIS-
TRIBUTED, ESCAPE, FULL, INNER, JOIN, LEFT, OUTER, PRIVILEGES,
RESTRICT, RIGHT, SCHEMA, WORK
MODIFYING DATABASES
Digging into SQL
Server
PART
III
2627ch10.qxt 8/22/00 10:45 AM Page 393
Please purchase PDF Split-Merge on www.verypdf.com to remove this watermark.
CHAPTER 10 • DATABASES
394
Now that you know how to modify your database to behave the way you want it
to, you are ready to start filling it with data. Once your users start working with the
database, you may find the need to resize it. Let’s look at how to do that next.
Changing Database Size
Once you put your database in production and your users start filling it with data,
you will eventually find the need to resize the database—making it bigger if it turns
out to be very popular, or smaller if it is not used as much as anticipated. Let’s look at
how to expand the original database file first.
Expanding a Data File
If the database you created turns out to be more popular than you expected and your
users are constantly adding data to it, you may need to increase the size of the data-
base. Of course, the easiest way to do this is to allow the database to automatically
grow, like you did with the MAXSIZE and FILEGROWTH options on the sales data-
base. However, when the database hits the size restriction you set for it, you may need
to expand it still further. There are two ways to accomplish this: by increasing the size
of the existing data file or by adding secondary data files.
To increase the size of the sales database, use the following steps:
1. Open Enterprise Manager, expand Databases under your server, right-click the
sales database, and select Properties.
2. Select the Data Files tab and enter 15 in the Space Allocated column.
3. Under Restrict File Growth, enter 20.
2627ch10.qxt 8/22/00 10:45 AM Page 394
Please purchase PDF Split-Merge on www.verypdf.com to remove this watermark.