Tài liệu Oracle PL/SQL by Example- P10 ppt
Bạn đang xem bản rút gọn của tài liệu. Xem và tải ngay bản đầy đủ của tài liệu tại đây (274.32 KB, 50 trang )
LAB 18.2
The BULK COLLECT Clause
LAB OBJECTIVE
After completing this lab, you will be able to
.
Use the BULK COLLECT clause
The BULK COLLECT clause fetches the batches of results and brings them back from SQL to
PL/SQL. For example, consider a cursor against the STUDENT table that returns the student’s
ID, first name, and last name. After this cursor is opened, the rows are fetched one by one until
all of them have been processed. Then this cursor is closed. These steps are illustrated in the
following example:
FOR EXAMPLE
DECLARE
CURSOR student_cur IS
SELECT student_id, first_name, last_name
FROM student;
BEGIN
FOR rec IN student_cur LOOP
DBMS_OUTPUT.PUT_LINE ('student_id: '||rec.student_id);
DBMS_OUTPUT.PUT_LINE ('first_name: '||rec.first_name);
DBMS_OUTPUT.PUT_LINE ('last_name: '||rec.last_name);
END LOOP;
END;
Recall that the cursor FOR loop opens and closes the cursor and fetches cursor records implicitly.
The same task of fetching records from the STUDENT table can be accomplished by employing
the BULK COLLECT clause. The difference here is that the BULK COLLECT clause fetches all
rows from the STUDENT table at once. Because BULK COLLECT fetches multiple rows, these
rows are stored in collection variables.
Consider a modified version of the previous example, in which the cursor processing is replaced
by the BULK COLLECT clause:
LAB 18.2
422
Please purchase PDF Split-Merge on www.verypdf.com to remove this watermark.
FOR EXAMPLE
DECLARE
Define collection type and variables to be used by the
BULK COLLECT clause
TYPE student_id_type IS TABLE OF student.student_id%TYPE;
TYPE first_name_type IS TABLE OF student.first_name%TYPE;
TYPE last_name_type IS TABLE OF student.last_name%TYPE;
student_id_tab student_id_type;
first_name_tab first_name_type;
last_name_tab last_name_type;
BEGIN
Fetch all student data at once via BULK COLLECT clause
SELECT student_id, first_name, last_name
BULK COLLECT INTO student_id_tab, first_name_tab, last_name_tab
FROM student;
FOR i IN student_id_tab.FIRST student_id_tab.LAST
LOOP
DBMS_OUTPUT.PUT_LINE ('student_id: '||student_id_tab(i));
DBMS_OUTPUT.PUT_LINE ('first_name: '||first_name_tab(i));
DBMS_OUTPUT.PUT_LINE ('last_name: '||last_name_tab(i));
END LOOP;
END;
This script declares three nested table types and variables. These variables are used to store data
returned by the SELECT statement with the BULK COLLECT clause.
DID YOU KNOW?
When nested tables are populated using the SELECT BULK COLLECT INTO statement, they are initial-
ized and extended automatically. Recall that typically a nested table must be initialized prior to its
use by calling a constructor function that has the same name as its nested table type. After it has
been initialized, it must be extended using the EXTEND method before the next value can be
assigned to it.
To display this data, the collections are looped through using a numeric FOR loop. Note how
lower and upper limits for the loop counter are specified using the FIRST and LAST methods.
The BULK COLLECT clause is similar to a cursor loop in that it does not raise a NO_DATA_
FOUND exception when the SELECT statement does not return any records. As a result, it is
considered a good practice to check if a resulting collection contains any data.
Because the BULK COLLECT clause does not restrict the size of a collection and extends it auto-
matically, it is also a good idea to limit the result set when a SELECT statement returns large
LAB 18.2
The BULK COLLECT Clause
423
Please purchase PDF Split-Merge on www.verypdf.com to remove this watermark.
amounts of data. This can be achieved by using BULK COLLECT with a cursor SELECT and by
adding the LIMIT option.
FOR EXAMPLE
DECLARE
CURSOR student_cur IS
SELECT student_id, first_name, last_name
FROM student;
Define collection type and variables to be used by the
BULK COLLECT clause
TYPE student_id_type IS TABLE OF student.student_id%TYPE;
TYPE first_name_type IS TABLE OF student.first_name%TYPE;
TYPE last_name_type IS TABLE OF student.last_name%TYPE;
student_id_tab student_id_type;
first_name_tab first_name_type;
last_name_tab last_name_type;
Define variable to be used by the LIMIT clause
v_limit PLS_INTEGER := 50;
BEGIN
OPEN student_cur;
LOOP
Fetch 50 rows at once
FETCH student_cur
BULK COLLECT INTO student_id_tab, first_name_tab,
last_name_tab
LIMIT v_limit;
EXIT WHEN student_id_tab.COUNT = 0;
FOR i IN student_id_tab.FIRST student_id_tab.LAST
LOOP
DBMS_OUTPUT.PUT_LINE ('student_id: '||student_id_tab(i));
DBMS_OUTPUT.PUT_LINE ('first_name: '||first_name_tab(i));
DBMS_OUTPUT.PUT_LINE ('last_name: '||last_name_tab(i));
END LOOP;
END LOOP;
CLOSE student_cur;
END;
This script employs a BULK COLLECT clause with the LIMIT option to fetch 50 rows from the
STUDENT table at once. In other words, each collection contains, at most, 50 records. To
accomplish this, the BULK COLLECT clause is used in conjunction with the cursor loop. Note
LAB 18.2
424
The BULK COLLECT Clause
Please purchase PDF Split-Merge on www.verypdf.com to remove this watermark.
that in this case, the loop’s exit condition is based on the number of records in the collection
rather than the
student_cur%NOTFOUND attribute.
Note how the numeric FOR loop that displays information on the screen has been moved inside
the cursor loop. This is done because every new batch of 50 records fetched by the BULK
COLLECT replaces the previous batch of 50 records fetched in the previous iteration.
So far you have seen examples of the BULK COLLECT clause fetching data into collections
where the underlying elements are simple data types such as NUMBER or VARCHAR2.
However, the BULK COLLECT clause can be used to fetch data into collections of records or
objects. Collections of objects are discussed in Chapter 23, “Object Types in Oracle.” Consider
a modified version of the previous example, in which student data is fetched into a collection of
user-defined records:
FOR EXAMPLE
DECLARE
CURSOR student_cur IS
SELECT student_id, first_name, last_name
FROM student;
Define record type
TYPE student_rec IS RECORD
(student_id student.student_id%TYPE,
first_name student.first_name%TYPE,
last_name student.last_name%TYPE);
Define collection type
TYPE student_type IS TABLE OF student_rec;
Define collection variable
student_tab student_type;
Define variable to be used by the LIMIT clause
v_limit PLS_INTEGER := 50;
BEGIN
OPEN student_cur;
LOOP
Fetch 50 rows at once
FETCH student_cur BULK COLLECT INTO student_tab LIMIT v_limit;
EXIT WHEN student_tab.COUNT = 0;
FOR i IN student_tab.FIRST student_tab.LAST
LOOP
DBMS_OUTPUT.PUT_LINE
('student_id: '||student_tab(i).student_id);
DBMS_OUTPUT.PUT_LINE
('first_name: '|| student_tab(i).first_name);
LAB 18.2
The BULK COLLECT Clause
425
Please purchase PDF Split-Merge on www.verypdf.com to remove this watermark.
FOR EXAMPLE (continued)
DBMS_OUTPUT.PUT_LINE
('last_name: '|| student_tab(i).last_name);
END LOOP;
END LOOP;
CLOSE student_cur;
END;
So far you have seen how to use the BULK COLLECT clause with the SELECT statement.
However, often BULK COLLECT is used with the INSERT, UPDATE, and DELETE statements
as well. In this case, the BULK COLLECT clause is used in conjunction with the RETURNING
clause, as shown here:
FOR EXAMPLE
DECLARE
Define collection types and variables
TYPE row_num_type IS TABLE OF NUMBER INDEX BY PLS_INTEGER;
TYPE row_text_type IS TABLE OF VARCHAR2(10) INDEX BY PLS_INTEGER;
row_num_tab row_num_type;
row_text_tab row_text_type;
BEGIN
DELETE FROM TEST
RETURNING row_num, row_text
BULK COLLECT INTO row_num_tab, row_text_tab;
DBMS_OUTPUT.PUT_LINE ('Deleted '||SQL%ROWCOUNT ||' rows:');
FOR i IN row_num_tab.FIRST row_num_tab.LAST
LOOP
DBMS_OUTPUT.PUT_LINE ('row_num = '||row_num_tab(i)||
' row_text = ' ||row_text_tab(i));
END LOOP;
COMMIT;
END;
This script deletes records from the TEST table created in Lab 18.1. Note that the DELETE state-
ment returns ROW_NUM and ROW_TEXT values using the RETURNING clause. These values
are then fetched by the BULK COLLECT clause into two collections, row_num_tab and
row_text_tab, which are displayed on the screen.
When run, this script produces the following output:
Deleted 7 rows:
row_num = 2 row_text = row 2
LAB 18.2
426
The BULK COLLECT Clause
Please purchase PDF Split-Merge on www.verypdf.com to remove this watermark.
row_num = 3 row_text = row 3
row_num = 4 row_text = row 4
row_num = 6 row_text = row 6
row_num = 8 row_text = row 8
row_num = 9 row_text = row 9
row_num = 10 row_text = row 10
PL/SQL procedure successfully completed.
Throughout this chapter you have seen how to use the FORALL statement and BULK COLLECT
clause. Next, consider an example that combines both. This example is based on the script
ch18_1a.sql, which selects some data from the ZIPCODE table and inserts it into the
MY_ZIPCODE table. Changes are shown in bold.
FOR EXAMPLE
DECLARE
Declare collection types
TYPE string_type IS TABLE OF VARCHAR2(100) INDEX BY PLS_INTEGER;
TYPE date_type IS TABLE OF DATE INDEX BY PLS_INTEGER;
Declare collection variables to be used by the FORALL statement
zip_tab string_type;
city_tab string_type;
state_tab string_type;
cr_by_tab string_type;
cr_date_tab date_type;
mod_by_tab string_type;
mod_date_tab date_type;
v_counter PLS_INTEGER := 0;
v_total INTEGER := 0;
BEGIN
Populate individual collections
SELECT *
BULK COLLECT INTO zip_tab, city_tab, state_tab, cr_by_tab,
cr_date_tab, mod_by_tab, mod_date_tab
FROM zipcode
WHERE state = 'CT';
Populate MY_ZIPCODE table
FORALL i in 1 zip_tab.COUNT
INSERT INTO my_zipcode
(zip, city, state, created_by, created_date, modified_by,
modified_date)
VALUES
(zip_tab(i), city_tab(i), state_tab(i), cr_by_tab(i),
cr_date_tab(i), mod_by_tab(i), mod_date_tab(i));
COMMIT;
LAB 18.2
The BULK COLLECT Clause
427
Please purchase PDF Split-Merge on www.verypdf.com to remove this watermark.
▼
FOR EXAMPLE (continued)
Check how many records were added to MY_ZIPCODE table
SELECT COUNT(*)
INTO v_total
FROM my_zipcode
WHERE state = 'CT';
DBMS_OUTPUT.PUT_LINE
(v_total||' records were added to MY_ZIPCODE table');
END;
LAB 18.2 EXERCISES
This section provides exercises and suggested answers, with discussion related to how those answers
resulted. The most important thing to realize is whether your answer works.You should figure out the
implications of the answers and what the effects are of any different answers you may come up with.
18.2.1 Use the BULK COLLECT Statement
In this exercise, you create various scripts that select and modify data in the MY_INSTRUCTOR table in
bulk.
Create the MY_INSTRUCTOR table as follows. If this table already exists, drop it and then re-create it.
CREATE TABLE my_instructor AS
SELECT *
FROM instructor;
Complete the following tasks:
A) Create the following script: Select the instructor ID, first name, and last name from the
MY_INSTRUCTOR table, and display them on the screen. Note that the data should be fetched
in bulk.
ANSWER: This script should look similar to the following:
ch18_2a.sql, version 1.0
SET SERVEROUTPUT ON;
DECLARE
Define collection types and variables to be used by the
BULK COLLECT clause
TYPE instructor_id_type IS TABLE OF
my_instructor.instructor_id%TYPE;
TYPE first_name_type IS TABLE OF my_instructor.first_name%TYPE;
TYPE last_name_type IS TABLE OF my_instructor.last_name%TYPE;
instructor_id_tab instructor_id_type;
first_name_tab first_name_type;
last_name_tab last_name_type;
BEGIN
Fetch all instructor data at once via BULK COLLECT clause
LAB 18.2
428
Lab 18.2 Exercises
Please purchase PDF Split-Merge on www.verypdf.com to remove this watermark.
SELECT instructor_id, first_name, last_name
BULK COLLECT INTO instructor_id_tab, first_name_tab,
last_name_tab
FROM my_instructor;
FOR i IN instructor_id_tab.FIRST instructor_id_tab.LAST
LOOP
DBMS_OUTPUT.PUT_LINE ('instructor_id: '||instructor_id_tab(i));
DBMS_OUTPUT.PUT_LINE ('first_name: '||first_name_tab(i));
DBMS_OUTPUT.PUT_LINE ('last_name: '||last_name_tab(i));
END LOOP;
END;
The declaration portion of this script contains definitions of three collection types and variables.
The executable portion of the script populates collection variables using the SELECT statement
with the BULK COLLECT clause. Finally, it displays on the screen data stored in the collection
variables by looping through them.
When run, this script produces the following output:
instructor_id: 101
first_name: Fernand
last_name: Hanks
instructor_id: 102
first_name: Tom
last_name: Wojick
instructor_id: 103
first_name: Nina
last_name: Schorin
instructor_id: 104
first_name: Gary
last_name: Pertez
instructor_id: 105
first_name: Anita
last_name: Morris
instructor_id: 106
first_name: Todd
last_name: Smythe
instructor_id: 107
first_name: Marilyn
last_name: Frantzen
instructor_id: 108
first_name: Charles
last_name: Lowry
instructor_id: 109
first_name: Rick
last_name: Chow
instructor_id: 110
first_name: Irene
last_name: Willig
PL/SQL procedure successfully completed.
LAB 18.2
Lab 18.2 Exercises
429
Please purchase PDF Split-Merge on www.verypdf.com to remove this watermark.
As mentioned previously, the BULK COLLECT clause is similar to the cursor loop in that it does not
raise a NO_DATA_FOUND exception when the SELECT statement does not return any rows.
Consider deleting all the rows from the MY_INSTRUCTOR table and then executing this script
again. In this case the output is as follows:
SQL> DELETE FROM my_instructor;
10 rows deleted.
SQL> SET SERVEROUTPUT ON;
SQL> DECLARE
2 Define collection types and variables to be used by the
3 BULK COLLECT clause
4 TYPE instructor_id_type IS TABLE OF
my_instructor.instructor_id%TYPE;
5 TYPE first_name_type IS TABLE OF
my_instructor.first_name%TYPE;
6 TYPE last_name_type IS TABLE OF
my_instructor.last_name%TYPE;
7
8 instructor_id_tab instructor_id_type;
9 first_name_tab first_name_type;
10 last_name_tab last_name_type;
11
12 BEGIN
13 Fetch all instructor data at once via BULK COLLECT clause
14 SELECT instructor_id, first_name, last_name
15 BULK COLLECT INTO instructor_id_tab, first_name_tab,
last_name_tab
16 FROM my_instructor;
17
18 FOR i IN instructor_id_tab.FIRST instructor_id_tab.LAST
19 LOOP
20 DBMS_OUTPUT.PUT_LINE ('instructor_id:
'||instructor_id_tab(i));
21 DBMS_OUTPUT.PUT_LINE ('first_name:
'||first_name_tab(i));
22 DBMS_OUTPUT.PUT_LINE ('last_name:
'||last_name_tab(i));
23 END LOOP;
24 END;
25 /
You see the following error message:
DECLARE
*
ERROR at line 1:
ORA-06502: PL/SQL: numeric or value error
ORA-06512: at line 18
Note that the error message refers to line 18, which contains a FOR loop that iterates through the
collections and displays the results on the screen. Note that the SELECT statement with the BULK
LAB 18.2
430
Lab 18.2 Exercises
Please purchase PDF Split-Merge on www.verypdf.com to remove this watermark.
COLLECT clause does not cause any errors.To prevent this error from happening, you can modify
the script as follows. Changes are shown in bold.
ch18_2b.sql, version 2.0
SET SERVEROUTPUT ON;
DECLARE
Define collection types and variables to be used by the
BULK COLLECT clause
TYPE instructor_id_type IS TABLE OF
my_instructor.instructor_id%TYPE;
TYPE first_name_type IS TABLE OF my_instructor.first_name%TYPE;
TYPE last_name_type IS TABLE OF my_instructor.last_name%TYPE;
instructor_id_tab instructor_id_type;
first_name_tab first_name_type;
last_name_tab last_name_type;
BEGIN
Fetch all instructor data at once via BULK COLLECT clause
SELECT instructor_id, first_name, last_name
BULK COLLECT INTO instructor_id_tab, first_name_tab,
last_name_tab
FROM my_instructor;
IF instructor_id_tab.COUNT > 0 THEN
FOR i IN instructor_id_tab.FIRST instructor_id_tab.LAST
LOOP
DBMS_OUTPUT.PUT_LINE ('instructor_id:
'||instructor_id_tab(i));
DBMS_OUTPUT.PUT_LINE ('first_name: '||first_name_tab(i));
DBMS_OUTPUT.PUT_LINE ('last_name: '||last_name_tab(i));
END LOOP;
END IF;
END;
This version of the script contains an IF-THEN statement that encloses the FOR loop.The IF-THEN
statement checks if one of the collections is nonempty, thus preventing the numeric or value
error.
WATCH OUT!
If you have deleted records from the MY_INSTRUCTOR table, you need to roll back your changes or
populate it with the records from the INSTRUCTOR table again before proceeding with the exercise.
B) Modify the newly created script as follows: Fetch no more than five rows at a time from the
MY_INSTRUCTOR table.
ANSWER: The script should look similar to the following. Changes are shown in bold.
ch18_2c.sql, version 3.0
SET SERVEROUTPUT ON;
DECLARE
CURSOR instructor_cur IS
LAB 18.2
Lab 18.2 Exercises
431
Please purchase PDF Split-Merge on www.verypdf.com to remove this watermark.
SELECT instructor_id, first_name, last_name
FROM my_instructor;
Define collection types and variables to be used by the
BULK COLLECT clause
TYPE instructor_id_type IS TABLE OF
my_instructor.instructor_id%TYPE;
TYPE first_name_type IS TABLE OF my_instructor.first_name%TYPE;
TYPE last_name_type IS TABLE OF my_instructor.last_name%TYPE;
instructor_id_tab instructor_id_type;
first_name_tab first_name_type;
last_name_tab last_name_type;
v_limit PLS_INTEGER := 5;
BEGIN
OPEN instructor_cur;
LOOP
Fetch partial instructor data at once via BULK COLLECT
clause
FETCH instructor_cur
BULK COLLECT INTO instructor_id_tab, first_name_tab,
last_name_tab
LIMIT v_limit;
EXIT WHEN instructor_id_tab.COUNT = 0;
FOR i IN instructor_id_tab.FIRST instructor_id_tab.LAST
LOOP
DBMS_OUTPUT.PUT_LINE ('instructor_id:
'||instructor_id_tab(i));
DBMS_OUTPUT.PUT_LINE ('first_name: '||first_name_tab(i));
DBMS_OUTPUT.PUT_LINE ('last_name: '||last_name_tab(i));
END LOOP;
END LOOP;
CLOSE instructor_cur;
END;
In this version of the script, you declare a cursor against the MY_INSTRUCTOR table. This enables
you to do a partial fetch from the MY_INSTRUCTOR table.You process this cursor by fetching five
records at a time using the BULK COLLECT clause with the LIMIT option.This ensures that the
collection variables contain no more than five records for each iteration of the cursor loop. Finally,
to display all the results on the screen, you move the FOR loop inside the cursor FOR loop.This
version of the script produces output identical to the first version of the script.
C) Modify the newly created script as follows: Instead of fetching data from the MY_INSTRUCTOR
table into individual collections, fetch it into a single collection.
ANSWER: To accomplish this task, the new record type must be declared so that a single collec-
tion type can be based on this record type.
LAB 18.2
432
Lab 18.2 Exercises
Please purchase PDF Split-Merge on www.verypdf.com to remove this watermark.
This is shown next. Changes are shown in bold.
ch18_2d.sql, version 4.0
SET SERVEROUTPUT ON;
DECLARE
CURSOR instructor_cur IS
SELECT instructor_id, first_name, last_name
FROM my_instructor;
Define record type
TYPE instructor_rec IS RECORD
(instructor_id my_instructor.instructor_id%TYPE,
first_name my_instructor.first_name%TYPE,
last_name my_instructor.last_name%TYPE);
Define collection type and variable to be used by the
BULK COLLECT clause
TYPE instructor_type IS TABLE OF instructor_rec;
instructor_tab instructor_type;
v_limit PLS_INTEGER := 5;
BEGIN
OPEN instructor_cur;
LOOP
Fetch partial instructor data at once via BULK COLLECT
clause
FETCH instructor_cur
BULK COLLECT INTO instructor_tab
LIMIT v_limit;
EXIT WHEN instructor_tab.COUNT = 0;
FOR i IN instructor_tab.FIRST instructor_tab.LAST
LOOP
DBMS_OUTPUT.PUT_LINE
('instructor_id: '||instructor_tab(i).instructor_id);
DBMS_OUTPUT.PUT_LINE
('first_name: '||instructor_tab(i).first_name);
DBMS_OUTPUT.PUT_LINE
('last_name: '||instructor_tab(i).last_name);
END LOOP;
END LOOP;
CLOSE instructor_cur;
END;
In this version of the script, you declare a user-defined record type with three fields. Next, you
declare a single collection type based on this record type.Then you fetch the results of the cursor
into a collection of records that you then display on the screen.
LAB 18.2
Lab 18.2 Exercises
433
Please purchase PDF Split-Merge on www.verypdf.com to remove this watermark.
Next, consider another version that also creates a collection of records. In this version, the collec-
tion type is based on the row type record returned by the cursor:
ch18_2e.sql, version 5.0
SET SERVEROUTPUT ON;
DECLARE
CURSOR instructor_cur IS
SELECT instructor_id, first_name, last_name
FROM my_instructor;
Define collection type and variable to be used by the
BULK COLLECT clause
TYPE instructor_type IS TABLE OF instructor_cur%ROWTYPE;
instructor_tab instructor_type;
v_limit PLS_INTEGER := 5;
BEGIN
OPEN instructor_cur;
LOOP
Fetch partial instructor data at once via BULK COLLECT
clause
FETCH instructor_cur
BULK COLLECT INTO instructor_tab
LIMIT v_limit;
EXIT WHEN instructor_tab.COUNT = 0;
FOR i IN instructor_tab.FIRST instructor_tab.LAST
LOOP
DBMS_OUTPUT.PUT_LINE
('instructor_id: '||instructor_tab(i).instructor_id);
DBMS_OUTPUT.PUT_LINE
('first_name: '||instructor_tab(i).first_name);
DBMS_OUTPUT.PUT_LINE
('last_name: '||instructor_tab(i).last_name);
END LOOP;
END LOOP;
CLOSE instructor_cur;
END;
D)
Create the following script: Delete records from the MY_INSTRUCTOR table and display them on
the screen.
ANSWER: The script should look similar to the following:
ch18_3a.sql, version 1.0
SET SERVEROUTPUT ON;
DECLARE
Define collection types and variables to be used by the
BULK COLLECT clause
TYPE instructor_id_type IS TABLE OF
my_instructor.instructor_id%TYPE;
LAB 18.2
434
Lab 18.2 Exercises
Please purchase PDF Split-Merge on www.verypdf.com to remove this watermark.
TYPE first_name_type IS TABLE OF my_instructor.first_name%TYPE;
TYPE last_name_type IS TABLE OF my_instructor.last_name%TYPE;
instructor_id_tab instructor_id_type;
first_name_tab first_name_type;
last_name_tab last_name_type;
BEGIN
DELETE FROM MY_INSTRUCTOR
RETURNING instructor_id, first_name, last_name
BULK COLLECT INTO instructor_id_tab, first_name_tab,
last_name_tab;
DBMS_OUTPUT.PUT_LINE ('Deleted '||SQL%ROWCOUNT||' rows ');
IF instructor_id_tab.COUNT > 0 THEN
FOR i IN instructor_id_tab.FIRST instructor_id_tab.LAST
LOOP
DBMS_OUTPUT.PUT_LINE
('instructor_id: '||instructor_id_tab(i));
DBMS_OUTPUT.PUT_LINE ('first_name: '||first_name_tab(i));
DBMS_OUTPUT.PUT_LINE ('last_name: '||last_name_tab(i));
END LOOP;
END IF;
COMMIT;
END;
In this script, you store the instructor ID, first name, and last name in the collections by using the
RETURNING option with the BULK COLLECT clause. When run, this script produces the following
output:
Deleted 10 rows
instructor_id: 101
first_name: Fernand
last_name: Hanks
instructor_id: 102
first_name: Tom
last_name: Wojick
instructor_id: 103
first_name: Nina
last_name: Schorin
instructor_id: 104
first_name: Gary
last_name: Pertez
instructor_id: 105
first_name: Anita
last_name: Morris
instructor_id: 106
first_name: Todd
last_name: Smythe
instructor_id: 107
first_name: Marilyn
last_name: Frantzen
LAB 18.2
Lab 18.2 Exercises
435
Please purchase PDF Split-Merge on www.verypdf.com to remove this watermark.
instructor_id: 108
first_name: Charles
last_name: Lowry
instructor_id: 109
first_name: Rick
last_name: Chow
instructor_id: 110
first_name: Irene
last_name: Willig
PL/SQL procedure successfully completed.
LAB 18.2
436
Lab 18.2 Exercises
Please purchase PDF Split-Merge on www.verypdf.com to remove this watermark.
▼
TRY IT YOURSELF
In this chapter, you’ve learned about bulk SQL—specifically, the FORALL statement and the BULK
COLLECT clause. Here are some projects that will help you test the depth of your understanding.
Before beginning these exercises, create the MY_SECTION table based on the SECTION table. This table
should be created empty.
1) Create the following script: Populate the MY_SECTION table using the FORALL statement with the
SAVE EXCEPTIONS clause. After MY_SECTION is populated, display how many records were
inserted.
2) Modify the script you just created. In addition to displaying the total number of records inserted
in the MY_SECTION table, display how many records were inserted for each course. Use the BULK
COLLECT statement to accomplish this step. Note that you should delete all the rows from the
MY_SECTION table before executing this version of the script.
3) Create the following script: Delete all the records from the MY_SECTION table, and display how
many records were deleted for each course. Use BULK COLLECT with the RETURNING option.
The projects in this section are meant to have you use all the skills you have acquired throughout this
chapter.The answers to these projects can be found in Appendix D and on this book’s companion Web
site.Visit the Web site periodically to share and discuss your answers.
Try it Yourself
437
Please purchase PDF Split-Merge on www.verypdf.com to remove this watermark.
This page intentionally left blank
Please purchase PDF Split-Merge on www.verypdf.com to remove this watermark.
CHAPTER 19
Procedures
CHAPTER OBJECTIVES
In this chapter, you will learn about
.
Creating procedures
.
Passing parameters into and out of procedures
All the PL/SQL you have written up to this point has been anonymous blocks
that were run as scripts and compiled by the database server at runtime. Now
you will begin using modular code. Modular code is a way to build a program
from distinct parts (modules), each of which performs a specific function or task
toward the program’s final objective. As soon as modular code is stored on the
database server, it becomes a database object, or subprogram, that is available to
other program units for repeated execution. To save code to the database, the
source code needs to be sent to the server so that it can be compiled into p-code
and stored in the database. This chapter and the next two describe this process.
This short chapter introduces stored procedures. Chapter 20, “Functions,” covers
the basics of stored functions. Chapter 21, “Packages,” pulls together all this
material.
In Lab 19.1, you will learn more about stored code and how to write the type of
stored code known as procedures. In Lab 19.2, you will learn about passing
parameters into and out of procedures.
BENEFITS OF MODULAR CODE
A PL/SQL module is any complete logical unit of work. The five types of PL/SQL
modules are anonymous blocks that are run with a text script (this is the type
you have used so far), procedures, functions, packages, and triggers.
Using modular code offers two main benefits: It is more reusable, and it is more
manageable.
You create a procedure either in SQL*Plus or in one of the many tools for creat-
ing and debugging stored PL/SQL code. If you are using SQL*Plus, you need to
write your code in a text editor and then run it at the SQL*Plus prompt.
Please purchase PDF Split-Merge on www.verypdf.com to remove this watermark.
BLOCK STRUCTURE
The block structure is common for all the module types. The block begins with a header (for
named blocks only), which consists of the module’s name and a parameter list (if used).
The declaration section consists of variables, cursors, and subblocks that are needed in the next
section.
The main part of the module is the executable section, which is where all the calculations and
processing are performed. This section contains executable code such as IF-THEN-ELSE, loops,
calls to other PL/SQL modules, and so on.
The last section of the module is an optional exception-handling section, which is where the
code to handle exceptions is placed.
ANONYMOUS BLOCK
So far, you have only written anonymous blocks. Anonymous blocks are much like modules,
except that anonymous blocks do not have headers. There are important differences, though. As
the name implies, anonymous blocks have no name and thus cannot be called by another block.
They are not stored in the database and must be compiled and then run each time the script is
loaded.
The PL/SQL block in a subprogram is a named block that can accept parameters and that can
be invoked from an application that can communicate with the Oracle database server. A
subprogram can be compiled and stored in the database. This allows the programmer to reuse
the program. It also allows for easier code maintenance. Subprograms are either procedures or
functions.
CHAPTER 19
440
Please purchase PDF Split-Merge on www.verypdf.com to remove this watermark.
▼
LAB 19.1
Creating Procedures
LAB OBJECTIVES
After completing this lab, you will be able to
.
Create procedures
.
Query the data dictionary for information on procedures
A procedure is a module that performs one or more actions; it does not need to return any
values. The syntax for creating a procedure is as follows:
CREATE OR REPLACE PROCEDURE
name
[(
parameter
[,
parameter
, ])]
AS
[
local declarations]
BEGIN
executable statements
[EXCEPTION
exception handlers
]
END [
name
];
A procedure may have zero to many parameters, as covered in Lab 19.2. Every procedure has
three parts: the header portion, which comes before AS (sometimes you see IS; they are inter-
changeable); the keyword, which contains the procedure name and parameter list; and the body,
which is everything after the AS keyword. The word REPLACE is optional. When REPLACE is
not used in the header of the procedure, to change the code in the procedure, you must drop
and then re-create the procedure. Because it is very common to change a procedure’s code, espe-
cially when it is under development, it is strongly recommended that you use the OR REPLACE
option.
LAB 19.1 EXERCISES
This section provides exercises and suggested answers, with discussion related to how those answers
resulted. The most important thing to realize is whether your answer works.You should figure out the
implications of the answers and what the effects are of any different answers you may come up with.
19.1.1 Create Procedures
In this exercise, you run a script that creates a procedure. Using a text editor such as Notepad, create a
file that contains the following script:
LAB 19.1
441
Please purchase PDF Split-Merge on www.verypdf.com to remove this watermark.
ch19_01a.sql
CREATE OR REPLACE PROCEDURE Discount
AS
CURSOR c_group_discount
IS
SELECT distinct s.course_no, c.description
FROM section s, enrollment e, course c
WHERE s.section_id = e.section_id
AND c.course_no = s.course_no
GROUP BY s.course_no, c.description,
e.section_id, s.section_id
HAVING COUNT(*) >=8;
BEGIN
FOR r_group_discount IN c_group_discount
LOOP
UPDATE course
SET cost = cost * .95
WHERE course_no = r_group_discount.course_no;
DBMS_OUTPUT.PUT_LINE
('A 5% discount has been given to '||
r_group_discount.course_no||' '||
r_group_discount.description
);
END LOOP;
END;
At a SQL*Plus session, run the previous script
Then answer the following questions:
A) What do you see on the screen? Explain what happens.
ANSWER: The procedure is created. The procedure named Discount is compiled into p-code and
stored in the database for later execution. If an error is generated, you must have made a typing
mistake. Check the code and recompile.
B) Execute the Discount procedure. How do you accomplish this? What results do you see on the
screen?
ANSWER:
SQL> EXECUTE Discount
5% discount has been given to 25 Adv. Word Perfect
(through each course with an enrollment over 8)
PL/SQL procedure successfully completed.
C)
The script does not contain a COMMIT. Discuss the issues involved with placing a COMMIT in the
procedure, and indicate where the COMMIT could be placed.
ANSWER: Because this procedure does not have a COMMIT, the procedure will not update the
database. A COMMIT needs to be issued after the procedure is run if you want the changes to be
made. Alternatively, you can enter a COMMIT either before or after the end loop. If you put the
COMMIT before the end loop, you are committing the changes after every loop. If you put the
COMMIT after the end loop, the changes are not committed until the procedure is near comple-
tion. It is wiser to use the second option.This way, you are better prepared to handle errors.
LAB 19.1
442
Lab 19.1 Exercises
Please purchase PDF Split-Merge on www.verypdf.com to remove this watermark.
BY THE WAY
If you receive an error in SQL*Plus, enter this command:
show error
You can also use this command:
L
start_line_number end_line_number
to see a portion of the code in order to isolate errors.
19.1.2 Query the Data Dictionary for Information on Procedures
Two main views in the data dictionary provide information on stored code. USER_OBJECTS shows you
information about the objects, and USER_SOURCE shows you the text of the source code.The data
dictionary also has ALL_ and DBA_ versions of these views.
Complete the following tasks:
A) Write a SELECT statement to get pertinent information from the USER_OBJECTS view about the
Discount procedure you just wrote. Run the query and describe the results.
ANSWER:
SELECT object_name, object_type, status
FROM user_objects
WHERE object_name = 'DISCOUNT';
The output is as follows:
OBJECT_NAME OBJECT_TYPE STATUS
DISCOUNT PROCEDURE VALID
The status indicates that the procedure was compiled successfully. An invalid procedure cannot
be executed.
B) Write a SELECT statement to display the source code from the USER_SOURCE view for the
Discount procedure.
ANSWER:
SQL> column text format a70
SELECT TO_CHAR(line, 99)||'>', text
FROM user_source
WHERE name = 'DISCOUNT'
BY THE WAY
A procedure can become invalid if the table it is based on is deleted or changed. You can recompile
an invalid procedure using this command:
alter procedure
procedure_name
compile
LAB 19.1
Lab 19.1 Exercises
443
Please purchase PDF Split-Merge on www.verypdf.com to remove this watermark.
LAB 19.2
Passing Parameters into and
out of Procedures
LAB OBJECTIVE
After completing this lab, you will be able to
.
Use IN and OUT parameters with procedures
Parameters are the means to pass values to and from the calling environment to the server. These
are the values that are processed or returned by executing the procedure. The three types of
parameter modes are IN, OUT, and IN OUT.
MODES
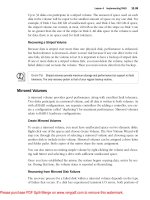
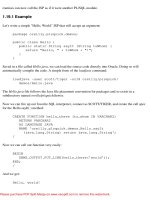
Modes specify whether the parameter passed is read in or a receptacle for what comes out.
Figure 19.1 illustrates the relationship between parameters when they are in the procedure
header versus when the procedure is executed.
LAB 19.2
444
EXECUTE FIND_NAME (127, NAME)
PROCEDURE FIND_NAME (ID IN NUMBER, NAME OUT VARCHAR2)
PROCEDURE HEADER:
PROCEDURE CALL:
FIGURE 19.1
Matching a procedure call to a procedure header
FORMAL AND ACTUAL PARAMETERS
Formal parameters are the names specified in parentheses as part of a module’s header. Actual
parameters are the values or expressions specified in parentheses as a parameter list when the
Please purchase PDF Split-Merge on www.verypdf.com to remove this watermark.
▼
module is called. The formal parameter and the related actual parameter must be of the same or
compatible datatypes. Table 19.1 explains the three types of parameters.
TABLE 19.1
Three Types of Parameters
MODE DESCRIPTION USAGE
IN Passes a value into the program Read-only value
Constants, literals, expressions
Cannot be changed within the program’s default mode
OUT Passes a value back from the program Write-only value
Cannot assign default values
Must be a variable
A value is assigned only if the program is successful
IN OUT Passes values in and also sends values back Has to be a variable
PASSING CONSTRAINTS (DATATYPE) WITH PARAMETER VALUES
Formal parameters do not require constraints in the datatype. For example, instead of specify-
ing a constraint such as VARCHAR2(60), you just say VARCHAR2 against the parameter name
in the formal parameter list. The constraint is passed with the value when a call is made.
MATCHING ACTUAL AND FORMAL PARAMETERS
You can use two methods to match actual and formal parameters: positional notation and named
notation. Positional notation is simply association by position: The order of the parameters used
when executing the procedure matches the order in the procedure’s header. Named notation is
explicit association using the symbol =>:
formal_parameter_name => argument_value
In named notation, the order does not matter. If you mix notation, list positional notation before
named notation.
Default values can be used if a call to the program does not include a value in the parameter list.
Note that it makes no difference which style is used; they function similarly.
LAB 19.2 EXERCISES
This section provides exercises and suggested answers, with discussion related to how those answers
resulted. The most important thing to realize is whether your answer works.You should figure out the
implications of the answers and what the effects are of any different answers you may come up with.
19.2.1 Use IN and OUT Parameters with Procedures
Create the following text file in a text editor. Run the script at a SQL*Plus session.
ch19_02a.sql
CREATE OR REPLACE PROCEDURE find_sname
(i_student_id IN NUMBER,
LAB 19.2
Lab 19.2 Exercises
445
Please purchase PDF Split-Merge on www.verypdf.com to remove this watermark.
o_first_name OUT VARCHAR2,
o_last_name OUT VARCHAR2
)
AS
BEGIN
SELECT first_name, last_name
INTO o_first_name, o_last_name
FROM student
WHERE student_id = i_student_id;
EXCEPTION
WHEN OTHERS
THEN
DBMS_OUTPUT.PUT_LINE('Error in finding student_id:
'||i_student_id);
END find_sname;
A)
Explain what happens in the find_sname procedure.What parameters are passed into and out
of the procedure? How would you call the procedure? Call the find_sname script with the
following anonymous block:
ch19_03a.sql
DECLARE
v_local_first_name student.first_name%TYPE;
v_local_last_name student.last_name%TYPE;
BEGIN
find_sname
(145, v_local_first_name, v_local_last_name);
DBMS_OUTPUT.PUT_LINE
('Student 145 is: '||v_local_first_name||
' '|| v_local_last_name||'.'
);
END;
ANSWER:
The procedure takes in a student_id using the parameter named
i_student_id. It passes out the parameters o_first_name and o_last_name.
The procedure is a simple select statement that retrieves the first_name and last_name
from the Student table, where the student_id matches the value of i_student_id.
i_student_id is the only in parameter that exists in the procedure.To call the procedure, a
value must be passed in for the i_student_id parameter.
B) Explain the relationship between the parameters that are in the procedure’s header definition
versus the parameters that are passed into and out of the procedure.
ANSWER: When calling the procedure find_sname, a valid student_id should be passed
in for i_student_id. If it is not a valid student_id, an exception is raised. Two variables
must also be listed when calling the procedure. These variables, v_local_first_name and
v_local_last_name, are used to hold the values of the parameters that are being passed
out. After the procedure has been executed, the local variables have a value and can then be
displayed with a DBMS_OUTPUT.PUT_LINE.
LAB 19.2
446
Lab 19.2 Exercises
Please purchase PDF Split-Merge on www.verypdf.com to remove this watermark.