Tài liệu Mssql Replication(step 5) ppt
Bạn đang xem bản rút gọn của tài liệu. Xem và tải ngay bản đầy đủ của tài liệu tại đây (639.78 KB, 16 trang )
Step V.Creating a Subscription
This section of the article describes how to create a subscription to the publication
you created with the New Subscription Wizard.
1. In SQL Server Management Studio, right-click the publication you created.
2. Click New Subscriptions.
Click this bar to view the small image.
Figure 40. Starting the New Subscription Wizard
3.The New Subscription Wizard introduction page is displayed.Click Next
Click this bar to view the small image.
Figure 41. New Subscription Wizard introduction page
4.On the Publication page, the publication you created is displayed and selected by
default. Click Next
Click this bar to view the small image.
Figure 42. Selecting the publication
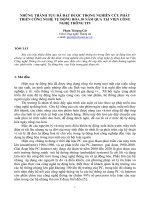
5.On the Distribution Agent Location page, select the location at which the
Distribution Agents will run. If there are less than fifty Subscribers, we recommend
the default of running the Distribution Agent at the Distributor.
a. Select Run all agents at the Distributor (push subscriptions)
b.click Next
Click this bar to view the small image.
Figure 43 Specifying the Distribution Agent location
6.On the Subscribers page, select the Subscriber instance that will receive the
replicated data from the Oracle Publisher. You must also specify whether the
Subscriber is another instance of SQL Server or a different type of database provider.
a. Click Add Subscriber.
b. Select Add SQL Server Subscriber.
c.Click Next
Click this bar to view the small image.
Figure 44. Adding a Subscriber
7.Specify the connection information for the SQL Server Subscriber.
a. In the Connect to Server dialog box, select the instance of SQL Server that will be
the Subscriber.
b. Specify the authentication method that is used to connect to the Subscriber.
c. Click Connect to save the connection information.
Note: In the configuration used for this paper, the Distributor and Subscriber are on
the same instance of SQL Server. Therefore the connection settings in the following
illustration are the same as those shown earlier in the paper.
Click this bar to view the small image.
Figure 45. Specifying connection properties for the Subscriber
8.Next, you select the database on the Subscriber that will receive the replicated
data. If the subscription database does not exist, you can create it by selecting New
database.
a. In the Subscription Database list, select a database, or click New database.
b. (Optional) To add other Subscribers, click Add Subscriber and repeat the process.
For each Subscriber, you must connect to a Subscriber and specify a subscription
database.
c. Click Next.
Click this bar to view the small image.
Figure 46. Specifying a subscription database
9.The Distribution Agent Security page of the wizard lets you configure Agent
security for each Subscriber that you have added, to ensure that the Distribution
Agents have the correct permissions.
Click the browse button ( ) for each Subscriber to open the Distribution Agent
Security dialog box
Click this bar to view the small image.
Figure 47. Reviewing connection properties
10.In the Distribution Agent Security dialog box, select the Windows user that you
configured before you started the New Subscription Wizard. The Windows user that
you select must meet the following conditions:
a. The user is included in the PAL.
b. The user is a member of the db_owner fixed database role in the subscription
database.
c. The user has read permissions on the snapshot share.
Specify the Windows user under which the Distribution Agent will run.
a. Type the SQL login account info.
b. Click OK to save changes and close the dialog box
c. On the Distribution Agent Security page, click Next.
Click this bar to view the small image.
Figure 48. Specifying Distribution Agent security
11.By default, the Distribution Agent runs continuously and delivers changes from
the Publisher to the Subscribers as changes become available.
a. Verify that Run Continuously is selected in the Agent Schedule column.
b. Click Next.
Click this bar to view the small image.
Figure 49. Scheduling synchronization
12.Use the Initialize Subscriptions page of the wizard to specify how the publication
is initialized. When the Distribution Agent first runs for a subscription, by default it
delivers the complete snapshot of initial data to the Subscriber. This initialization
occurs immediately after the New Subscription Wizard finishes.
a. If the Subscriber already contains all the initial tables and data, clear the Initialize
option on the Initialize Subscriptions page.
b. Select Immediately in the Initialize When list to specify when initialization will
occur.
c. Click Next.
Click this bar to view the small image.
Figure 50. Setting initialization options
13.On the Wizard Actions page, you specify when the subscription will be created,
and whether the subscription configuration is saved in a script. We recommend that
you select the check box for scripting so that you will have a copy of the replication
configuration for future reference.
a. Select both check boxes.
b. Click Next.
Click this bar to view the small image.
Click this bar to view the small image.
Figure 51, 52. Generating the publication and script file
14.On the Complete the Wizard page, verify that all options are correct. Click Finish
Click this bar to view the small image.
Figure 53. Verifying wizard options
15.The New Subscription Wizard now saves the configuration information that you
have entered and creates the subscription. Click Close after the steps are complete
Click this bar to view the small image.
Figure 54. Creating the subscription
16.After the wizard has completed, you can view the subscriptions you created in
SQL Server Management Studio.
a. In Object Explorer, expand Replication.
b. Expand Publications.
c. Right-click the publication you created and click Refresh.
d. Expand the publication.
Click this bar to view the small image.
Figure 55. Viewing the new subscription