Tài liệu Thủ thuật lập trình cho iPhone part 3 ppt
Bạn đang xem bản rút gọn của tài liệu. Xem và tải ngay bản đầy đủ của tài liệu tại đây (800.24 KB, 18 trang )
Collection By traibingo
15
Bài 4: Connecting Code to An Interface
Builder View
Finally, we get to write some real code! In this tutorial, I will show you how
to create an interface using Interface Builder and connect it to your code.
We will be creating a UITextField, UILabel, and a Button. Now, don‟t be
intimidated that this tutorial is so long. I have really went into detail
explaining everything as I go. You could easily scan over it and get the gist
of it. Here‟s how the application will work:
1. The user will tap inside a text box which brings up the iPhone‟s keyboard
2. The user will type their name using the keyboard
3. The user will press a button
4. The label will update with a greeting containing that user‟s name (ex. “Hello
Brandon!”)
5. If the user fails to enter in text, the label will say something like “Please
Enter Your Name”
Prerequisites: This tutorial assumes that you have completed the following
tutorials
Hello World Tutorial Using UITableView
Beginner Interface Builder
In this tutorial you will learn:
Create a new View-Based application
Create a simple user interface
Write code to connect to an interface
Connect the interface to the code
Update the interface based on user interaction
Like the last tutorial I wrote, we are going to need only one view. So we will
just use Apple‟s View-Based Application template. So click File -> New
Project. Select View-Based Application and name it ViewBased (You can
name it whatever you want).
Collection By traibingo
16
So like last time, Apple has provided us with most of the code needed to
get this app up and running. You can click Build and Go to launch the
simulator, but all you will see is blankness.
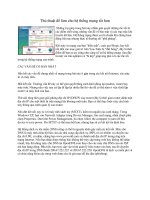
Let‟s get started by double clicking on ViewBasedViewController.xib.
This is a nib file that opens with Interface Builder. It contains information
regarding the layout and controls of our view. Once you do this, Interface
Builder should open up.
It will look something like the screenshot below.
Collection By traibingo
17
A few notes about interface builder…
Library – The right-most window contains all of your controls that you can
add to your view. For this tutorial we will be using a TextField, Label, and
Button.
The next window to the left of that contains objects that we will connect our
interface to. View represents the view of this nib file (basically the
interface). File’s Owner is the object that links the interface to the code.
View - This is your user interface for your iPhone application. This window
is where you will drop controls from the right-most window.
Attributes – This is where we will set the styling properties of our controls
Add a Text Field
The first thing you want to do is drag a Text Field from the library box on
to your view window. You will see some blue lines to guide you. These are
in place to help line up controls as well as center them.
Once you have added the Text Field to the View, move it around until it‟s
in a position that you are happy with. Next, stretch each side of the text
box so that it spans accross almost the entire view area. (The blue lines on
the right and left will let you know when to stop.)
Collection By traibingo
18
Now we are going to set some of the attributes of the Text Field. If the
Attributes Inspector doesn‟t appear, click on the Text Field and then click
Tools -> Attributes Inspector.
In the Placeholder field type in Name. This is the default text that appears
in the Text Field before a user types anything.
For Capitalize select Words – This tells XCode that we want to capitalize
each word
For Return Key – Select Done. This makes the return key on the keyboard
say Done rather than return.
Also, make sure Clear When Edit Begins is checked
Collection By traibingo
19
Add a Label
Drag a Label from the Library onto your view. Similarly, stretch it the
length of your view and place it where you would like. Let‟s change the
default text of the label. If the Attributes Inspector doesn‟t appear, click
on the Label and then click Tools -> Attributes Inspector. In the Text
Collection By traibingo
20
field type in “Enter your name above” (or below depending on where you
chose to put the label in relation to the Text Field.
Add a Button
Collection By traibingo
21
Now drag a Button from the library onto your view. Stretch it and position
it however you would like. Now we need to add some text to the Button.
Click on the button and then click Tools -> Attributes Inspector. In the
Title field, type “Display“.
We are now done creating our interface. It should look something like this:
Collection By traibingo
22
Advertisement
<script type="text/javascript"> //<![CDATA[ ord = window.ord ||
Math.floor(Math.random()*1E16);document.write('<script
type="text/javascript"
src=" />50,336x280;ord=' + ord + '?"><\/script>'); //]]> </script>
Let‟s return to our code… Close Interface Builder and go back to Xcode.
The files that link an interface to some code are called View Controllers.
Let‟s open up ViewBasedViewController.h. This is the file where we will
declare all of our interface variables. Add the following code to you
ViewBasedViewController.h.
Collection By traibingo
23
Interface Builder uses IBOutlets and IBActions to connect to the code.
Here is a brief explanation of each line of code.
IBOutlet UITextField *textName – creates an outlet to connect to the text
field we created in interface builder. We use this variable to get information
from the text field.
IBOutlet UILabel *lblHello – An outlet that connects our label on our
interface to the code. This variable is used to set the value of the label.
Now that we have declared these variables, we need to make them
properties. This allows us to set certain attributes that are associated with
the variables. Retain tells the compiler that we will handle the memory
management of this object (don‟t forget to release it when you are done).
Otherwise it will get “cleaned” after being instantiated.
There is one other thing here.
- (IBAction) updateText:(id) sender;
This is the function that will get called when the user presses the button
that was created in Interface Builder. We are simply declaring it here in
the header file. We will implement this function a little later in the tutorial.
Now, we need to connect the interface to the code. Double click on
ViewBasedViewController.xib again to open up Interface Builder.
1. Connect the View
1. Click anywhere on the background of your view (anywhere that is not
the Text Field, Label, or Button). Now click Tools -> Connections
Inspector. Next to New Referencing Outlet, you will see a circle. Click in
that circle and drag the blue line to the File’s Owner object and release it.
Collection By traibingo
24
The word view should pop up. Click on it. You have now connected the
view to your proxy object. You should now see:
2.
2. Connect the Text Field
1. Click on the Text Field in your View window to select it. Then click Tools -
> Connections Inspector. You will now see a circle next to New
Referencing Outlet. Click in that circle and drag it over to the File’s
Collection By traibingo
25
Owner object. A message will pop up with txtName. Click on txtName and
the connection is made. You should now see:
2.
3. Connect the Label
1. Click on the Label in your View window to select it. Then click Tools ->
Connections Inspector. You will now see a circle next to New
Referencing Outlet. Click in that circle and drag it over to the File’s
Collection By traibingo
26
Owner object. A message will pop up with lblHello. Click on lblHello and
the connection is made. You should now see:
2.
4. Connect the Button
1. Click on the Button in your View window to select it. Then click Tools ->
Connections Inspector. You will now see a circle next to Touch Up
Inside. This is the trigger that gets called when a user presses the button.
Collection By traibingo
27
Click in that circle and drag it over to the File’s Owner object. A message
will pop up with updateText. Click on updateText and the connection is
made. You should now see:
2.
Now all of the connections should be set up. Go ahead and close Interface
Builder. We are done using it.
Collection By traibingo
28
Open up the file ViewBasedViewController.m . This is the file where we
will implement the updateText function. Add the following code…
This code is pretty straight forward and easy to follow. I will explain it line-
by-line:
@synthesize txtName,lblHello;
Most of the time when creating (private) variables, you need to specify what
are called “getter” and “setter” methods. Theses functions get the value of a
variable and set the value of a variable. What synthesize does is creates
these methods for you under the hood. Pretty handy…
Next we will implement our updateText method. I started by creating a
temporary string. This is the string that we will insert into the text of the
label.
The next line checks to see if the user has entered any text int the Text
Field. txtName.text returns an NSString. We are simply calling the length
method on a string. If the length is 0, then obviously the user has not
entered any text. If this is the case, we set the temporary string to “Please
enter your name”: instructing the user to enter in their name.
If the user has entered in some text, a new string is allocated. The
initWithFormat method is similar to printf in C. So, I used the string “Hello
Collection By traibingo
29
%@!”. The “%@” in the string means we will be substituting it for a string.
To get the value of the Text Field we again use the txtName.text property.
Finally, the value of the Label is set by calling lblHello.text. This calls the
text property of label and sets the text to our temporary string variable.
The last line ; releases the temporary text field from memory. This is
necessary to write an efficient iPhone application. If you want to know why
a lot of iPhone apps crash, it‟s because the developers don‟t follow through
with this step.
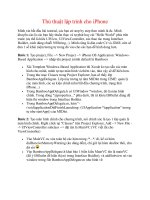
That‟s it! Click Build and Go. The application should launch in the iPhone
Simulator. When you click inside the Text Field it should bring up the
iPhone’s keyboard (you can also type with your keyboard). Enter in your
name and click “Display”. Here are a few screens of what your app should
look like.
Collection By traibingo
30
User Clicks Display without typing in their name
Collection By traibingo
31
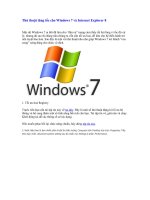
User types in their name and clicks Display
Collection By traibingo
32
Well, that concludes this tutorial. I hope that I was able to help you out on
your road to iPhone glory. If you get lost at any point you can download the
code to this tutorial here ViewBasedSampleCode. As always, if you have
any questions or comments, be sure to leave them in the comments
section of this page. Happy iCoding!