Tài liệu Thủ thuật lập trình cho iPhone part 4 doc
Bạn đang xem bản rút gọn của tài liệu. Xem và tải ngay bản đầy đủ của tài liệu tại đây (869.74 KB, 13 trang )
Collection By traibingo
33
Bài 5: Transitioning Between Views
Phần này sẽ hướng dẫn cho các bạn cách chuyển qua lại giữa các UIView
với nhau. Có 2 cách để chuyển qua lại giữa các View: 1. Nếu sử dụng
NavigationBar thì đơn giản là push view cần chuyển vào NavigationBar vì
thực tế NavigationBar là một stack chứa các View. Đối tượng View được
hiển thị là đối tượng ở trên đỉnh stack. Ngược lại để quay lại View trước đó
thì chỉ cần pop View trên cùng ra. Cách làm chi tiết như thế nào thì bài này
sẽ từng bước hướng dẫn cụ thể cho các bạn. 2. Nếu không sử dụng
NavigationBar và bạn muốn chuyển từ một View hiện tại sang một View
khác thì bản thân đối tượng View đã cung cấp cho chúng ta hàm
addSubView. Nếu bạn đang đứng ở một đối tượng kế thừa từ UIView thì
sử dụng lệnh [self addSubView:<View Object need to switch>] Dưới đây là
nguyên bản tutorial trong trang
This tutorial will focus on transitioning from one view to another. We will be
utilizing Apple‟s UINavigationController. I will be using the code from the
“Hello World” tutorial that I previously wrote. So if you have not completed it
yet, go ahead and do it and come back to this page. (It‟s quick I promise).
You can view it here.
In this tutorial you will learn:
Add A New View
Add A View Controller
Set Up The Transition To The View
Connect The View To The Code
Add A Back Button
The first thing we are going to do is change our “Hello World” text to say
something that sounds more like navigation. Go ahead and open
RootViewController.m. Location the cellForRowAtIndexPath method
(it‟s the one that you edited to display “Hello World” in the table cell.
Change the line: [cell setText:@"Hello World"] ; to [cell setText:@"Next
View"];
Collection By traibingo
34
Add A New View
We will now add the view that we will be transitioning to. Click on
RootViewController.xib and this should open up Interface Builder. We
don‟t actually need to edit this file. Once inside Interface Builder click on
File -> New and select View.
It will add a blank View to your project. For now, we will keep it simple. Go
ahead and drag a new Label on to the View. Double click on the label and
change the text to whatever you want. I set mine to View 2 (I know, not
very imaginative).
Collection By traibingo
35
Let‟s save the view. Click File -> Save. Call it View2. Make sure that you
save it inside your Hello World project‟s directory. It may want to save it
somewhere else by default.
Collection By traibingo
36
Next, you will see a screen asking you if you want to add the View to your
project. Check the box next to Hello World and click Add.
Close Interface Builder. Drag the View2.xib file into the Resources
folder, if it didn‟t appear there by default (this will help maintain
organization).
Collection By traibingo
37
Add A View Controller
Now we need to create a ViewController class. This class will be used to
connect the view that we just created to our code. Inside of Xcode click
File -> New File… Select UIViewController subclass and click Next.
Name it View2ViewController and make sure “Also create
“View2ViewController.h” “ is checked. Click Finish to continue. This will
add the new ViewController to your project.
Collection By traibingo
38
For organization sake, drag your View2ViewController.h and .m files into
the Classes folder if they didn‟t appear there to begin with.
Set Up The Transition To The New View
Open up RootViewController.h and add the following code:
This code should be pretty self explanatory, but I will explain it anyway. The
import statement #import “View2ViewController.h” gets the header file of
the ViewController that we created and allows us to create new instances
of it.
Next, we declare a variable called view2ViewController which is of the
type View2ViewController. One thing that I want to point out is the first
Collection By traibingo
39
part starts with a capitol “V” which is the type of object that we are
declaring. The second part starts with a lower case “v“. This is our variable
name that we will use to reference our ViewController object. Finally, we
make our variable a property to set additional information.
Now, open up RootViewController.m and add the following code
underneath @implementation RootViewController. This creates default
“getter” and “setter” methods for our view2ViewController property.
Advertisement
<script type="text/javascript"> //<![CDATA[ ord = window.ord ||
Math.floor(Math.random()*1E16); document.write('<script
type="text/javascript"
src=" />50,336x280;ord=' + ord + '?"><\/script>'); //]]> </script>
Next find the function didSelectRowAtIndexPath. It may be commented
out. If it is, go ahead and uncomment it. This method gets called
(automatically) every time a table cell gets tapped. Notice that it takes an
indexPath. This will be useful later on when I show you how to populate a
UITableView with an NSArray. We will ignore it for now.
Add the following code to the method.
First we check to see if self.view2ViewController is null. This will happen
the first time the user presses on the table cell. After this, the
viewController gets stored in memory to optimize performance. Next we
create a new instance of a View2ViewController and set it to our
view2ViewController. Remember to pay attention to a capitol “V” verses a
lowercase “v”. After we set this viewController to our viewController, it
Collection By traibingo
40
should be released. Remember, objective-c does not have a garbage
collector, so we need to clear all of our unused objects from memory.
Finally, the last line of code is what actually transitions our view to the
newly created view. The navigationController object is a stack that
contains viewControllers. The view at the top of the stack is the one that
gets rendered. So all we are doing is pushing a viewController onto this
stack. There last part animated:YES, tells the compiler that we want an
animated transition to the next view.
Connect The View To Code
Before this code will execute, we must connect the code that we just wrote
to the view we just created. Double click on View2.xib to open it up in
Interface Builder. We need to associate our View2ViewController class
object with the view so click on the File’s Owner object and then click
Tools -> Identity Inspector.
Click the dropdown next to class and select View2ViewController.
Collection By traibingo
41
Next click anywhere on your view to select it. Click Tools -> Connections
Inspector. Click in the circle next to New Referencing Outlet, drag it to
the File’s Owner object and release it. The word view will popup. Go
ahead and click on it.
Collection By traibingo
42
Close Interface Builder. You can now click Build and Go. When you click
on the words “Next View”, you will see the screen transition to your new
view. There is still one thing missing. There is no back button in the
NavigationController at the top. Apple actually adds this for us, but we
need to set a title on our main view.
Collection By traibingo
43
Adding The Back Button
Close the iPhone Simulator and open RootViewController.m. In the
viewDidLoad method (gets called when the view is first loaded) add the
following code.
Since RootViewController extends Apple‟s class UITableViewController, it
comes with a title property. You can set this to anything you want. I have
set it to the string “Hello”. Now click Build and Go and you are done. Here
are a few screenshots.
Collection By traibingo
44
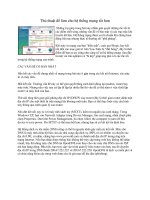
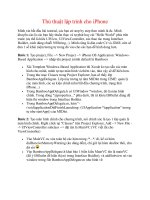
When you click on “Next View” it should transition to:
Collection By traibingo
45
Notice the back button at the top with the text “Hello”. If you press it, your
view will be popped from the NavigationController stack and the previous
view will be shown. If you have any problems/questions/comments post
them in the comments. I‟m pretty good about answering them as it emails
me when you do so and I receive them on my iPhone. If you have any
problems, you can download the source code here Hello World Views
Source. Happy iCoding!