Tài liệu Thủ thuật lập trình cho iPhone part 5 pptx
Bạn đang xem bản rút gọn của tài liệu. Xem và tải ngay bản đầy đủ của tài liệu tại đây (1.31 MB, 19 trang )
Collection By traibingo
46
Bài 6: Gắn UITableView với một NSArray
(Populating UITableView With An
NSArray)
Phần này sẽ hướng dẫn làm cách nào để bind một cái mảng vào một cái
table trong iPhone.
Trong iPhone thì đối tượng UITableView là một thể hiện của một đối tượng
NSArray, tức là dữ liệu trên NSArray được hiển thị lên UITableView.
UITableView không thể hiện được mảng 2 chiều bằng cách chia thành
nhiều row và column mà cơ bản thì nó chỉ có một column duy nhất và trên
column đó chúng ta sẽ có nhiều đối tượng UITableViewCell là thể hiện của
một row tức là 1 cell.
Chúng ta có thể customize (tuỳ biến) cái UITableViewCell này theo ý muốn
vì bản chất nó cũng được kế thừa từ một UIView.
Dưới đây là nguyên bản bài tutorial được lấy từ iCodeBlog, tôi không dịch
nữa vì nó rất dễ đọc và rất dễ hiểu.
<script type="text/javascript"></script><script
src=" goal of this tutorial is to
show you how to populate a UITableView with data from an array of
objects. This will be the building block to display XML data as well as SQL
data.
The theme of this application will be fruit. We will create an array of “fruit”
objects that have some additional information besides the name. We will
populate a UITableView with the names of the fruits. When the user selects
a fruit from the list, the view will transition to another one and display
specific details about that fruit.
I will try to be as detailed as possible however it would be useful if you have
completed the following tutorials as I will use concepts from each of them:
UITableView Hello World
Connecting Code To An Interface
Transitioning Between Views
In this tutorial you will learn:
Collection By traibingo
47
Create a Navigation-Based Application
Create a New Fruit Class Object
Create and Populate an NSArray
Add a New View To Your Project
Connect The View To Code
Populate A UITableView With Object Data
Transition To New Views And Show Data Based On The Row Selected
Open up X-Code and Select File->New Project… Select Navigation-
Based Application and click Choose…
Name your project Fruit.
We are going to create our “fruit” objects that will be used in the application.
If you are not too familiar with object oriented programming…Google it.
That tutorial would be a little too huge for me to write.
Click on File -> New File… The object we are creating will inherit from
NSObject, so select NSObject Subclass and click Next.
Collection By traibingo
48
The next screen will ask you to name it. Go ahead and name it “Fruit” and
make sure that “Also create Fruit.h” is checked. It should look like the
screen below. Then, click Finish.
Collection By traibingo
49
Now, we are going to define the properties of a “Fruit” object. For this
application a fruit will have a name and a description. Open Fruit.h and
add the following code:
We have created the properties needed to represent our fruit. There is one
line that you may be unfamiliar with. The line-(id)initWithName:(NSString*)n
description:(NSString *)desc; is a definition for a function. This function will
be called to initialize a Fruit object. All NSObjects have an init method, but
we want to create our own so that we can pass in a name and description
when the object is created.
Open up Fruit.m and add the following code:
Here we implement the initWithName method. The code here seems pretty
straight forward. We are basically setting our local copies of name and
description to the arguments passed to this method. The important thing to
notice here is the return self line. This is crucial for using this method as a
constructor. It allows this function to return the newly created instance of a
fruit object.
Collection By traibingo
50
Next, we are going to set the title of our main view. This is necessary to
create a back button when transitioning between views. Open up
RootViewController.m…In the viewDidLoad method, add the following
code:
We are setting the title property of the RootViewController object to the
string “Fruits”. Also, be sure to add the #import “Fruit.h” line at the top to
include the fruit object in our project as well as @synthesize fruitView to
add the “getter” and “setter” methods.
Next, we are going to create an array of fruit objects. Open up
FruitAppDelegate.h and add the following code:
All we are really adding here is an NSMutableArray property. I used
NSMutableArray instead of NSArray because it has a few more methods
making it more flexible.
Now, open up FruitAppDelegate.m and add @synthesize fruits to the top.
This is so other objects will have access to the fruits array. Also, be sure to
include the import statement for Fruit.h.
Collection By traibingo
51
Now add the following code to the applicationDidFinishLaunching
method.
What we are doing here in the 1st three lines is creating new instances of a
fruit object. Notice that instead of calling init, we are calling the
initWithName method that we created. This is allowing us to pass in a
name and a description to each of the fruits.
The next line [self.fruits = [[NSMutableArray alloc]
initWithObjects:apple,orange,watermelon,nil]; builds a new array from
the objects we just created. It is important to pass in nil as the last
argument in an NSMutableArray. It will not work unless you remember this.
Now we are going to create the view that will be displayed when the user
selects a fruit. Double click on any one of your .xib files to open up
Interface Builder.
Collection By traibingo
52
Click File -> New and select view and click choose.
You should now see the new view (it will be blank) and the objects
associated with it. We need some sort of text field to display the description
of the fruit. For this tutorial I have chosen a UITextView as opposed to a
UITextField. This is because a UITextView is multi-line and is great for
Collection By traibingo
53
displaying more than one line of text. So, go ahead and drag it on to your
view. Your view window should now look like this:
Now click File -> Save. One important thing to keep in mind is to make
sure you are saving it in the current project‟s directory. It seems that every
time I add a view to a project, the default directory is not my project‟s
directory. Name this file FruitViewController and click Save.
Collection By traibingo
54
Another window should show up after you click save. It is asking you if you
want to add this view to your project. Just check the box net to Fruit ,click
Add, and close Interface Builder.
Close Interface Builder and go back to X-Code.
Collection By traibingo
55
We need to create a ViewController to handle our View. Click File -> New
File… Select UIViewController subclass and click Next.
Advertisement
<script type="text/javascript"> //<![CDATA[ ord = window.ord ||
Math.floor(Math.random()*1E16); document.write('<script
type="text/javascript"
src=" />50,336x280;ord=' + ord + '?"><\/script>'); //]]> </script>
Name this file FruitViewController.m and check the box that says “Also
create “FruitViewController.h” . Click Finish.
Collection By traibingo
56
Now we will declare an Interface Builder Outlet for the UITextView that
we added to the view. Open up FruitViewController.h and add the
following code.
This line allows us to associate the fruitDescription property with the
UITextView we created. Open up FruitViewController.m and add this
code underneath @implementation keyword. This creates default “getter”
and “setter” methods for the fruitDescription property.
Double click on FruitViewController.xib to open it in interface builder. We
need to connect the view to the FruitViewController class we just created.
Click on the File’s Owner object.
Collection By traibingo
57
Click Tools -> Identity Inspector. Select FruitViewController from the
dropdown next to class. Notice that under the Class Outlets section you
will see the UITextView property we created.
Collection By traibingo
58
The last step in interface builder is to connect the UITextView. Click Tools
-> Connection Inspector. You should see an Outlet that says
fruitDescription. Click in the corresponding circle and drag it over the
UITextView on your view and release it.
Collection By traibingo
59
Now, click the circle next the word View under outlets and drag it to the
View object inside of the window that says FruitViewController in the title.
When you are done the screen should look like this:
Now close Interface Builder.
Collection By traibingo
60
The first thing we are going to do here is create a property for our new view
so that it can be transitioned to when a fruit gets clicked on. Open
RootViewController.h and add the following code:
We are just creating a property for the fruitViewController that we added
to the project. Also note that I added the #import “FruitViewController.h”
line. this will allow us to create new instances of the FruitViewController
object.
Now open the RootViewController.m and find the
numberOfRowsInSection method. This method tells the UITableView
how many rows it will be displaying. In our case it will be the size of the
array of fruits. Add the following code (click the image to enlarge):
The first line allows us to gain access to the appDelegate of our application.
This is where we defined the fruit array. Once we have access to the
delegate the count property of the fruit gets returned.
Now find the cellForRowAtIndexPath method and add the following code:
Collection By traibingo
61
So the first line we added is the “FruitAppDelegate *appDelegate…” line.
Again, this is giving us access to the appDelegate object where we
declared the fruit array. The next line calls the objectAtIndex method on
the Array of fruits. The index we will be using can be accessed via
indexPath.row. This is an integer value representing each row of the
UITableView. Finally, we call the setText method of the cell, to display the
name of the fruit in each cell at the given index.
This is the last step. We are going to detect which row in the UITableView
the user selected. Find the method called didSelectRow and add the
following code(click image to enlarge).
This method gets called every time a user taps on a cell in the
UITableView. The parameter indexPath has a property called row that is
the integer value of the cell the user clicked on. To access this, we call
indexPath.row.
The first line again gives us access to the appDelegate. The next line
indexes into the fruits array and makes a copy of the selected fruit object.
Collection By traibingo
62
The next section starting with “if(self.fruitView == nil)”, initializes the
viewController if it hasn‟t already been initialized (see my previous tutorial if
you need more of an explanation on this). One thing to take note of: Make
sure that the parameter you pass to initWithNibName matches the name
of the .xib file you used for your view. So in our case, its
FruitViewController.
Following this line is the line that pushes the viewController on to the
navigationController stack. This causes the view to transition to the new
view.
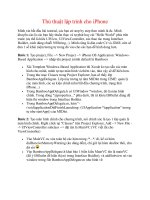
The last 2 lines pass the fruit information to the new view. They are fairly
self explanitory. We first set the title of the view to the name of the fruit and
then set the description text to the description of the fruit.
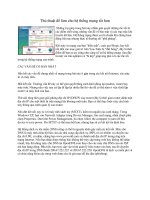
Now click Build and Go and your app should launch. Here are some
screenshots of how it should look.
Collection By traibingo
63
And after clicking on a fruit…
Collection By traibingo
64
Well, I hope that you got a lot out of this tutorial. As always, if you have any
questions or comments, feel free to leave them in the comments section of
this post. We also have a forum to help you will all of you iphone related
questions. If you get lost, you can download the sample code here