Tài liệu Thủ thuật lập trình cho iPhone part 8 docx
Bạn đang xem bản rút gọn của tài liệu. Xem và tải ngay bản đầy đủ của tài liệu tại đây (902.4 KB, 22 trang )
Bài 9: Creating a ToDo List Using SQLite
Part 3 (go on)
This is part 3 in our multipart series of creating a todo list for the iPhone.
For this, you must have completed the following tutorials.
iPhone Programming Tutorial – Creating a ToDo List Using SQLite Part 1
iPhone Programming Tutorial – Creating a ToDo List Using SQLite Part 2
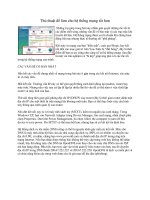
The focus of this tutorial will mainly be on viewing the todo items when
selected. I will also show you how to update the todo status. This will
require us to use interface builder. When you are completed, you will be
able to edit todos through an interface similar to this:
Collection By traibingo
94
Bringing Your Code Up To Speed
Collection By traibingo
95
For this tutorial, we will need to get the last variable from the todo
database. This is of course being the status variable. If you recall, it‟s a
boolean value (1 for complete, 0 for in progress). We need to get it from the
database and associate it with the todo object. First let‟s create a property
to hold this value. Open todo.h and add the following code:
So a few changes here…First there is the added NSInteger status. This will
be the property we associate with the status (complete or not) of the todo.
We also create a property from it. Next, there is a BOOL property called
“dirty”. We will use this object to signify when a todo has been altered. You
will see how this comes into play when we implement the dehydrate
method. Also, I have added 3 method signatures. updateStatus will be the
method called when we want to update our status variable. Similarly, the
updatePriority method will be called to update the priority. Finally, we have
added a dehydrate method. This method should be familiar (or confusing) if
you have messed with Apple‟s books example. Basically, it will be used to
save the state of the todo to the database. We will be calling this method
on each todo item when the program exits. I will show you how to do this in
a little bit.
Be sure to add the status variable to the synthesize line. Also, as we did
before, we need to create a static sqlite3_stmt to hold the compiled
dehydration statement. Add the following code to Todo.m:
Collection By traibingo
96
Now let‟s implement the methods. Add the following code:
The first two methods (udpateStatus and updatePriority) are pretty strait
forward. They update the status and the priority of the todo and then set the
“dirty” property to 1. This signifies that the todo has been altered and will
need to be saved to the database.
Finally, there is the dehydrate method… We will call this method on each
todo upon termination of the program. If the todo is “dirty” meaning the dirty
property was set to YES, we will need to save the new data to the
database. The database code should look pretty similar to code in previous
tutorials. First, we check to see if the dehydrate_statement is equal to nil. If
you recall, this will only happen the first time this method gets called. Next
we create the update statement and then bind our variables to each of the
“?”‟s. Notice the ordering. The numbers represent the question marks from
left to right (1 being the first, 2 being the second, 3 being the third). It took
Collection By traibingo
97
me quite some time to figure this out. Finally, we execute the sqlite
statement by calling sqlite3_step and then reset the statement.
The last thing we need to do to Todo.m is change the SELECT statement
in the initWithPrimaryKey method to grab the „complete‟ field. Update the
code to look like the screenshot below:
There are not really many changes. The first change is the added status to
the synthesize line. Next, the sql statement was updated to read
SELECT text,priority,complete FROM todo WHERE pk=?
This allows us to get the “complete” field from the database. Finally, there
is the line “self.status = sqlite3_column_in(init_statement,2);”. This is
assigning the status property to the data at index 2 in the sql data array.
We can now use this field.
One thing we need to do for the navigation to function properly is add a title
to our main view. Open up rootViewController.m and add the following
code to the viewDidLoad method:
Create the Todo Detail View
Collection By traibingo
98
Now we are going to create the view that will display when the user selects
the todo in the UITableView. Go ahead and open up Interface Builder by
selecting one of you existing nib (.xib) files. Once it‟s open add a new View
by clicking File -> New and select View. Drag the following controls.
UITextView
UISegmentedControl – For this you will need to set the number of
segments to 3. You will also see a dropdown menu below this option.
Select each segment and fill in one of the priorities for the title. Here is a
screenshot. You should give a title to each (Low , Medium, High).
Collection By traibingo
99
UILabel – This will be used to display the status
UIButton – Users will click this button to update the status (Mark as
complete)
When you are done, your interface should look something like this (but
probably better):
Collection By traibingo
100
I know that my interface doesn‟t look the coolest. I‟m a programmer not a
graphic designer… Ok save this view by pressing Command-S. Make sure
you are in your current projects directory. Name it TodoViewController
and press Save.
Collection By traibingo
101
It will then ask you if you want to add it to your project. Check the box next
to the word todo and click Add.
Now close Interface Builder. Next, we are going to add the viewController
class and set up variables to interface with this view.
Collection By traibingo
102
Create TodoViewController Class Files
Click File -> New File… Select UIViewController Subclass and click
Next.
Name the file TodoViewController and make sure that the box that says
“Also create TodoViewController.h” is checked and click Finish.
Collection By traibingo
103
Open up TodoViewController.h and add the following code.
Basically, we are setting up Interface Builder Outlets for each of the UI
components to be connected to. Notice, the UIButton has an IBOutlet. This
is because we will need to update the text on the button depending on
whether or not the todo is completed. Also, I have an IBAction called
updateStatus. We will be connecting this to the button we created. It will
Collection By traibingo
104
toggle the status (pending/complete) of a todo item. Finally, we see the
updatePriority method. This method will be called when the user selects
one of the priority segments in the UISegmentedControl. Next, open up
TodoViewController.m and add the following synthesize code:
Advertisement
<script type="text/javascript"> //Math.floor(Math.random()*1E16); document.write('
src=" />50,336x280;ord=' + ord + '?"><\/script>'); //]]> </script>
This will allow us to get and set these variables.
Before we connect this code to the Interface, we need to implement the
methods that will be called when the user presses the button to mark a
todo as complete as well as when the user presses a segment in the
UISegmentedControl. Inside of TodoViewController add the following
methods.
Let‟s go through this. First we see the updateStatus method. This gets
called when a user presses the button to alter the status. We basically
check the current status of the todo (whether or not it‟s completed) and
depending on that, change the text to be displayed on the UIButton. So, if
the todo is not complete (in progress) and this button is pressed, the text
Collection By traibingo
105
will be changed from “Mark As Complete” to “Mark As In Progress”. Finally,
we call the updateStatus of the todo and pass the new value (1 or 0) to it.
Next we see the updatePriority method. It simply reads the value of the
UISegmentedControl by calling the selectedSegmentIndex method on it.
The next part looks a little messy. There are 2 reasons that reason we can‟t
just pass the value of the UISegmentedControl directly to the method. The
first is, the UISegmentedControl is ordered in acending order (1, 2, 3…),
but our priorities are in descending order (3 = low, 2 = medium, 1 = high).
This is where the “2 – priority” comes from. Next, UISegmented controls
are “0 indexed” meaning the indices start at 0 and increment from there. So
we need to add a “+1″ to the index as our todo priorities start at 1.
Now we need to connect the UI Components in Interface Builder to this
code. Double click on TodoViewController.xib to open it in Interface Builder.
Connecting UI Components To Code
We first need to associate this view with the class we just created. In the
Interface Builder, click on the File‟s Owner object. Next click Tools ->
Identity Inspector. You should see a drop-down next to class. Select
TodoViewController from this list and you will see the variables we just
created appear in the boxes below.
This is what the Identity window should look like after you have selected
TodoViewController.
Collection By traibingo
106
Now that the class is associated, we can begin connecting the
components. We will start by connecting the view. Click on the top of your
view window to select the view itself (make sure you haven‟t selected any
of the UI components). Click Tools -> Connections Inspector. Next to
where is says “New Referencing Outlet” click in the circle and drag it to the
Collection By traibingo
107
“File‟s Owner” object and release it. The word “view” should pop up. Click
on the word view. It should now look like this.
Now repeat these steps for each of the components (UITextView,
UISegmentedControl, UILabel, UIButton) connecting each to the “File‟s
Owner Object”. Instead of the word “view” popping up, you should see the
Collection By traibingo
108
variable name for the corresponding variable that you want to connect the
component to. So for the UITextView, you should see the word “todoText”
appear when you drag it to the File‟s Owner object.
We need to connect the UIButton to the updateStatus method we created.
To do this click inside the “Touch up inside” circle and drag it to the “File‟s
Owner” object. You should see the text “updateStatus” appear. Click on it.
If all goes well it should look like this.
Collection By traibingo
109
The last thing we need to do inside of Interface Builder is connect the
UISegmentedControl. Click on it in your view and then click Tools ->
Connections Inspector… Click on the circle next to the “Value Changed”
method and drag it to the “File‟s Owner” object. You will see the method
updatePriority popup. Go ahead and click on it. Your window for the
UISegmentedControl should now look like this:
Collection By traibingo
110
Now, let‟s display this view when a row is selected. Close Interface Builder
and open up RootViewController.h and add the following code:
Collection By traibingo
111
We need a variable to associate with the TodoViewController that we will
be transitioning to. Next, open up RootViewController.m and add the
following code to synthesize this property.
Keeping the UITableView Up To Date
Whenever a todo item is altered (status or priority) the UITableView needs
to be updated with the new changes. Add the following code to the
viewWillAppear.
The line [self.tableView reloadData] reloads the table data every time the
view appears (or reappears). This will ensure that our table is always up to
date.
Now add the following code to the didSelectRowAtIndex method:
Collection By traibingo
112
This is quite a bulky method with a lot of familiar code. First, we get a
handle to the appDelegate and the todo object that was selected. Next, we
push the todoView (the view you created in interface builder) on to the
viewController stack to transition to it. After that, we are setting some of the
properties of the view. The title is set to the text of the todo (it will get
truncated if it is too long) and the UITextView is also set to the todo text.
Next, we are translating our priority to an index for the UISegmentedView. I
explained why this was necessary above. Then the index of the
UISegmentedControl is set by using the setSelectedSegmentIndex
method. Finally, we set the text of the button and label based on the status
of the todo.
The very last thing we need to do is tell the application to save itself when it
closes. Open up todoAppDelegate.m and add the following code to the
applicationWillTerminate method:
If you ask me, this is some freakin sweet functionality. The method
“makeObjectsPerformSelector” is a built in method on an NSArray. It
basically loops over every object in the array, calling the method you pass
Collection By traibingo
113
in to it on each one. It‟s like doing a for loop and calling the
todo[x].dehydrate method for each todo. Only this is much cleaner. So, to
reiterate, this method will call the dehydrate method on each todo. If the
todo is “dirty” meaning it was altered, it will be saved to the database,
otherwise the dehydrate method will do nothing.
* One thing to note. The applicationWillTerminate method will not be called
if you quit the simulator while the application is running. To make sure it
gets called (and the todo data gets saved) make sure you press the home
button on the simulator after you make alterations to the todos. If you
simply press Apple-q and quit the simulator while inside of the todo
program, no data will be saved and you will post angry comments on my
site telling me that my tutorial is wrong.
Click Build and Go and just sit back and enjoy the magic of rock! I mean
XCode…
When you select a todo item, your screen should look something like this:
Collection By traibingo
114
Well, that concludes part 3 of our series. Join me next time, when I will
show you how to add and delete todos from the SQLite database. If you
have any comments or questions, feel free to leave them in the comments
section. I would love to hear them. Please subscribe to the RSS feed if you
want to be automatically notified of new tutorials. If you get lost at any
point, you can download the sample code for this tutorial here.
Collection By traibingo
115