Tài liệu Thủ thuật lập trình cho iPhone part 9 pdf
Bạn đang xem bản rút gọn của tài liệu. Xem và tải ngay bản đầy đủ của tài liệu tại đây (560.73 KB, 14 trang )
Collection By traibingo
116
Bài 10: Creating a ToDo List Using
SQLite Part 4
This is the final installment of our 4 part series of creating a Todo list for the
iPhone. In this tutorial, I will detail how to add and delete new todo objects
from the SQLite database. Make sure that you have completed the
following tutorials before you begin this one:
iPhone Programming Tutorial – Creating a ToDo List Using SQLite Part 1
iPhone Programming Tutorial – Creating a ToDo List Using SQLite Part 2
iPhone Programming Tutorial – Creating a ToDo List Using SQLite Part 3
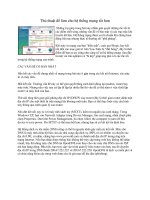
When you have completed this tutorial, you should have a main screen that
looks something like this:
Collection By traibingo
117
Let‟s get started…
The first thing we need to do is add the UIBarButtonItem items to the
NavigationBar so that we get the “Edit” and “Add” button. Open up
Collection By traibingo
118
RootViewController.m and add the following code to the viewDidLoad
method.
The first thing we see is the line that sets the leftBarButtonItem to
self.editButtonItem. This automatically adds the “Edit” button to the
NavigationController. Also, it sets up the functionality that allows the
“delete” buttons to be displayed when the button is pressed. You can see
this functionality if you do a “Build and Go” at this step. Next, I have
manually created a UIBarButtonItem and added it to the navigationbar. This
can be done in Interface Builder, but I wanted to show you how to do it
manually and assign an action to it (I‟m sure you will require this
functionality in a future program). Here is a break down of the parameters:
initWithTitle – The text to be displayed on the button
style – How the button will look
target – The class object that handles the messages sent from this button
action – The method to be called when the button is passed. We can use
@selector and give it the name of the function to call.
Finally, we assign this button to the rightBarButtonItem. If you do a Build
and Go, it should error since we haven‟t created the addTodo method. We
will do that in a bit. Now, let‟s create a method inside of our Todo object
that will add new Todos to the database.
Open up Todo.h and add the following code:
So in addition to the insertNewTodoIntoDatabase method, we also see
the deleteFromDatabase method signature. I have just added this so I don‟t
have to come back to it later. We will be implementing this when I show you
how to delete todos from the database. One thing to note about the
insertNewTodoIntoDatabase method is it has a “+” rather than a “-” sign.
This means that it is a static method. Static methods are associated with
Collection By traibingo
119
the class not the instance meaning we can call this method without
instanciating this class. So we can do stuff like
Todo.insertNewTodoIntoDatabase. Now we will implement this method.
Before we can do this, we must declare a few more static
sqlite3_statement‟s. Add the following statements to the top of Todo.m
Nothing new here…Now implement the following method:
This is similar to our update method. Notice that we are inserting default
values into the database. This is so we don‟t run into any problems with null
or nil values. The most important part of this method is the fact that it
returns the primary key of the newly created todo object. This will be used
later so we can immediately transition to the todo when the “Add” button is
pressed. The last thing we need to do to the todo object is update the
dehydrate method so that the todoText gets saved if it gets changed.
Update the dehydrate method to look like this:
Collection By traibingo
120
There are only a few minor changes here. First we see the “text = ?” part
added to the sql statement. This is simply so we can update the text of the
todo. The other change is we bound the self.text property to the 1st
question mark in the sql statement. One thing to notice is we call [self.text
UTF8String]. This is because sqlite3_bind_text takes a (char *). This will
convert an NSString to an acceptable format.
Now we need to add a method inside of our RootViewController to add a
todo. This is the method that will be called when the user presses the “Add”
button. Inside of RootViewController.m add the following code:
First, we get a reference to the appDelegate object. This is because we
need to call its addTodo method. Next, we instantiate the
TodoViewController if it has not already been instantiated. We need this
around because we will push it on to the view stack and transition to it after
we create our new todo object. After this is done, we call the addTodo
method of the appDelegate. It will return the newly created todo object and
the view will be transitioned to its detail screen in order to update its details.
Collection By traibingo
121
Now we need to implement the method addTodo inside of our
appDelegate. Open up todoAppDelegate.h and add the following code to
create the method signature.
Now, let‟s implement this method. Open up todoAppDelegate.m and add
the following code:
Advertisement
<script type="text/javascript"> //<![CDATA[ ord = window.ord ||
Math.floor(Math.random()*1E16); document.write('<script
type="text/javascript"
src=" />50,336x280;ord=' + ord + '?"><\/script>'); //]]> </script>
First, we are calling the insertNewTodoIntoDatabase method of the Todo
object. Notice that we are simply calling the method without first building an
instance of a todo object. As I said in tutorial 3, this is because that method
is static and gets called without building an instance of the class. Next, we
insatiate the todo object that was just created by calling its
initWithPrimaryKey method. This will give us reference to the new todo
object. Finally, we append this todo to the end of our todos array. Since our
UITableView is updated with this array, it will automatically include the new
todo object. The last line just returns this todo object.
Remember is the last tutorial we made it so the users could update the
status and the priority of a todo? Well, now we also need to give them the
ability to update the text of the todo. So open up TodoViewController.h and
add the following code:
Collection By traibingo
122
Ok, so I‟m guessing you are wondering why the UITextView for the
todoText object has been changed to a UITextField. Well, I will tell you.
UITextView doesn‟t have the methods that we need to save the text with
our current design. We will also be changing this on our Interface inside of
Interface Builder. So for now, just believe me and anywhere it says
UITextView, change it to UITextField. The only additional code we added
here is the method signature for the updateText method. It‟s an IBAction
that will get called when the user presses the “Done” button on the
keyboard after setting the text for the todo. Next, we need to implement this
method. Open up TodoViewController.m and add the following code:
All this does is update the text of the todo to the text that the user entered
inside of the UITextField. The last thing we need to do in order to add a
todo is to replace the UITextView with a UITextField and connect it to our
updateText method. Double click on your TodoViewController.xib file to
open it in Interface Builder.
Now click on the UITextView on your interface and press the delete key on
your keyboard to delete it. Now, drag a UITextField from the library and
drop it onto your interface. Resize it to fit. When you have completed that,
your interface should look something like this:
Collection By traibingo
123
Now we need to connect this component. Make sure it is selected and click
Tools -> Connections Inspector to open up the connections inspector. Drag
from the circle next to the method “Did End On Exit” to the “File‟s Owner”
object. The words udpateText should pop up. Click on them to make the
connection. Next, click in the circle next to “New Referencing Outlet” and
drag it to the “File‟s Owner” object. Select todoText when it pops up. The
Connections Inspector should look like this:
Collection By traibingo
124
Now we are done with Interface Builder. Go ahead and close it. We are
now able to add todos. The last thing we need to do is give the ability to
delete todos from the list as well as our database. This is all done in code,
and we won‟t need interface builder for this.
Collection By traibingo
125
Let‟s start by adding the methods to the appDelegate to handle the deletion
of todos. Open up todoAppDelegate.h and add the following code:
All we see here is a signature for the removeTodo method. Also, be sure to
add a #import “Todo.h” statement to the top of this file so that we can
interface with the todo objects. Now let‟s implement the removeTodo
method. Open up todoAppDelegate.m and add the following code:
The first line looks up the todo in the todos NSArray. It returns the index in
the array of the todo to be deleted. Then, we call the deleteFromDatabase
method on the todo object and then remove it from the todos array. Since
the UITableView is updated via this array, it will automatically remove the
todo without any additional code on our part.
Now, let‟s create the removeTodo method for the todo object. We have
already written the method signature in Todo.h in a previous step, so open
up Todo.m and add the following code:
Remember the delete_statement variable is a static sqlite3_stmt that we
declared in a previous step. First, we check to see if it is nil. If it is we
compile the statement using the sqlite3_prepare statement. Next, we bind
the primary key of the current todo to the “?” in the sqlite3 statement. Next,
Collection By traibingo
126
we just step the statement to execute it and reset it. The last thing we need
to do to delete todos from the database is to specify what happens when
the user presses the “delete” button. Open up RootViewController.m and
add the following code:
The first step (like the first step of many functions) is to get a reference to
the appDelegate. Next, we check to see if we are currently editing. If so,
call the removeTodo method on appDelegate. The next line, removes the
row from the UITableView at the given indexPath.
Now click Build and Go! You should now be able to add and delete todo
items from the database. This concludes our four part series of creating a
todo list for the iPhone. As always, if you have any questions feel free to
leave them in the comments section. If you get lost at any time you can
download the sample code here.
Collection By traibingo
127
Bài 11: UITabBar iPhone Tutorial
Phần này hướng dẫn cách sử dụng UITabBar
<script type="text/javascript"> </script>
[ Javascript required to view QuickTime movie, please turn it on and refresh
this page ]
This tutorial will show you the basics of using the UITabBar and
UITabBarItem controls when programming for the iPhone.
I will be showing you step by step in the video how to create a project from
a UITabBar template and add additional UITabBarItems as well as
additonal views to be displayed with these items. Here is a brief
explanation of each step:
1. Create a new project from a UITabBar template
This is pretty straight forward. We will be using Apple‟s default UITabBar
template to start our project. This is a fully functioning app. You can click
Build and Go to see it run.
2. Open Interface Builder (click on mainWindow.xib) and Add
addtional UITabBar items
To add additonal UITabBarItems, you simply drag them from the library on
to the UITabBar. For each new item, you must specify the name of the view
that will be shown when the item is clicked. This is done by clicking on the
tab bar item and clicking Tools -> attributes inspector. There should be a
box titled “Nib Name”. Whatever you enter here will be the name of the
view that will be loaded when this tab is clicked.
So for this tutorial, we entered ThirdView. So, naturally when we created
our view to be loaded here, we saved it as “ThirdView.xib”. This is one
Gotcha when working with these components.
3. Changing the text of the UITabBarItems
Collection By traibingo
128
This is took me a while to figure out. To change the text, image, or style of
the UITabBarItem, double click on it. You should now be able to access
these settings in the Attributes Inspector.
4. Set the Background Color For Views 1 and 2
Advertisement
<script type="text/javascript"> //<![CDATA[ ord = window.ord ||
Math.floor(Math.random()*1E16); document.write('<script
type="text/javascript"
src=" />50,336x280;ord=' + ord + '?"><\/script>'); //]]> </script>
This was pretty easy. For the first view, we simply clicked on it and clicked
the box next to “Background” in the Attributes Inspector. Next, we did the
same to the secondView by opening up SecondView.xib in Interface
Builder.
5. Create ThirdView
We need to create the third view to be loaded when the user clicks on the
UITabBarItem that we inserted. This was done inside of Interface Builder
by clicking File -> new and selecting View. The next thing we did was drag
a label from the library and add it to the view. Finally, we set the
background color like we did in the other views.
Be sure when you save this view, you name it ThirdView.xib (this
corrisponds the name that we put in the “Nib Name” box in step 2). Also, be
sure to save this view in your projects folder (sometimes Interface Builder
does not navigate here by default).
6. Connecting ThirdView to the ViewController
In this step we connect the ThirdView to our FirstViewController. Notice
that all of the views get connected to this view controller. This will handle all
of the UI components put on to each view. *Note: this step can‟t be done
until ThirdView is saved and added to the project.
Collection By traibingo
129
So to connect this view to FirstViewController, simply click on the File‟s
Owner object and select FirstViewController from the drop-down in the
Identity Inspector.
The last thing we need to do is connect the view. So control-click from
File‟s Owner and drag the line to the View object. The word “View” should
pop up. Click on it and the views are now connected.
That should be it! Click Build and Go and you are done.
Well, I hope you guys have enjoyed the video tutorial. I know that the audio
is kind of low. This is because I used my computer‟s built in microphone
and it‟s not the greatest. I have since purchased a new microphone (thanks
again to all who have donated thus far) and future tutorials will have much
better audio quality. I would LOVE to hear your feedback on the videos. I‟m
a total noob when it comes to screencasts and would love your
constructive criticism. Thank you all and Happy iCoding!