Tài liệu MySQL Administrator’s Bible- P12 pdf
Bạn đang xem bản rút gọn của tài liệu. Xem và tải ngay bản đầy đủ của tài liệu tại đây (1.25 MB, 50 trang )
Logging and Replication
W
hen changes are made to the database mysqld writes to
binary logs, which are used in the replication process. Much
of this chapter concerns configuration options that are used
to manage both logging and replication. These options can be configured
from server startup using the command line or set in the configuration file.
Unless the material specifically says that an option can only be configured
from the command line or the configuration file, either method is possible.
In addition, many of the configuration options can be controlled at server
runtime.
IN THIS CHAPTER
Logging in MySQL
Configuring replication
Replication topologies
Correcting data
Log Files
Four log files are used by mysqld: the error log, the binary log, the general query log, and the slow query log. A fifth log type, the relay log, is
used by a slave server. If the logs are enabled, mysqld writes them to the
data directory unless otherwise specified. By default, no logging is enabled.
If you find that an error log is being written to when
the configuration file does not enable the error log,
there is no need to worry. Some startup scripts specify error log files. These
startup scripts are dependent upon the installation.
Error log
The error log contains entries for when the mysqld daemon started and
stopped and also any critical errors that occur while the server is running.
517
Please purchase PDF Split-Merge on www.verypdf.com to remove this watermark.
Part III
Core MySQL Administration
Information such as when the event scheduler executes an event and when replication starts and
stops is also written to the error log. On some operating systems the error log additionally will
write a stack trace if mysqld dies. This stack trace can be very useful for troubleshooting system
failures. The error log is a plain text file.
To enable the error log, specify the log-error option. The error log will be written to the data
directory using the format host_name.err. To customize the filename, give the log-error
option a filename, such as:
log-error=/var/log/mysqld.err
The log_warnings option is used to control whether or not warning messages are logged to
the error log. The default value is 1 (enabled). If the value is greater than 1, aborted connections
are written to the error log. Warning logging can be disabled using a value of 0.
If you do not specify log-error, or if you use the --console option on Windows, errors are
written to stderr, the standard error output. Even though you are not required to have an
error log, it is extremely useful to help troubleshoot issues.
Binary logs
The binary logs are used for several reasons. They can be used to perform a point-in-time recovery during a recovery process. How this is done is detailed in Chapter 13. Another function of
the binary log is to enable replication. This is covered later in this chapter.
The contents of the binary log are any statements that occur in the server that could potentially
modify the databases. Non-modifying statements such as SELECT are not logged. However, a
non-modifying statement will be logged if it is part of a transaction that modifies data, because
the entire transaction will be logged.
To enable binary logging, use the log-bin option. The binary log index file is a plain text file
that keeps track of the current binary logs. By default, its name is mysql-bin.index. To set
the filename and path of the binary logs and binary log index file, specify the following options:
log-bin = /data/logs/binary/changelog
log-bin-index = /data/logs/relay/binarylog.index
Binary log data is stored in a binary format. This means you can not just open the file with
a text editor and read it. To display the binary logs in text/readable format you must use the
mysqlbinlog tool. The operation of the mysqlbinlog tool is pretty straightforward.
In the following example the entire contents of the mysql-bin.00001 binary log are converted
into text format and copied into a new file called output.sql:
shell> mysqlbinlog mysql-bin.00001 > output.sql
518
Please purchase PDF Split-Merge on www.verypdf.com to remove this watermark.
Logging and Replication
If you leave off the > output.sql the contents will be sent to the console.
Numerous options can be used with mysqlbinlog. Table 16-1 lists the frequently used mysqlbinlog options. The standard options for command-line programs that interact with mysqld,
such as -u, -h, -p, and -P, are not listed
TABLE 16-1
Frequently used mysqlbinlog Options
Option
Description
read-fromremote-server
Used to read the binary log from a remote server.
start-position
Determines the position in the binary log where mysqlbinlog
begins reading data.
end-position
Determines the position in the binary log where mysqlbinlog
stops reading data.
start-datetime
Begins reading from the binary log at the first event with a
timestamp equal to or greater than the specified datetime.
end-datetime
Stops reading from the binary log at the first event with a
timestamp equal to or greater than the specified datetime.
The following is a more complicated example, reading from a remote server:
shell> mysqlbinlog --read-from-remote-server -uuser -p \
mysql-bin.000001 -h 192.168.2.65 -P 3306 \
--start-position=932 --stop-position=1132 > remote000001.sql
Here is an example showing how to use the time-based parameters:
shell> mysqlbinlog mysql-bin.000001 \
--start-datetime="2009-02-15 17:34:40" \
--stop-datetime="2009-02-15 17:34:56" > sixteensecs.sql
This is a good way to extract a smaller log if you know approximately what time an event happened.
mysqlbinlog does not change the original binary log.
Please purchase PDF Split-Merge on www.verypdf.com to remove this watermark.
519
16
Part III
Core MySQL Administration
Relay logs
Relay logs are used by a replication slave to record events received from the master server
before execution on the slave server. They utilize the same binary format as the binary logs
and, like the binary logs, can be viewed using the mysqlbinlog tool. By default a slave server
stores the relay logs in datadir. In addition to the relay logs there is the relay-log.index
file, which is used to keep track of the currently used relay log. Also, the relay-log.info
file documents the currently used relay log file and position, plus the position in the master
binary log.
If you want to change the location for the relay logs, there are three configuration values you
will want to add to the configuration file. These values are relay-log, relay-log-index, and
relay-log-info. If you wanted to store all these logs in the directory /data/logs/relay
you would need to add this to your MySQL configuration file:
relay-log = /data/logs/relay/relay-bin
relay-log-index = /data/logs/relay/relay-bin.index
relay-log-info-file = /data/logs/relay/relay-bin.info
As you can see, you can specify filenames in addition to directories. Relay logs are automatically
deleted by the SQL thread of the slave server when it has executed all events in the log and it is
no longer needed.
General and slow query logs
The general query and slow query log files are used to log the activities occurring in the
database. If the general query log is enabled it logs all activity on the server. In addition to the
actual SQL statements being executed it logs information such as when clients both connect and
disconnect. It can be a very useful tool when troubleshooting issues.
The general log writes statements as they are sent to mysqld, including ones that result
in errors.
It is not advisable to turn on the general query log on a production machine unless
it is really necessary. Because it logs all server activity it can be quite a detriment to
performance. The general query log can be turned on and off while the server is still running, so if
a general log is needed for debugging purposes it can be enabled for a short period of time.
Beginning in MySQL Server 5.1 general and slow queries can be logged to either a log file or a
table in the mysql database. The general queries are logged to the general_log table and the
slow queries are logged to the slow_log table.
Why would you want to log this information to a database table? If all log statements are
stored in a table rather than in a text file, you can use a simple SELECT statement to query the
data — speeding up the information search of your logs.
520
Please purchase PDF Split-Merge on www.verypdf.com to remove this watermark.
Logging and Replication
To set the location of both the slow and general query log output, set the server variable
log_output. Possible values for log_output are:
■ FILE
■ TABLE
■ NONE
■ FILE,TABLE
The default value is FILE.
The log_output server variable is an example of a dynamic variable. That means
that it can be set while the server is running. As an example, to set log_output to
NONE (turning off both general and slow query logs), execute the following using mysql:
mysql> SET GLOBAL log_output=NONE;
Table 16-2 lists the server variables used to manage the general and slow query logs.
TABLE 16-2
Server Variables Used to Manage General and Slow Query Logs
Server Variable
Description
log_output= [ NONE |
FILE | TABLE |
FILE,TABLE]
Determines where both general query and slow query logs are
stored.
general_log= [ON|OFF]
Used to turn on or off the general query log. Possible values
are ON and OFF.
general_log_file
[=filename]
Specifies the location of the general query log file. The default
location is the data directory.
slow_query_log
Possible values are ON and OFF.
slow_query_log_file
[=filename]
Specifies the location of the slow query log file. The default
location is the data directory.
long_query_time=num
Queries that take longer than num seconds are logged in the
slow query log. Defaults to 10.
log-queries-notusing-indexes
Queries that do a full table scan will be logged.
min_examined_row_
limits=num
Only logs queries in slow query log that examine at least num
specified rows. Defaults to 0. This option is usually used in
conjunction with log-queries-not-using-indexes, to
log queries on large tables that do not use indexes.
Please purchase PDF Split-Merge on www.verypdf.com to remove this watermark.
521
16
Part III
Core MySQL Administration
The slow query log is similar to the general query log but only logs queries that take more
than the number of seconds specified by the server variable long_query_time. The
long_query_time server variable is used to control the granularity of the logging of slow
queries. Up until mysqld version 5.1.21 you could only log queries that took a minimum
of two seconds to execute (it would log queries greater than the minimum of one second).
Beginning with version 5.1.21 you can specify the minimum query execution time in fractions
of a second. For example, you could set long_query_time = .05 (fifty milliseconds). In all
versions of mysqld, the long_query_time option defaults to 10 (seconds).
Like the error log, in almost every situation it will make sense to have the slow query log
enabled. In fact, you should determine what amount of time it takes before you consider a query
slow. For a web application, 4–5 seconds is the maximum most people will wait for a regular
page to load. It is quite common to see a 2-second limit or even smaller.
Because it logs the time a query took, the slow query log does not write a statement until after
it has finished. It will write statements that have failed, so long as they have taken more than
long_query_time seconds.
To enable the general_log you have to set general_log = ON and, in a similar way, to
enable slow_log you have to set log_slow_queries = ON. After logging is enabled you can
choose log_output but, whereas there are two separate variables for enabling the general
and slow query log, there is only one variable related to log output. So you can have the
general_log enabled and the slow_log disabled, but if you choose an output (and both logs
are enabled) that output (FILE, TABLE, or FILE,TABLE) applies to both the logs.
If the logs are disabled, no logging occurs regardless of the value of log_output. This is
why no logging occurs by default, because the logs are disabled, even though the default for
log_output is FILE.
Rotating logs
Log files can consume large amounts of disk space quickly and if they are rotated they can be
compressed for archival purposes or deleted if not needed. Even if you have plenty of disk
space, log files that become too large make it difficult to work with when troubleshooting and
performing general monitoring. The most common methods of log file rotation are covered in
the following sections.
flush logs
You can manually rotate the binary logs and error log by issuing a FLUSH LOGS command from
mysql. When this is done the server closes the binary log currently in use and creates a new
binary log by incrementing the sequence number of the file by one (in relation to the previous
log). With the flushing of the error log the server:
■ Closes the current file
■ Creates a new error log
■ Renames the old error log with a suffix of -old
522
Please purchase PDF Split-Merge on www.verypdf.com to remove this watermark.
Logging and Replication
For the other log files, FLUSH LOGS only closes and then reopens the log file. However, this
means that other log files can be rotated by moving the original file, creating a blank file to
replace the original, and performing a FLUSH LOGS statement.
The mysladmin utility can perform a FLUSH LOGS from the shell. Here is an example of this
type of usage:
shell> mysqladmin flush-logs
max_binlog_size
The max_binlog_size option automatically rotates the binary log after it reaches a certain
size. The option name is a bit of a misnomer because the binary logs are rotated after the size
is reached, so the size of the file may be slightly larger than max_binlog_size. Values can be
specified as integers (which indicate bytes) or using K, M, or G to specify kilobytes, megabytes,
or gigabytes. For example, to set mysqld to rotate binary logs after they reach 512 MB in size:
max_binlog_size=512M
purge binary logs
The PURGE BINARY LOGS command is another manual method of log management that is
specifically designed for the binary logs. Unlike FLUSH LOGS, it deletes logs instead of saving
them. There are two methods of purging: by filename and by timestamp.
For example to purge all binary logs older than ’mysql-bin.00987’:
mysql> PURGE BINARY LOGS TO ’mysql-bin.00987’;
To purge all logs older than December 13, 2008 at 11:00 PM:
mysql> PURGE BINARY LOGS BEFORE ’2008-12-13 23:00:00’;
The MASTER keyword is an alias for BINARY; this command is also called PURGE MASTER LOGS.
expire_logs_days
The expire_logs_days option purges binary logs after a configured number of days. Something to keep in mind is that if your slave servers fall behind the master it is possible to have the
master delete old binary logs and ruin slave replication because it deleted data that had not been
replicated to the slave server yet!
Other methods of rotating
With the Red Hat rpm installations of mysqld there should be a mysql-log-rotate script
that can be used to rotate your log file. If you are using a non–Red Hat system you can create
Please purchase PDF Split-Merge on www.verypdf.com to remove this watermark.
523
16
Part III
Core MySQL Administration
your own script and run it from cron for log rotation. Unfortunately, FLUSH statements cannot
be used inside an event in mysqld.
Some operating system distributions, such as Debian, include a general script for log rotation
called logrotate. Some specific hooks for the MySQL logs are included with the Debian
MySQL packages. If you are using Debian this will almost certainly take care of any log rotation
needs you have.
Various home-grown scripts are also available on the Internet and if none of these suit your purposes it would certainly be feasible to write you own without much difficulty.
Replication
Replication is the ability to keep distributed databases synchronized by copying either executed
statements or data set changes from a master server to one or more slave servers. It is the primary method of keeping two mysqld instances synchronized. This could be done for a number
reasons including:
■ Failover requirements — high availability
■ Load balancing and scale out
■ Off-site processing — backups, running reporting queries, and so on
See Chapter 22 for more information on using replication to achieve scalability and high
availability. With mysqld a slave can have only a single master. However, a master can have any
number of slaves. In addition, it is possible for a master server to be a slave of another master.
This allows you to build some fairly complicated replication topologies.
MySQL replication is asynchronous. This means that the master does not wait for slaves to
acknowledge receiving the data before committing any changes. The master simply writes
events to the binary log with no regard to the status of any slave servers. This means there is
no guarantee that replication is actually synchronizing data appropriately. This is in contrast
to semisynchronous replication, where a thread that performs a transaction commit on the
master blocks after the commit is done and waits until at least one semisynchronous slave
acknowledges that it has either received all events for the transaction or a timeout occurs. The
benefit to this is immediately apparent — because both servers are always synchronized there
is no chance of losing committed data. Even if your master server experienced a catastrophic
hardware failure the slave would be guaranteed to have any committed changes.
This guarantee comes at a price. Semisynchronous replication does have a performance impact
because commits are slower due to the need to wait for slaves. The amount of slowdown is at
least the amount of time it takes the TCP/IP packet to go from the master to the slave and back.
This is needed to send the commit to the slave and wait for the acknowledgment of receipt by
the slave. This is the tradeoff for increased data integrity. This means that semisynchronous
replication works best for close servers communicating over fast networks. You probably should
not use it for situations where servers are not on the same network.
524
Please purchase PDF Split-Merge on www.verypdf.com to remove this watermark.
Logging and Replication
This capability was not included prior to mysqld version 6.0. Several patches are available that
allow this capability in previous versions of mysqld.
With mysqld version 6.0 Sun has created the capability for semisynchronous replication using a
plugin-based system. This will allow for a great deal of flexibility in the future. The actual code
is based on code developed at Google by Mark Callaghan and Wei Li. It was ported to version
6.0 of the server as plugin components. Though the addition of semisynchronous replication is
a great option, moving replication to a plugin-based system is far more exciting. This allows a
great deal of flexibility. Several plugins are already being developed, including one for delayed
replication.
Semisynchronous replication differs from true synchronous replication in that the
master server does not wait for all slaves to acknowledge receipt of events. In
addition, the master requires only acknowledgment of receipt, not that the events have been
both fully executed and committed on the slave side. Synchronous replication is not available in
mysqld. MySQL Cluster uses synchronous replication.
In a replication setup the data is written by the master server to the binary log. Any slave
servers connect to the master server using what is called an I/O thread. This process writes the
statements or data received from the master into the relay log. The SQL thread is the process that
reads from the relay log and then replays the statements or data changes for the MySQL process
on the slave server.
The end result of this process is that the slave server has executed the same statements or data
changes that the master server executed.
If a slave server is also configured as a master server of other slaves, it simply writes its own
binary logs and the secondary slaves read from that binary log using their I/O threads.
Setting up semisynchronous replication
When you set up replication it is configured by default to be asynchronous. Some extra steps are
involved in configuring replication to be semisynchronous. To begin using semisyncronous replication the master server and one or more slave servers must be configured for semisynchronous
replication. If you do not do this replication will default to asynchronous replication. In addition, asynchronous replication must already be running.
Semisynchronous replication is implemented using plugins. These plugins are not distributed
with the server code itself and must be downloaded separately. The semisynchronous replication
plugins are available at and
work only on Linux.
A single file contains the plugins for both master and slave servers. You need to install
the libsemisync_master* files in the plugin directory of the master server and the
libsemisync_slave* files in the plugin directory of each slave server. If you do not
know the location of the plugin directory, the command SHOW GLOBAL VARIABLES LIKE
’plug% should tell the location of the plugin directory. The plugins are available from
Please purchase PDF Split-Merge on www.verypdf.com to remove this watermark.
525
16
Part III
Core MySQL Administration
. After a plugin has been installed on a server, you control
it by modifying the system variables associated with it. Until a plugin is installed these system
variables are not available. To load a plugin you should use the INSTALL PLUGIN statement on
the master and on each slave that is to be configured with semisynchronous replication.
On the master:
mysql> INSTALL PLUGIN rpl_semi_sync_master SONAME
’libsemisync_master.so’;
On each slave:
mysql> INSTALL PLUGIN rpl_semi_sync_slave SONAME
’libsemisync_slave.so’;
The preceding commands use a plugin filename suffix of .so. A different suffix might apply on
your system. If you are not sure about the plugin filename, look for the plugins in the server’s
plugin directory.
Two simple methods exist for determining which plugins are installed on a running server:
■ Use the SHOW PLUGINS statement
■ Query the INFORMATION_SCHEMA.PLUGINS table
Installing the semisynchronous replication plugin will enable it by default. To use semisynchronous replication you must have the plugins enabled both on the master server and
at least one slave server. If only one side is enabled any replication that occurs will be
asynchronous.
To control an installed plugin you must set the appropriate system variables. You can set these
variables at runtime using SET GLOBAL, or at server startup on the command line or in an
option file.
At runtime, these master server system variables are available:
mysql> SET GLOBAL rpl_semi_sync_master_enabled = {0|1};
mysql> SET GLOBAL rpl_semi_sync_master_timeout = N;
On the slave side, this system variable is available:
mysql> SET GLOBAL rpl_semi_sync_slave_enabled = {0|1};
For rpl_semi_sync_master_enabled or rpl_semi_sync_slave_enabled, the value
should be 1 to enable semisynchronous replication or 0 to disable it. By default, these variables
are set to 1.
For rpl_semi_sync_master_timeout, the value N is given in seconds. The default value
is 10.
526
Please purchase PDF Split-Merge on www.verypdf.com to remove this watermark.
Logging and Replication
If you enable semisynchronous replication on a slave at runtime, you must also start the slave
I/O thread (stopping it first if it is already running) to cause the slave to connect to the master
and register as a semisynchronous slave:
mysql> STOP SLAVE IO_THREAD;
mysql> START SLAVE IO_THREAD;
If the I/O thread is already running and you do not restart it, the slave continues to use asynchronous replication.
At server startup, the variables that control semisynchronous replication can be set as
command-line options or in an option file. Typically, you set the variables in the my.cnf or
my.ini files on the master and slave servers.
On the master:
[mysqld]
rpl_semi_sync_master_enabled=1
rpl_semi_sync_master_timeout=10
On each slave:
[mysqld]
rpl_semi_sync_slave_enabled=1
At this point you how have semisynchronous replication enabled and running.
Statement-based, row-based, and mixed-based
replication
You have three methods of logging the data for replication:
■ Statement-based replication (SBR) replicates SQL statements that modify data.
■ Row-based replication (RBR) replicates only the changed rows.
■ Mixed-based replication (MBR) is comprised of a combination of statement-based replication and row-based replication.
Currently for all versions of mysqld, statement-based replication is the default method of
logging. Most storage engines support all three methods of logging data. The two exceptions
are that Blackhole does not support row-based replication and Falcon does not support
statement-based replication.
If mixed-based replication is in use it will utilize statement-based replication by default but
will switch to row-based replication when needed. The reasons that RBR will be used are the
following:
■ When a function is called that contains the UUID() function.
■ When two or more tables containing AUTO_INCREMENT fields are updated.
Please purchase PDF Split-Merge on www.verypdf.com to remove this watermark.
527
16
Part III
Core MySQL Administration
■ Upon execution of the INSERT DELAYED statement.
■ When a UDF is called.
■ When the following functions are used:
■ FOUND_ROWS()
■ ROW_COUNT
■ USER()
■ CURRENT_USER()
■ CURRENT_USER
The use of row-based replication definitely resolves some issues with statement-based replication that are difficult, if not impossible, to fix otherwise. However, the relative newness of RBR
means that it is not as widely deployed and is not as well understood by MySQL administrators.
As well, a very small statement can change a very large amount of data, so RBR may be more
bandwidth-intensive than SBR.
The mysqlbinlog tool has been updated to support RBR, but the output can still be somewhat
difficult to decipher. If you just run the mysqlbinlog tool without special options
shell> mysqlbinlog mysql-bin.00001
# at 238
#081213 13:14:29 server id 1 end_log_pos 1278
table id 17 flags: STMT_END_F
Write_rows:
BINLOG ’
fAS3SBMBAAAALAAAANoAAAAAABEAAAAAAAAABHRlc3QAAXQAAwMPCgIUAAQ=
fAS3SBcBAAAAKAAAAAIBAAAQABEAAAAAAAEAA//8AQAAAAVhcHBsZQ==
’/*!*/;
you will have binary data where the row-based events are in the log. Using the –v (verbose)
option will enable to you to view the statements that made the data changes:
shell> mysqlbinlog –v mysql-bin.00001
# at 238
#081213 13:14:29 server id 1 end_log_pos 1278
table id 17 flags: STMT_END_F
Write_rows:
BINLOG ’
fAS3SBMBAAAALAAAANoAAAAAABEAAAAAAAAABHRlc3QAAXQAAwMPCgIUAAQ=
fAS3SBcBAAAAKAAAAAIBAAAQABEAAAAAAAEAA//8AQAAAAVhcHBsZQ==
’/*!*/;
### INSERT INTO test.a
### SET
###
@1=1
###
@2=’testing’
528
Please purchase PDF Split-Merge on www.verypdf.com to remove this watermark.
Logging and Replication
###
@3=NULL
...
# at 1298
#081213 13:14:29 server id 1 end_log_pos 1326
table id 17 flags: STMT_END_F
Update_rows:
Your output will now contain pseudo SQL statements that are commented out that represent the
row-based events. This output is much better than the default, but if you look closely you will
see that the INSERT statement does not include field names — only placeholders (@1, @2, @3).
To be clear, the necessary data for replication and point-in-time recovery is stored in the binary
log, but it just is not as easy to decipher as with statement-based replication logs.
Replication Configurations
Replication setup can be as simple as a master and a slave server. It can be as complex as what
is called circular replication, where the servers form a ring with each master also being a slave of
another master.
Simple replication
The simplest replication setup is a single master with a single slave. We will use this example to
show the basics of replication setup. Figure 16-1 shows a simple master/slave configuration.
FIGURE 16-1
Master
Slave
To begin with you need to edit the configuration file on both servers. On the master server in
the [mysqld] directive you need to add:
server-id= X
log-bin = mysql-bin
sync_binlog= 1
Please purchase PDF Split-Merge on www.verypdf.com to remove this watermark.
529
16
Part III
Core MySQL Administration
The server-id value of X needs to be a positive integer that is unique among all your
database servers. Often administrators will use the last octet of the server’s IP address because
this will typically be unique from server to server. For example, if the server’s IP address was
192.168.2.100 you would use 100 as the server-id. To use more unique integers, the serial
number of the system or the entire IP address could be used, such as 192168002100, or even
the IP address plus the port, such as 1921680021003306.
If you do not use unique values of server-id among your replication servers unpredictable
results will occur. Quite often if two slaves have the same server-id a master will send some
data to one slave, then send different data to another slave, leaving both with an incomplete set
of data changes.
After the configuration changes are made you must restart mysqld.
You must restart mysqld anytime changes are made to the configuration file for the
changes to take effect.
Once this is done you must create a replication user on the master server. To do this, log in to
mysqld and issue the following command:
mysql> CREATE USER ’username’@’host’ IDENTIFIED BY ’password’;
mysql> GRANT REPLICATION SLAVE ON *.*
-> TO ’user’@’host’ IDENTIFIED BY ’password’;
You will need to replace host with the hostname or IP address of the slave server.
At this point you are done on the master server setup. You must now edit the configuration file
on the slave server. In the [mysqld] section you need to add:
server-id = X
As before, for the server-id line, X should to be a unique positive integer that is different than
any other server-id entries on other database servers. Most of the configuration on a slave
server is done dynamically using the CHANGE MASTER command.
After this change is made you need to restart mysqld on the slave.
It is important to understand that in order to utilize replication you must have the same data
sets on both servers. If your master server has no data this is simple; if this is not the case it is
more difficult. You have multiple ways of ensuring you have the same data set on both servers.
We cover the details of backing up and restoring in Chapter 13. The basic idea is that you need
to take a consistent backup of the master, noting down at what point in the master binary logs
the backup was taken.
The --master-data option to mysqldump will automatically store a CHANGE MASTER TO
statement at the end of the export. On import, the slave information will already be set up. In a
physical backup, copying the master.info file is all that is needed.
530
Please purchase PDF Split-Merge on www.verypdf.com to remove this watermark.
Logging and Replication
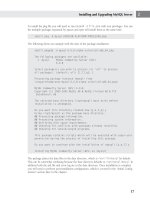
After the backup is restored on the slave, log in and execute a START SLAVE command and then
the SHOW SLAVE STATUS command:
mysql> START SLAVE;
mysql> SHOW SLAVE STATUS;
*************************** 1.
Slave_IO_State:
Master_Host:
Master_User:
Master_Port:
Connect_Retry:
Master_Log_File:
Read_Master_Log_Pos:
Relay_Log_File:
Relay_Log_Pos:
Relay_Master_Log_File:
Slave_IO_Running:
Slave_SQL_Running:
Replicate_Do_DB:
Replicate_Ignore_DB:
Replicate_Do_Table:
Replicate_Ignore_Table:
Replicate_Wild_Do_Table:
Replicate_Wild_Ignore_Table:
Last_Errno:
Last_Error:
Skip_Counter:
Exec_Master_Log_Pos:
Relay_Log_Space:
Until_Condition:
Until_Log_File:
Until_Log_Pos:
Master_SSL_Allowed:
Master_SSL_CA_File:
Master_SSL_CA_Path:
Master_SSL_Cert:
Master_SSL_Cipher:
Master_SSL_Key:
Seconds_Behind_Master:
Master_SSL_Verify_Server_Cert:
Last_IO_Errno:
Last_IO_Error:
Last_SQL_Errno:
Last_SQL_Error:
1 row in set (0.00 sec)
row ***************************
Waiting for master to send event
192.168.16.4
replica
3306
60
mysql-bin.000001
548
mysql-relay-bin.000001
600
mysql-bin.000001
Yes
Yes
0
0
4
3630
None
0
No
0
No
0
0
Both Slave_IO_Running and Slave_SQL_Running must show YES for the slave to be running correctly.
Table 16-3 lists each field from the SHOW SLAVE STATUS command and a brief description.
Please purchase PDF Split-Merge on www.verypdf.com to remove this watermark.
531
16
Part III
Core MySQL Administration
TABLE 16-3
SHOW SLAVE STATUS Field Descriptions
Field Name
Description
Master_Host
The hostname or IP address of the master server.
Master_User
User used to establish the connection to the master host.
Master_Port
The TCP/IP port to connect to on the master host.
Connect_Retry
The amount of time that the slave waits before attempting to
reconnect to the master server after a connection failure.
The default value is 60 (seconds).
Master_Log_File
The master binary log file that the slave I/O thread is
reading from.
Read_Master_Log_Pos
The position in the master binary log that the I/O thread is
currently reading from.
Relay_Log_File
The relay log file on the slave from which the SQL thread is
reading.
Relay_Log_Pos
The current position of the SQL thread in the relay log.
Slave_IO_Running
If this has a value of YES the I/O thread has started and
connected successfully to the master host. If NO it has
stopped running; for example, if the network connection is
lost.
Slave_SQL_Running
If this has a value of YES the SQL thread is running. If it has
a value of NO the SQL thread is not running. A statement
causing an error can cause the SQL thread to stop running.
Replicate_Do_DB
Specifies a database which will be replicated. There can
multiple entries for Replicate_Do_DB in a
comma-separated list.
Replicate_Ignore_DB
Specifies a database that will not be replicated. There can
be multiple entries for Replicate_Ignore_DB in a
comma-separated list.
Replicate_Do_Table
Specifies a table that will be replicated. There can be
multiple entries for Replicate_Do_Table in a
comma-separated list.
Replicate_
Ignore_Table
Specifies a table that will not be replicated. There can be
multiple entries for Replicate_Ignore_Table in a
comma-separated list.
Replicate_Wild_
Do_Table
A ‘‘wildcard’’ entry specifying databases that will be
replicated.
532
Please purchase PDF Split-Merge on www.verypdf.com to remove this watermark.
Logging and Replication
TABLE 16-3
(continued )
Field Name
Description
Replicated_Wild_
Ignore_Table
A ‘‘wildcard’’ entry specifying databases that will not be
replicated.
Last_Errno
The error number of the last replication error that occurred.
Last_Error
A description of the last replication error that occurred. This
may include an SQL statement that caused the SQL thread
to stop.
Skip_Counter
The last value of num used when executing SET GLOBAL
SQL_SLAVE_SKIP_COUNTER=num.
Exec_Master_Log_Pos
The position of the last event executed by the SQL thread
from the master binary log.
Relay_Log_Space
The total size of all relay logs.
Seconds_Behind_Master
Shows how far the SQL thread is behind the IO thread in
execution of the relay logs. This is calculated by taking the
last timestamp value in the relay log and subtracting the
timestamp value for the current event that the SQL thread is
executing. Seconds_Behind_Master does not give any
indication of how long the slave will take to become
up-to-date.
If the IO thread is not able to keep the relay logs current
with the master binary logs, Seconds_Behind_Master
can be falsely reassuring. If the IO thread cannot keep up
with the volume of master binary logs, but the SQL thread
can keep up with the IO thread, the value of
Seconds_Behind_Master can be 0 even though the
slave is lagging — potentially far behind.
Master_SSL_Verify_
Server_Cert
Possible values are 0 (do not verify that the Common Name
of the server certificate matches the hostname that the client
connected to) or 1 (perform the verification, valid only
when encrypted connections are in use). The default value
is 0.
Last_IO_Errno
The last error number encountered by the IO thread.
Last_IO_Error
A description of the last error encountered by the IO thread.
Last_SQL_Errno
The last error number encountered by the SQL thread.
Last_SQL_Error
A description of the last error encountered by the SQL
thread.
Please purchase PDF Split-Merge on www.verypdf.com to remove this watermark.
533
16
Part III
Core MySQL Administration
CHANGE MASTER statement
If your master server information was not stored in the backup or if you are configuring a slave
of a master server with an empty data set, you will need to configure the connection information using the CHANGE MASTER command. The CHANGE MASTER command can also be used to
change the slave information after the first slave configuration; for example, when you are promoting a slave to be a new master and want to change other slaves to stop replicating the old
master and start replicating the new master (see Chapter 22 for examples of slave promotion).
To do this, log in to mysqld, and execute the following command while replication is stopped:
CHANGE MASTER TO
MASTER_HOST=’host_name’,
MASTER_USER=’user’,
MASTER_PASSWORD=’password’,
MASTER_LOG_FILE=’mysql-bin.000001’,
MASTER_LOG_POS=98;
The five fields listed here are the minimum data that mysqld needs to be able to configure
replication. Almost all of the fields listed in Table 16-3 can be used in the CHANGE MASTER
TO statement; for example, MASTER_PORT and MASTER_CONNECT_RETRY can be set. Once
this has been executed, you can then execute a START SLAVE statement and finally the SHOW
SLAVE STATUS command. If replication is not working smoothly, check the error log for more
information.
More complex setups
It is possible to build more complicated replication setups than the simple master-slave setup.
Each of the following sections briefly describes an elaborate setup you can use as needed.
Single master and multiple slaves
You can set up as many slaves as needed. Figure 16-2 illustrates a master server with data
changes being replicated to three slaves.
FIGURE 16-2
Master
Slave
Slave
Slave
534
Please purchase PDF Split-Merge on www.verypdf.com to remove this watermark.
Logging and Replication
One common reason for a setup like this is to help alleviate the load on the master database.
The application can read from any slave and receive data that is frequently as up-to-date as
needed (replication is asynchronous by default, so the data may be out of date).
There is no difference in the previous configurations discussed for the master or the additional
slave servers in this setup. As pointed out before, each server must have a unique server-id
entry in the [mysqld] directive of the configuration file.
You should understand when working with multiple slaves that each slave causes a small
amount of overhead on the master server. Even on busy servers this is not very much until you
begin adding a large number of slaves directly to a master.
Master and relay slave
If you need more slaves than a master can comfortably manage, it is time to introduce a relay
server. The sole function of this server is to relay the binary logs from the master to all the
slaves. Figure 16-3 shows this type of setup.
FIGURE 16-3
Master
Relay
Slave
Slave
Slave
Slave
Slave
Slave
Slave
This will reduce the load on the master server. The configuration for this setup will need to be
slightly different than before. The relay slave will need a specific configuration.
In the [mysqld] section you will need to have:
server-id = X
log-bin = mysql-bin
log-slave-updates
Please purchase PDF Split-Merge on www.verypdf.com to remove this watermark.
535
16
Part III
Core MySQL Administration
The difference between this configuration and the standard configuration is the addition of the
log-slave-updates and log-bin statements. This tells the server that it should write binary
logs and include the changes it receives from the master. Otherwise this cascading replication
configuration will not work. The six slaves on the bottom level of our example do not need
to have log-slave-updates or log-bin configured. There are other reasons to enable the
binary logs, including incremental backup, point-in-time recovery, and consistent configuration
setups in the event that one of the slaves on the bottom is promoted to be a relay slave.
Though not necessary, it can be useful to use the Blackhole storage engine on the relay slave.
With the Blackhole storage engine the data is not actually stored in a table. All changes are
written to the binary logs, which then enable the changes to propagate to the lower-level slaves.
Because tables are not actually maintained the I/O demands on the server are typically much
less. This will improve the overall performance of the server. You can find more details on the
Blackhole storage engine in Chapter 11.
A final note about this: you could of course add another level of slaves below these six
slaves if needed. As with the relay slave in the example you would have to make sure the
log-slave-updates and log-bin statements are in the configuration file for the slaves that
are replicating to other slaves.
Master-Master replication
A common way of providing a form of high availability is through the use of what is called
master-master replication. With this topology there are two servers, each both a master and a
slave of each other. Figure 16-4 shows this setup.
FIGURE 16-4
Server A
Server B
This setup might seem simple enough, but actually introduces some subtle issues that the
database administrator needs to be aware of when working with master-master replication.
536
Please purchase PDF Split-Merge on www.verypdf.com to remove this watermark.
Logging and Replication
The primary issue is that both servers could potentially be simultaneously inserting a row into
the same table with an auto-increment field. At this point replication will break on one of the
servers because it can not insert a row with the same ID.
Two entries in the [mysqld] section of the configuration file are needed to resolve this issue:
auto_increment_increment
auto_increment_offset
These should each have an integer value. The auto_increment_increment value determines
the increment amount between successive auto_increment values and should be the same
for each server in the replication ring. It must be at least as large as the number of servers in
the replication ring. The auto_increment_offset value should be different for each server.
It is the offset used in combination with the auto_increment_increment value to get a final
unique value.
Let’s say you had the following auto_increment settings for Server A and Server B:
# Server A
auto_incremenent_increment = 10
auto_increment_offset = 1
# Server B
auto_incremenent_increment = 10
auto_increment_offset = 2
In this case any table with an auto_increment field would increment in amounts of 10. With
Server A, the initial insert into a table (with an auto_increment field) will be with a value of
1. Server B will begin with 2. The next values would be 11 on Server A and 12 on Server B.
It is not wise to have your application write to both servers at the same time. Writing
to both servers at the same time makes a reasonably durable fast failover for high
availability but has no performance gains. Both servers have to execute all write statements,
whether the write statements come directly from clients or come via replication.
For any replication setup, after a while the data gets out of sync. This causes a large problem on
master-master replication architectures — if Server A has a certain value for a field and Server B
has a different value, which is the right value? In a master-slave setup, you would say the master has the correct data set, because all data changes should happen there — no data changes
should occur directly on the slave. But if there is more than one server on which a change is
allowed to happen, which has the complete, true data set?
If you set up master-master replication in your environment, be prepared to run into this issue.
Circular replication
A final configuration that is an extension of master-master replication is called circular replication or multi-master replication. With this setup there are two or more servers in a ring
formation. Figure 16-5 illustrates this arrangement with four servers:
Please purchase PDF Split-Merge on www.verypdf.com to remove this watermark.
537
16
Part III
Core MySQL Administration
FIGURE 16-5
Server A
Server B
Server D
Server C
Like master-master replication, circular replication offers no performance gains for
writes — even though the writes can be balanced among three or more servers, each
server will have to perform all of the writes eventually, because the writes will come through
replication. In addition, circular replication also has the problem of figuring out which server
has the correct data set when the data becomes out of sync.
However, unlike master-master replication, circular replication cannot be used for high
availability.
Circular replication introduces a very large problem: A problem with one server can affect the
rest of the servers. For example, in the circular replication setup shown in Figure 16-5, Server
A replicates to Server B, which replicates to Server C, which replicates to Server D, which replicates to Server A. If a write occurs on Server C, Server A does not receive it until after Server D
receives it, executes it, and then saves it in its binary logs.
This means that if a problem occurs — for example, a network issue causes Server A not to
be able to connect to Server D to read the binary logs — the rest of the servers are affected.
Though statements from Server A can make it to Servers B, C, and D, statements from Server B
go through Server C and Server D, but because Server A cannot connect to Server D, Server A
never receives the statements from Server B. Statements from Server C only get to Server D and
not Server A and B, and statements from Server D are only applied on Server D.
Circular replication is useful only in the rare cases when it is acceptable to have the data
out of sync on the machines for long periods. However, most database administrators need
538
Please purchase PDF Split-Merge on www.verypdf.com to remove this watermark.
Logging and Replication
replication to be synchronous — the only reason mysqld has lasted so long without synchronous replication is that ordinarily statements are processed very quickly. Most of the time,
there is very little delay from the time a statement is executed on the master to the time it is
executed on the slave.
If, after all these warnings, you still want to set up circular replication — perhaps to test its
failure modes — it is very similar to setting up master-master replication. As with master-master
replication, each server is both a master and a slave, and as such some additional entries are
needed for the configuration file in order to operate properly.
In the [mysqld] section you will need to have:
server-id = X
log-bin = mysql-bin
log-slave-updates
You will also need auto_increment settings. Remember, only one of these sections is needed for
a server.
# Server A
auto_incremenent_increment = 10
auto_increment_offset = 1
# Server B
auto_incremenent_increment = 10
auto_increment_offset = 2
# Server C
auto_incremenent_increment = 10
auto_increment_offset = 3
# Server D
auto_incremenent_increment = 10
auto_increment_offset = 4
Additional replication configuration options
Several configuration options are not mandatory but can be very beneficial. In particular, to
help ensure a slave’s data is kept in sync with the master, it is useful to include the read-only
option in the slave’s configuration file. This ensures that the only changes to the data will come
through replication or from a user with SUPER privileges. The read-only option is a dynamic
variable so it is very easy to change when promoting a slave to a master.
By default, replication attempts to start when mysqld is started up. If you do not want replication to begin on server start, you can use the skip-slave-start option in the [mysqld]
directive of your configuration file. To begin replication you must log in to mysqld and execute
a START SLAVE command.
Please purchase PDF Split-Merge on www.verypdf.com to remove this watermark.
539
16
Part III
Core MySQL Administration
Correcting Data Drift
If you work with replication setups for very long you will run across situations where the data
sets differ on the master and slave. This is often referred to as data drift. This problem can arise
for several reasons including the use of non-deterministic functions and allowing write access to
a slave server.
Though it is possible to resolve data drift problems by hand, it is often highly impractical. Fortunately, Baron Schwartz recognized the problem and provided a solution in the Maatkit toolkit,
available at www.maatkit.org. All the tools are programmed in Perl with minimal prerequisites. Maatkit includes one tool, mk-table-checksum, which you can use to uncover data drift
problems. A second tool, mk-table-sync, is used to actually resolve these issues.
mk-table-checksum overview
The premise of the mk-table-checksum tool is that it should calculate checksums for tables
on both the master and slave servers. It then compares checksums telling you if a slave’s table
is out of sync with the corresponding master’s table. Several algorithms can be used to calculate
checksums with the default being to use the CHECKSUM function. You can read about other
algorithms and their strengths and weaknesses in the tool’s documentation. To access the
mk-table-checksum documentation just execute perldoc mk-table-checksum to get an
overview of all functions and options.
The --replicate option is used to check if a master and its slaves are in sync. In this case
mk-table-checksum is run on the master server and all calculations are replicated on slaves.
The tool gets the master and slave information from the configuration files. In general command
line looks like this:
shell> perl mk-table-checksum --replicate=test.checksum \
--algorithm=BIT_XOR localhost --user=backup_user --askpass
Let’s have a look at each of these options.
--replicate=test.checksum tells mk-table-checksum to use replication to compare mas-
ter and slave. In general it is the most efficient way to do this. To use this method some preparations have to be made. A test.checksum table with the following structure has to be created:
CREATE TABLE checksum (
db
tbl
chunk
boundaries
this_crc
this_cnt
master_crc
master_cnt
char(64)
char(64)
int
char(64)
char(40)
int
char(40)
int
NOT
NOT
NOT
NOT
NOT
NOT
NULL,
NULL,
NULL,
NULL,
NULL,
NULL,
NULL,
NULL,
540
Please purchase PDF Split-Merge on www.verypdf.com to remove this watermark.
Logging and Replication
ts
timestamp
NOT NULL,
PRIMARY KEY (db, tbl, chunk)
) ENGINE=InnoDB;
The ENGINE=InnoDB option is optional, but it is highly recommended. A deadlock will break
replication if the checksum table is non-transactional. The checksum table does not need to be
created in the test database; it can be created in any database as long as it is being replicated.
The mk-table-checksum tool will insert at least one row into the checksum table for each
table it calculates a checksum for. All the calculations will be replicated to the slave(s). Once
this is done a simple query on the slave will show differences. The checksum table should be
passed to the --replicate option using dot notation (that is, test.checksum) to specify the
database in which it has been created.
--algorithm=BIT_XOR specifies what algorithm will be used to calculate table checksums. You
can find detailed description in mk-table-checksum documentation. In general, two things
you should remember are: the default algorithm uses the CHECKSUM function and is order dependent, and the BIT_XOR algorithm is order independent and sometimes is preferred.
host is the master’s host server, where the utility is being run. The host option is specified with
nothing introducing it. In the preceding example, the value of host is localhost.
--user and --askpass are credentials used to connect to mysqld. When using --askpass
the script will ask for the password immediately after starting. If mk-table-checksum is being
launched from a script, it is possible to use the option --password=password so it does not
ask for a password.
For big tables (larger than a million rows) it is advisable to use the --chunksize option and
specify a number of rows to divide the tables in smaller portions. This allows for better concurrency with the mk-table-checksum program. When specified, the tool will try to divide the
table into segments with a number of rows as close as possible to this number. It will use table
keys to determine the ranges for each portion. In this case test.checksum will hold one row
per chunk. Using a smaller chunksize may improve concurrency because less of the table is
locked, but actually ends up slowing the process down.
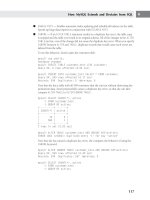
When the mk-table-checksum program starts it displays checksums for each table or chunk
as it processes the table. When it is finished the following query can be used to check which
tables/chunks differ on the slave(s):
SELECT db, tbl, chunk, this_cnt-master_cnt AS cnt_diff,
this_crc <> master_crc
OR ISNULL(master_crc) <> ISNULL(this_crc) AS crc_diff
FROM checksum
WHERE master_cnt <> this_cnt OR master_crc <> this_crc
OR ISNULL(master_crc) <> ISNULL(this_crc);
This will show which tables (or chunks) differ on the master and slave servers.
Please purchase PDF Split-Merge on www.verypdf.com to remove this watermark.
541
16