Tài liệu Module 4: Installing and Configuring Web Applications docx
Bạn đang xem bản rút gọn của tài liệu. Xem và tải ngay bản đầy đủ của tài liệu tại đây (1.09 MB, 36 trang )
Contents
Overview 1
Introduction to Web Applications 2
Creating and Removing Web Applications 4
Configuring Web Applications 6
Lab A: Creating and Configuring
Applications 10
Installing ISAPI Filters 20
Lab B: Installing and Using ISAPI
Applications and Filters 22
Review 29
Module 4: Installing and
Configuring Web
Applications
Information in this document is subject to change without notice. The names of companies,
products, people, characters, and/or data mentioned herein are fictitious and are in no way intended
to represent any real individual, company, product, or event, unless otherwise noted. Complying
with all applicable copyright laws is the responsibility of the user. No part of this document may
be reproduced or transmitted in any form or by any means, electronic or mechanical, for any
purpose, without the express written permission of Microsoft Corporation. If, however, your only
means of access is electronic, permission to print one copy is hereby granted.
Microsoft may have patents, patent applications, trademarks, copyrights, or other intellectual
property rights covering subject matter in this document. Except as expressly provided in any
written license agreement from Microsoft, the furnishing of this document does not give you any
license to these patents, trademarks, copyrights, or other intellectual property.
2001 Microsoft Corporation. All rights reserved.
Microsoft, Active Directory, ActiveX, BackOffice, FrontPage, MS-DOS, Outlook, PowerPoint,
SQL Server, Visual Basic, Visual InterDev, Visual SourceSafe, Visual Studio, Windows, Win32,
Windows Media, and Windows NT are either registered trademarks or trademarks of Microsoft
Corporation in the U.S.A. and/or other countries.
Other product and company names mentioned herein may be the trademarks of their respective
owners.
Module 4: Installing and Configuring Web Applications iii
Instructor Notes
This module provides students with the knowledge and skills necessary to
configure Web applications in Microsoft
® Internet Information Services (IIS)
5.0.
After completing this module, students will be able to:
Describe the types of Web applications.
Create and remove Web applications.
Configure Web applications.
Install Internet Server Application Program Interface (ISAPI) filters.
Materials and Preparation
This section provides the materials and preparation tasks that you need to teach
this module.
Required Materials
To teach this module, you need the Microsoft PowerPoint® file 2295A_04.ppt.
Preparation Tasks
To prepare for this module, you should:
Read all of the materials for this module.
Complete the labs.
Presentation:
30 Minutes
Lab:
60 Minutes
iv Module 4: Installing and Configuring Web Applications
Module Strategy
Use the following strategy to present this module:
Introduction to Web Applications
This topic describes the types of Web applications that are discussed in this
module. Explain the concept of Web applications, and discuss each of the
Application Programming Interfaces (APIs): Common Gateway Interface
(CGI), ISAPI, and Microsoft Active Server Pages (ASP).
Creating and Removing Web Applications
This topic describes the procedures for creating and removing Web
applications in IIS. Explain that, to create a Web application, you must first
designate a directory as the starting point (application root) for the
application. Next, demonstrate the procedures for creating and removing a
Web application.
Configuring Web Applications
This topic describes the different procedures for configuring Web
applications. Explain that you can control program execution on your Web
site by setting application permissions. Describe the procedure for setting
application permissions for each permissions setting.
Describe how to configure application protection settings and explain the
impact that each setting has on performance. Warn students that, for
performance purposes, it is not recommended that you run more than ten
isolated applications.
Next, explain how to configure application mappings to determine which
program will run to process a Hypertext Transfer Protocol (HTTP) request.
Demonstrate the procedures for setting and removing application mappings,
and explain the purpose of caching ISAPI applications.
Finally, describe the procedures for configuring ASP scripts to control how
they run and for setting debugging options for ASP scripts. Open the
Application Configuration dialog box, and describe the settings on the
App Options and App Debugging tabs.
Installing ISAPI Filters
This topic describes how to install ISAPI filters to control how HTTP
requests and responses are handled. Explain the difference between global
filters (filters for all sites on a server) and filters for individual Web sites.
Open the Application Configuration dialog box, describe the settings on
the ISAPI Filters tab, and demonstrate the procedure for adding an ISAPI
filter. Discuss the need to stop and restart the Web server whenever adding
or changing a global filter.
Module 4: Installing and Configuring Web Applications v
Customization Information
This section identifies the lab setup requirements for a module and the
configuration changes that occur on student computers during the labs. This
information is provided to assist you with replicating or customizing Training
and Certification courseware.
The labs in this module are also dependent on the classroom
configuration that is specified in the Customization Information section at the
end of the Classroom Setup Guide for Course 2295A, Implementing and
Supporting Microsoft Internet Information Services 5.0.
Lab Setup
The following list describes the setup requirements for the labs in this module.
Setup Requirement 1
The labs in this module require the Inetpub directory to be on drive D. To
prepare student computers to meet this requirement, perform one of the
following actions:
Complete Module 1, “Installing Internet Information Services 5.0,” in
Course 2295A, Implementing and Supporting Microsoft Internet
Information Services 5.0.
Configure setup requirement manually by installing IIS with the Inetpub
directory on drive D.
Setup Requirement 2
The first lab in this module requires that five virtual directories be created. To
prepare student computers to meet this requirement, perform one of the
following actions:
Run C:\MOC\2295A\Labs\Mod4\Setup.bat.
Configure setup requirement manually by creating the following virtual
directories in the default Web site:
• Inprocess, which uses the path C:\MOC\2295A\Labs\Mod4\Inprocess.
• Pooled1, which uses the path: C:\MOC\2295A\Labs\Mod4\Pooled1.
• Pooled2, which uses the path: C:\MOC\2295A\Labs\Mod4\Pooled2.
• Isolated1, which uses the path: C:\MOC\2295A\Labs\Mod4\Isolated1.
• Isolated2, which uses the path: C:\MOC\2295A\Labs\Mod4\Isolated2.
Lab Results
Performing the labs in this module introduces the following configuration
changes:
Five applications are created in the default Web site.
The ActiveState Perl program is installed.
Importan
t
Module 4: Installing and Configuring Web Applications 1
Overview
Introduction to Web Applications
Creating and Removing Web Applications
Configuring Web Applications
Installing ISAPI Filters
*****************************
ILLEGAL FOR NON-TRAINER USE******************************
Installing Web applications is an essential skill for extending the capabilities of
Microsoft
® Internet Information Services (IIS) 5.0 to include custom
applications and scripting languages.
After completing this module, you will be able to:
Describe the types of Web applications.
Create and remove Web applications.
Configure Web applications.
Install Internet Server Application Programming Interface (ISAPI) filters.
Topic Objective
To provide an overview of
the module topics and
objectives.
Lead-in
Installing and configuring
Web applications enables
you to extend the
capabilities of IIS 5.0.
2 Module 4: Installing and Configuring Web Applications
Introduction to Web Applications
CGI
CGI
ISAPI
ISAPI
Provides a server-side interface for initiating software
services that define communications between information
services and resources on the server’s host computer
Provides a server-side interface for initiating software
services that define communications between information
services and resources on the server’s host computer
Provides a set of standard APIs that you can use to
develop extensions to IIS
Provides a set of standard APIs that you can use to
develop extensions to IIS
Application Programming Interfaces
Application Programming Interfaces
Application Programming Interfaces
ASP
ASP
Provides a server-side scripting environment that can be
used to create dynamic Web pages or to build Web
applications by using a standard text editor
Provides a server-side scripting environment that can be
used to create dynamic Web pages or to build Web
applications by using a standard text editor
*****************************
ILLEGAL FOR NON-TRAINER USE******************************
A Web application is a collection of Web site elements that performs a task by
using one or more programs. Web applications are designed to run on a Web
server, such as a computer running IIS, and use a Web browser, such as
Microsoft Internet Explorer, as the user interface. Web applications are
typically client/server applications. For example, the ordering mechanism on an
electronic commerce site is a Web application.
IIS provides standard Application Programming Interfaces (APIs) on the server
that you can use for developing Web applications. These APIs include:
Internet Server Application Programming Interface (ISAPI)
Microsoft Active Server Pages (ASP)
Common Gateway Interface (CGI)
Internet Server Application Programming Interface
ISAPI is a Microsoft set of standard APIs that you can use to develop
extensions to IIS. ISAPI gives developers a powerful method for extending the
functionality of IIS to provide better performance than ASP or CGI, and to
provide low-level access to all Microsoft Win32
® API functions. Because
ISAPI dynamic-link libraries (DLLs), which are programs, are generally written
in a high-level programming language such as C or C++, they are typically
more difficult to develop than ASP-based or CGI-based solutions.
There are two kinds of ISAPI DLLs, which have different uses:
ISAPI extensions. A run-time DLL that is usually loaded in the same
memory address space occupied by IIS. ISAPI extensions extend the
functionality of IIS.
ISAPI filters. Intercept specific server events before the server itself handles
them. An example of an ISAPI filter is the Secure Sockets Layer (SSL)
protocol component of Microsoft Internet Information Server (IIS) 4.0. In
IIS 5.0, Hypertext Transfer Protocol (HTTP) compression is an ISAPI filter.
Topic Objective
To describe the types of
Web applications that are
discussed in this module.
Lead-in
IIS enables you to create
Web applications or scripts
that provide users with
dynamic Hypertext Markup
Language (HTML) pages.
Delivery Tip
Define ISAPI, ASP, and CGI
applications.
Module 4: Installing and Configuring Web Applications 3
Active Server Pages
ASP is a server-side scripting language that can be used to create dynamic Web
pages or build Web applications by using a standard text editor, such as
Notepad.
With server-side scripting, the program runs on the server and only the
Hypertext Markup Language (HTML) that is the result of running the program
is returned to the client.
ASP pages are text files that can contain HTML tags, text, and script
commands. The ASP scripting language has built-in objects that allow it to
perform tasks, such as connecting to a database or identifying the user name of
the logged-on user. With ASP, a developer can add interactive content to Web
pages or build entire Web applications that use Internet Explorer as the
interface.
ASP is an ISAPI extension, which means that it is based on the ISAPI
architecture, and is implemented as an ISAPI extension (asp.dll). Therefore,
ASP performs well and has access to many features of the IIS server and
Microsoft Windows
® 2000 Server. IIS 5.0 was specifically designed to integrate
with ASP and has built-in features for optimizing and debugging ASP.
Common Gateway Interface
CGI is a standard mechanism for communication between a Web server and
server-side gateway programs. These gateway programs are written in a
compiled language, such as C, or in an interpreted language, such as Perl. CGI
enables Web servers to run scripts or programs on the server and then send the
output to the client’s Web browser. A script is a program that consists of a set
of instructions for an application or utility program. A script can be embedded
in a Web page.
When a Web client, such as Internet Explorer, submits information to a Web
server that uses CGI, the Web server receives the information and then passes it
to the gateway program for processing. The gateway program then returns the
result of the processing to the server, and the server returns the result to the
Web browser as an HTML page.
CGI was developed for UNIX-based systems and is supported by most
Web servers, including IIS. ISAPI is a set of server extensions for IIS that
functions in a way similar to that of CGI but uses fewer resources. The main
difference is that, with CGI, the system creates a unique process for every CGI
request, whereas ISAPI extensions do not require separate processes. This
makes ISAPI applications generally more responsive than CGI applications.
Note
Note
4 Module 4: Installing and Configuring Web Applications
Creating and Removing Web Applications
Create
Remove
*****************************
ILLEGAL FOR NON-TRAINER USE******************************
A Web application is a defined set of directories in a Web site. To create a Web
application, you use the IIS snap-in to designate a directory as the starting point
(also called the application root) for the application. You can then set properties
for the Web application.
Every file and directory under the starting-point directory in your Web site is
considered part of the Web application until another starting-point directory is
found. Therefore, you can use the directory structure to form application
boundaries that define the scope of an application. You can have more than one
application per Web site, and each application can be configured differently.
The default Web site that is created when you install IIS is an application
starting point.
Each application may have a Global.asa file associated with it. This optional
file specifies the actions that occur when the application starts and stops, or
when a new user requests a page from the application. This file stores the event
information and objects that are used globally by the application. It is not a
content file that is displayed to the users.
To create a new Web application:
1. Click Start, point to Programs, point to Administrative Tools, and then
click Internet Services Manager.
In Administrative Tools, the IIS console is called Internet Services
Manager; however, when you open the console, it is called Internet
Information Services, also known as the IIS snap-in.
2. In the IIS snap-in, right-click the starting-point directory for the Web
application, and then click Properties.
Topic Objective
To describe the procedures
for creating and removing
Web applications in IIS.
Lead-in
To create a Web
application, you designate a
directory as the starting
point, or application root, for
the application.
Note
Delivery Tip
Demonstrate the procedure
for creating a Web
application.
Module 4: Installing and Configuring Web Applications 5
3. On the Home Directory, Virtual Directory, or Directory tab, click
Create.
4. In the Application name box, type a name for your application, and then
click OK.
You can remove an application by specifying that the directory should no
longer be an application starting point. Requests to files in that directory and its
subdirectories will no longer start the application unless the application’s
directory is a subdirectory of another application starting point.
Removing an application does not delete the application’s directory from
your Web site or from your computer’s hard disk.
To remove a Web application:
1. In the IIS snap-in, right-click the starting-point directory of the application
that you want to remove, and then click Properties.
2. On the Home Directory, Virtual Directory, or Directory tab, verify that
the name of the application that you want to remove appears in the
Application name box, and then click Remove.
IIS starts an application and processes the Global.asa file the first time a page
within the application’s directory is accessed. When you update the files of an
application, you must stop the application and unload it from memory. With
IIS, you can stop and unload applications from memory without taking the Web
server offline. However, stopping an application will end any connected user
sessions.
To stop an application and unload it from memory:
1. In the IIS snap-in, right-click the starting-point directory of the application
that you want to unload, and then click Properties.
2. On the Home Directory, Virtual Directory, or Directory tab, verify that
the name of the application that you want to unload appears in the
Application name box, and then click Unload.
If the Unload button is dimmed, you are not in the application’s
starting-point directory, or the application is not started.
IIS automatically restarts the application when a user requests a page from
within the application boundary.
Note
Delivery Tip
Demonstrate the procedure
for removing a Web
application.
Note
6 Module 4: Installing and Configuring Web Applications
Configuring Web Applications
Setting Application Permissions
Configuring Application Protection Settings
Configuring Application Mappings
Configuring ASP Script Options and Debugging
*****************************
ILLEGAL FOR NON-TRAINER USE******************************
You can configure Web applications to:
Control the level of program execution that is allowed on your Web site.
Balance Web server reliability with application performance.
Determine which ISAPI or CGI program to run to process a request and
control how ASP scripts run.
Configure options and debugging for ASP scripts.
Topic Objective
To outline the topics for
configuring applications.
Lead-in
You can configure
applications so that they
perform efficiently in an
IIS installation.
Module 4: Installing and Configuring Web Applications 7
Setting Application Permissions
*****************************
ILLEGAL FOR NON-TRAINER USE******************************
You can set application permissions to control whether users visiting your Web
site are allowed to run scripts or executables on the site. This feature enables
you to determine the level of program execution that is allowed on your Web
site. You can set application permissions on directories and virtual directories.
To set permissions for an application:
1. In the IIS snap-in, right-click the starting-point directory for the application,
and then click Properties.
2. On the Home Directory, Virtual Directory, or Directory tab, under
Application Settings, in the Execute Permissions list, click the appropriate
permissions setting, and then click OK.
The following table describes the application permissions settings that are
available.
Permission Description
None Prevents programs or scripts from running. Only static files,
such as HTML or image files, can be accessed.
Scripts only Enables applications mapped to a script engine to run.
Executable files will not run.
Scripts and Executables Enables files to be accessed or executed.
You can configure application mappings to specify which programs
perform as script engines. Configuring application mappings is covered later in
this module.
Topic Objective
To describe the procedure
for setting application
permissions.
Lead-in
Setting application
permissions enables you to
control program execution
on your Web site.
Delivery Tip
Explain the procedure for
setting application
permissions and describe
each of the permissions
settings.
Note
8 Module 4: Installing and Configuring Web Applications
Configuring Application Protection Settings
IIS Process
(Inetinfo.exe)
IIS Process
(Inetinfo.exe)
Isolated Process
(Dllhost.exe)
Isolated Process
(Dllhost.exe)
Isolated Process
(Dllhost.exe)
Isolated Process
(Dllhost.exe)
Pooled Process
(Dllhost.exe)
Pooled Process
(Dllhost.exe)
In-Process
In
In
-
-
Process
Process
Pooled 1
Pooled 1
Pooled 1
Isolated 1
Isolated 1
Isolated 1
In-Process
In
In
-
-
Process
Process
Pooled 2
Pooled 2
Pooled 2
Pooled 3
Pooled 3
Pooled 3
Isolated 2
Isolated 2
Isolated 2
Isolated 2
Isolated 2
Isolated 2
Pooled Process
(Dllhost.exe)
Pooled Process
(Dllhost.exe)
Pooled 1
Pooled 1
Pooled 1
Pooled 2
Pooled 2
Pooled 2
Pooled 3
Pooled 3
Pooled 3
= Process
= Application
*****************************
ILLEGAL FOR NON-TRAINER USE******************************
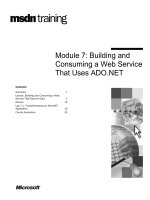
You can balance Web server reliability with application performance by
configuring application protection settings. In earlier versions of IIS, all ISAPI
applications (including ASP technology) shared the resources and memory of
the server process. In IIS 5.0, applications can run in the same process as IIS,
offering the best performance, or in a separate process, offering greater isolation
in the event of failures.
IIS offers three levels of application protection:
Low (IIS Process). Specifies that an application will run in the same
memory space as Web services (Inetinfo.exe), which results in higher
performance. However, if an application fails, Web services may become
unavailable. This mode of operation is called In-Process.
Medium (Pooled). Specifies that an application will run in an isolated,
pooled process. All applications that are specified with the Medium
application protection level will run in the same process, which is isolated
from the Web server process. In this way, a pooled process provides
protection for the Web server without the resource usage that is typically
involved in maintaining a large number of isolated processes. This mode of
operation is called Pooled Process.
High (Isolated). Specifies that an application will run in an isolated process
separate from other processes. This setting enables you to run Web
applications in their own memory space. This is known as process isolation,
which improves server stability by protecting the main IIS process even if
an application fails, but increases the amount of resource usage. This mode
of operation is called Out-of-Process.
Topic Objective
To describe how to
configure application
protection settings and to
explain the impact that each
setting has on performance.
Lead-in
Application protection
settings enable you to
balance Web server
reliability with application
performance.
Delivery Tip
The slide for this topic
includes animation. Press
the SPACEBAR to advance
the animation.
Describe each of the
application protection
settings and explain the
impact that each setting has
on performance.
Use the slide to illustrate the
process that occurs when
either an isolated application
or a pooled application fails.
Inform students that the
recommended configuration
is to run Inetinfo.exe in its
own process, run mission-
critical applications in their
own (isolated) processes,
and run remaining
applications in a shared,
pooled process.
Finally, describe the
procedure for setting or
changing the level of
application protection.
Module 4: Installing and Configuring Web Applications 9
By default, applications are created with the Medium application protection
level and are run in a pooled process in one instance of DLLHost.exe.
Additionally, Web services will run in its own process (Inetinfo.exe), and
isolated applications will each run in their own instance of DLLHost.exe.
If an isolated application fails, no other applications are affected because the
failed application is in its own process. Because IIS is still running, it will
restart the application when a client makes a request.
If a pooled application fails, all applications in the pooled process will fail.
However, because IIS is still running, all of the applications in the pooled
process will restart when a client makes a request.
To set or change the level of application protection:
1. In the IIS snap-in, right-click the starting-point directory for the application,
and then click Properties.
2. On the Home Directory, Virtual Directory, or Directory tab, in the
Application Protection list, click the appropriate setting, and then click
OK.
10 Module 4: Installing and Configuring Web Applications
Lab A: Creating and Configuring Applications
*****************************
ILLEGAL FOR NON-TRAINER USE******************************
Objectives
After completing this lab, you will be able to configure the application
protection settings for an IIS application.
Scenario
You are deploying an IIS server to host multiple applications that are created by
different departments in your organization. You are trying to decide which
approach you will take to prevent the applications from interfering with one
another and with the proper operation of your Web server.
To aid in your decision, you will create five test applications with different
application protection settings. Next, you will simulate the failure of two of the
applications and observe the effects of those simulated failures on the other
applications.
Estimated time to complete this lab: 30 minutes
Topic Objective
To introduce the lab.
Lead-in
In this lab, you will create
Web applications, adjust
application protection
settings, and test the impact
of these settings on stability
and performance.
Module 4: Installing and Configuring Web Applications 11
Exercise 0
Lab Setup
The Lab Setup section lists the tasks that you must perform before you begin the lab.
Tasks Detailed steps
1. Log on as Administrator
with a password of
password.
a. Log on as Administrator with a password of password.
2. Run the batch file
C:\MOC\2295A\Labs\
Mod4\Setup.bat, which will
create the following virtual
directories:
• Inprocess
• Pooled1
• Pooled2
• Isolated1
• Isolated2
a. Open Windows Explorer.
b. In Windows Explorer, expand My Computer, expand Local Disk
(C:), expand MOC, expand 2295A, expand Labs, and then click
Mod4.
c. In the right pane, double-click Setup.bat.
When you run the batch file, the following virtual directories are
created in the default Web site:
• Inprocess, which uses the path
C:\MOC\2295A\Labs\Mod4\Inprocess.
• Pooled1, which uses the path C:\MOC\2295A\Labs\Mod4\Pooled1.
• Pooled2, which uses the path C:\MOC\2295A\Labs\Mod4\Pooled2.
• Isolated1, which uses the path
C:\MOC\2295A\Labs\Mod4\Isolated1.
• Isolated2, which uses the path
C:\MOC\2295A\Labs\Mod4\Isolated2.
Note: If you have not completed Lab A in Module 1, “Installing Internet Information Services 5.0,” of
Course 2295A, Implementing and Supporting Microsoft Internet Information Services 5.0, you will need to
modify the batch file to reflect the correct location of the Inetpub\Adminscripts directory.
12 Module 4: Installing and Configuring Web Applications
Exercise 1
Creating the Applications and Setting the Protection Levels
In this exercise, you will create five test applications and configure them with different application
protection levels.
Tasks Detailed steps
1. Open the IIS snap-in, and
then expand the default Web
site.
a. On the Start menu, point to Programs, point to Administrative
Tools, and then click Internet Services Manager.
In Administrative Tools, the IIS console is called Internet Services
Manager; however, when you open the console, it is called Internet
Information Services, also known as the IIS snap-in.
b. In the IIS snap-in, in the console tree, expand server_name (where
server_name is the name of your server), and then expand Default
Web Site.
2. Open Component Services
in Microsoft Management
Console (MMC) and note
the IIS-related Component
Object Model (COM)+
applications that are
installed.
a. On the Start menu, point to Programs, point to Administrative
Tools, and then click Component Services.
b. In the console tree of Component Services, expand Component
Services, expand Computers, expand My Computer, and then
double-click COM+ Applications.
c. On the View menu, click Status View.
d. In the details pane, widen the Name column (if necessary) to show the
entire names of the installed COM+ applications.
What COM+ applications are installed that start with the letters IIS?
IIS In-Process Applications, IIS Out-Of-Process Pooled Applications, and IIS Utilities.
3. Return to the IIS snap-in.
Create an application for the
Inprocess virtual directory
under the default Web site,
set the permissions to allow
scripts, and then set the
application protection to
Low (IIS Process).
a. In the IIS snap-in, in the console tree, right-click the Inprocess virtual
directory, and then click Properties.
b. On the Virtual Directory tab, under Application Settings, click
Create.
c. In the Execute Permissions list, click Scripts only.
d. In the Application Protection list, click Low (IIS Process), and then
click OK.
4. Create an application for the
Pooled1 virtual directory
under the default Web site,
set the permissions to allow
scripts, and then set the
application protection to
Medium (Pooled).
a. In the IIS snap-in, in the console tree, right-click the Pooled1 virtual
directory, and then click Properties.
b. On the Virtual Directory tab, under Application Settings, click
Create.
c. In the Execute Permissions list, click Scripts only.
d. In the Application Protection list, verify that Medium (Pooled) is
selected, and then click OK.
Module 4: Installing and Configuring Web Applications 13
Tasks Detailed steps
5. Create an application for the
Pooled2 virtual directory
under the default Web site,
set the permissions to allow
scripts, and then set the
application protection to
Medium (Pooled).
a. In the IIS snap-in, in the console tree, right-click the Pooled2 virtual
directory, and then click Properties.
b. On the Virtual Directory tab, under Application Settings, click
Create.
c. In the Execute Permissions list, click Scripts only.
d. In the Application Protection list, verify that Medium (Pooled) is
selected, and then click OK.
6. Create an application for the
Isolated1 virtual directory
under the default Web site,
set the permissions to allow
scripts, and then set the
application protection to
High (Isolated).
a. In the IIS snap-in, in the console tree, right-click the Isolated1 virtual
directory, and then click Properties.
b. On the Virtual Directory tab, under Application Settings, click
Create.
c. In the Execute Permissions list, click Scripts only.
d. In the Application Protection list, click High (Isolated), and then
click OK.
7. Create an application for the
Isolated2 virtual directory
under the default Web site,
set the permissions to allow
scripts, and then set the
application protection to
High (Isolated).
a. In the IIS snap-in, in the console tree, right-click the Isolated2 virtual
directory, and then click Properties.
b. On the Virtual Directory tab, under Application Settings, click
Create.
c. In the Execute Permissions list, click Scripts only.
d. In the Application Protection list, click High (Isolated), and then
click OK.
8. Return to Component
Services and refresh the
display to view any new
COM+ applications.
a. In Component Services, in the console tree, right-click COM+
Applications, and then click Refresh.
What COM+ applications are installed that start with the letters IIS?
IIS In-Process Applications, IIS Out-Of-Process Pooled Applications, IIS Utilities, IIS-{Default Web
Site//Root/isolated1}, and IIS-{Default Web Site//Root/isolated2}.
14 Module 4: Installing and Configuring Web Applications
Exercise 2
Testing the Application Protection Levels
In this exercise, you will simulate two different application failures and observe the effect that those
failures have on other applications that are running on the server.
Tasks Detailed steps
1. Load the Web page that is
provided to test the five
different applications.
a. On the Start menu, click Run.
b. In the Run dialog box, in the Open box, type
C:\MOC\2295A\Labs\Mod4\Apptest.htm and then click OK.
Note: Internet Explorer opens and contains five frames. Each frame shows the default page for one of the
five applications that was added in the previous exercise. The counter in each frame changes in increments to
indicate that the application is running.
2. Return to Component
Services and note the
applications that are
running.
a. In Component Services, in the console tree, right-click COM+
Applications, and then click Refresh.
What is the process ID (PID) of the IIS-{Default Web Site//Root/isolated2} application?
Note: The process ID is shown in the PID column of the Status View.
Answer varies.
3. Shut down the second
isolated application, and
then open Internet Explorer
and note the applications
that are running.
a. In the details pane, in the COM+ Applications list, right-click IIS-
{Default Web Site//Root/isolated2}, and then click Shut down.
b. On the Taskbar, click Application Protection Demo.
What has changed on the Internet Explorer Web page?
One of the isolated applications has failed but the other four applications have continued running.
4. Refresh the Web page. a. In Internet Explorer, on the View menu, click Refresh.
Note: Notice that IIS restarts the application.
5. Return to Component
Services and view the new
process ID.
a. In Component Services, in the console tree, right-click COM+
Applications, and then click Refresh.
Module 4: Installing and Configuring Web Applications 15
Tasks Detailed steps
What is the process ID (PID) of the IIS-{Default Web Site//Root/isolated2} application?
Answer varies. This answer will be different from the process ID that was recorded earlier.
What is the process ID (PID) of the IIS Out-Of-Process Pooled Applications application?
Answer varies.
6. Shut down the IIS Out-Of-
Process Pooled
Applications, and then, in
Internet Explorer, note the
applications that are
running.
a. In the details pane, in the COM+ Applications list, right-click IIS
Out-Of-Process Pooled Applications, and then click Shut down.
b. On the Taskbar, click Application Protection Demo.
What has changed on the Internet Explorer Web page?
Both of the pooled applications have failed, but the other three applications have continued running.
7. Refresh the Web page. a. In Internet Explorer, on the View menu, click Refresh.
Note: Notice that IIS restarts the application pool.
8. Return to Component
Services and view the new
process ID.
a. In Component Services, in the console tree of the Component Services
window, right-click COM+ Applications, and then click Refresh.
What is the process ID (PID) of the IIS Out-Of-Process Pooled Applications application?
Answer varies. This answer will be different from the process ID that was recorded earlier.
8. (continued) b. Close all windows and log off.
16 Module 4: Installing and Configuring Web Applications
Configuring Application Mappings
Add
*****************************
ILLEGAL FOR NON-TRAINER USE******************************
You can develop Web applications in a number of programming and scripting
languages. IIS uses the file name extension of a requested resource on your
Web site to determine which ISAPI or CGI program to run to process the
request. For example, a request for a file ending with an .asp extension causes
the Web server to use the ASP interpreter (Asp.dll) to process the request.
The Application Configuration dialog box lists file name extensions and the
path to each extension’s associated executable file. The association of a file
name extension with an ISAPI or CGI program is called application mapping.
By default, IIS is configured to support common application mappings. You
can add or remove mappings for all applications on a Web site or for individual
applications.
You can set application mappings to map file name extensions to the ISAPI or
CGI application that processes those files.
To map a file name extension to an application:
1. In the IIS snap-in, right-click the starting-point directory for the application,
and then click Properties.
2. On the Home Directory, Virtual Directory, or Directory tab, click
Configuration.
3. In the Application Configuration dialog box, on the App Mappings tab,
click Add.
4. In the Add/Edit Application Extension Mapping dialog box, in the
Executable box, type the path to the ISAPI or CGI program that will
process the file.
You must specify a program in a local directory on the Web server.
Topic Objective
To describe how to
configure application
mappings.
Lead-in
You can configure
application mappings to
determine which program
will run to process an HTTP
request.
Delivery Tip
Open the Application
Configuration dialog box
and describe the contents of
the Applications Mappings
list.
Demonstrate the procedure
for setting application
mappings.
Module 4: Installing and Configuring Web Applications 17
5. In the Extension box, type the file name extension that you want to be
associated with the ISAPI or CGI program.
When the Web server receives a Uniform Resource Locator (URL)
identifying a file with this extension, it uses the associated program to
process the request.
6. Under Verbs, click one of the following options:
• All Verbs. Specifies that all verbs should be passed to the application.
• Limit to. Specifies the HTTP verbs that the executable file will pass to
the application. When you select this setting, you must type the verbs in
the box and separate them with commas.
7. Select the Script Engine check box if you want the application to run in a
directory with Scripts only permission.
When a directory has the Scripts only permission set (instead of the Scripts
and Executables permission), only files associated with applications that
are designated script engines can be processed in the directory.
8. Select the Check that file exists check box to instruct the Web server to
verify that the requested script file exists.
This option also ensures that the requesting user has access permission for
that script file. This prevents security attacks that use techniques involving a
request to access non-existent files.
9. When you are finished specifying your settings, click OK.
To remove an application mapping, open the Application Configuration
dialog box. Under Application Mappings, select the file name extension for
the mapping that you want to delete, and then click Remove. Requests for files
with that file name extension will no longer be processed in the Web site or
directory.
For security purposes, it is recommended that you remove the application
mappings that are not used on your Web server.
Caching ISAPI Applications
To increase efficiency, you can cache ISAPI applications so that they are loaded
into memory once and then are reused for subsequent requests. To do this, open
the Application Configuration dialog box. Then, on the App Mappings tab,
select the Cache ISAPI Applications check box. Typically, you should only
clear this option for special circumstances, such as debugging ISAPI
applications.
If the same ISAPI application has been loaded and cached by more than
one Web site on a server, clearing this option for the server does not unload the
application from memory. You must clear this option for all Web sites that use
the application. In addition, clearing this option does not unload running
applications; only subsequent requests are not cached.
Delivery Tip
Demonstrate the procedure
for removing application
mappings.
Note
Delivery Tip
Explain the purpose of
caching ISAPI applications.
Note
18 Module 4: Installing and Configuring Web Applications
Configuring ASP Script Options and Debugging
*****************************
ILLEGAL FOR NON-TRAINER USE******************************
You can configure the settings on the App Options tab of the Application
Configuration dialog box to control how ASP scripts run within a selected
application. The following table describes the settings that you can configure.
Setting Description
Enable session
state
Specifies whether to create sessions for users. Select this check box
to enable session state, or clear it to disable session state. Session
state refers to the pieces of user-specific information that are
relevant to a particular session. When session state is enabled, a
session is created for each user who accesses an ASP application.
This setting enables you to identify the user across pages in the
application; however, it also impacts performance. If you are not
using this feature of ASP, session state should not be enabled.
Session timeout Specifies the length of the timeout period for a session. A session
automatically ends if the user has not requested or refreshed a page
in an application by the end of the timeout period.
Increasing the length of the session timeout will cause the server to
consume more resources; decreasing the length will cause user
sessions to be dropped prematurely.
Enable
buffering
Determines whether ASP output is buffered. Select this check box to
buffer output to the browser. When you select this option, all output
that is generated by an ASP page is collected before it is sent to the
browser. When this check box is cleared, output is returned to the
browser as the page is processed. Buffering output enables you to set
HTTP headers from anywhere in an ASP script and improves the
browsing experience for the user.
Topic Objective
To describe how to
configure options and
debugging for ASP scripts.
Lead-in
You can configure the
settings on the App
Options and App
Debugging tabs of the
Application Configuration
dialog box to control how
ASP scripts run, and set
debugging options for ASP
scripts.
Delivery Tip
Describe each of the
settings on the App
Options tab of the
Application Configuration
dialog box.
Module 4: Installing and Configuring Web Applications 19
(continued)
Setting Description
Enable parent
paths
Select this check box to allow ASP scripts to use relative paths to
the parent directory of the current directory.
A good security practice is to disable this option. If you leave this
option enabled, do not provide the parent directories with Execute
access; otherwise, a script could attempt to run an unauthorized
program in a parent directory.
Default ASP
language
Specifies the primary script language for Active Server Pages. To
choose a different primary script language for all pages in the
selected application, type the name of the language in the box.
ASP Script
timeout
Specifies the length of time that ASP will allow a script to run. If the
script does not finish running by the end of the time-out period, ASP
stops the script and writes an event to the Windows Event Log.
You can configure the settings on the App Debugging tab of the Application
Configuration dialog box to set debugging options for ASP scripts for a
selected application. The following table describes the settings that you can
configure.
Setting Description
Enable ASP server-side
script debugging
Select this check box to enable the Web server to enter the
Microsoft Script Debugger while processing ASP scripts.
You can then use the debugger to examine your scripts. Do
not enable this setting unless you are debugging ASP
applications, because performance of the server is greatly
reduced when this setting is enabled.
Enable ASP client-side
script debugging
This check box is reserved for future use and has no effect
on the current version of ASP.
Send detailed ASP error
messages to client
Select this option to send specific debugging information
(including the file name, error message, and line number)
to the browser.
Send text error message
to client
Certain errors may reveal sensitive information about your
application. For security purposes, you can choose not to
send this information to the client.
Select this option to send a default error message to the
client browser when any error prevents the Web server
from processing the ASP script. A specific error message is
written to the error log. You can change the default error
message by typing a new message in the text box.
You can create custom error messages for your Web site to
control the format of error messages that are sent to the
client. For more information about custom error messages,
see Module 3, “Administering Web and FTP Sites,” in
Course 2295A, Implementing and Supporting Microsoft
Internet Information Services 5.0.
Delivery Tip
Describe each of the
settings on the App
Debugging tab of the
Application Configuration
dialog box.