Tài liệu Systems Administration and Security ppt
Bạn đang xem bản rút gọn của tài liệu. Xem và tải ngay bản đầy đủ của tài liệu tại đây (492.3 KB, 46 trang )
10
Systems
Administration
and Security
CERTIFICATION OBJECTIVES
10.01 Configuring NIS Clients
10.02 Basic Host Security
10.03 The Pluggable Authentication Module
(PAM) System
10.04 System Logging
10.05 The Extended Internet Services
Daemon (xinetd)
10.06 Firewall Policies
10.07 Network Address Translation
✓
Two-Minute Drill
Q&A Self Test
CertPrs8 / RHCE Red Hat Certified Engineer Linux Study Guide / Jang / 222485-1 / Chapter 10
Blind Folio 10:579
D:\omh\CertPrs8\485-1\ch10.vp
Wednesday, September 18, 2002 10:26:57 AM
Color profile: Generic CMYK printer profile
Composite Default screen
CertPrs8 / RHCE Red Hat Certified Engineer Linux Study Guide / Jang / 222485-1 / Chapter 10
A
s a Red Hat Linux systems manager, you probably wear several hats, one of which is
security manager. This is especially true if you work for a small company. Even if you
work for a large organization that has a dedicated network or systems security staff,
most of the administrators are probably responsible for other operating systems; you’re
probably responsible for security policies on your Linux systems.
You may spend very little time thinking about Linux security, or it may turn out
to be a full-time job. For most Linux systems administrators, the amount of time
spent on securing systems falls somewhere between these two extremes. The level of
security you choose to configure depends on many factors, including the purpose of
the system and the overall security policies of your company or organization, as well
as the size and number of computers in the company.
For example, a Red Hat Linux system at home does not require as much security as
a Red Hat Linux server that is being used to process credit card orders for a Web site.
Red Hat Linux comes with a large and varied assortment of tools for handling
security. This includes tools for managing the security on individual Linux computers
and tools for managing security for an entire network of systems, both Linux and
otherwise. In this chapter, we look at some of the tools Red Hat Linux provides for
managing security. We start out by looking at tools for controlling access to individual
Linux host systems; then we look at tools for securing networks.
You’ll need to know how to protect your computer and network. Sometimes
this means you’ll turn off, deactivate, or even uninstall a service. Other times,
you’ll set specific levels of security for different users. You can even regulate
the type of traffic coming in, going out, and being transferred through your
computer.
You have different ways to secure your system and network. The Network
Information System (NIS) can provide a common database of authentication and
configuration files for your network. The PAM (Pluggable Authentication Module)
system lets you configure how users are allowed to log in or access different services.
System logging often provides the clues that you need to solve a lot of problems.
The Extended Internet Services Daemon governs a lot of services that do not have
their own individual daemons. IP Aliases allow you to set up more than one IP
address on a specific network card. With iptables, you can set up firewalls to accept
or block many different kinds of network traffic. Network Address Translation allows
you to protect computers inside your network by hiding their address information.
580
Chapter 10: Systems Administration and Security
CertPrs8 / RHCE Red Hat Certified Engineer Linux Study Guide / Jang / 222485-1 / Chapter 10
D:\omh\CertPrs8\485-1\ch10.vp
Wednesday, September 18, 2002 10:26:57 AM
Color profile: Generic CMYK printer profile
Composite Default screen
CertPrs8 / RHCE Red Hat Certified Engineer Linux Study Guide / Jang / 222485-1 / Chapter 10
Configuring NIS Clients
581
CERTIFICATION OBJECTIVE 10.01
Configuring NIS Clients
Generally, access to a Red Hat Linux system requires a valid username and password.
One problem with a large network of Linux systems is that “normally,” each user
requires an account on every Linux computer.
The Network Information System (NIS) allows you to set up one centrally
managed database of usernames and passwords for your Unix and Linux systems.
With NIS, you can maintain one password database on an NIS server and configure
the other systems on the network as NIS clients. When a user logs into an NIS client,
that system first checks its local password file, usually /etc/passwd. If it can’t find
your username, it looks up the corresponding file on the NIS server.
NIS clients and NIS servers are organized in NIS domains. You can have multiple
NIS domains on a single network, but clients and servers can belong to only one
domain. If you are using NIS, you can find out the name of your NIS domain by
using this command:
domainname
NIS domains are different from BIND domains. In fact, for security reasons,
your NIS domain name should be different from your BIND domain name.
If you are coming from the Microsoft Windows NT world, NIS domains are
analogous to LAN manager domains.
NIS provides you with more than a shared authorization database. With NIS, you
can provide shared access to any kind of information. By default, NIS under Red
Hat Linux shares the following files:
■
/etc/passwd
■
/etc/group
■
/etc/hosts
■
/etc/rpc
■
/etc/services
■
/etc/protocols
■
/etc/mail/*
D:\omh\CertPrs8\485-1\ch10.vp
Wednesday, September 18, 2002 10:26:57 AM
Color profile: Generic CMYK printer profile
Composite Default screen
You can configure NIS to share other files as well. This is easy to configure in the
NIS configuration file, /var/yp/Makefile.
NIS services require at least one NIS master server. This is where the centralized
NIS database files, known as maps, are stored. NIS changes require an update to the
map on the master server. You can have only one NIS master server per NIS domain.
(NIS maps are stored in the /var/yp/DOMAIN directory, where DOMAIN is the
name of your NIS domain.)
For larger networks or redundancy, you may also want an NIS slave server. NIS
slaves take copies of the NIS maps from the master server. NIS clients can then get
their configuration files from either the master server or a slave server. You can have
multiple NIS slave servers on a network.
NIS clients are systems that use information from an NIS server. NIS clients don’t
store any information that is contained in the NIS databases; whenever that information
is needed, it is retrieved from a server.
You may notice that most NIS commands start with yp. This is a holdover
from the previous name of NIS when it was known as the Yellow Pages service.
NIS Components on Red Hat Linux
The /usr/lib/yp directory includes the utilities you need to configure and manage NIS
services. The ypinit program can configure an NIS server. Table 10-1 lists the files
needed to configure an NIS server.
Although NIS was designed to enable you to manage security by controlling who
has access to the systems on your network, NIS is not a very secure product. Anyone
who knows your NIS domain name and can connect to your network can read all
the information stored in your NIS databases, such as /etc/passwd.
You can do a couple of things to help protect your NIS database. The
/var/yp/securenets file can control who can connect to your NIS server. This file is
easy to configure. Only two lines are required for a LAN:
host 127.0.0.1
255.255.255.0 192.168.0.0
The first line allows access from the local computer. The second line may look a bit
backward, but it allows access from all of the computers with IP addresses on the
192.168.0.0 network.
CertPrs8 / RHCE Red Hat Certified Engineer Linux Study Guide / Jang / 222485-1 / Chapter 10
582
Chapter 10: Systems Administration and Security
CertPrs8 / RHCE Red Hat Certified Engineer Linux Study Guide / Jang / 222485-1 / Chapter 10
D:\omh\CertPrs8\485-1\ch10.vp
Wednesday, September 18, 2002 10:26:57 AM
Color profile: Generic CMYK printer profile
Composite Default screen
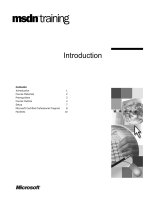
Once you’ve configured an NIS server, it’s easy to configure an NIS client. Just
use authconfig. Figure 10-1 shows the authconfig screen used to configure NIS. This
will configure your system to use the ypbind daemon, and add the appropriate
entries in the /etc/yp.conf, /etc/nsswitch.conf, and /etc/pam.d/system-auth files. All
you need is the name of the NIS domain, and the name of the computer where it’s
located.
The other command you need to know about when running an NIS client is
yppasswd. All users can manage their NIS password with this command.
One security risk to keep in mind if you use NIS is that anyone with access to
the root account on any system that uses NIS can use the su - username
command (note the space on both sides of the dash) to switch to any account
in your NIS database.
The Name Service Switch File
The Name Service Switch file (/etc/nsswitch.conf ) governs the search order. For example,
when an NIS client looks for a computer host name, it might start with the
following entry from /etc/nsswitch.conf:
hosts: files nisplus nis dns
CertPrs8 / RHCE Red Hat Certified Engineer Linux Study Guide / Jang / 222485-1 / Chapter 10
Configuring NIS Clients
583
CertPrs8 / RHCE Red Hat Certified Engineer Linux Study Guide / Jang / 222485-1 / Chapter 10
File Description
/usr/lib/yp/ypinit
Shell script to build initial database maps on an NIS server in /var/yp; ypinit
-m builds the databases for a master server.
/var/yp/Makefile Configuration file. Edit this file to control which files are shared via NIS.
Implement the changes from the /var/yp directory with the make command.
/usr/sbin/ypserv NIS server daemon. Remember to use /sbin/chkconfig to make sure it will
start when you boot Linux.
/usr/sbin/yppasswdd NIS password update daemon. Allows users to change their NIS passwords
with the yppasswd command. Remember to use /sbin/chkconfig to make
sure it starts when you boot Linux.
/etc/ypserv.conf The ypserv daemon configuration file.
/var/yp/securenets Controls which systems can access NIS databases. See the ypserv man page
for an example.
TABLE 10-1 NIS Configuration Files and Commands
D:\omh\CertPrs8\485-1\ch10.vp
Wednesday, September 18, 2002 10:26:57 AM
Color profile: Generic CMYK printer profile
Composite Default screen
CertPrs8 / RHCE Red Hat Certified Engineer Linux Study Guide / Jang / 222485-1 / Chapter 10
This line tells your computer to search through name databases in the following order:
1. Start with the database of host names and IP addresses in /etc/hosts.
2. Next, search for the host name in a map file based on NIS+ (NIS Version 3).
3. Next, search for the host name in a map file based on NIS (Version 2).
4. If none of these databases includes the desired host name, refer to the DNS
server.
CERTIFICATION OBJECTIVE 10.02
Basic Host Security
A network is only as secure as the most open system in that network. Although no
system can be 100 percent secure, you can follow certain basic host measures to
enhance the security on any given system and, consequently, your network. When
584
Chapter 10: Systems Administration and Security
CertPrs8 / RHCE Red Hat Certified Engineer Linux Study Guide / Jang / 222485-1 / Chapter 10
FIGURE 10-1
Configuring an
NIS Client with
authconfig
D:\omh\CertPrs8\485-1\ch10.vp
Wednesday, September 18, 2002 10:26:57 AM
Color profile: Generic CMYK printer profile
Composite Default screen
Basic Host Security
585
CertPrs8 / RHCE Red Hat Certified Engineer Linux Study Guide / Jang / 222485-1 / Chapter 10
devising security measures, you have to plan for two types of security violations: user
accidents and break-ins.
Accidents happen because users lack adequate training or are unwilling to follow
procedures. If security is too burdensome, productivity may suffer, and your users
will try to get around your rules. Password security falls into this category.
When a cracker breaks in to your system, some crackers may be looking for
secrets such as credit card information. Others may just want to bring down your
system. You can do several things to keep your network secure. Monitor Red Hat
errata for the latest issues. With the up2date utility, you can keep your Red Hat
system updated with the latest packages.
As you’ll see later in this chapter, you can manage your computer’s response to
certain requests through the /etc/hosts.allow and /etc/hosts.deny files. You can set up
protection within the kernel through firewalls based on iptables or ipchains. One
simple way to promote security is to uninstall as many network access programs as
possible.
Password Security
Good password security is important. Good passwords include a combination of
letters and numbers that aren’t easily guessed. Good password security requires users
to change their password on a regular basis.
Password security also means disabling or deleting unused accounts. These accounts
are a common way for a cracker to try to break into your system.
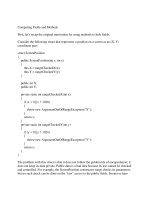
You can also check system log files for suspicious activity. Login records are kept
in a database in /var/log/wtmp. While you can’t read this file directly, you can use
the utmpdump command to make this file readable. For example, the utmpdump
/var/log/wtmp command lists recent login activity. Take a look at Figure 10-2. Note
the login from IP address 172.132.4.8. If you don’t have any users from a computer
with that IP address, you have a reason for concern.
Security Updates
Another step you can take to keep your Red Hat Linux system secure is to install the
latest errata releases from Red Hat. These contain patches or fixes for problems in
applications or the operating system that could result in security violations. A list of
the latest errata is available as of this writing at www.redhat.com/apps/support/errata.
D:\omh\CertPrs8\485-1\ch10.vp
Wednesday, September 18, 2002 10:26:57 AM
Color profile: Generic CMYK printer profile
Composite Default screen
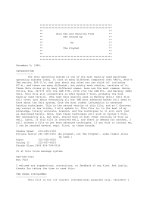
Red Hat provides a built-in service to check for updates called up2date that you
can configure if your computer is directly connected to the Internet. Just run up2date
from a command line in the X Window of your choice. If you haven’t already done
so, you’ll need to register the settings on your computer. Then follow the prompts;
up2date connects to rhn.redhat.com for updates. A sample result is shown in Figure 10-3,
which suggests an update to three packages, including the kernel.
Delete Extra Services
One simple way to promote security on your system is to delete the packages associated
with network services that you aren’t going to use. For example, a cracker can’t use
Telnet to break into your system if the Telnet RPM is not installed. Any firewall or
other configuration that you may add to the service still means that you are theoretically
vulnerable to an attack through that service. If you’re not going to use a network
service, you may want to remove the associated RPM packages.
To review currently installed network services, check the /etc/xinetd.d, the
/etc/rc.d/init.d directories.
586
Chapter 10: Systems Administration and Security
CertPrs8 / RHCE Red Hat Certified Engineer Linux Study Guide / Jang / 222485-1 / Chapter 10
FIGURE 10-2
Suspicious login
activity
D:\omh\CertPrs8\485-1\ch10.vp
Wednesday, September 18, 2002 10:26:58 AM
Color profile: Generic CMYK printer profile
Composite Default screen
The Pluggable Authentication Module (PAM) System
587
CertPrs8 / RHCE Red Hat Certified Engineer Linux Study Guide / Jang / 222485-1 / Chapter 10
CERTIFICATION OBJECTIVE 10.03
The Pluggable Authentication
Module (PAM) System
Red Hat Linux uses the Pluggable Authentication Modules (PAM) system to check
for authorized users. PAM includes a group of dynamically loadable library modules
that govern how individual applications verify their users. You can modify PAM
configuration files to suit your needs.
PAM was developed to standardize the user authentication process. For example,
the login program uses PAM to require usernames and passwords at login. Open the
/etc/pam.d/login file. Take a look at the first line:
auth required /lib/security/pam_securetty.so
FIGURE 10-3
up2date at work
D:\omh\CertPrs8\485-1\ch10.vp
Wednesday, September 18, 2002 10:26:58 AM
Color profile: Generic CMYK printer profile
Composite Default screen
588
Chapter 10: Systems Administration and Security
CertPrs8 / RHCE Red Hat Certified Engineer Linux Study Guide / Jang / 222485-1 / Chapter 10
This line means that root users can log in only from secure terminals as defined in
the /etc/securetty file.
PAM modules are documented in the /usr/share/doc/pam-versionnumber/txts
directory. For example, the functionality of the pam_securetty.so module is
described in the README.pam_securetty file.
The configuration files shown in the /etc/pam.d directory are named after
applications. These applications are “PAM aware.” In other words, you can change
the way users are verified for applications such as the console login program. Just
modify the appropriate configuration file in /etc/pam.d.
Pluggable Authentication Modules (PAM) and Associated Files
The PAM system divides the process of verifying users into four separate tasks.
These are the four different types of PAM modules:
■
Authentication management Establishes the identity of a user. For
example, a PAM auth command may decide whether to prompt for a
username and or a password.
■
Account management Allows or denies access according to the account
policies. For example, a PAM account command may deny access according
to time, password expiration, or a specific list of restricted users.
■
Password management Manages other password policies. For example,
a PAM password command may limit the number of times a user can try
to log in before a console is reset.
■
Session management Applies settings for an application. For example, the
PAM session command may set default settings for a login console.
The code shown in Figure 10-4 is an example PAM configuration file,
/etc/pam.d/login. Every line in all PAM configuration files is written in the
following format:
module_type control_flag module_path [arguments]
The module_type, as described previously, is auth, account, password, or session.
The control_flag determines what PAM does if the module succeeds or fails. The
module_path specifies the location of the actual PAM module file. Finally, as with
regular shell commands, you can specify arguments for each module.
D:\omh\CertPrs8\485-1\ch10.vp
Wednesday, September 18, 2002 10:26:58 AM
Color profile: Generic CMYK printer profile
Composite Default screen
The control_flag field requires additional explanation. It determines how the
configuration file reacts when a module flags success or failure. There are four
different control flags, each described in Table 10-2.
To demonstrate how control flags work, take a look at the /etc/pam.d/reboot
configuration file. The first auth command checks the pam_rootok.so module. If
the root user runs the reboot command, and the control_flag is sufficient, the other
auth commands in this file are ignored. Linux runs the reboot command.
The Pluggable Authentication Module (PAM) System
589
CertPrs8 / RHCE Red Hat Certified Engineer Linux Study Guide / Jang / 222485-1 / Chapter 10
FIGURE 10-4
The PAM login
module
control_flag Description
required If the module works, the command proceeds. If it fails, go to the next command
in the configuration file—but the command will still fail.
requisite Stop the process if the module fails.
sufficient If the module works, the login or other authentication proceeds. No other
commands need be processed.
optional PAM ignores module success or failure.
TABLE 10-2 PAM Control Flags
D:\omh\CertPrs8\485-1\ch10.vp
Wednesday, September 18, 2002 10:26:58 AM
Color profile: Generic CMYK printer profile
Composite Default screen
The second auth command is run only for nonroot users; it just governs the console
parameters. The module associated with the account command (pam_permit.so)
accepts all users, even those who’ve logged in remotely. In other words, this configuration
file would allow any root user, local or remote, to reboot your Linux computer.
#%PAM-1.0
auth sufficient /lib/security/pam_rootok.so
auth required /lib/security/pam_console.so
#auth required /lib/security/pam_stack.so service=system-auth
account required /lib/security/pam_permit.so
The third line is commented out by default. If you make this line active, it refers to
the system-auth configuration file, which requires root user privileges. Remote users
who know your root password are still allowed to reboot your computer.
Alternatively, you might add the pam_securetty.so module, which would keep
remote users from rebooting your system. This module is described in more detail
earlier in this chapter.
Allowing just any user to shut down a server system is not normal for corporate
servers, but it is a commonly accepted practice on workstations. In this way,
users can shut down their own laptop or desktop without having to change to
the root account.
PAM Configuration Example: /etc/pam.d/login
This section refers back to the /etc/pam.d/login configuration file shown in Figure 10-4.
When a user opens a text console and logs in, Linux goes through this configuration
file line by line. The first line in /etc/pam.d/login was already analyzed in the
previous section. The next line brings the login program through the following
service, system-auth, which also happens to be a PAM configuration file.
auth required /lib/security/pam_stack.so service=system-auth
Essentially, this calls the auth commands in the /etc/pam.d/system-auth
configuration file shown in Figure 10-5. This sets up environment variables and
allows different users to log in. The last auth line in /etc/pam.d/system-auth checks
the /etc/nologin file. If this file exists, no regular users are allowed to log into your
console.
590
Chapter 10: Systems Administration and Security
CertPrs8 / RHCE Red Hat Certified Engineer Linux Study Guide / Jang / 222485-1 / Chapter 10
D:\omh\CertPrs8\485-1\ch10.vp
Wednesday, September 18, 2002 10:26:58 AM
Color profile: Generic CMYK printer profile
Composite Default screen
The account and password commands in /etc/pam.d/login also refer to
the /etc/pam.d/system-auth configuration file. The account command in
/etc/pam.d/system-auth refers to the pam_unix.so module, which sets up the
normal username and password prompts. There are two password commands
in /etc/pam.d/system-auth. The file shown in Figure 10-5 sets a maximum
of three retries and sets up the use of md5 and shadow passwords.
The authconfig utility can modify the Linux password configuration through
the /etc/pam.d/system-auth configuration file.
Finally, there are two session commands in the /etc/pam.d/login file. The first
command refers to the /etc/pam.d/system-auth configuration file, which can allow you
to set limits on individual users through /etc/security/limits.conf, and environment
variables through the pam_unix.so module. The second command manages file
permissions while users are logged onto your Linux computer.
CertPrs8 / RHCE Red Hat Certified Engineer Linux Study Guide / Jang / 222485-1 / Chapter 10
The Pluggable Authentication Module (PAM) System
591
FIGURE 10-5
The /etc/pam.d/
system-auth
configuration file
D:\omh\CertPrs8\485-1\ch10.vp
Wednesday, September 18, 2002 10:26:58 AM
Color profile: Generic CMYK printer profile
Composite Default screen
EXERCISE 10-1
Configuring PAM
In this exercise, you can experiment with some of the PAM security features of Red
Hat Linux.
1. Make a backup copy of /etc/securetty: cp /etc/securetty /etc/securetty.sav.
2. Edit /etc/securetty and remove the lines for tty3 through tty8. Save the
changes and exit.
3. Use ALT-F3 (CTRL-ALT-F3 if you’re running X Window) to switch to virtual
console number 3. Try to log in as root. What happens?
4. Repeat this process as a regular user. What happens?
5. Use ALT-F2 to switch to virtual console number 2 and try to log in as root.
6. Restore your original /etc/securetty file: mv /etc/securetty.sav /etc/securetty.
Make sure you understand how Red Hat Linux handles user authorization
through the /etc/pam.d configuration files. When you test these files, make
sure you create a backup of everything in PAM before making any changes,
because any errors that you make to a PAM configuration file can disable
your system completely (it is that secure).
CERTIFICATION OBJECTIVE 10.04
System Logging
An important part of maintaining a secure system is keeping track of the activities
that take place on the system. If you know what usually happens, such as understanding
when users log into your system, you can use log files to spot unusual activity. Red
Hat Linux comes with several utilities you can use to monitor activity on a system.
These utilities can help you identify the culprit if there is a problem.
592
Chapter 10: Systems Administration and Security
CertPrs8 / RHCE Red Hat Certified Engineer Linux Study Guide / Jang / 222485-1 / Chapter 10
D:\omh\CertPrs8\485-1\ch10.vp
Wednesday, September 18, 2002 10:26:59 AM
Color profile: Generic CMYK printer profile
Composite Default screen
System Logging
593
CertPrs8 / RHCE Red Hat Certified Engineer Linux Study Guide / Jang / 222485-1 / Chapter 10
Red Hat Linux comes with two logging daemons. The kernel log daemon service,
klogd, logs kernel messages and events. The syslog daemon, syslogd, logs all other
process activity. You can use the log files that syslogd generates to track activities on
your system. If you are managing multiple Red Hat Linux systems, you can configure
the syslogd daemon on each system to log messages to a central host system.
Both daemons are typically active by default, and both can be activated by
the /etc/rc.d/init.d/syslog script. Once these daemons start, syslog examines
/etc/syslog.conf to find configured logging options.
System Log Configuration File
You can configure what syslogd records through the /etc/syslog.conf configuration
file. As shown in Figure 10-6, it includes a set of rules for different facilities: auth,
auth-priv, cron, daemon, kern, lpr, mail, mark, news, security, syslog, user, and uucp.
FIGURE 10-6
The /etc/
syslog.conf log
configuration file
D:\omh\CertPrs8\485-1\ch10.vp
Wednesday, September 18, 2002 10:26:59 AM
Color profile: Generic CMYK printer profile
Composite Default screen
CertPrs8 / RHCE Red Hat Certified Engineer Linux Study Guide / Jang / 222485-1 / Chapter 10
Each facility is associated with several different levels of logging, known as the
priority. In ascending order, log priorities are: debug, info, notice, warn, err, crit,
alert, emerg. The “none” priority logs all messages at all levels.
For each facility and priority, log information is sent to a specific log file. For example,
take the following line from /etc/syslog.conf:
*.info;mail.none;news.none;authpriv.none;cron.none /var/log/messages
This line sends log information from all of the given facilities to the
/var/log/messages file. This includes:
■
All facility messages of info level and higher
■
All log messages related to mail, news, authpriv (authentication), and cron
You can use the asterisk as a wildcard in /etc/syslog.conf. For example, a line that
starts with *.* tells the syslog daemon to log everything. A line that starts with auth.*
means you want to log all messages from the auth facility.
By default, syslogd logs all messages of a given priority or higher. In other words,
a cron.err line will include all log messages from the cron daemon at the err, crit,
alert, and emerg levels.
Most messages from syslogd are written to files in the /var/log directory. You
should scan these logs on a regular basis and look for patterns that could indicate
a security breach.
Managing Logs
Logs can easily become very large and difficult to read. By default, the logrotate
utility creates a new log file on a weekly basis. You can also configure
/etc/logrotate.conf to compress, mail, and remove desired log files. By default, the
cron daemon runs logrotate on a regular basis, using the configuration files located
in the /etc/logrotate.d directory.
As you can see in Figure 10-7, this process works fairly well; five or more weeks
of logs are kept for a number of log facilities.
The Red Hat Log Viewer
There is a new Red Hat GUI tool that can help you scan though applicable logs.
It can be useful if you don’t remember the locations of the key log files and don’t
594
Chapter 10: Systems Administration and Security
D:\omh\CertPrs8\485-1\ch10.vp
Wednesday, September 18, 2002 10:26:59 AM
Color profile: Generic CMYK printer profile
Composite Default screen
System Logging
595
CertPrs8 / RHCE Red Hat Certified Engineer Linux Study Guide / Jang / 222485-1 / Chapter 10
remember to look through /etc/syslog.conf for those locations. In the Red Hat GUI,
run the redhat-logviewer command to open up the tool shown in Figure 10-8.
As you can see, the Red Hat Log Viewer simply provides a front end. For example,
you can review the information shown in Figure 10-8 simply by looking through the
latest mail log files in the /var/log directory. And as of this writing, the regular text
log files provide more complete information.
FIGURE 10-7
Typical log files
in /var/log
FIGURE 10-8
The Red Hat
Log Viewer
D:\omh\CertPrs8\485-1\ch10.vp
Wednesday, September 18, 2002 10:26:59 AM
Color profile: Generic CMYK printer profile
Composite Default screen
CERTIFICATION OBJECTIVE 10.05
The Extended Internet Services Daemon (xinetd)
Linux typically supports network communication between clients and servers. For
example, you can use Telnet to connect to a remote system. The Telnet client on
your computer makes a connection with a Telnet server daemon on the remote system.
To establish the connection on a TCP/IP network, a client application needs the
IP address of the server, and the port number associated with the server daemon. All
common TCP/IP applications have a standard port number; some examples are shown
in Table 10-3.
If you don’t specify the port number, TCP/IP assumes that you’re using the
default port for the specified service. Clients can’t connect unless the corresponding
server is running on the remote system. If you are managing a server, you may have
a number of server daemons to start when Linux is booted.
The xinetd (which stands for Extended Internet Services Daemon) program can
start a number of these server daemons simultaneously. The xinetd program listens
for connection requests for all of the active servers with scripts in the /etc/xinetd.d
directory.
Each file in the /etc/xinetd.d directory specifies a particular service you want to
allow xinetd to manage. By default, scripts in this directory are disabled. The following
596
Chapter 10: Systems Administration and Security
CertPrs8 / RHCE Red Hat Certified Engineer Linux Study Guide / Jang / 222485-1 / Chapter 10
Port Number Service
21 FTP
23 Telnet
25 SMTP (outgoing mail)
80 HTTP
443 HTTPS (secure HTTP)
631 Internet Printing Protocol (CUPS configuration)
901 SWAT (Samba Configuration)
TABLE 10-3 Typical TCP/IP Port Numbers
D:\omh\CertPrs8\485-1\ch10.vp
Wednesday, September 18, 2002 10:26:59 AM
Color profile: Generic CMYK printer profile
Composite Default screen
The Extended Internet Services Daemon (xinetd)
597
CertPrs8 / RHCE Red Hat Certified Engineer Linux Study Guide / Jang / 222485-1 / Chapter 10
code shows a sample of the /etc/xinetd.d/ntalk configuration file, with this service
disabled:
# default: off
# description: The ntalk server accepts ntalk connections, for chatting \
# with users on different systems.
service ntalk
{
disable = yes
socket_type = dgram
wait = yes
user = nobody
group = tty
server = /usr/sbin/in.ntalkd
}
This is a typical /etc/xinetd.d configuration file. The fields are described in Table 10-4.
This is a versatile configuration file; other fields are described in the man pages for
xinetd.conf. Read this man page; the only_from and no_access fields may be of
particular interest.
CIDR notation is based upon “Classless Inter-Domain Routing.” Under CIDR, you
do not need to specify the full IPv4 subnet address; 192.168.0.0/255.255.255.0
is the same as 192.168.0.0/24. As of this writing, the RHCE exam does not
require any detailed understanding of IPv6 addresses.
Field Description of Field Entry
disable Yes by default, which disables the service
socket_type Specifies the communication stream
wait Yes for single-threaded applications, or No for multithreaded applications
user Account under which the server should run
group Group under which the server should run
server The server program
only_from Host name or IP address allowed to use the server. CIDR notation (e.g. 192.168.0.0/24)
is okay
no_access Host name or IP address not allowed to use the server. CIDR notation is okay
TABLE 10-4 Typical /etc/xinetd.d Configuration Parameters
D:\omh\CertPrs8\485-1\ch10.vp
Wednesday, September 18, 2002 10:26:59 AM
Color profile: Generic CMYK printer profile
Composite Default screen
You have two ways to activate a service. You can edit the configuration file directly
by changing the disable field from no to yes. Then make the xinetd daemon reread
the configuration files with the /sbin/service xinetd reload command.
Alternatively, you can use the /sbin/chkconfig servicename on command, which
automatically makes this change and makes xinetd reread the configuration file.
In some cases, it is possible to limit xinetd-based services by username. One prime
example with an FTP server is the /etc/ftpaccess file, which allows you to restrict (or
expand) user privileges by User ID number or username. As with other default Red
Hat network configuration files, the default /etc/ftpaccess file is instructive. Try it
out with your own users!
Always remember to make sure that a service will be active after a reboot.
The /sbin/chkconfig servicename on command is one way to do this for xinetd
services. Otherwise, anything you configure may not work after your
computer is rebooted.
EXERCISE 10-2
Configuring xinetd
In this exercise, we will enable the Telnet service using xinetd. Attempt to establish a
Telnet session using the command telnet localhost. Telnet is disabled by default in
Red Hat Linux, so your attempt should fail, unless you have already enabled Telnet.
1. Edit /etc/xinetd.d/telnet and change the value of disable from yes to no.
2. Tell xinetd to reread its configuration file using the command:
kill -SIGUSR1 'cat /var/run/xinetd.pid'
3. Try the telnet localhost command again. It should work.
4. Use the /sbin/chkconfig command to disable Telnet. Do you have to restart
or reload xinetd? What happens when you use /sbin/chkconfig to enable
Telnet? Does it change the /etc/xinted.d/telnet configuration file?
598
Chapter 10: Systems Administration and Security
CertPrs8 / RHCE Red Hat Certified Engineer Linux Study Guide / Jang / 222485-1 / Chapter 10
D:\omh\CertPrs8\485-1\ch10.vp
Wednesday, September 18, 2002 10:26:59 AM
Color profile: Generic CMYK printer profile
Composite Default screen
CertPrs8 / RHCE Red Hat Certified Engineer Linux Study Guide / Jang / 222485-1 / Chapter 10
tcp_wrappers and the libwrap Packages
The best way to prevent a cracker from using a service is to remove it completely
from your Linux system. But what if you still need some Extended Internet Services
(xinetd) packages?
You can achieve some measure of security by disabling or removing unused services
in /etc/xinetd.conf. But you need to take other measures to protect yourself against
attacks through enabled services. With xinetd, you have two approaches. You can set
up fields in individual /etc/xinetd.d configuration files to block computers by host
name or IP address. Alternatively, you can set this up for some or all xinetd services
through the /etc/hosts.allow or /etc/hosts.deny file. This system is known as
tcp_wrappers, which is enabled by default.
When xinetd receives a network request for a service, it passes the request on to
tcp_wrappers. This system logs the request and then checks its access rules. If there
are no limits on the particular host or IP address, tcp_wrappers passes control back
to xinetd to start the needed service.
The key files are /etc/hosts.allow and /etc/hosts.deny. The philosophy is fairly
straightforward; clients listed in hosts.allow are allowed access; clients listed in hosts.deny
are denied access. When xinetd receives a request, the tcp_wrappers system takes the
following steps:
1. It searches /etc/hosts.allow. If tcp_wrappers finds a match, it grants access.
2. It searches /etc/hosts.deny. If tcp_wrappers finds a match, it denies access.
3. If the host isn’t found in either file, access is automatically granted to the client.
You use the same access control language in both /etc/hosts.allow and
/etc/hosts.deny to tell tcp_wrappers which clients to allow or deny. The basic
format of the lines in both files is this:
daemon_list : client_list
The simplest version of this format is:
ALL : ALL
This specifies all services managed by xinetd and makes the rule applicable to all
hosts on all IP addresses. If you set this line in /etc/hosts.deny, all access is prohibited
to all services. However, you can create finer filters. For example, the following line:
in.telnetd : 192.168.1.5
The Extended Internet Services Daemon (xinetd)
599
CertPrs8 / RHCE Red Hat Certified Engineer Linux Study Guide / Jang / 222485-1 / Chapter 10
D:\omh\CertPrs8\485-1\ch10.vp
Wednesday, September 18, 2002 10:26:59 AM
Color profile: Generic CMYK printer profile
Composite Default screen
600
Chapter 10: Systems Administration and Security
CertPrs8 / RHCE Red Hat Certified Engineer Linux Study Guide / Jang / 222485-1 / Chapter 10
in /etc/hosts.allow allows the client with an IP address of 192.168.1.5 to connect to
your system through Telnet. The same line in /etc/hosts.deny would prevent the
computer with that IP address from using Telnet to connect to your system. You
can specify clients a number of different ways, as shown in Table 10-5.
As you can see in Table 10-5, there are two different types of wildcards: ALL can
be used to represent any client or service. The dot specifies all hosts with the
specified domain name or IP network address.
You can set up multiple services and addresses with commas. Exceptions are
easy to make with the EXCEPT operator. See the following excerpt from a
/etc/hosts.allow file for an example:
#hosts.allow
ALL :.asafe.dom.com
in.ftpd : 192.168.25.0/255.255.255.0 EXCEPT 192.168.25.73
in.fingerd, in.rshd : 192.168.1.10
The first line in this file is simply a comment. The next line opens ALL xinetd
services to all computers in the .asafe.dom.com domain. The following line opens
FTP to any computer on the 192.168.25.0 network, except the one with an IP
address of 192.168.25.73. Then, the finger and Remote Shell (rsh) services are
opened to the computer with an IP address of 192.168.1.10.
The code that follows contains a hosts.deny file to see how lists can be built to
control access.
#hosts.deny
ALL EXCEPT in.fingerd : .xyz.com
in.telnetd : ALL EXCEPT 192.168.1.10
ALL:ALL
Client Description
.example.com Domain name. Since this domain name begins with a dot, it specifies all
clients on the example.com domain.
172.16. IP address. Since this address ends with a dot, it specifies all clients with
an IP address of 172.16.x.y.
172.16.72.0/255.255.254.0 IP network address with subnet mask. CIDR notation not recognized.
ALL Any client, any daemon.
Applies to the specific user on the given computer.
TABLE 10-5 Address Fields in /etc/hosts.allow or /etc/hosts.deny
D:\omh\CertPrs8\485-1\ch10.vp
Wednesday, September 18, 2002 10:27:00 AM
Color profile: Generic CMYK printer profile
Composite Default screen
The Extended Internet Services Daemon (xinetd)
601
CertPrs8 / RHCE Red Hat Certified Engineer Linux Study Guide / Jang / 222485-1 / Chapter 10
The first line in the hosts.deny file is a comment. The second line denies all services
except finger to computers in the .xyz.com domain. The third line states that the
only computer that is allowed to telnet to us has an IP address of 192.168.1.10.
Finally, the last line is a blanket denial; all other computers are denied access to all
services controlled by tcp_wrappers.
You can also use the twist command in /etc/hosts.allow or /etc/hosts.deny to
access shell commands. For example, take the following line in a /etc/hosts.deny file:
in.telnetd : .crack.org : twist /bin/echo Sorry %c, access denied
This sends a customized error message for Telnet users on the crack.org domain.
Different operators such as %c are described in Table 10-6. Some of these operators
may be able to help you track the intruder.
EXERCISE 10-3
Configuring tcp_wrappers
In this exercise, we will use tcp_wrappers to control access to network resources.
Since tcp_wrappers is enabled by default, you shouldn’t have to make any
modifications to /etc/xinetd.conf.
1. Verify that you can telnet to the system using the address localhost.
2. Edit /etc/hosts.deny and add the following line (don’t forget to write the file):
ALL : ALL
3. What happens when you try to telnet to the address localhost?
4. Edit /etc/hosts.allow and add the following line:
in.telnetd : LOCAL
5. Now what happens when you try to telnet to the address localhost?
6. If you have other systems available to you, try restricting access to the Telnet
service using some of the other tcp_wrappers rules.
7. Undo your changes when finished.
D:\omh\CertPrs8\485-1\ch10.vp
Wednesday, September 18, 2002 10:27:00 AM
Color profile: Generic CMYK printer profile
Composite Default screen
602
Chapter 10: Systems Administration and Security
CertPrs8 / RHCE Red Hat Certified Engineer Linux Study Guide / Jang / 222485-1 / Chapter 10
CERTIFICATION OBJECTIVE 10.06
Firewall Policies
A firewall sits between your company’s internal LAN and an outside network. A
firewall can be configured to examine every network packet that passes into or out
of your LAN. When configured with appropriate rules, it can filter out those packets
that may pose a security risk to your system. To understand how packet filtering
works, you have to understand a little bit about how information is sent across
networks.
Before you send a message over a network, the message is broken down into smaller-
sized units called packets. Administrative information, including the type of data, the
source address, and destination address, is added to each packet. The packets are
reassembled when they reach the destination computer. A firewall examines these
administrative fields in each packet to determine whether to allow the packet to pass.
Red Hat Linux comes with everything you need to configure a system to be a
firewall. Three basic Linux firewall commands are available: ipfwadm, ipchains, and
iptables. The first command, ipfwadm, was associated with Linux kernel 2.0.x and
is now generally obsolete. The ipchains command was developed for Linux kernel
2.2.x and is still in active use, even on Linux distributions based on Linux kernel 2.4.x.
The RHCE exam explicitly requires that you know how to use iptables, which
was developed for Linux kernel 2.4.x. Therefore, this chapter focuses on iptables.
Field Description Field Description
%a Client address %h Client host name
%A Host address %H Server host name
%c Client information %p Process ID
%d Process name %s Server information
TABLE 10-6 tcp_wrappers Operators
D:\omh\CertPrs8\485-1\ch10.vp
Wednesday, September 18, 2002 10:27:00 AM
Color profile: Generic CMYK printer profile
Composite Default screen
Firewall Policies
603
CertPrs8 / RHCE Red Hat Certified Engineer Linux Study Guide / Jang / 222485-1 / Chapter 10
Configuring iptables
The philosophy behind iptables is based on “chains.” These are sets of rules applied
to each network packet. Each rule does two things: it specifies the conditions a
packet must meet to match the rule, and it specifies the action if the packet matches.
Before you can set up iptables commands, you need to make sure that the appropriate
modules are part of your Linux kernel. Check your current rules. Run the
/sbin/iptables -L command to list the current chains. If you see error messages
similar to the following:
iptables: Incompatible with this kernel
you’ll need to upgrade your modules. Use the /sbin/rmmod modulename command
to delete any ipchains-related modules. Then use the /sbin/insmod ip_tables command
to add the iptables kernel module. Now you’re ready to start configuring iptables rules.
The iptables command uses the following basic format:
iptables -t
tabletype
<Action / Direction> <Packet Pattern> -j <What to do>
Now let us analyze this command, step by step. First there is the -t tabletype switch.
There are two basic tabletype options for iptables:
■
filter This sets a rule for filtering packets.
■
nat This sets up Network Address Translation, which is discussed in the
last section of this chapter.
The default is filter; if you don’t specify a -t tabletype, iptables assumes that you’re
trying to affect a filtering rule. Next is the <Action / Direction>. There are four basic
Actions that you can take with an iptables rule:
■
-A ( append) Appends a rule to the end of a chain.
■
-D ( delete) Deletes a rule from a chain. Specify the rule by the number
or the Packet Pattern.
■
-L ( list) Lists the currently configured rules in the chain.
■
-F ( flush) Flushes all of the rules in the current iptables chain.
If you’re appending to (-A) or deleting from (-D) a chain, you’ll want to apply it
to network data traveling in one of three directions:
■
INPUT All incoming packets are checked against the rules in this chain.
D:\omh\CertPrs8\485-1\ch10.vp
Wednesday, September 18, 2002 10:27:00 AM
Color profile: Generic CMYK printer profile
Composite Default screen