Tài liệu Lab 3.2.9 Copying, Editing, and Pasting Configurations doc
Bạn đang xem bản rút gọn của tài liệu. Xem và tải ngay bản đầy đủ của tài liệu tại đây (109 KB, 7 trang )
1 - 7 CCNA 2: Routers and Routing Basics v 3.0 - Lab 3.2.9 Copyright 2003, Cisco Systems, Inc.
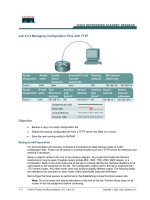
Lab 3.2.9 Copying, Editing, and Pasting Configurations
Router
Designation
Router
Name
FastEthernet 0
Address
Interface
type
Serial 0
Address
Subnet mask
for both
interfaces
Enable
secret
password
Enable/VTY/Console
passwords
Router 1 GAD 172.16.0.1 DCE 172.17.0.1 255.255.0.0 class cisco
Router 2 BHM 172.18.0.1 DTE 172.17.0.2 255.255.0.0 class cisco
Objective
• Demonstrate the capture of the running configuration of a router to an ASCII text file with
HyperTerminal.
• Edit or modify the configuration with a text editor such as Notepad.
• Use the edited text file to configure another router using HyperTerminal.
• Cable a network similar to the one in the previous diagram.
Background/Preparation
The HyperTerminal capture option can be very useful not only for configuration files but for capturing
command output and for documentation. It is a simple way to save whatever is displayed on the
screen of the PC acting as a console to the router.
Any router that meets the interface requirements may be used. Possible routers include 800, 1600,
1700, 2500 and 2600 routers, or a combination. Refer to the chart at the end of the lab to correctly
identify the interface identifiers to be used based on the equipment in the lab. The configuration
output used in this lab is produced from 1721 series routers. Any other router used may produce
slightly different output. The following steps are intended to be executed on each router unless
specifically instructed otherwise.
Start a HyperTerminal session as performed in the Establishing a HyperTerminal session lab.
Note: Go to the erase and reload instructions at the end of this lab. Perform those steps on all
routers in this lab assignment before continuing.
Step 1 Configure the hostname and passwords on the Gadsden router
2 - 7 CCNA 2: Routers and Routing Basics v 3.0 - Lab 3.2.9 Copyright 2003, Cisco Systems, Inc.
a. On the Gadsden router, enter the global configuration mode. Configure the hostname as shown
in the chart. Configure the console, virtual terminal and enable passwords.
Step 2 Configure the interfaces and routing protocol on the Gadsden router
a. Go to the proper command mode and enter the following:
GAD(config)#interface fastethernet 0
GAD(config-if)#ip address 172.16.0.1 255.255.0.0
GAD(config-if)#no shutdown
GAD(config-if)#exit
GADconfig)#interface serial 0
GAD(config-if)#ip address 172.17.0.1 255.255.0.0
GAD(config-if)#clock rate 56000
GAD(config-if)#no shutdown
GAD(config-if)#exit
GAD(config)#router rip
GAD(config-router)#network 172.16.0.0
GAD(config-router)#network 172.17.0.0
GAD(config-router)#exit
GAD(config)#exit
Step 3 Save the Gadsden router configuration
GAD# copy running-config startup-config
Destination filename [startup-config]? [Enter]
Step 4 Configure the hostname and passwords on the Birmingham router
a. On the Birmingham router, enter the global configuration mode. Configure the hostname as
shown in the chart. Configure the console, virtual terminal and enable passwords.
Step 5 Configure the interfaces and routing protocol on the Birmingham router
a. Go to the proper command mode and enter the following:
BHM(config)# interface fastethernet 0
BHM(config-if)# ip address 172.18.0.1 255.255.0.0
BHM(config-if)# no shutdown
BHM(config-if)# exit
BHMconfig)# interface serial 0
BHM(config-if)# ip address 172.17.0.2 255.255.0.0
BHM(config-if)# no shutdown
BHM(config-if)# exit
BHM(config)# router rip
BHM(config-router)# network 172.17.0.0
BHM(config-router)# network 172.18.0.0
BHM(config-router)# exit
BHM(config)# exit
Step 6 Save the Birmingham router configuration
BHM# copy running-config startup-config
Destination filename [startup-config]? Enter
Step 7 Verify that the internetwork is functioning
3 - 7 CCNA 2: Routers and Routing Basics v 3.0 - Lab 3.2.9 Copyright 2003, Cisco Systems, Inc.
ping the FastEthernet interface of the other router.
a. From GAD, can the BHM router FastEthernet interface be reached?
_____________________
b. From BHM, can the GAD router FastEthernet interface be reached?
____________________
c. If the answer is no for either question, troubleshoot the router configurations to find the error.
Then do the pings again until the answer to both questions is yes.
Step 8 Start capturing the configuration file
a. Start the process of copying the router configuration to a text file.
Use HyperTerminal to capture all text displayed on its screen to a text file.
In HyperTerminal click on Transfer.
Capture Text.
Specify the name of the router for the filename and use .txt for the extension the capture text
to be saved on A drive.
Click on Start button to start capturing text.
b. Write down the name and location of this file:
__________________________________________________________________________
c. Enter the show running-config command. Press the space bar when the "-More -" prompt
appears. The show running-config command is used to display the active configuration file
for the router that is stored in RAM.
Step 9 Stop capturing the configuration file
a. To discontinue capturing the output of the router configuration to a text file:
On the HyperTerminal menu bar select Transfer > Capture text > Stop.
Step 10 Clean up captured configuration file
a. The captured text file will have information not required for configuring a router. For example, the
"- More -" prompts are not required for configuring a router. To make put this in a form to be
“pasted” back in the router, remove any unnecessary information from the captured
configuration.
b. To add comments into the configuration to explain its various parts, use the exclamation mark
"!". The router will ignore any comment in a router configuration that starts with an exclamation
mark. Therefore, write any kind of comment that helps to understand the configuration.
c. Start Notepad. From the Windows Desktop select:
Start
Run
Type Notepad
Press the Enter key
d. In Notepad click on:
File/Open
Find the file made and select it.
Click Open
e. Delete the lines that contain:
Show running-config
Building configuration
Current configuration:
- More -
Lines that appear after the word "End"
4 - 7 CCNA 2: Routers and Routing Basics v 3.0 - Lab 3.2.9 Copyright 2003, Cisco Systems, Inc.
f. At the end of each of the interface sections add:
No Shutdown
Example:
interface Serial 0
ip address 199.6.13.1 255.255.255.0
no shutdown
Note:
g. The last line to edit is the:
enable secret 5 $1$prts$Rbf8hxlss.ZrufvI7rMVy/
change this to:
enable secret class
This password must be entered in clear text or the encryption algorithm will re-encrypt the current
password. Then entry from the user prompt will be impossible.
h. Save the clean version of the configuration by clicking on File/Save and exit Notepad.
Step 11 Test the backup configuration
a. Any form of backup that has not been tested could be a liability in a failure situation. This
includes backup configurations. The backup configuration must be tested. The test should be
scheduled during low network usage periods as the router will have to be taken off line. All users
that may be affected should be notified well in advance to ensure that the down time will not be
an inconvenience.
b. Before testing the backup configuration, erase the startup configuration. From the HyperTerminal
session, enter the command erase startup-config at the enable router prompt. This
deletes the configuration file from NVRAM.
Confirm that startup configuration has been deleted. Enter show startup-config at the router
prompt.
c. What does the router show after this command is entered?
__________________________________________________________________________
Step 12 Restart the router to remove the running configuration
a. Enter reload at the privileged exec mode prompt to reboot the router.
When asked to proceed with the reload, enter Y and press the Enter key.
If prompted that the configuration has changed, confirm that the configuration should not be
saved.
When the router restarts, note that the router displays the message:
"Notice: NVRAM invalid, possibly due to write erase."
When prompted to enter the initial configuration dialog, type N and press Enter.
When prompted to terminate autoinstall type Y and press Enter.
Press Enter again.
b. What does the prompt look like?
__________________________________________________________________________
5 - 7 CCNA 2: Routers and Routing Basics v 3.0 - Lab 3.2.9 Copyright 2003, Cisco Systems, Inc.
Step 13 Reconfigure the router from the saved text file
a. Use the send file command in HyperTerminal to restore the new configuration. The edited
version of the router configuration file from previous step will be copied into the area of memory
known as the clipboard.
b. In HyperTerminal, change to Privileged EXEC mode.
c. Why was a password not required?
__________________________________________________________________________
d. Enter global config mode:
Enter the command configure terminal.
Click on Transfer/Send Text File.
Select the file.
Each line in the text file will be entered.
Observe for any errors.
e. What is the most obvious indication that the router has been restored?
__________________________________________________________________________
Press Ctrl z key while pressing the Z key momentarily to exit global configuration mode.
f. Save new configuration file as the startup configuration (in NVRAM)
Use the command copy running-config startup-config to save the newly created router
configuration. This is abbreviated copy run start. This copies the active router configuration
from RAM into NVRAM.
Verify that the running configuration is correct by using the show running-config
command. This is abbreviated show run.
Enter the command copy start run at the router prompt.
Step 14 Verify that the internetwork is functioning again
ping the FastEthernet interface of the other router.
a. Use the command reload command to restart the router. Verify that the new configuration has
been saved to NVRAM by restarting the router.
b. Enter the command reload.
When prompted to confirm, press Y. This will restart the router.
Once the router restarts, press the Enter key again.
c. From GAD, can the BHM FastEthernet interface be pinged?
_____________________
d. From BHM, can the GAD FastEthernet interface be pinged?
_____________________
e. If the answer is no for either question, troubleshoot the router configurations to find the error.
Then perform the pings again until the answer to both questions is yes.
Upon completion of the previous steps, logoff by typing exit. Turn the router off.
6 - 7 CCNA 2: Routers and Routing Basics v 3.0 - Lab 3.2.9 Copyright 2003, Cisco Systems, Inc.
Erasing and reloading the router
Enter into the privileged exec mode by typing enable.
If prompted for a password, enter class. If “class” does not work, ask the instructor for assistance.
Router>enable
At the privileged exec mode enter the command erase startup-config.
Router#erase startup-config
The responding line prompt will be:
Erasing the nvram filesystem will remove all files! Continue?
[confirm]
Press Enter to confirm.
The response should be:
Erase of nvram: complete
Now at the privileged exec mode enter the command reload.
Router(config)#reload
The responding line prompt will be:
System configuration has been modified. Save? [yes/no]:
Type n and then Enter.
The responding line prompt will be:
Proceed with reload? [confirm]
Press Enter to confirm.
In the first line of the response will be:
Reload requested by console.
After the router has reloaded the line prompt will be:
Would you like to enter the initial configuration dialog? [yes/no]:
Type n and then Enter.
The responding line prompt will be:
Press RETURN to get started!
Press Enter.
The router is ready for the assigned lab to be performed.
7 - 7 CCNA 2: Routers and Routing Basics v 3.0 - Lab 3.2.9 Copyright 2003, Cisco Systems, Inc.
Router Interface Summary
Router
Model
Ethernet
Interface #1
Ethernet
Interface #2
Serial
Interface #1
Serial
Interface #2
Interface
#5
800 (806) Ethernet 0 (E0) Ethernet 1 (E1)
1600 Ethernet 0 (E0) Ethernet 1 (E1) Serial 0 (S0) Serial 1 (S1)
1700 FastEthernet 0 (FA0) FastEthernet 1 (FA1) Serial 0 (S0) Serial 1 (S1)
2500 Ethernet 0 (E0) Ethernet 1 (E1) Serial 0 (S0) Serial 1 (S1)
2600 FastEthernet 0/0
(FA0/0)
FastEthernet 0/1 (FA0/1) Serial 0/0 (S0/0) Serial 0/1
(S0/1)
In order to find out exactly how the router is configured, look at the interfaces. This will identify the type of router
as well as how many interfaces the router has. There is no way to effectively list all of the combinations of
configurations for each router class. What is provided are the identifiers for the possible combinations of interfaces
in the device. This interface chart does not include any other type of interface even though a specific router may
contain one. An example of this might be an ISDN BRI interface. The string in parenthesis is the legal abbreviation
that can be used in IOS command to represent the interface.