Tài liệu CATIA V5 Structural Analysis for the Designer P1 pptx
Bạn đang xem bản rút gọn của tài liệu. Xem và tải ngay bản đầy đủ của tài liệu tại đây (3.33 MB, 30 trang )
MSC.Software Corporation
2 MacArthur Place
Santa Ana, CA 92707, USA
Tel: (714) 540-8900
Fax: (714) 784-4056
Web:
CATIA V5 Structural Analysis for the Designer
March 2002
CAT509 Workshops
Part Number: DAS*V2002*Z*Z*Z*SM-CAT509-WBK
United States
MSC.Patran Support
Tel: 1-800-732-7284
Fax: (714) 979-2990
Tokyo, Japan
Tel: 81-3-3505-0266
Fax: 81-3-3505-0914
Munich, Germany
Tel: (+49)-89-43 19 87 0
Fax: (+49)-89-43 61 716
DISCLAIMER
MSC.Software Corporation reserves the right to make changes in specifications and other information contained in this
document without prior notice.
The concepts, methods, and examples presented in this text are for illustrative and educational purposes only, and are not
intended to be exhaustive or to apply to any particular engineering problem or design. MSC.Software Corporation assumes
no liability or responsibility to any person or company for direct or indirect damages resulting from the use of any
information contained herein.
User Documentation: Copyright© 2002 MSC.Software Corporation. Printed in U.S.A. All Rights Reserved.
This notice shall be marked on any reproduction of this documentation, in whole or in part. Any reproduction or distribution
of this document, in whole or in part, without the prior written consent of MSC.Software Corporation is prohibited.
MSC and MSC. are registered trademarks and service marks of MSC.Software Corporation. NASTRAN is a registered
trademark of the National Aeronautics and Space Administration. MSC.Nastran is an enhanced proprietary version
developed and maintained by MSC.Software Corporation. MSC.Patran is a trademark of MSC.Software Corporation.
All other trademarks are the property of their respective owners.
TABLE OF CONTENTS
Workshop Page
1 FEM Review ……………………………………………………… …………………………………….1-3
2 Foot Peg ……………………………………………………………………………………………………… 2-3
3 Bicycle Pedal Static Analysis………………………………………….……………………………………. 3-3
4 Bicycle Pedal Mesh Refinement and Adaptivity…………………………………………………………. 4-3
5 Crank Analysis Using Virtual Parts……………………………………………………………………… 5-3
6 Rear Rack (Modal) Analysis……………………………………………………………………………… 6-3
7 Seat Post Assembly Analysis……………………………………………………………………………… 7-3
8 Rectangular Section Cantilever Beam…………………………………………………………………… 8-3
8b Z-Section Cantilever Beam………………………………………………………………………………… 8b-3
9 Stress Concentration for a Stepped Flat Tension Bar………………………………………………… 9-3
9b Torsion of a Shaft with a Shoulder Fillet………………………………………………………………… 9b-3
10 Annular Plate………………………………………………………………………………………………… 10-3
10b Rectangular Plate Small Concentric Circle Load……………………………………………………… 10b-3
11 Press Fit………………………………………………………………………………………………………….11-3
12 Flat Plate Column Buckling ………………………………………………………………………… ……. 12-3
13 Bicycle Fender Surface Meshing………………………………………………………………………… 13-3
14 Knowledgeware………………………………………………………………………………… ………….… 14-3
WORKSHOP 1
FEM REVIEW
CAT509, Workshop 1, March 2002
WS1-2
CAT509, Workshop 1, March 2002
WS1-3
CAT509, Workshop 1, March 2002
Quiz yourself on the FEM:
1. How can preliminary structural analysis improve the design process?
2. Briefly describe the Finite Element Method (FEM).
3. Simple pieces that represent a more complex structure are called
___________ ___________ .
4. The simple pieces mentioned above are connected together at
___________ .
5. The assembly of #3 and #4 is called a __________ __________
___________ .
WORKSHOP 1 – FEM REVIEW
WS1-4
CAT509, Workshop 1, March 2002
Quiz yourself on FEA:
1. What are the six main steps in pre-processing a finite element
analysis (FEA)?
2. Name a load type that would be applied in FEA.
3. Name a constraint (restraint) type that would be applied in FEA.
4. What step in FEA comes between pre- and post-processing?
5. What are the two main steps in FEA post-processing?
6. How are FEA results displayed?
WORKSHOP 1 – FEM REVIEW
WS1-5
CAT509, Workshop 1, March 2002
Quiz yourself on CATIA structural analysis:
1. What are the 3 types of analysis supported by the CATIA structural
analysis tools?
2. Write the name or sketch at least one linear and one parabolic
element supported by the CATIA structural analysis tools.
3. What is the name of your instructor? (extra credit)
WORKSHOP 1 – FEM REVIEW
WS1-6
CAT509, Workshop 1, March 2002
WS2-1
WORKSHOP 2
FOOT PEG
CAT509, Workshop 2, March 2002
WS2-2
CAT509, Workshop 2, March 2002
WS2-3
CAT509, Workshop 2, March 2002
Problem Description
A new All Terrain Vehicle (ATV) is being designed to carry two
people – a driver and a passenger. An area of concern is the Foot
Peg for the passenger on the ATV. The Foot Peg needs to be small
due to limited space on the ATV yet able to handle the force of the
passenger during the ride.
Analyze the Foot Peg as an aluminum part in the preliminary
design phase to check for part failure in a static condition.
WORKSHOP 2 - FOOT PEG
WS2-4
CAT509, Workshop 2, March 2002
Suggested Exercise Steps
1. Open the existing CATIA part in the Part Design workbench.
2. Apply aluminum material properties to the part.
3. Create a new CATIA analysis document (.CATAnalysis).
4. Apply the restraint condition.
5. Apply the load condition.
6. Compute the analysis.
7. Visualize the analysis results.
8. Save the analysis document.
WORKSHOP 2 - FOOT PEG
WS2-5
CAT509, Workshop 2, March 2002
Open the Foot Peg
part in the Part Design
workbench.
Steps:
1. Select File and
Open… from the top
pull-down menu.
2. Access the class
workshop directory
using the typical
Windows interface.
3. Open the
ws2footpeg.CATPart
by double-clicking.
By default, the Foot
Peg and any other
CATPart document is
opened in Part Design
workbench.
Step 1. Open the part
1
2
3
WS2-6
CAT509, Workshop 2, March 2002
Material properties
must be applied prior
to analysis.
Steps:
1. Click the Apply
Material icon.
2. Select the part.
3. Activate the Metal
tab in the Library
window.
4. Select Aluminum.
5. Click Apply Material
button…OK.
1
2
5
3
4
Step 2. Apply material properties
WS2-7
CAT509, Workshop 2, March 2002
Apply the customized
render mode to view
the Aluminum material
display.
Steps:
1. Click the
Customized View
Parameters
icon.
2. If material display is
not seen, select
Customize View under
Render Style from the
View pull-down menu.
3. Activate the
Materials box in the
Custom View Modes
definition window.
4. Click OK.
Step 2. Apply material properties
1
2
Material property seen
in the specification tree
2
3
4
WS2-8
CAT509, Workshop 2, March 2002
Create a CATAnalysis
document that will
contain the information
for our static analysis
of the Foot Peg.
Steps:
1. Select the GSA
workbench from the
Start menu.
2. Highlight the Static
Analysis case.
3. Click OK.
The new CATAnalysis
document is now
active in the GSA
workbench.
2
3
Step 3. Create analysis document
1
WS2-9
CAT509, Workshop 2, March 2002
Apply a clamp restraint
to the rear face of the
Foot Peg to represent
clamping (no motion)
of the part at that face.
Steps:
1. Select the clamp
icon from the GSA
workbench.
2. Be sure Supports
field is highlighted.
3. Select geometry to
clamp (rear face).
4. Click OK.
1
Step 4. Apply restraint condition
2
4
3
WS2-10
CAT509, Workshop 2, March 2002
The clamp restraint is
created and seen in
the specification tree.
Symbols appear on
the part showing the
clamp restraint applied
to the rear surface of
the Foot Peg.
Clamp symbols
Clamp created
Step 4. Apply restraint condition
WS2-11
CAT509, Workshop 2, March 2002
Apply a force load of
550lbf to the Foot Peg
top face in a direction
normal to the face
pushing downward.
Steps:
1. Select the force icon
from the GSA
workbench.
2. Drag and drop the
compass on to the top
face to establish an
axis system normal to
the face.
3. The top face is
highlighted and force
vectors shown.
4. Key in value -550lbf
for the Z vector…OK.
Step 5. Apply load condition
1
2
3
4
WS2-12
CAT509, Workshop 2, March 2002
The force load is
created and seen in
the specification tree.
The force load is
applied to the top face
in a downward
direction as shown by
the vector arrows.
Hint: Drag and drop
the compass back to
its normal position
away from the part
after use.
Force created
Force direction arrows
Step 5. Apply load condition
WS2-13
CAT509, Workshop 2, March 2002
After restraint and load
conditions are applied,
the analysis can be
computed.
Steps:
1. Select the Compute
icon.
2. Specify that All
parameters should be
used in the calculation.
3. Verify that the
Preview box is not
checked.
4. Click OK.
Step 6. Compute the analysis
4
2
1
3
WS2-14
CAT509, Workshop 2, March 2002
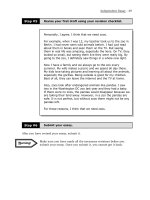
To visualize results,
select the desired
image. In this case,
we want to see the
Von Mises stress.
Steps:
1. Select the Von
Mises stress image
icon.
2. Verify that the
Customized View
Parameters
icon is active.
The Von Mises stress
image is displayed
with color palette when
the custom view mode
is active.
Von Mises stress
image and palette
Image created
Step 7. Visualize analysis results
1
2
WS2-15
CAT509, Workshop 2, March 2002
For detailed results,
query the maximum
Von Mises stress
values for the analysis.
Steps:
1. Select the
Informations
icon.
2. Select the Von
Mises stress image if
necessary.
The information
window shows the
minimum and
maximum Von Mises
stress values as well
as the material yield
strength of aluminum.
From this initial
analysis the
part will not fail
Max Von Mises
stress is lower
than material
yield strength
Step 7. Visualize analysis results
1
2