Tài liệu Creating Applications with Mozilla-Chapter 2. Getting Started- P2 pptx
Bạn đang xem bản rút gọn của tài liệu. Xem và tải ngay bản đầy đủ của tài liệu tại đây (38.85 KB, 7 trang )
Chapter 2. Getting Started- P2
2.3. Making Mozilla Work for You
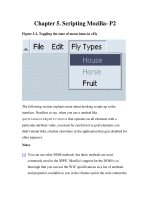
The second "Hello World" sample, shown in Example 2-4
, adds some
important application features and begins to take advantage of the resources
that Mozilla provides for you. This section goes over the ways you can
import stylesheets and Mozilla scripts to make your XUL more sophisticated
and modular. It also prepares you to make an actual application.
You can see this example in action by saving the code in Example 2-4
to a
file, hello2.xul, and then launching Mozilla and selecting File > Open
File from the browser. This displays the example as content in the Mozilla
browser, as shown in Figure 2-2
.
Example 2-4. Sample XUL window
<?xml version="1.0"?>
<?xml-stylesheet href="chrome://global/skin"
type="text/css"?>
<!DOCTYPE window>
<window title="Hello xFly"
xmlns:html="
xmlns=" />there.is.only.xul"
style="background-color: white;"
width="300"
height="215"
onload="centerWindowOnScreen( )">
<script type="application/x-javascript"
src="chrome://global/content/dialogOverlay.js" />
<vbox align="left">
<label style="font-weight: bold;"
value="Hello, Welcome to the xFly" />
<image src=" />
<button label="hello xFly"
oncommand="alert('Hello World');" />
</vbox>
</window>
The difference between Example 2-4
and the first example is the addition of
new elements, including the script element that brings in Mozilla
JavaScript functions for use, additional box layout properties, inline style
rules and processing instructions to import stylesheets, and the DOCTYPE
declaration, which we describe later in this chapter in the section Section
2.5.5.3.
These extras make your XUL file work more like an application by giving
you access to services and features that already exist in Mozilla. They can
also help you organize your own work into reusable parts, such as
application stylesheets, widgets, and script libraries, as described later in this
chapter in the section Section 2.5
.
Figure 2-2. The second Hello xFly example loaded in the browser
2.3.1. Importing Resources from Mozilla
The code in Example 2-4
uses scripts and styles that are already defined in
Mozilla. As you'll see in examples in this book and in the Mozilla source
code, the global.css stylesheet is where many basic styles are defined
for XUL widgets. Most XUL widgets have some inherent style, as you can
see in Example 2-1
, where the button has a button-like look without any
explicit style rules or stylesheet imports.
As the XPFE has evolved, XUL widgets have used XBL internally to define
some of these inherent looks and behaviors, which has taken some of the
responsibility away from global.css and other CSS files. But this
stylesheet still contains important rules for displaying basic XUL widgets.
It's usually a good idea to import this main stylesheet into your application,
as described here, and see what it gets you in terms of presentation. If you
load Example 2-4
with and without the global.css line, you can see the
way that the rules in the stylesheet provide styles for the widgets in the
XUL.
Similarly, scripts like globalOverlay.js, tasksOverlay.js, and
dialogOverlay.js, imported in Example 2-4
, provide basic functions
you can use in your applications.
2.3.1.1. Loading stylesheets
In the second line of Example 2-4
, the stylesheet declaration uses a
chrome:// URL to refer to and load the global.css file. The style
rules in that file give the button widget its "widgetness." You can use the
stylesheet processing instruction to load Mozilla stylesheets like
global.css, navigator.css, and toolbar.css, or you can use it
to load your own application stylesheet. In both cases, the chrome://
URL allows you to refer to packaged files in a flexible way.
<! import the navigator.css stylesheet
from the Mozilla navigator component >
<?xml-stylesheet href="chrome://navigator/skin"
type="text/css"?>
<! import xfly.css stylesheet from the xFly
package >
<?xml-stylesheet href="chrome://xfly/skin"
type="text/css"?>
Also note the use of an inline style in Example 2-4
. The style property on
the label widget gives you a place to define CSS rules directly on widgets.
In this case, the label is given a bold font so that it shows up better in the
window. You could also define this style rule in an external stylesheet and
make that stylesheet part of the package for your application, as we do later
in this chapter in the section Section 2.5.5
.
2.3.1.2. Accessing script in XUL
To access a script in XUL, use the script element and a URL value for its
src attribute:
<script type="application/x-javascript"
src="chrome://xfly/content/xfly.js" />
The dialogOverlay.js script imported into your XUL file in Example
2-4 provides access to the CenterWindowOnScreen( ) function. This
function is made available to your XUL file with the line:
<script type="application/x-javascript"
src="chrome://global/content/dialogOverlay.js" />
All functions in dialogOverlay.js are imported into the scope of the
XUL file and can be called directly, as CenterWindowOnScreen( ) is
in the onload event handler for the XUL window. Note that the functions
contained in an imported JavaScript file are not broadcast in any particular
way (though you can see them if you use the JavaScript Debugger). You
may need to look around in the source code or see how other applications
import files to find the functions you need, but the routines you want to use
in your application code are probably already available in Mozilla.[1]
Notes
[1]
Unfortunately, no good reference exists for the functions defined in the
various scripts files you can import. The functions and their locations
within the files continue to change, so finding and using the right ones is
sometimes a matter of luck, sometimes a matter of whom you know, and
often a matter of testing, determination, and patience.
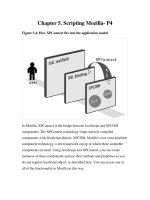
2.4. Displaying XUL Files as Chrome
Figure 2-2
shows the XUL file in Example 2-4 loaded into the browser's
main content area. The example features a label widget and an image,
both situated within a vbox that lays them out properly in the available
space. These widgets make up the chrome of your application, the Mozilla
user interface that can refer to itself and its resources with the special
chrome:// URL.
This example is starting to show off some of the nice features of XPFE
programming, but it still isn't an application yet. Among other things, you
probably don't want your code to live inside the browser window forever. As
it grows, you may also want to divide it into sensible parts a XUL file, a
separate stylesheet, and a script file, for example. The rest of this chapter
explains how to organize and package the code in Example 2-4
and launch it
as a standalone window by using the -chrome option when launching
Mozilla.
Launching a XUL file by using the chrome switch requires that you register
your application in the chrome registry so that Mozilla sees and recognizes
it. The Section 2.5.6
section later in this chapter provides more information
about the chrome environment and how to register this sample application.
Although this example hasn't been registered yet, we want to give you a
preview of what it will look like when launched in a standalone window so
you can compare it with how the same XUL file looks when loaded into the
browser window. When you do launch the example by using the -chrome
option (as described later in this chapter in the section Section 2.6
), you will
see the window displayed in Figure 2-3
.
Figure 2-3. The second Hello xFly example launched in its own window
Using the -chrome option tells Mozilla to display the specified file (in this
case, the code from Example 2-4
) as a standalone application rather than as
content within a browser window. The file itself is the same regardless of
how it is loaded, but the results differ depending on what you tell Mozilla to
do with the file.
Displaying a XUL file in its own chrome window makes it more
independent and breaks the link to the browser content area that is present
when you use the File > Open File method. Launching standalone
windows, accompanied by the JavaScript window.openDialog function
explained later in this chapter, opens up much more flexible window display
options for your application.