Tài liệu Excel 2010 part 1 docx
Bạn đang xem bản rút gọn của tài liệu. Xem và tải ngay bản đầy đủ của tài liệu tại đây (733.48 KB, 8 trang )
Chapter
Chapter
1
1
1
Working
with Excel
You use Microsoft Excel to create
spreadsheets, which are
documents that enable you to
manipulate numbers and
formulas to quickly create
powerful mathematical, financial,
and statistical models. In this
chapter you learn about Excel
and you find out the kinds of
tasks you can perform with Excel.
You also learn how to start the
program, and you take a tour of
the program’s major features.
This chapter also shows you how
to work with Excel Ribbon and
the Ribbon’s galleries, how to
customize the Ribbon and the
Quick Access Toolbar, how to
work with smart tags, and how
to customize the view and other
aspects of the program.
03_577639-ch01.indd 203_577639-ch01.indd 2 3/15/10 2:35 PM3/15/10 2:35 PM
Chapter
1
1
Getting to Know Excel . . . . . . . . . . . . . . . . . . . . . . . . . . . 4
Start Excel . . . . . . . . . . . . . . . . . . . . . . . . . . . . . . . . . . 6
Tour the Excel Window . . . . . . . . . . . . . . . . . . . . . . . . . . 8
Work with Excel’s Ribbon . . . . . . . . . . . . . . . . . . . . . . . . 9
Work with Excel’s Galleries . . . . . . . . . . . . . . . . . . . . . . . 10
Customize the Quick Access Toolbar . . . . . . . . . . . . . . . . . 12
Customize the Ribbon . . . . . . . . . . . . . . . . . . . . . . . . . . 14
Work with Smart Tags . . . . . . . . . . . . . . . . . . . . . . . . . . 16
Change the View . . . . . . . . . . . . . . . . . . . . . . . . . . . . . 18
Configure Excel Options . . . . . . . . . . . . . . . . . . . . . . . . . 20
03_577639-ch01.indd 303_577639-ch01.indd 3 3/15/10 2:35 PM3/15/10 2:35 PM
4
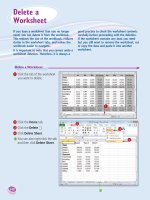
Add Data
You can insert text, numbers, and other characters into any cell in
the spreadsheet. Click the cell that you want to work with and then
type your data in the Formula bar. This is the large text box above
the column letters. Your typing appears in the cell that you selected.
When you are done, press Enter. To edit existing cell data, click the
cell and then edit the text in the Formula bar.
Getting to
Know Excel
Working with Excel involves two basic tasks:
building a spreadsheet and then manipulating
the data on the spreadsheet. Building a
spreadsheet involves adding data, formulas, and
functions. Manipulating data involves calculating
totals, working with series, creating tables for
your data, and visualizing data in charts.
This section just gives you an overview of these
tasks. You learn about each task in greater
detail as you work through the book.
Build a Spreadsheet
Add a Formula
A formula is a collection of numbers, cell addresses, and
mathematical operators that performs a calculation. In
Excel, you enter a formula in a cell by typing an equal
sign (=) and then the formula text. For example, the
formula =B1-B2 subtracts the value in cell B2 from the
value in cell B1.
Add a Function
A function is a predefined formula that performs a specific task.
For example, the AVERAGE function calculates the average of
a list of numbers, and the PMT function calculates a loan or
mortgage payment. You can use functions on their own,
preceded by =, or as part of a larger formula. Click Insert
Function (
) to see a list of the available functions.
03_577639-ch01.indd 403_577639-ch01.indd 4 3/15/10 2:35 PM3/15/10 2:35 PM
5
Working with Excel
CHAPTER
1
Manipulate Data
Calculate Totals Quickly
If you just need a quick sum of a list of
numbers, click a cell below the numbers and
then click the Sum button (
), which is
available in the Home tab of Excel’s Ribbon.
In Excel, you can also select the cells that you
want to sum, and their total appears in the
status bar.
Fill a Series
Excel enables you to save time by completing a
series of values automatically. For example, if
you need to enter the numbers 1 to 100 in
consecutive cells, you can enter just the first few
numbers, select the cells, and then click and
drag the lower right corner to fill in the rest of
the numbers. Most programs also fill in dates,
as well as the names for weekdays and months.
Manage Tables
The row-and-column format of a spreadsheet
makes the program suitable for simple
databases called tables. Each column becomes
a field in the table, and each row is a record.
You can sort the records, filter the records to
show only certain values, and add subtotals.
Add a Chart
A chart is a graphic representation of spreadsheet
data. As the data in the spreadsheet changes, the
chart also changes to reflect the new numbers.
Excel offers a wide variety of charts, including
bar charts, line charts, and pie charts.
03_577639-ch01.indd 503_577639-ch01.indd 5 3/15/10 2:35 PM3/15/10 2:35 PM
6
22
11
33
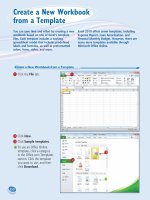
The App Programs menu
appears.
3 Click Microsoft Office.
1 Click Start.
The Start menu appears.
2 Click All Programs.
Start Excel
Before you can perform tasks such as adding
data and building formulas, you must first start
Excel. This brings the Excel window onto the
Windows desktop, and you can then begin
using the program. This task and the rest of
the book assume that you have already
installed Excel 2010 on your computer.
When you have finished your work with Excel,
you should shut down the program. This
reduces clutter on the desktop and in the
taskbar, and it also conserves memory and
other system resources.
Start
Excel
03_577639-ch01.indd 603_577639-ch01.indd 6 3/15/10 2:35 PM3/15/10 2:35 PM
7
Working with Excel
CHAPTER
1
44
Are there faster methods I can use to start Excel?
Yes. After you have used Excel a few times, it should appear on the main Start
menu in the list of your most-used programs. If so, you can click that icon to start
the program. You can also force the Excel icon onto the Start menu by following
Steps 1 to 3, right-clicking the Microsoft Excel 2010 icon, and then clicking Pin
to Start Menu. If you are using Windows 7, you can also click Pin to Taskbar
to add the Excel icon to the taskbar.
The Microsoft Excel window
appears on the desktop.
Note: When you are finished
with Excel, close the program by
clicking the File tab and then
clicking Exit.
The Microsoft Office menu
appears.
4 Click Microsoft Excel 2010.
03_577639-ch01.indd 703_577639-ch01.indd 7 3/15/10 2:35 PM3/15/10 2:35 PM
8
To get up to speed quickly with Excel, it helps
to understand the various elements of the
Excel window. These include standard window
elements such as the title bar and status bar,
as well as Office-specific elements such as the
Ribbon and the File tab.
Tour the
Excel Window
Title Bar
The title bar displays the name of the current
workbook.
Quick Access Toolbar
This area gives you one-click access to a few often-
used features. To learn how to customize this
toolbar, see “Customize the Quick Access Toolbar.”
Workbook Window
Controls
You use these controls to
minimize, maximize, restore,
and close the current workbook
window.
File Tab
Click this tab to access file-related
commands, such as Save and
Open.
Worksheet
This area displays the current
worksheet, and it is where you
will do most of your Excel work.
Status Bar
This area displays messages about
Excel’s current status, the results
of certain operations, and other
information.
Ribbon
This area gives you
access to all of Excel’s
commands, options,
and features. To learn
how to use this
element, see “Work
with Excel’s Ribbon.”
Excel Window
Controls
You use these controls
to minimize, maximize,
restore, and close
Excel’s application
window.
03_577639-ch01.indd 803_577639-ch01.indd 8 3/15/10 2:35 PM3/15/10 2:35 PM
9
CHAPTER
1
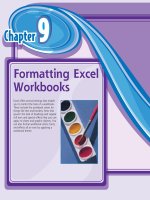
Excel displays the controls in
the tab.
•
Each tab is organized into
groups of related controls, and
the group names appear here.
•
In many groups you can click
the dialog box launcher button
(
) to display a dialog box
that contains group settings.
2 Click the control for the feature.
•
If the control displays a list of
options, click the option you
want.
Excel runs the command or
sets the option.
Work with
Excel’s Ribbon
You use Excel’s Ribbon element to access all of
the program’s features and commands. The
Ribbon is the horizontal strip that runs across
the top of the Excel window, just below the
title bar. The Ribbon is organized into various
tabs, such as File, Home, and Insert, and each
tab contains related controls, which usually
include buttons, lists, and check boxes. There
is no menu bar in Excel, so you do not use
pull-down menus to access commands.
Work with Excel’s Ribbon
1 Click the tab that contains
the Excel feature you want to
work with.
22
11
03_577639-ch01.indd 903_577639-ch01.indd 9 3/15/10 2:35 PM3/15/10 2:35 PM