Tài liệu Windows 7 Resource Kit- P18 ppt
Bạn đang xem bản rút gọn của tài liệu. Xem và tải ngay bản đầy đủ của tài liệu tại đây (931.64 KB, 50 trang )
Managing Client-Side Printer Experience Using Group Policy CHAPTER 18
803
print processor mismatch, the client spooler will always send jobs to the print server for
rendering. Disabling the preceding policy setting does not override this behavior.
n
In cases in which the client print driver does not match the server print driver (mis-
matched connection), the client will always process the print job regardless of the
setting of this policy.
Configuring Package Point and Print Restrictions
Windows XP SP1 and Windows Server 2003 introduced the following Group Policy setting:
User Configuration\Policies\Administrative Templates\Control Panel\Printers\Point And Print
Restrictions
This policy setting controls the servers to which a client computer can connect for Point
and Print. A new feature of this policy setting for Windows 7 and Windows Vista is the ability
to control the behavior of UAC prompts when installing printer drivers on Windows Vista
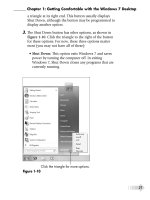
computers using Point and Print (see Figure 18-8). This policy setting applies only to non–
Print Administrators clients and only to computers that are members of a domain.
FIGURE 18-8 Controlling the behavior of security prompts using the Point And Print Restrictions policy
setting when installing printers using Point and Print
When you enable the policy setting, the client is restricted to only Point and Print to a list
of explicitly named servers. You can configure Windows 7 and Windows Vista clients to not
show security warnings or elevation prompts when users Point and Print or when drivers for
printer connections need to be updated.
Please purchase PDF Split-Merge on www.verypdf.com to remove this watermark.
CHAPTER 18 Managing Printing
804
If you do not configure the policy setting:
n
Windows XP and Windows Server 2003 client computers can point and print to any
server in their forest.
n
Windows Vista and later client computers can point and print to any server.
n
Windows Vista and later computers will show a warning and an elevation prompt when
users point and print to any server.
n
Windows Vista and later computers will show a warning and an elevation prompt when
a driver for an existing printer connection needs to be updated.
If you disable the policy setting:
n
Windows XP and Windows Server 2003 client computers can point and print to any
server.
n
Windows Vista and later client computers can point and print to any server.
n
Windows Vista and later computers will not show a warning or an elevation prompt
when users point and print to any server.
n
Windows Vista and later computers will not show a warning or an elevation prompt
when a driver for an existing printer connection needs to be updated.
Note that the Users Can Only Point And Print To Machines In Their Forest setting applies
only to Windows XP SP1 (and later service packs) and Windows Server 2003.
In addition to this updated Point And Print Restrictions policy setting, Windows 7 and
Windows Vista include two new policy settings related to Point and Print:
n
Only Use Package Point And Print This policy restricts clients’ computers to use
Package Point and Print only. If you enable this setting, users will only be able to point
and print to printers that use package-aware drivers. When using Package Point and
Print, client computers will check the driver signature of all drivers that are downloaded
from print servers. If you disable or don’t configure this setting, users will not be
restricted to Package Point and Print only.
n
Package Point And Print – Approved Servers Restricts Package Point and Print
to approved servers. If you enable this setting, users will only be able to use Package
Point and Print on print servers approved by the network administrator. When using
Package Point and Print, client computers will check the driver signature of all drivers
that are downloaded from print servers. If you disable or don’t configure this setting,
Package Point and Print will not be restricted to specific print servers.
In Package Point and Print, the complete driver package is put in the driver store on the
Windows 7 or Windows Vista client computer. All files in the printer driver are installed on
the client, and the installation process ensures that the package is digitally signed properly
before adding it to the store. This result is a more secure form of Point and Print than found
on previous versions of Windows.
Please purchase PDF Split-Merge on www.verypdf.com to remove this watermark.
Managing Client-Side Printer Experience Using Group Policy CHAPTER 18
805
note Printing from Windows Vista and later versions to print servers running earlier
versions of Windows uses legacy Point and Print.
Extending Point and Print Using Windows Update
By default, Windows Update is checked for a compatible driver whenever a user uses the Add
Printer Wizard to install a new printer. When a compatible in-box driver cannot be found
when Group Policy is used to deploy a printer to a client computer, Windows Update is again
checked for a compatible driver. This failover behavior can be turned off in enterprise envi-
ronments using the following Group Policy setting, which is new in Windows 7 and Windows
Server 2008 R2:
Computer Configuration\Policies\Administrative Templates\Printers\Extend Point And Print
Connection To Use Windows Update And Use An Alternate Connection If Needed
If you enable or do not configure this policy setting, the client computer will continue to
search for compatible Point and Print drivers from Windows Update after it fails to find the
compatible driver from the local driver store and the server driver cache. If the client com-
puter is unable to find a compatible Point and Print driver, it will attempt to create a CSR
mismatch connection using any available driver that supports the hardware. If you disable
this policy setting, the client computer will search only the local driver store and server driver
cache for compatible Point and Print drivers. If it is unable to find a compatible driver, then
the Point and Print connection will fail.
If this policy is enabled, the new cross-platform Point and Print feature of Windows 7 is
also enabled. Cross-platform Point and Print is designed to allow users who have computers
running different processor architectures (x86 or x64, for example) to share their printers easily.
Cross-platform Point and Print is designed to enable the following types of scenarios:
n
Karen brings home a new Windows 7 laptop for her son to use in school. She decides
to upgrade her old Windows XP desktop to Windows 7 at the same time. She enrolls
both PCs to her new HomeGroup during the setup process. She takes her existing
inkjet printer and plugs it into her desktop system through the USB port. A short while
later, she notices that her son’s laptop already has a print queue for her office printer
so he can print reports and other documents. She is unaware of the fact that the desk-
top is running an x86 version of Windows and the laptop is running an x64 version of
Windows. This setup works because, in Windows 7, a user can add a printer locally to
one system in a HomeGroup, and every other PC in the HomeGroup will search their
local driver store, the print server, and Windows Update to find a suitable driver to
make a print connection.
Please purchase PDF Split-Merge on www.verypdf.com to remove this watermark.
CHAPTER 18 Managing Printing
806
n
Tony brings home a new Windows 7 laptop for working on personal projects. He already
has a home network set up, including an older Windows XP file and print server in his
office. After the new laptop is set up, Tony uses the Add Printer Wizard to create a
new connection to his office printer. The new laptop is running an x64 edition of the
Windows 7 Business operating system. The printer is older, and there are no in-box
drivers. Without any prompts or elevations, the system searches Windows Update to
find a suitable driver, installs it, and creates the connection to the printer. Tony then
brings his laptop to work because he wants to use it for a presentation. After the meet-
ing, he is asked to print out a copy of the slides for his manager. He navigates to the
print server at work through Windows Explorer and opens the printer. After a few min-
utes, it is available to print, and he makes a copy of the slides even though Windows
Update is blocked by his company’s IT department.
In business environments, you might want to disable the automatic querying Windows Up-
date for compatible printer drivers, especially when Group Policy is used to deploy printers as
described in the next section. An example of a scenario in which you disable this Group Policy
setting might be the following:
n
Tony is setting up a small business computer environment for a startup. He is using
Windows 7 for all of the systems. He writes some scripts to set up the servers, including
a connection to a shared printer for printing out logs and other reports periodically.
He also uses the Print Management console to set up the print server and push printer
connections out to all of the clients. On the first client box he tests, he notices that it is
going to Windows Update to find a print driver for the push printer connection. This
is not the behavior he wants, so he investigates and finds out that a new feature in
Windows 7 allows clients to search Windows Update for drivers when they aren’t avail-
able on the server. He also discovers that Group Policy can be configured to disable
this failover case. He disables this policy setting and adds the driver found on Windows
Update to the print server so that the remaining clients can use standard Point and
Print.
Deploying Printers Using Group Policy
The ability to deploy printer connections to Windows-based client computers using Group
Policy was first introduced in Windows Server 2003 R2. You can use Group Policy to deploy
printer connections in two ways:
n
As per-computer printer connections available for all users who log on to the client
computer. You can deploy per-computer printer connections to computers running
Windows XP or later versions.
n
As per-user printer connections available to the user on any client computer to which
the user logs on. You can deploy per-user printer connections to users of computers
running Windows 2000 or later versions.
Please purchase PDF Split-Merge on www.verypdf.com to remove this watermark.
Deploying Printers Using Group Policy CHAPTER 18
807
Deploying printers using Group Policy is useful in scenarios in which every user or com-
puter in a room or office needs access to the same printer. Deploying printers using Group
Policy can also be useful in large enterprises where users and computers are differentiated by
function, workgroup, or department.
diReCt FRoM tHe Field
Configuring Printer Connections Using Group Policy Preferences
Jerry Honeycutt
Deployment Forum
G
roup Policy preferences, a new feature of Windows Server 2008, provides
administrators with another means of deploying, configuring, and managing
printer connections on Windows 7 computers. Configuring printer connections
is a common task that administrators typically perform by writing logon scripts.
The Printers preference extension, however, enables you to easily create, update,
replace, or delete shared printers, TCP/IP printers, and local printers to multiple,
targeted users or computers. Using preference targeting, you can deploy printer
connections based on location, department, computer type, and so on.
Windows 7 Group Policy provides native support for deploying printers. However,
it supports only shared printers and requires AD DS schema extensions. In contrast,
the Printers extension supports shared, local, and TCP/IP printers on Windows XP
SP2, Windows Vista, and Windows 7. It also allows you to set the default printer and
map shared printers to local ports.
note For more information about Group Policy Preferences, see Chapter 14.
Preparing to Deploy Printers
Deploying printers using Group Policy requires you to perform the following preparatory steps:
n
If you are not using Windows Server 2008 domain controllers, your AD DS schema
must first be upgraded to Windows Server 2003 R2 or later. This means the schema
revision number must be 9 (for Windows Server 2003) and the schema version number
must be 31 (for the R2 schema update). You can use ADSI Edit to determine your
current schema version number by looking under the Schema node, right-clicking
the object named CN=Schema,CN=Configuration,DC=forest_root_domain, selecting
Properties, and then examining the value of the objectVersion attribute. The R2 schema
update is required so that Print Management can create the following two objects in
AD DS:
Please purchase PDF Split-Merge on www.verypdf.com to remove this watermark.
CHAPTER 18 Managing Printing
808
•
CN=Schema,CN=Policies,CN=GPO_GUID,CN=Machine,CN=PushPrinterConnections
•
CN=Schema,CN=Policies,CN=GPO_GUID,CN=User,CN=PushPrinterConnections
n
If your client computers are running an earlier version of Windows, you must deploy
the PushPrinterConnections.exe utility to these clients prior to using Group Policy to
deploy printer connections to these computers. The PushPrinterConnections.exe
utility reads the GPOs that are used to deploy printer connections and adds or
removes these connections on the client as needed. The easiest way to deploy
PushPrinterConnections.exe is to use a GPO as follows:
•
As a user logon script for deploying per-user printer connections
•
As a computer startup script for deploying per-computer printer connections
The simplest approach is to use the same GPO to deploy both PushPrinterConnections.exe
to targeted users and/or computers using startup/logon scripts and the actual printer
connections themselves to those users and/or computers. Beginning with Windows
Vista, however, you do not need to first deploy PushPrinterConnections.exe to client
computers because Windows Vista and later versions include this capability in the
operating system.
Deploying a Printer Connection
After you complete the preceding preparatory steps, you can deploy a printer connection by
following these steps:
1. Create a new GPO for deploying the connections, or use an existing GPO linked to the
OU, domain, or site where the users or computers being targeted reside.
2. Open Print Management, right-click the printer you want to deploy, and select Deploy
With Group Policy.
3. In the Deploy With Group Policy dialog box, click Browse, find and select the GPO you
will use to deploy the printer, and then click OK.
4. Choose whether to deploy the printer as a per-computer connection, a per-user con-
nection, or both.
Please purchase PDF Split-Merge on www.verypdf.com to remove this watermark.
Deploying Printers Using Group Policy CHAPTER 18
809
5. Click Add to add the printer connection settings to the GPO.
6. If needed, repeat steps 3 through 5 to deploy the same printer to additional GPOs.
7. Click OK when finished. The printer connection to be deployed using Group Policy will
be displayed under the Deployed Printers node in Print Management.
Per-user printer connections can be deployed immediately using Group Policy if the user
next logs off and then logs on again to a targeted client computer. Per-computer printer con-
nections can also be deployed immediately if the user’s computer is restarted. Neither type of
connection will be deployed on earlier versions of Windows during normal background
refresh of Group Policy. On Windows Vista and later clients, however, background policy
refresh can also deploy both per-user and per-computer printer connections.
note On Windows Vista and later versions, users can also force printer connections to be
deployed immediately by typing gpupdate /force at an elevated command prompt.
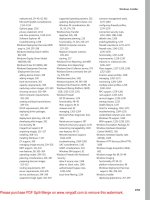
The deployed printer connection is also displayed in the GPO used to deploy the connec-
tion. To view this, open the Group Policy Management Console (GPMC), right-click the GPO
you used to deploy the connection, and then click Edit to open the GPO using the Group
Policy Object Editor (see Figure 18-9). To remove the deployed printer connection from the
targeted users or computers during the next background refresh of Group Policy, right-click
the connection and then click Remove. Unlinking the GPO from the OU, domain, or site where
the targeted users or computers reside also removes the deployed connections.
note You can also use the Group Policy Results Wizard in the GPMC to collect RSoP
information to verify the success or failure of deploying printers using Group Policy. For
more information on using Group Policy with Windows 7, see Chapter 14.
Please purchase PDF Split-Merge on www.verypdf.com to remove this watermark.
CHAPTER 18 Managing Printing
810
FIGURE 18-9 Viewing a deployed printer connection in a GPO
Limitations of Deploying Printers Using Group Policy
The following limitations apply when deploying printer connections to Windows 7 clients
using Group Policy:
n
You cannot configure the default printer on the targeted client using Group Policy.
n
Loopback mode is not supported.
Assigning Printers Based on Location
Windows Vista introduced a feature with the ability to assign printers based on location. This
can be useful in large enterprises that span more than one geographical location, allow-
ing mobile users to update their printers as they move to new locations. When mobile users
return to their primary locations, their original default printers are restored.
To assign printers based on location, deploy printers using GPOs linked to AD DS sites.
When a mobile computer moves to a new site, the printer connections for the computer are
updated using normal Group Policy processing.
Please purchase PDF Split-Merge on www.verypdf.com to remove this watermark.
Deploying Printers Using Group Policy CHAPTER 18
811
diReCt FRoM tHe SoURCe
Managing Deployed Printer Connections
Alan Morris, Software Design Engineer
Test, Windows Printing
T
here are two ways of managing deployed printer connections in Windows 7:
n
Using the Print Management console
n
Using the Group Policy Management Editor
The following sections of this sidebar describe the differences between these two
approaches.
Managing Deployed Printer Connections Using the Print
Management Console
Deployed printer connections will be displayed in Print Management’s Deployed
Printers node for the connections hosted by the current list of monitored servers
when the Print Management operator has Read access to the domain policies in
which printer connections are deployed.
To deploy connections to a Group Policy using the Print Management console, you
must have Write access to the domain policy, and the server that shares the printer
must be added to the list of servers that Print Management is monitoring. The op-
erator in charge of printer deployment does not need to have administrative rights
on the print server.
The deployed printer connections feature is not used to create local printers, but
anyone with administrative rights can add printer connections to the local policy of
a computer. Local Policy-deployed printer connections are useful when AD DS is not
fully implemented or when setting up systems in a workgroup environment. Some
form of peer-to-peer authentication is required when the workgroup computers or
users cannot authenticate to a domain controller.
Deployed printer connections do not need to be published to the AD DS.
Deployed printers do not require any driver download prompts during installation.
The user does not have access to delete deployed printer connections. The printer
needs to be removed from the policy or the user must be unlinked from the policy
for the printer removal to occur.
Managing Deployed Printer Connections Using the Group Policy
Management Editor
This tool has a few advantages over the Print Management snap-in. You don’t need
to monitor the server sharing the deployed printers. You can deploy printer shares
Please purchase PDF Split-Merge on www.verypdf.com to remove this watermark.
CHAPTER 18 Managing Printing
812
that have yet to be created. The user interface works directly within the selected
GPO. The user does not need to be logged on to the same domain as the GPO.
The big disadvantage when using this tool rather than the Print Management
snap-in is the lack of any print share validation. If valid server and share informa-
tion is improperly entered, the connection will fail. When no share validation is
performed, the advantage is that this method allows for deployment of connections
prior to creating the share. After the share is created, the connections will be added
for the user during the next policy refresh on Windows 7 clients and the next time
PushPrinterConnections.exe is run on previous-version clients.
Printers hosted on a server in one domain can easily be deployed to clients in
another trusted domain.
Another important use of the Group Policy Management Editor is in the removal of
deployed printers after a print server is retired. The Group Policy Management
Editor will display the printers deployed to a policy and allow the operator to
remove them after the server is no longer available on the network.
Migrating Print Servers
You can use either the Printer Migration Wizard or the PrintBRM command-line tool to export
print queues, printer settings, printer ports, and language monitors and then import them on
another print server running Windows. This is an efficient way to consolidate multiple print
servers onto a single computer or to replace an older print server with a newer system. The
Printer Migration Wizard and the PrintBRM command-line tool were introduced in Windows
Vista to replace the earlier Print Migrator 3.1 tool available from the Microsoft Download
Center.
note The Printer Migration Wizard can also be useful for backing up print server config-
urations for disaster recovery purposes. For more information on this topic, see the section
titled “Exporting and Importing Print Server Configurations” earlier in this chapter.
Migrate Print Servers Using Print Management
To migrate print servers using Print Management, follow these steps:
1. Open Print Management, right-click the printer server that contains the print queues
and printer drivers that you want to export, and then click Export Printers To A File.
This launches the Printer Migration Wizard.
Please purchase PDF Split-Merge on www.verypdf.com to remove this watermark.
Migrating Print Servers CHAPTER 18
813
2. Review the list of items to be exported and then click Next.
3. Click Browse to specify the location where you want to save your printer export file
(*.printerExport), type a name for this file, and then click Open.
4. Click Next to export the print server’s print queues and printer drivers as a compressed
cabinet (CAB) file with the .printerExport extension.
5. If errors are reported during the export process, click Open Event Viewer to view the
related events.
6. Click Finish to complete the export process.
7. Right-click the destination print server to which you want to import the previously
exported print queues and printer drivers and then click Import Printers From A File.
8. Click Browse, find the previously saved printer export file, and double-click it.
9. Click Next, review the items to be imported, and then click Next again.
10. Choose the options you want to select on the Select Import Options page of the
wizard (these options are described following this procedure).
11. Click Next. If errors are reported during the import process, click Open Event Viewer to
view the related events.
12. Click Finish to complete the export process.
note If the printers being migrated were deployed using Group Policy, you can use
Group Policy to remove the deployed printer connections from users’ computers before
migrating your print server. When the migration is complete, you can use Group Policy to
redeploy the migrated printers.
Please purchase PDF Split-Merge on www.verypdf.com to remove this watermark.
CHAPTER 18 Managing Printing
814
The available options on the Select Import Options page are:
n
Import Mode Specifies what to do if a specific print queue already exists on the
destination print server. The possible choices are:
•
Keep Existing Printers; Import Copies (the default)
•
Overwrite Existing Printers
n
List In The Directory Specifies whether to publish the imported print queues in
AD DS. The possible choices are:
•
List Printers That Were Previously Listed (the default)
•
List All Printers
•
Don’t List Any Printers
n
Convert LPR Ports To Standard Port Monitors Specifies whether to convert Line
Printer Remote (LPR) printer ports in the printer settings file to the faster Standard Port
Monitor when importing printers.
Migrating Print Servers Using PrintBRM
PrintBRM was introduced in Windows 7 and Windows Server 2008 to replace the Printmig.exe
utility used in previous versions of Windows. PrintBRM allows an administrator to easily back
up, restore, and migrate print queues, printer settings, printer ports, and language monitors.
Windows 7 and Windows Server 2008 R2 introduce some enhancements to PrintBRM that are
designed to provide more flexibility and better instrumentation for the administrator. For more
information concerning these enhancements, see the sidebar titled “Direct from the Source:
Enhancements to PrintBRM in Windows 7 and Windows Server 2008 R2” in this chapter.
To migrate print servers using PrintBRM from the command line, follow these steps:
1. Open an elevated command prompt by clicking Start, pointing to All Programs, selecting
Accessories, right-clicking Command Prompt, and then clicking Run As Administrator.
2. To export the print server configuration to a file, type the following commands:
cd %WinDir%\System32\Spool\Tools
Printbrm -s \\print_server_name -b -f file_name.printerExport
3. To import the previously saved print server configuration file, type the following
command:
Printbrm -s \\print_server_name -r -f file_name.printerExport
Please purchase PDF Split-Merge on www.verypdf.com to remove this watermark.
Migrating Print Servers CHAPTER 18
815
diReCt FRoM tHe SoURCe
Enhancements to PrintBRM in Windows 7 and Windows
Server 2008 R2
CSS Global Technical Readiness (GTR) Team
P
rintBRM has been enhanced in Windows 7 and Windows Server 2008 R2 in the
following ways:
n
Better error handling and reporting
n
The ability to perform a partial restore of print objects from a backup
n
The option to not restore security settings for print queues during a restore
n
Driver isolation settings are migrated
The sections that follow describe these improvements.
Better Error Handling and Reporting
Many general improvements have been made to the reporting and handling of error
conditions during the backup and restore processes. Any problems encountered
during an export or import should be reported to the administrator either in the
export/import dialog box or in the event logs.
Refer to the following Event Viewer logs for messages from the tool:
n
Custom Views\Administrative Events
n
Custom Views\Printer Migration Events
n
Windows Logs\Application
n
Windows Logs\System
n
Applications and Services Logs\Microsoft\Windows\PrintService\Admin
n
Applications and Services Logs\Microsoft\Windows\PrintService\Operational
Selective Restore
Administrators have a means of performing a selective restore of printers and
related objects using the command-line tool, PrintBRM.exe. This option is not avail-
able using PrintBRMUI.exe.
Option to Not Restore Print Queue ACLs
There might be situations in which it is not desirable to restore security settings for
print queues. For example, if printers are being migrated to another domain or if
print queues with permissions for local users and groups are being migrated, you
likely will not want the access control lists (ACLs) to be migrated.
Please purchase PDF Split-Merge on www.verypdf.com to remove this watermark.
CHAPTER 18 Managing Printing
816
The PrintBRM.exe command-line tool allows the administrator to prevent the resto-
ration of print queue ACLs.
Driver Isolation Settings Are Migrated
The print driver isolation settings are exported along with other spooler settings in
BRMSpoolerAttrib.xml. The following line is added to the XML file with the current
driver isolation settings.
<DriverIsolation value="<PrintDriverIsolationGroups>"/>
The value for <PrintDriverIsolationGroups> comes from the registry key value:
HKLM\System\CurrentControlSet\Control\Print\PrintDriverIsolationGroups
The string value can be manipulated in the XML file before an import/restore opera-
tion if desired.
Monitoring and Troubleshooting Printers
Printer troubleshooting can involve numerous considerations, including device problems such
as paper jams, incompatible printer drivers, misconfigured printer settings, problems with
the Print Spooler service on the client or the print server, and more. Detailed procedures for
troubleshooting printer problems are beyond the scope of this chapter and are not presented
here. Instead, following are some general considerations and recommendations regarding
monitoring printers so that support personnel can quickly identify and respond to problems.
The new Windows Troubleshooting Platform in Windows 7 includes a Printer Trouble-
shooter that end users can use to identify and resolve printer problems themselves without
calling the Help desk. For information on how to start this troubleshooter, see the section
titled “Using Devices And Printers” earlier in this chapter.
note For general guidance on how to troubleshoot hardware issues, see Chapter 30,
“Troubleshooting Hardware, Driver, and Disk Issues.” For additional information about how
device drivers are implemented and managed on Windows 7, see Chapter 16, “Managing
Disks and File Systems.”
Configuring E-Mail Notifications
When you create a custom printer filter, you have the option of sending an automatic e-mail
notification to someone when the conditions of the filter are met. This can be useful for
resolving printer problems, particularly in an organization with multiple buildings and
Please purchase PDF Split-Merge on www.verypdf.com to remove this watermark.
Monitoring and Troubleshooting Printers CHAPTER 18
817
administrators. For example, you can set up a view of all printers managed by a particular
print server where the status does not equal Ready. Then, if a printer changes from the
Ready status to another status, the administrator can receive a notification e-mail from Print
Management. (You can also configure e-mail notifications for existing printer filters, including
the Printers Not Ready and Printers With Jobs default filters.) To send e-mail notifications,
you must specify a Simple Mail Transfer Protocol (SMTP) server that can forward these e-mail
messages.
To configure e-mail notifications, follow these steps:
1. To set a notification on an existing printer filter, open Print Management, right-click a
printer filter, click Properties, and then click the Notification tab.
2. Select the Send E-mail Notification check box.
3. Specify the following information:
n
In the Recipient E-mail Address(es) text box, type the e-mail address(es) of the
recipient(s) using the format account@domain. (Use semicolons to separate multiple
accounts.)
n
In the Sender E-mail Address text box, type the e-mail address of the sender using
the format account@domain.
n
In the SMTP Server text box, type the fully qualified host name or IP address of the
SMTP server that will forward the e-mail notifications.
n
In the Message text box, type a text message describing the conditions of the
printer problem.
4. Click Test to verify your SMTP configuration for sending e-mail notifications and then
click OK if the test is successful.
Configuring Print Server Notifications
In addition to setting notifications on a custom set of printers by using a printer filter, you can
also set notifications for print servers. For example, if the print server is offline or the spooler
goes down, an e-mail notification can be sent.
To configure print server notifications, right-click a print server in Print Management,
select Set Notifications, and then follow the steps described previously to configure e-mail
message parameters.
Configuring Script Actions
When you create a custom printer filter for specific printer criteria, you have the option of
running a script when the conditions of the filter are met. Script notifications are also defined
in the previously described Notifications tab of the printer filter’s Properties dialog box.
Setting script notifications can be useful for resolving printer problems and troubleshoot-
ing. For example, you can automatically run a script to restart the Print Spooler service on a
Please purchase PDF Split-Merge on www.verypdf.com to remove this watermark.
CHAPTER 18 Managing Printing
818
print server when its printers go offline. You can also automatically run a script that prints a
test page or that notifies your internal monitoring system of a potential problem. Scripts can
be written in VBScript or any scripting language available on the computer. The script must
be on the computer that is running Print Management, and the script should be running with
suitable credentials and have the permissions needed to accomplish what you want the script
to do.
An example of a command that you might use in a script to start the Print Spooler service
is the net start spooler command. For sample scripts that you can use and customize to
manage print queues, see the list in the section titled “On the Companion Media” at the end
of this chapter. You can also find additional scripts on Microsoft TechNet at
/>Configuring Detailed Event Logging
To save a record of print jobs and their details, you can enable detailed Information event
logging as follows:
1. Right-click a print server in Print Management and then select Properties.
2. Click the Advanced tab.
3. Select the Log Spooler Information Events check box.
You can use Event Viewer to view the resulting Informational Events and then use them
either for troubleshooting or auditing purposes. For example, if a bad printer driver is causing
reams of paper to be printed with random data on them, you can use these events to identify
the user name, print queue, document title, size in pages, and other useful information to
determine the possible cause of the problem.
note For troubleshooting information about event log events related to printing issues,
see />Summary
Windows 7 and Windows Vista include numerous enhancements in printing technologies and
new tools for managing print queues and migrating print servers. Using these new features
and tools can provide a more satisfying printing experience for end users and make the job of
managing printers within an enterprise easier.
Additional Resources
These resources contain additional information and tools related to this chapter.
Please purchase PDF Split-Merge on www.verypdf.com to remove this watermark.
Additional Resources CHAPTER 18
819
Related Information
n
“What’s New in Print Management for Windows 7” at
/en-us/library/dd878494.aspx.
n
“What’s New In Print and Document Services for Windows Server 2008 R2” at
/>n
The Windows Server 2008 Print Services section of the Windows Server TechCenter at
/>n
Windows TIFF IFilter Installation and Operations Guide at
/en-ca/library/dd755985(WS.10).aspx.
n
“Script Repository: Printing (Windows PowerShell Scripts)” at
/technet/scriptcenter/scripts/msh/printing/default.mspx?mfr=true.
n
TechNet Forum for Print/Fax discussions at
/en-US/winserverprint/threads.
n
“Printing – Architecture and Driver Support” at
/print/default.mspx.
n
XPS Team Blog at />n
PrintVerifier Team Blog at />n
“Printing and Print System Management” at
/aa970449.aspx.
On the Companion Media
n
FindPrinterDrivers.ps1
n
FindPrinterPorts.ps1
n
Get-PrinterPorts.ps1
n
Get-PrintQueueStatistics.ps1
n
Get-SharedPrinter.ps1
n
InstallPrinterDriver.ps1
n
InstallPrinterDriverFull.ps1
n
ListPrinterDrivers.ps1
n
listPrinters.ps1
n
ListSharedPrintersAddPrintConnection.ps1
n
notepad
n
TroubleshootPrinter.ps1
n
WorkWithPrinters.ps1
Please purchase PDF Split-Merge on www.verypdf.com to remove this watermark.
Please purchase PDF Split-Merge on www.verypdf.com to remove this watermark.
821
CHAPTER 19
Managing Search
n
Search and Indexing Enhancements 821
n
How Windows Search Works 827
n
Managing Indexing 851
n
Using Search 863
n
Troubleshooting Search and Indexing Using the Built-in
Troubleshooter 880
n
Summary 882
n
Additional Resources 882
B
eginning with Windows Vista, the Search feature has been enhanced and extended in
many ways compared to previous Windows platforms. A new search-engine architec-
ture provides improved performance and better query capabilities for faster and more
focused information retrieval. Integration of Search throughout the user interface (UI)
makes it easier to look for files, e-mail, and other information from within the currently
open window. Search produces nearly instantaneous search results as users type their
queries, so that they can better focus their queries and narrow search results on the fly
as they type. Also, users now have a simple way of saving the results of their queries so
that they can quickly access frequently needed data, which reduces the need for users to
manually organize how they store information on their computers. This chapter explains
how search and indexing work in Windows 7 and how to use Group Policy to manage
these capabilities from within the UI.
Search and Indexing Enhancements
Rapidly growing storage capabilities in business environments mean that the ability to
quickly and efficiently find information is essential for knowledge workers. To meet these
growing requirements, search and indexing capabilities were significantly enhanced in
Windows Vista. These capabilities have now been improved further in Windows 7 to
provide users with an even better search experience.
Please purchase PDF Split-Merge on www.verypdf.com to remove this watermark.
CHAPTER 19 Managing Search
822
Search in Windows XP
Search in Windows XP suffered from the following issues and limitations:
n
Using the Search Companion to search for files was often a slow process. As a result,
users often had to spend much of their time organizing their data into hierarchical sets
of folders to make information easier to find through folder-specific searches.
n
Searching for text within files required enabling the Indexing Service (Cisvc.exe) on the
computer, and by default this service is stopped and set for manual startup.
n
The Indexing Service, when enabled, tended to be intrusive in its operation by being
CPU and input/output (I/O) intensive, which sometimes interfered with other user
activity on the system.
n
E-mail search capabilities in applications such as Microsoft Office Outlook were not
integrated with how search and indexing worked in Windows.
n
The search query syntax was limited in scope and capabilities. Specifically, there was
no support for keywords, such as From:, and the Indexing Service was restricted to file
content.
Search in Windows Vista
Search was significantly improved in Windows Vista to make it more powerful and easier to
use. The following new features and enhancements in search and indexing functionality were
added in Windows Vista:
n
Windows Vista introduced a completely new search engine architecture called the
Windows Search service, which was based on the earlier Windows Desktop Search
(WDS) add-on for Windows XP and Windows Server 2003. The Windows Search service
supersedes the earlier Indexing Service and provides better performance and improved
query capabilities. For information about this new search engine architecture and how
it works, see the section titled “How Windows Search Works“ later in this chapter. For
information concerning the different versions of Windows Search, see the section titled
“Understanding the Windows Search Versions“ later in this chapter.
n
In Windows XP, indexing of content had to be enabled before it could be used. Begin-
ning with Windows Vista, indexing of content is enabled by default and supports
querying both the metadata (properties) of any file type and the full text of many
common document formats. The extensibility of Windows Search also allows Indepen-
dent Software Vendors (ISVs) to provide plug-ins that allows users to search third-party
document formats, such as Adobe Portable Document Format (PDF). Beginning with
Windows Vista, users can also search for e-mail messages in Office Outlook 2007 and
for content stored in Microsoft Office OneNote 2007 notebooks. Users can also use
Advanced Query Syntax (AQS) to create complex queries that return highly focused
results and then save these queries for future use.
Please purchase PDF Split-Merge on www.verypdf.com to remove this watermark.
Search and Indexing Enhancements CHAPTER 19
823
n
In Windows XP, the Indexing service did not try to avoid indexing content when the
system was under heavy use. Beginning with Windows Vista, however, the Windows
Search service includes algorithms that prevent the indexing of content when the
system is too busy. This improvement makes Windows Search less intrusive than the
previous Indexing service. A new feature of Windows Search is word-wheeled search
(or search-as-you-type) functionality, whereby users can watch the results of their
queries narrow as they type the characters of the file name or word they are looking
for. This makes the search experience for the user much more responsive than in earlier
platforms, where users had to type their entire search string and click Search each time
they wanted to run a query.
n
Beginning with Windows Vista, search capability is integrated into the shell in more
places, making searching easy to perform because of the ubiquitous presence of
the Search box within the Start menu, Control Panel, any Windows Explorer window,
and other Windows Vista experiences. In addition, each instance of the Search box is
tuned to provide results appropriate for the types of queries that users might perform
from within that instance.
n
Windows Vista introduced new searching and organizing capabilities that make it
much easier for users to find files on their computers without having to spend a lot
of time organizing them into hierarchical sets of folders. These capabilities include en-
hanced column headers; the ability to sort, group, and stack files and folders; and the
ability to tag files and folders with descriptive keywords.
n
Beginning with Windows Vista, client-side caching (CSC) is enabled by default so that
redirected folders are accessible to users when their computers are not connected to
the network. These redirected folders are indexed locally so that users can search their
contents even when their computers are not on the network or when the server to
which their user profile folders have been redirected is down. The cached versions of
offline folders are also indexed locally so that network shares marked offline can even
be searched when the user’s computer is not connected to the network.
n
Beginning with Windows Vista, users can search for information stored in shared fold-
ers on other computers running Windows Vista and later versions. The results of such
searches are security trimmed so that search results display only those files and docu-
ments that the user has permission to access.
Search in Windows 7
Windows 7 builds upon the foundation of Windows Vista by adding the following new features
and enhancements in search and indexing functionality:
n
Start Menu Search has been significantly enhanced to make it a universal entry point
for starting programs, finding Control Panel settings, and searching for almost anything
on the local computer, the corporate network, or the Internet. For more information
about these improvements, see the section titled “Using Start Menu Search“ later in
this chapter.
Please purchase PDF Split-Merge on www.verypdf.com to remove this watermark.
CHAPTER 19 Managing Search
824
n
The Advanced Search option in Windows Vista, which became available only after
searching, has been replaced with a new Advanced Search pane that helps users create
complex queries while learning AQS. For more information on this improvement, see
the section titled “Searching Libraries” and the How It Works sidebar titled “Advanced
Query Syntax” later in this chapter.
n
Beginning with Windows 7, when the indexer is up to date on the system, all items in
the indexed location that would be returned by a grep search are now also returned by
the indexer, with the exception of reparse points such as junction points and hard links.
This is a change from Windows Vista, where certain types of files were always excluded
from being indexed by default. For more information on this change, see the section
titled “Understanding the Indexing Process“ later in this chapter.
n
A new feature of Windows 7 called Libraries now makes it easier for users to organize
and search for documents and other types of files. For more information about librar-
ies, see Chapter 15, “Managing Users and User Data.” For information about searching
libraries, see the section titled “Searching Libraries“ later in this chapter.
n
Indexing prioritization has been implemented to ensure that particular scopes are
given higher priority during indexing. Windows Explorer uses this feature to ensure
that index-backed views are always given priority to improve the speed and relevance
of searches issued against libraries. For example, if a user has the Music library open
and is viewing it via an index-backed view (for example, by artist), Windows Explorer
requests that the index scopes associated with that view are given priority. The result
is that if indexing hasn’t yet finished for those scopes, indexing for this location takes
priority over the indexing of other content on the system.
n
Indexing performance has been improved by significantly reducing resource require-
ments for the indexer. New functionality has also been added to the indexer to facili-
tate troubleshooting, reporting, and feedback concerning indexing issues. For more
information, see the section titled “Troubleshooting Search and Indexing Using the
Built-in Troubleshooter“ later in this chapter.
n
In Windows Vista, a user needed to be a local administrator on the computer to add
new locations to the indexer using Indexing Options in Control Panel. Beginning with
Windows 7, this restriction has been removed, and standard users can now add to or
remove locations from the indexer.
n
Beginning with Windows 7, Windows Search is also now an optional feature that can
be enabled or disabled using the Turn Windows Features On Or Off task option in
Control Panel. Note that the Windows Search feature is enabled by default, and signifi-
cant loss of functionality will occur for users who disable Search in this way.
n
Files encrypted using the Encrypting File System (EFS) and locally stored on the user’s
computer can now be indexed and searched as easily as unencrypted files. For more
information concerning this feature, see the section titled “Configuring Indexing of
Encrypted Files Using Group Policy“ later in this chapter.
Please purchase PDF Split-Merge on www.verypdf.com to remove this watermark.
Search and Indexing Enhancements CHAPTER 19
825
n
Windows 7 now enables users to search for Tagged Image File Format (TIFF) images
based on textual content, such as text contained in images of faxed documents. For
more information on this new feature, see the section titled “Configuring Indexing of
Text in TIFF Image Documents“ later in this chapter.
n
Windows 7 minimizes the impact of indexing e-mail stored on Microsoft Exchange
Server. Support for indexing digitally signed e-mail is also new in Windows 7.
n
Windows 7 allows searching the content of network file shares on computers running
Windows 7, Windows Server 2008 R2, Windows Vista, Windows Server 2008, Windows
XP, or Windows Server 2003. Some of these operating systems require the installation
of an additional feature to support remote queries from computers running
Windows 7. For more information, see the section titled “Understanding Remote
Search“ later in this chapter.
n
Federated Search is a new feature of Windows 7 that enables users to search remote
data sources from within Windows Explorer. Federated Search uses search connectors
to enable users to work with files stored in repositories, such as Windows SharePoint
sites, as easily as if they were browsing the local file system on their computers. For
more information about Federated Search, see the section titled “Using Federated
Search“ later in this chapter.
Understanding the Windows Search Versions
Organizations that are in the process of performing a large-scale desktop migration may find
that they have several different versions of Windows Search on their computers. This can have
implications for administrators who need to manage search and indexing functionality across
an enterprise. It is therefore important to understand the different versions of Windows
Search that are available for or included in various version of Windows.
Windows Search is provided in several different forms:
n
As a built-in service called Windows Search in Windows 7 and Windows Vista
n
As a role service called Windows Search Service, which you can install from within the
File Services role in Windows Server 2008 and Windows Server 2008 R2
n
As a downloadable add-on from the Microsoft Download Center for Windows XP,
Microsoft Windows 2000 Server, and Windows Server 2003
Search Versions Included in Windows 7 and Windows Vista
Table 19-1 lists the different versions of Windows Search included in Windows 7 and Windows
Vista.
Please purchase PDF Split-Merge on www.verypdf.com to remove this watermark.
CHAPTER 19 Managing Search
826
TABLE 19-1 Versions of Windows Search in Windows 7 and Windows Vista
WINDOWS VERSION WINDOWS SEARCH VERSION
Windows 7 4.00.6001.16503
Windows Vista Service Pack 2 (SP2) 4.00.6001.16503
Windows Vista SP1 3.00.6001.18000
Windows Vista RTM 3.00.6000.16386
In addition, Windows Search 4.0 (version 4.00.6001.16503) is available for Windows Vista
SP1 as a downloadable add-on from the Microsoft Download Center.
Search Versions Included in Windows Server 2008
Table 19-2 lists the different versions of the Windows Search service included in Windows
Server 2008.
TABLE 19-2 Versions of the Windows Search Service in Windows Server 2008
WINDOWS VERSION WINDOWS SEARCH VERSION
Windows Server 2008 R2 4.00.6001.16503
Windows Server 2008 SP2 4.00.6001.16503
Windows Server 2008 RTM 3.00.6001.18000
In addition, Windows Search 4.0 (version 4.00.6001.16503) is available for Windows Server
2008 as a downloadable add-on from the Microsoft Download Center.
Search Versions Available for Earlier Versions of Windows
Windows Search, which was previously known as Windows Desktop Search (WDS), is currently
available from the Microsoft Download Center in the following versions:
n
Windows Search 4.0
n
WDS 3.01
n
WDS 2.6.6
Windows Search 4.0 (version 4.00.6001.16503) can be installed on the following platforms:
n
Windows Vista SP1
n
Windows XP SP2 or later versions
n
Windows Server 2003 R2
n
Windows Server 2003 SP2 or later versions
n
Windows Search
Please purchase PDF Split-Merge on www.verypdf.com to remove this watermark.
How Windows Search Works CHAPTER 19
827
WDS 3.01 (version 3.01.6000.72) could be installed on the following platforms:
n
Windows XP SP2 or later versions
n
Windows Server 2003 SP1 or later versions
WDS 2.6.6 (version 2.06.6000.5414) could be installed on the following platforms:
n
Windows XP SP2
n
Windows Server 2003 SP1
n
Windows 2000 SP4
note You can use the GetIndexerVersionStr method of the ISearchManager interface to
retrieve the current version number of Windows Search on a system. For more information,
see />How Windows Search Works
The underlying architecture and operation of indexing has changed considerably in Windows
7 and Windows Vista compared with search capabilities built into earlier versions of Windows.
Understanding how search and indexing works can be helpful for configuring, maintaining,
and troubleshooting search and indexing.
Understanding Search Engine Terminology
The following terminology describes search and indexing as it has been implemented in
Windows 7 and Windows Vista:
n
Catalog The index with the property cache.
n
Crawl scopes (inclusions and exclusions) Included and excluded paths within a
search root. For example, if a user wants to index the D drive but exclude D:\Temp,
he would add a crawl scope (inclusion) for “D:\*” and a crawl scope (Exclusion) for
“D:\Temp\*”. The Crawl Scope Manager would also add a start address for “D:\”.
n
Gathering The process of discovering and accessing items from a data store using
protocol handlers and IFilters.
n
IFilter A feature of the Windows Search engine that is used to extract text from
documents so that it can be added to the index. (IFilters can also be used to extract
format-specific properties, such as Subject or Author; however, in Windows Vista and
Windows 7, property handlers are the preferred mechanism for extracting these prop-
erties.) Microsoft provides IFilters for many common document formats by default,
while third-party vendors such as Adobe provide their own IFilters for indexing other
types of content.
Please purchase PDF Split-Merge on www.verypdf.com to remove this watermark.