Tài liệu Windows 7 for Seniors for Dummles P2 ppt
Bạn đang xem bản rút gọn của tài liệu. Xem và tải ngay bản đầy đủ của tài liệu tại đây (530.93 KB, 10 trang )
➟
27
Chapter 1: Getting Comfortable with the Windows 7 Desktop
a triangle at its right end. This button usually displays
Shut Down, although the button may be programmed to
display another option.
3.
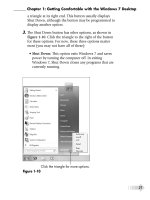
The Shut Down button has other options, as shown in
Figure 1-10. Click the triangle to the right of the button
for these options. For now, these three options matter
most (you may not have all of these):
• Shut Down: This option exits Windows 7 and saves
power by turning the computer off. In exiting
Windows 7, Shut Down closes any programs that are
currently running.
Click the triangle for more options.
Figure 1-10
05_509463-ch01.indd 2705_509463-ch01.indd 27 8/10/09 9:48 PM8/10/09 9:48 PM
➟
28
Part I: Getting to Know Windows 7
• Sleep: This option reduces the computer’s power
consumption without exiting Windows 7 or closing
programs. As a result, when you wake the computer
by moving the mouse or touching the keyboard,
everything is exactly as you left it: programs and
documents are open, if they were before Sleep.
• Hibernate: This option combines Sleep and Shut
Down. Hibernate records which programs are
running but completely shuts down the computer.
When you start the computer, Windows 7 opens
all programs you were using, just like Sleep.
Hibernate or Shut Down are equally green options —
they save the same amount of power. Sleep is a little
less green, but saves time in returning to a task you’re
in the middle of.
4.
Choose Shutdown to turn off the computer.
On most computers, pressing the power switch also
shuts down the computer. On a laptop, closing the
lid may shut down the laptop or put it into Sleep or
Hibernation mode.
For a desktop computer, consider using a power strip
to plug in the computer, the monitor, and the printer.
After you shut down or hibernate the computer, turn
the power strip off. This saves the most power.
05_509463-ch01.indd 2805_509463-ch01.indd 28 8/10/09 9:48 PM8/10/09 9:48 PM
Examining the
Anatomy of a
Window
A
t the dawn of the personal computer in
the 1980s, computers and their users ran
one program at a time. Although you can use
Windows to run one program at a time, that’s
so last-century. Windows is a multitasking
system that enables you to run many programs
at once. You can listen to music, browse the
Web, write e-mail, and play a game — all at
the same time.
Windows, with a capital W, gets its name from
its main feature: windows, with a lowercase w.
These windows contain activities. Each program
you run occupies its own window. One window
may contain your word processing program,
such as WordPad or Microsoft Word; another
may contain your Web browser; and another
may contain a game.
A window can occupy part of the computer’s
screen or fill the entire screen. Individual
windows have some common features, which
you explore in this chapter. Many windows
also have features that are unique to the
particular program, such as a slideshow option
in a photo program or a play option in a game.
2
Get ready to . . .
➟
Explore the Parts of
a Window ......................... 30
➟
Resize a Window ............... 33
➟
Arrange Windows .............. 35
➟
Snap Windows ................... 37
➟
Stack Windows .................. 39
➟
Flip between Windows ........ 40
➟
Chapter
06_509463-ch02.indd 2906_509463-ch02.indd 29 8/10/09 9:48 PM8/10/09 9:48 PM
➟
30
Part I: Getting to Know Windows 7
Getting comfortable with capital-W Windows means learning to open,
close, resize, move, and switch between lowercase-w windows, which is
the key to juggling multiple activities successfully.
Explore the Parts of a Window
1.
To see a window on your screen, click the Start button
and type sol in the Search Programs and Files box to dis-
play the Solitaire game. (See Chapter 1 for information
on using the Start button.) Figure 2-1 shows the window
that Solitaire runs in.
Menu bar
Program name Title bar Minimize
Maximize
Close
Status bar
Figure 2-1
06_509463-ch02.indd 3006_509463-ch02.indd 30 8/10/09 9:48 PM8/10/09 9:48 PM
➟
31
Chapter 2: Examining the Anatomy of a Window
2.
Explore this example of a window, starting at the top:
• Title bar: The title bar is the top line of the win-
dow, containing the title of the program you’re
using. When you use a program to create a docu-
ment, the name of the document also appears in
the title bar.
• View and close buttons: In the top-right corner of
the window are three little buttons with big func-
tions. (One of these buttons changes as you use
it.) From left to right, these buttons are:
Minimize: The Minimize button shrinks or hides
the window contents. The program that the win-
dow contains is still running and open, but the
window is out of sight. You’ll still see the pro-
gram’s icon in the taskbar. (I cover the taskbar in
Chapter 1.) Click the Minimize button when you
want to ignore a particular window but aren’t actu-
ally done with it. To restore the window, click its
icon in the taskbar (see Chapter 1).
Maximize/Restore: The Maximize button (the but-
ton with a single square) fills the screen with the
contents of this window. Click the Maximize but-
ton to hide the desktop and other open windows,
to concentrate on this one window, and to see as
much of the window’s contents as you can. Restore
(the button with two squares) is the name of the
button that appears after you click the Maximize
button; it replaces the Maximize button. Click the
Restore button to return the window to its previ-
ous size, which is in between maximized and
minimized.
06_509463-ch02.indd 3106_509463-ch02.indd 31 8/10/09 9:48 PM8/10/09 9:48 PM