E04 Camera Basics White Balance White balance
Bạn đang xem bản rút gọn của tài liệu. Xem và tải ngay bản đầy đủ của tài liệu tại đây (1.25 MB, 16 trang )
Camera Basics
White Balance
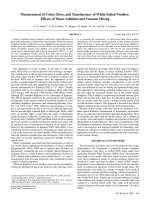
White balance is a feature that ensures that the colour white is reproduced
accurately regardless of the type of lighting under which a photo is taken. At
a very basic level, it is common to use the Auto White Balance setting.
However, this setting is no one -size-fits-all solution. For a white balance
setting that best suits the lighting source, choose one of the preset white
balance settings on your camera.
White balance makes sure your pictures turn out with the appropriate colour
tone for the lighting
Points-to-note
- Its original function is to ensure that white appears white in your photos.
- You can also use it to add a colour cast to your photos.
Depending on the light source, the photo you take of a white object may
take on a colour cast, appearing reddish or bluish, for instance. This is
something that is not apparent to the naked eye, because our brain
automatically corrects the colour casting so that the white object still
appears white regardless of the light source. However, cameras don’t have
that ability. Instead, this function is carried out by the white balance (WB)
function, which ensures that white objects are depicted as white in photos
regardless of the light source.
Most of the time, if you were to shoot with white balance set to the "Auto"
mode, which is also commonly known as Auto W hite Balance (AWB), the
colours in the photo would be quite close to those that you see with your
naked eye. However, for some scenes, "Auto" is not able to make the
appropriate corrections, which results in colours being depicted differently
from those that you see. When this happens, choose a white balance setting
from among the presets. You will have a few options, such as “Daylight”,
“Shade”, “Cloudy”, “Tungsten light”, “White fluorescent light” and so on.
However, you can also use the WB function to i ntentionally add a colour cast
to your photos. Try it out for yourself: First, take a photo with the “Daylight”
preset. Compare it with photos taken with “White fluorescent light” or
“Tungsten light”. See that the images are more bluish in tone than the on e
shot with “Daylight”? Next, try “Cloudy” and “Shade”. You will get images
that are warmer in tone.
Take note of these effects—you can use them to create drastic changes to
the look of your final image.
The difference between the various white balance presets
Auto
Daylight
Shade
Cloudy
Tungsten light
White fluorescent light
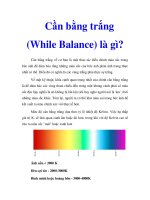
All examples shot with: EOS 5D Mark III/ EF50mm f/1.4 USM/ FL: 50mm/
Aperture-priority AE (f/1.4, 1/6400 sec, EV+1)/ ISO 100
These were shot outdoors on a fine day. Compared with the photo shot with
the “Daylight” preset, the white house looks warmer in the “Shade” and
“Cloudy” examples, and cooler in the “Tungsten light” and “White fluorescent
light” examples. Under normal circumstances, we recommend using “Auto”
when shooting outdoors because it gives a more natural look.
Auto
Daylight
All examples shot with: EOS 5D Mark II/ EF70 -200mm f/4L IS USM/ FL:
70mm/ Aperture-priority AE (f/4, 1/250 sec, EV -1)/ ISO 100
The sky during sunrise and sunset are reddish in to ne. When you
photograph them with white balance set to “Auto”, the function tries to
correct the red-cast clouds so that they will appear white, and this mutes the
reddish colours in the sky. If you want to emphasize the reddish tones
instead, here are the presets to try in order of increasing effect level:
Auto→Daylight→Cloudy→Shade.
Auto
Cloudy
All examples shot with: EOS 80D/ EF -S18-135mm f/3.5-5.6 IS USM/ FL:
135mm (216mm equivalent)/ Aperture -priority AE (f/5.6, 1/200 sec, EV+1.7)/
ISO 200
If you were to photograph the light of a tungsten bulb using AWB, the light
will appear white in your image, although it really is a warmer tone. For a
more accurate depiction of the white, choose the “Tungsten light” preset. For
an even warmer tone, choose either “Shade” or “Cloudy”. These settings will
impart an overall reddish tone, giving the entire photograph a warm feel.
White balance correction function
If we were to get technical about colour tones, white balance presets can
only adjust colour tones alo ng the amber/blue axis. To adjust along the
magenta/green axis, use white balance correction function. This emphasizes
the purple/green tones, which can make subjects look more appealing.
To set the white balance correction function, first, fix the colour tone of the
entire image by choosing one of the white balance presets. Then, in the
white balance correction menu, adjust along the magenta/green axis. If you
need to, also adjust for blue/amber, and there you have it —your customtoned image.
From the SHOOT menu, select [WB Shift/Bkt.] to display a screen like the
one above. Shift the square marker to the desired position on the grid.
The letters on the [WB Shift/Bkt.] grid each represent a colour. Move the
square marker in the direction of the colour you want to emphasize.
Examples of white balance correction
Normal
A:9
B:9
G:9
M:9
All examples shot with: EOS 6D/ EF24 -105mm f/3.5-5.6 IS STM/ FL: 24mm/
Aperture-priority AE (f/3.5, 1/500 sec, EV+1)/ ISO 100
In the above examples, I shifted the square marker by the number of units
indicated in the caption for A(mber), B(lue), G(reen) and M(agenta)
respectively. The effects of the adjustments are clear in the final images that
result.