ECG Notes: Interpretation and Management Guide_2 potx
Bạn đang xem bản rút gọn của tài liệu. Xem và tải ngay bản đầy đủ của tài liệu tại đây (4.33 MB, 261 trang )
Copyright © 2003, 2006 by F. A. Davis.
Copyright © 2003, 2006 by F. A. Davis.
Contacts • Phone/E-Mail
Name:
Ph: e-mail:
Name:
Ph: e-mail:
Name:
Ph: e-mail:
Name:
Ph: e-mail:
Name:
Ph: e-mail:
Name:
Ph: e-mail:
Name:
Ph: e-mail:
Name:
Ph: e-mail:
Name:
Ph: e-mail:
Name:
Ph: e-mail:
Name:
Ph: e-mail:
Name:
Ph: e-mail:
00Rnotes-Myer(p3)-FM 2/14/06 12:55 PM Page 2
Copyright © 2003, 2006 by F. A. Davis.
F. A. Davis Company • Philadelphia
RNotes
®
Purchase additional copies of this book at
your health science bookstore or directly
from F. A. Davis by shopping online at
www.fadavis.com or by calling 800-323-
3555 (US) or 800-665-1148 (CAN)
A Davis’s Notes Book
Ehren Myers, RN
RNotes
®
Nurse’s Clinical Pocket Guide
Nurse’s Clinical Pocket Guide
2nd Edition
00Rnotes-Myer(p3)-FM 2/14/06 12:55 PM Page 3
Copyright © 2003, 2006 by F. A. Davis.
F. A. Davis Company
1915 Arch Street
Philadelphia, PA 19103
www.fadavis.com
Copyright © 2003, 2006 by F. A. Davis Company
All rights reserved. This book is protected by copyright. No part of it may be repro-
duced, stored in a retrieval system, or transmitted in any form or by any means,
electronic, mechanical, photocopying, recording, or otherwise, without written
permission from the publisher.
Printed in China by Imago
Last digit indicates print number: 10 9 8 7 6 5 4 3 2 1
Publisher, Nursing: Robert G. Martone
Project Editor: Ilysa H. Richman
Content Development Manager: Darlene Pedersen
Consultants: Shirley Jones, MS Ed, MHA, EMT-P; Kim Cooper, RN, MSN; Dolores
Zygmont, PhD, RN; Cynthia Sanoski, BS, PharmD; Kathleen Jones, MSN, APRN,
BC; Jennifer Wilson, RN
Current Procedural Terminology (CPT) is copyright 2005 American Medical
Association. All Rights Reserved. No fee schedules, basic units, relative values, or
related listings are included in CPT. The AMA assumes no liability for the data
contained herein. Applicable FARS/DFARS restrictions apply to government use.
CPT® is a trademark of the American Medical Association.
As new scientific information becomes available through basic and clinical
research, recommended treatments and drug therapies undergo changes. The
author(s) and publisher have done everything possible to make this book accurate,
up to date, and in accord with accepted standards at the time of publication. The
author(s), editors, and publisher are not responsible for errors or omissions or for
consequences from application of the book, and make no warranty, expressed or
implied, in regard to the contents of the book. Any practice described in this book
should be applied by the reader in accordance with professional standards of care
used in regard to the unique circumstances that may apply in each situation. The
reader is advised always to check product information (package inserts) for
changes and new information regarding dose and contraindications before
administering any drug. Caution is especially urged when using new or
infrequently ordered drugs.
Authorization to photocopy items for internal or personal use, or the internal or
personal use of specific clients, is granted by F. A. Davis Company for users
registered with the Copyright Clearance Center (CCC) Transactional Reporting
Service, provided that the fee of $.10 per copy is paid directly to CCC, 222
Rosewood Drive, Danvers, MA 01923. For those organizations that have been
granted a photocopy license by CCC, a separate system of payment has been
arranged. The fee code for users of the Transactional Reporting Service is: 8036-
1335-5/06 0 ϩ $.10.
00Rnotes-Myer(p3)-FM 2/14/06 12:55 PM Page 4
Copyright © 2003, 2006 by F. A. Davis.
✓
✓
TOOLS/
INDEX
LABS/
ECG
MEDS/IV/
FLUIDS
EMERG
TRAUMA
Diseases &
Disorders
OB/PEDS/
GERI
ASSESSBASICS
Place 2
7
/
8
ϫ2
7
/
8
Sticky Notes here
For a convenient and refillable note pad
HIPAA Compliant
OSHA Compliant
Waterproof and Reusable
Wipe-Free Pages
Write directly onto any page of RNotes with a
ballpoint pen.Wipe old entries off with an alco-
hol pad and reuse.
00Rnotes-Myer(p3)-FM 2/14/06 12:55 PM Page 5
Copyright © 2003, 2006 by F. A. Davis.
Look for our other
Davis’s Notes titles
ECG Notes: Interpretation and Management Guide
ISBN-10: 0-8036-1347-4 / ISBN-13: 978-0-8036-1347-8
IV Therapy Notes: Nurse’s Clinical Pocket Guide
ISBN-10: 0-8036-1288-5 / ISBN-13: 978-0-8036-1288-4
LabNotes: Guide to Lab and Diagnostic Tests
ISBN-10: 0-8036-1265-6 / ISBN-13: 978-0-8036-1265-5
LPN Notes: Nurse’s Clinical Pocket Guide
ISBN-10: 0-8036-1132-3 / ISBN-13: 978-0-8036-1132-0
MedNotes: Nurse’s Pharmacology Pocket Guide
ISBN-10: 0-8036-1109-9 / ISBN-13: 978-0-8036-1109-2
New edition coming Fall 2006
MedSurg Notes: Nurse’s Clinical Pocket Guide
ISBN-10: 0-8036-1115-3 / ISBN-13: 978-0-8036-1115-3
NutriNotes: Nutrition & Diet Therapy Pocket Guide
ISBN-10: 0-8036-1114-5 / ISBN-13: 978-0-8036-1114-6
PsychNotes: Clinical Pocket Guide
ISBN-10: 0-8036-1286-9 / ISBN-13: 978-0-8036-1286-0
DermNotes: Dermatology Clinical Pocket Guide
ISBN-10: 0-8036-1495-0 / ISBN-13: 978-0-8036-1495-6
OB Peds Women’s Health Notes: Nurse’s Clinical Pocket Guide
ISBN-10: 0-8036-1466-0 / ISBN-13: 978-0-8036-1466-6
For a complete list of Davis’s Notes and
other titles for health care providers,
visit www
.fadavis.com.
00Rnotes-Myer(p3)-FM 2/14/06 12:55 PM Page 6
Copyright © 2003, 2006 by F. A. Davis.
BASICS
1
Standard (Universal) Precautions
■ Indications: Recommended for the care of all Pts, regardless
of their diagnosis or presumed infection status.
■ Purpose: Designed to provide a barrier precaution for all
health-care providers—prevent the spread of infectious
disease.
■ Application: Applies to blood, other bodily fluids, secretions,
excretions, nonintact skin, and mucous membranes.
Types of Standard Precautions
■ Hand washing: The single most important means of
preventing the spread of disease. Perform before and after
every Pt contact, and after contact with blood, bodily fluids,
or contaminated equipment.
■ Gloves: Nonlatex gloves should be worn whenever contact
with bodily fluids is possible. Note: lotions may degrade
gloves.
■ Mask and eye protection: Worn whenever there exists the
potential for getting splashed by bodily fluids.
■ Gown: Worn whenever exposed skin or clothing is likely to
become soiled during Pt contact.
■ Disposal of sharps: Sharp instruments and needles are
disposed of in a properly labeled, puncture-resistant
container. NEVER recap needles at any time.
■ Containment: Soiled linen should be placed in a leak-proof
bag. Grossly contaminated refuse is placed in a red biohazard
bag and placed in appropriate receptacle.
■ Decontamination: Contaminated equipment should be
properly disinfected per facility guidelines. Single-use
equipment must be properly disposed of after use.
Transmission-Based Precautions
Airborne: In addition to Standard Precautions, use Airborne
Precautions for Pts known or suspected to have serious illnesses
transmitted by airborne droplet nuclei.
01Rnotes-Myer(p3)-01 2/14/06 3:42 PM Page 1
Copyright © 2003, 2006 by F. A. Davis.
2
■ Particulate Size: Droplet nuclei smaller than 5 microns
■ Common Etiology: Measles, chickenpox, disseminated
varicella zoster, TB (tuberculosis)
■ Specific Precautions: Private room, negative airflow (at least
six changes per hour), and a mask for the health-care
provider. The Pt may be required to wear a mask if coughing
is excessive.
Droplet: In addition to Standard Precautions, use Droplet
Precautions for Pts known or suspected to have serious illnesses
transmitted by large particle droplets.
■ Particulate Size: Droplet nuclei larger than 5 microns
■ Common Etiology: Haemophilus influenzae type-B,
(meningitis, pneumonia, epiglottitis, and sepsis), Neisseria
meningitidis (meningitis, pneumonia, and sepsis), diphtheria,
pertussis, mycoplasma pneumonia, pneumonic plague,
streptococcal (group A) pharyngitis, pneumonia, scarlet fever
in children, adenoviruses, mumps, parvovirus B19, rubella,
and chicken pox
■ Specific Precautions: Private room and a mask for the health-
care provider are required. The Pt may be required to wear a
mask if coughing is excessive.
Contact: In addition to Standard Precautions, use Contact
Precautions for Pts known or suspected to have serious illnesses
transmitted by direct Pt contact or by contact with items in the
Pt’s environment.
■ Common Etiology: GI, respiratory, skin, or wound colonization
or infection with drug-resistant bacteria. Other pathogens
include Clostridium difficile (C-diff), Escherichia coli, (E-coli),
Shigella, hepatitis, rotavirus, respiratory syncytial virus
(RSV), diphtheria, herpes simplex, impetigo, pediculosis,
scabies, chicken pox, and viral hemorrhagic infections, such
as Ebola.
■ Specific Precautions: Private room for the Pt, and gloves and
gown for the health-care provider. The Pt may be required to
wear a mask if coughing is excessive.
BASICS
01Rnotes-Myer(p3)-01 2/14/06 3:42 PM Page 2
Copyright © 2003, 2006 by F. A. Davis.
3
Nosocomial Infection
■ Definition: A hospital-acquired infection that can be fatal to an
immunosuppressed Pt. Nosocomial infections are transmitted
by either accidental or deliberate disregard for standard
precautions designed to minimize transmission from Pt to Pt
or from health-care provider to Pt.
■ Common Organisms: Clostridium difficile (C-diff), methicillin-
resistant Staph. aureus (MRSA), vancomycin-resistant Staph.
aureus (VRSA), vancomycin-resistant Enterococcus (VRE).
■ Likely Access: Indwelling catheters, vascular access devices,
endotracheal (ET) tubes, nasogastric (NG) and gastric tubes,
and surgical wound sites.
■ Prevention: Use Standard Precautions during Pt contact.
Communication
Lifespan Considerations
■ Approach children at their eye level. Address them by name
often and use language appropriate to their developmental
level.
■ Be aware of cognitive impairment, but never assume that a
Pt is cognitively impaired simply because of advanced age.
■ Be considerate of generational and gender differences.
Cultural Considerations
■ Be aware that culture has a strong influence on an individual’s
interpretation of and responses to health care.
■ An interpreter may help ease the anxieties of a language
barrier.
■ Be sensitive to cultural influence on nonverbal
communication, i.e., touching or eye contact may be
perceived as disrespectful.
BASICS
01Rnotes-Myer(p3)-01 2/14/06 3:42 PM Page 3
Copyright © 2003, 2006 by F. A. Davis.
4
Safety—Restraints
General Information
■ Restraints are any physical or pharmacological means used to
restrict a Pt’s movement, activity, or access to his/her body.
■ Restraints are used only as a last alternative after all other methods
of control have been attempted prior to application.
■ Restraints can only be used to prevent Pts from harming
themselves or others, or interfering with medical treatment.
■ Restraints may never be used for staff convenience or discipline.
■ The application of restraints requires a written physician order
specifying the clinical necessity, type of restraint, frequency of
assessment, and duration restraint is to be used.
■ Use of restraints should not exceed 24 hours.
Note: Always refer to specific agency’s policy and procedure when
using restraints.
Procedure (Physical Restraints)
■ Informed consent should be obtained from Pt or family.
■ Obtain a written physician order—must be renewed every 24 hours.
■ Always use the least restrictive form of restraint available.
■ Assess skin and circulation, sensation, and motion (CSM) of area to
be restrained prior to application.
■ Pt should be restrained in an anatomically correct position with all
bony prominences adequately padded and protected to prevent the
development of pressure sores.
■ Follow manufacturer’s instructions when applying restraints.
■ Apply loosely enough for two fingers to fit under the restraints.
■ Restraints must not interfere with medical devices or treatment.
■ Restraints should be secured to chair or bed frame (Never to side
rails) using quick-release knots. For adjustable beds, secure to the
parts of the bed frame that move with the Pt.
■ A call bell must be easily accessible to the Pt.
■ Assess restraint sites (skin, distal circulation, etc.) q 15 min.
■ Remove restraints every 2 hours if possible. For aggressive Pts,
remove only one restraint at a time.
■ Document findings and interventions after each assessment.
BASICS
01Rnotes-Myer(p3)-01 2/14/06 3:42 PM Page 4
Copyright © 2003, 2006 by F. A. Davis.
5
Alternatives to Restraints
■ Provide regular orientation to reality and diversional activities.
■ Encourage family to be involved with diversion and
supervision.
■ Allow ample opportunity for supervised ambulation and
toileting.
■ Move Pt closer to nurse’s station. Monitor more frequently
and respond to call lights promptly.
■ Utilize pressure-sensitive alarms in beds and chairs or sitters.
■ Conceal tubes and lines with pajamas or scrubs.
Oxygen Delivery Equipment
Nasal Cannula:
■ Indicated for low flow, low
percentage supplemental
oxygen
■ Flow rate of 1–6 L/min
■ Delivers 22%–44% oxygen
■ Pt can eat, drink, and talk
■ Extended use can be very
drying; use with a humidifier
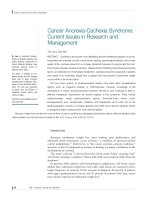
Simple Face Mask:
■ Indicated for higher
percentage supplemental
oxygen
■ Flow rate of 6–10 L/min
■ Delivers 35%–60% oxygen
■ Lateral perforations permit
exhaled CO
2
to escape
■ Permits humidification
BASICS
Exhalation
ports
Elastic
strap
To oxygen
source
(Continued text on following page)
01Rnotes-Myer(p3)-01 2/14/06 3:42 PM Page 5
Copyright © 2003, 2006 by F. A. Davis.
6
Oxygen Delivery Equipment (continued)
Nonrebreather (NRB) Mask:
■ Indicated for high percentage
supplemental oxygen
■ Flow rate of up to 15 L/min
■ Delivers up to 100% oxygen
■ One-way flaps open and close
with respiration, resulting in a
high concentration of delivered
oxygen and minimal to no CO
2
rebreathed by the Pt
Venturi Mask (venti-mask):
■ Indicated for precise titration
of percentage of oxygen
■ Flow rate of 4–8 L/min
■ Delivers 24%–40% oxygen
■ Accurate delivery of O
2
is accom-
plished with a graduated dial
which is set to the desired percent-
age of oxygen to be delivered
Bag-Valve-Mask (BVM):
■ Indicated for manual
ventilation of a Pt who has
no or ineffective respirations
■ Can deliver up to 100% O
2
when connected to O
2
source
■ Appropriate mask size and
fit are essential to create a
good seal and prevent injury
■ To create seal, hold mask with
thumb and index finger and grasp
underneath the ridge of the jaw
with remaining three fingers
BASICS
Exhalation
port
(one-way valves)
Inhalation
port
One way
valve
Mask
Bag
O
2
supply
Reservoir
(Continued text on following page)
01Rnotes-Myer(p3)-01 2/14/06 3:42 PM Page 6
Copyright © 2003, 2006 by F. A. Davis.
7
Oxygen Delivery Equipment (continued)
Humidified Systems:
■ Indicated for Pts
requiring long-term
oxygen therapy to
prevent drying of
mucous membranes
■ Setup may vary
between brands.
Fill canister with
sterile water to
recommended level,
attach to oxygen
source, and attach
mask or cannula to
humidifier
■ Adjust flow rate
Transtracheal Oxygenation:
■ Indicated for Pts
with a tracheostomy
who require long-
term oxygen therapy
and/or intermittent,
transtracheal aerosol
treatment
■ Ensure proper
placement (over
stoma, tracheal tube)
■ Assess for and clear
secretions as needed
■ Assess skin for signs
of irritation
BASICS
To oxygen
source
Maximum
fill line
Sterile water
in reservoir
To patient
Minimum
water level
line
Trachea
Tract
Transtracheal catheter
(connect to oxygen)
Chain necklace
01Rnotes-Myer(p3)-01 2/14/06 3:42 PM Page 7
Copyright © 2003, 2006 by F. A. Davis.
8
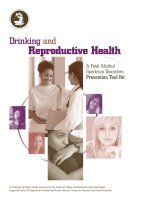
Artificial Airways
Oropharyngeal Airway (OPA):
■ Indicated for
unconscious Pts who
do not have a gag
reflex
■ Measure from the
corner of the Pt’s
mouth to the earlobe
■ Rotate airway 180Њ
while inserting into
oropharynx
Nasopharyngeal
Airway (NPA):
■ Indicated for Pts with
a gag reflex, or
comatose with
spontaneous
respirations
■ Measure from the tip
of the Pt’s nose to the
earlobe
■ The diameter should
match the Pt’s
smallest finger
■ NEVER insert in the
presence of facial
trauma!
BASICS
ESOPHAGUS
TRACHEA
PHARYNX
OROPHARYNGEAL
AIRWAY
OROPHARYNGEAL AIRWAY
TONGUE
ESOPHAGUS
TRACHEA
PHARYNX
NASOPHARYNGEAL
AIRWAY
NASOPHARYNGEAL AIRWAY
(Continued text on following page)
01Rnotes-Myer(p3)-01 2/14/06 3:42 PM Page 8
Copyright © 2003, 2006 by F. A. Davis.
9
Artificial Airways (continued)
Endotracheal Tube (ETT):
■ Indicated for apnea,
airway obstruction,
respiratory failure,
risk of aspiration, or
therapeutic
hyperventilation
■ Can be inserted
through the mouth
or nose
■ Inflated cuff protects
Pt from aspiration
Laryngeal Mask Airway (LMA):
■ Often used in
noncomplicated
surgeries and by
EMS
■ Direct visualization
not needed for
proper placement
■ When cuff is
inflated, the mask
conforms to the
hypopharynx,
occluding the
esophagus and
protecting the glottic
opening
BASICS
01Rnotes-Myer(p3)-01 2/14/06 3:42 PM Page 9
Copyright © 2003, 2006 by F. A. Davis.
10
Pulse Oximeters
Finding Intervention
SpO
2
Ͼ 95%
SpO
2
91%–94%
SpO
2
85%–90%
SpO
2
Ͻ 85%
Caution: Consider readings within the overall context of the Pt’s
medical history and physical exam. The reliability of pulse
oximeters is sometimes questionable and many conditions
can produce false readings. Assess the Pt’s skin signs,
respiratory rate (RR), and heart rate (HR). Ask how the Pt is
feeling. Repositioning the probe to a different location (ears,
toes, or a different finger) may help correct a suspected false
reading.
BASICS
■ Considered normal and requires no
intervention.
■ Continue routine monitoring of Pt.
■ Considered acceptable.
■ Assess probe placement and adjust if
necessary.
■ Continue to monitor Pt.
■ Raise head of bed (HOB) and stimulate
Pt to breathe deeply.
■ Assess airway and encourage coughing.
■ Suction airway if needed.
■ Administer oxygen and titrate to SpO
2
Ͼ 90%.
■ Notify physician and respiratory therapist
(RT) if SpO
2
fails to improve after a
few minutes.
■ Administer 100% oxygen, position Pt to
facilitate breathing, suction airway if needed,
and notify physician and RT immediately.
■ Check medication record and consider
naloxone or flumazenil for medication-
induced respiratory depression.
■ Be prepared to manually ventilate or aid in
intubation if condition worsens or fails to
improve.
01Rnotes-Myer(p3)-01 2/14/06 3:42 PM Page 10
Copyright © 2003, 2006 by F. A. Davis.
11
Conditions That May Produce False Readings
Anemia . . . . . . . . . . . . . . . . . . . . . . . . . . . . . . . . . . . . .false high
Carbon monoxide (CO) poisoning . . . . . . . . . . . . . . . .false high
Hypovolemia . . . . . . . . . . . . . . . . . . . . . . . . . . . . . . . . .false high
Pt movement . . . . . . . . . . . . . . . . . . . . . . . . . . . .erratic readings
Cool extremities . . . . . . . . . . . . . . . . . . . . . . . . . . . . . . .false low
Dark pigment . . . . . . . . . . . . . . . . . . . . . . . . . . . . . . . . .false low
Nail polish . . . . . . . . . . . . . . . . . . . . . . . . . . . . . . . . . . .false low
Medication (peripheral vasoconstrictors) . . . . . . . . . . .false low
Poor peripheral circulation . . . . . . . . . . . . . . . . . . . . . .false low
Raynaud’s disease . . . . . . . . . . . . . . . . . . . . . . . . . . . . .false low
Ventilated Patient in Distress
Patient in sudden, severe respiratory distress
■ Manually ventilate the patient: Disconnect the ventilator
tubing from the ET tube and manually ventilate Pt with 100%
oxygen using a bag-valve mask (BVM).
■ Have RT/MD notified stat.
If patient is easy to manually ventilate
■ The ventilator is the probable source of the problem.
■ Notify RT.
■ While you manually ventilate the Pt, RT should assess the
ventilator per manufacturer’s guidelines.
■ The ventilator may need to be changed if the problem cannot
be found.
If patient is difficult to manually ventilate
■ Clear airway: Suction the ET tube to clear secretions. Notify
RT. If unable to clear obstruction or pass suction catheter,
extubate and manually ventilate with 100% oxygen using a
BVM. Suction the oropharynx to clear secretions. Notify
RT/MD stat and assist with reintubation.
BASICS
01Rnotes-Myer(p3)-01 2/14/06 3:42 PM Page 11
Copyright © 2003, 2006 by F. A. Davis.
12
■ Assess for air leak: Listen for air around the cuff and check the
cuff pressure with a manometer if available. Notify RT for
possible reintubation if air leak cannot be fixed.
■ Assess for dislodgement: If tube is dislodged, remove and
manually ventilate Pt with 100% oxygen using a BVM. Suction
oropharynx to clear secretions. Notify RT/MD stat and assist
with reintubation.
■ If ineffective ventilation continues after airway, ET, and
ventilator are all determined to be patent, inspect and
auscultate the Pt’s chest for equal and adequate air
movement. If there is unequal chest wall movement and/or
decreased air movement on one side, it may be related to an
incorrectly positioned ET tube, atelectasis, or a tension
pneumothorax. Notify MD and RT stat.
■ If ineffective ventilation continues and no physical or
mechanical cause can be found consider sedating the Pt.
Troubleshooting Ventilator Alarms
■ When the ventilator alarms: Check the Pt first. If Pt is in no
apparent distress, check ventilator to determine source of
problem.
■ If patient is showing signs of distress (“fighting the vent”):
Try to calm the Pt. If unsuccessful, immediately disconnect Pt
from vent and manually ventilate with 100% oxygen using a
BVM. Notify the physician and RT immediately.
Alarm Intervention
Low-Pressure:
Usually caused
by system
disconnections
or leaks.
BASICS
■ Reconnect Pt to ventilator.
■ Evaluate cuff and reinflate if needed (if
ruptured, tube will need to be replaced).
■ Evaluate connections and tighten or
replace as needed.
■ Check ET tube placement (auscultate
lung fields and assess for equal, bilateral
breath sounds).
(Continued text on following page)
01Rnotes-Myer(p3)-01 2/14/06 3:42 PM Page 12
Copyright © 2003, 2006 by F. A. Davis.
13
Alarm Intervention
High-Pressure:
Usually caused by
resistance within
the system. Can
be kink or water
in tubing, Pt biting
the tube, copious
secretions, or
plugged endo-
tracheal tube.
High Respiratory
Rate:
Can be caused by
anxiety or pain,
secretions in
ETT/airway, or
hypoxia.
Low Exhaled
Volume:
Usually caused
by tubing dis-
connection or
inadequate seal.
Suctioning a Patient on the Ventilator
Preparation
■ Prepare the patient: Explain procedure—offer reassurance.
■ Gather supplies: Sterile gloves, sterile suction catheter and
tubing, sterile normal saline, sterile basin, bag-valve mask
connected to a supplemental oxygen source, suction source.
■ Equipment: Ensure that wall or portable suction is turned on
(no higher than 120 mm Hg) and position supplies and the
suction tubing so that they are easily accessible.
■ Wash hands: Follow standard precautions.
BASICS
■ Suction Pt if secretions are suspected.
■ Insert bite block to prevent Pt from
biting tube.
■ Reposition Pt’s head and neck, or
reposition tube.
■ Sedation may be required to prevent a
Pt from fighting the vent, but only after
careful assessment excludes a physical
or mechanical cause.
■ Suction Pt.
■ Look for source of anxiety (e.g., pain,
environmental stimuli, inability to
communicate, restlessness, etc.).
■ Evaluate oxygenation.
■ Evaluate/reinflate cuff; if ruptured, ETT
must be replaced.
■ Evaluate connections; tighten or replace
as needed; check ETT placement,
reconnect to ventilator.
01Rnotes-Myer(p3)-01 2/14/06 3:42 PM Page 13
Copyright © 2003, 2006 by F. A. Davis.
14
Preprocedure
■ Setup: Using sterile technique, open and position supplies so
that they are within easy reach. Fill sterile basin with sterile
normal saline and open sterile gloves close by so that they
are easy to reach.
■ Position yourself: Stand at the Pt’s bedside so that your
nondominant hand is toward the Pt’s head.
■ Preoxygenate: Manually ventilate Pt with 100% O
2
for several
deep breaths.
Technique
■ Don sterile gloves.
■ Wrap the sterile suction catheter around your dominant
hand and connect it to the suction tubing. Wrapping the
catheter around your hand prevents it from dangling and
minimizes risk of contamination. Be careful not to touch
your dominant hand with the end of the suction tubing.
■ Note: Your nondominant hand is no longer sterile and
must not touch any part of the catheter or your dominant
hand.
■ Insert suction catheter just far enough to stimulate a cough
reflex.
■ Apply intermittent suction while withdrawing catheter
and rotating 360Њ for no longer than 10–15 seconds to
prevent hypoxia.
■ Manually ventilate with 100% O
2
for several deep
breaths.
■ Repeat until the Pt’s airway is clear.
■ Suction oropharynx after suctioning of airway is complete.
■ Rinse catheter in basin with sterile saline in between
suction attempts (apply suction while holding tip in the
saline).
■ Rinse suction tubing when done and discard soiled
supplies.
BASICS
01Rnotes-Myer(p3)-01 2/14/06 3:42 PM Page 14
Copyright © 2003, 2006 by F. A. Davis.
15
Troubleshooting Chest Tubes
Air Leak
Continuous bubbling in the water seal chamber suggests that
there is an air leak, either in the Pt or in the drainage system.
Possible causes include a disconnection or break in the drainage
system, an incomplete seal around the tube at the insertion site,
or an improperly inserted tube. Notify the MD, and check the Pt
and system for the source of the air leak:
■ Briefly occlude the tube manually by pinching the tubing close
to the chest wall. A cessation of bubbling suggests that the air
leak is within the Pt at the insertion site. Notify the physician.
■ If bubbling continues, assess to see if air might be entering at
the insertion site around the wound. Using both hands, apply
pressure around insertion site. If bubbling stops or decreases
with pressure, notify physician and discuss replacing dressing
with another pressure dressing. A suture may be required
around tube.
■ If neither measure decreases bubbling, the air leak may be in
the tubing and/or connections. Secure and retape all
connections.
■ If air leak is still present, change out drainage system.
The Chest Tube Has Become:
Completely separated from the Pt.
■ Assess Pt for respiratory distress and notify physician stat.
■ Apply occlusive dressing to insertion site (taped on three
sides to allow air to escape, but not enter the chest).*
Partially pulled out of the insertion site, exposing the drainage
opening, but the end of the chest tube still remains in the Pt.
■ Assess Pt for respiratory distress and notify physician stat.
■ Remove dressing at insertion site and wrap chest tube
(covering the drainage opening) with an occlusive dressing.*
*Be prepared to assist with reinsertion of new chest tube.
BASICS
01Rnotes-Myer(p3)-01 2/14/06 3:42 PM Page 15
Copyright © 2003, 2006 by F. A. Davis.
16
Chest tube has become disconnected from drainage unit
■ Do one of three things while preparing to reattach tubes: (1)
Leave the tube open to air, (2) Submerge the distal end of the
chest tube under 1–2 inches of sterile water or normal saline
(essentially, a water seal), or (3) Attach a one-way (Heimlich)
valve.
■ Clean both exposed ends with Betadine swabs for 30 seconds
and let air dry for 30 seconds. Reconnect drainage system and
retape with fresh waterproof tape.
■ If tube connections have been grossly contaminated (i.e., with
feces, urine, etc.), a new drainage system including sterile
connector must be attached. This must be done as quickly as
possible to prevent respiratory distress due to possible
pneumothorax.
NG (Nasogastric) Tube—Insertion
■ Explain the procedure to the Pt and offer reassurance.
■ Auscultate abdomen for positive bowel sounds if NG tube is
to be used for administration of feedings or medication.
■ Position the Pt upright in high-Fowler’s position. Instruct the
Pt to keep a chin-to-chest posture during insertion. This helps
to prevent accidental insertion into the trachea.
■ Measure the tube from the tip of the nose to the ear lobe,
then down to the xyphoid. Mark this point on the tube with
tape.
■ Lubricate the tube by applying water-soluble lubricant to the
tube. Never use petroleum-based jelly, which degrades PVC
tubing.
■ Insert the tube through the nostril until you reach the
previously marked point on the tube. Instruct the Pt to take
small sips of water during insertion to help facilitate passing
of the tube.
■ Secure the tube to Pt’s nose using tape. Be careful not to block
the nostril. Tape tube 12–18 inches below insertion line and
then pin tape to Pt’s gown. Allow slack for movement.
■ Position HOB at 30Њ–45Њ to minimize risk of aspiration.
BASICS
01Rnotes-Myer(p3)-01 2/14/06 3:42 PM Page 16
Copyright © 2003, 2006 by F. A. Davis.
17
■ Confirm proper location of NG tube:
■ Pull back on plunger* of a 20-mL syringe to aspirate stomach
contents. Typically, gastric aspirates are cloudy and green, or tan,
off-white, bloody, or brown. Gastric aspirate can look like
respiratory secretions so it is best to also check pH.
■ Dip litmus paper into gastric aspirate. A reading of a pH of 1–3
suggests placement in the stomach.
■ An alternative method, but less reliable, is to inject 20 mL of air
into the tube while auscultating the abdomen. Hearing a loud
gurgle of air suggests placement in the stomach. If no bubbling is
heard, remove tube and reattempt. Withdraw tube immediately if
the Pt becomes cyanotic or develops breathing problems.
■ An inability to speak also suggests intubation of the trachea
instead of the stomach.
*Note: small-bore NI (nasointestinal) tubes (e.g., Dobhoff) may
collapse under pressure and initial confirmation of placement is
obtained with x-ray.
■ Assemble equipment (wall suction, feeding pump, etc.) per
manufacturer guidelines.
■ Document the type and size of NG tube, which nostril, and how the
Pt tolerated the procedure. Document how tube placement was
confirmed and whether tubing was left clamped or attached to
feeding pump or suction.
NG Tube—Care and Removal
Patient Care
■ Reassess placement of tube prior to administering bolus feedings,
fluids, or meds and q shift for continuous feedings.
■ Flush tube with 30 mL of water after each feeding and after each
administration of medication.
■ Assess for skin irritation or breakdown. Retape daily and alternate
sites to avoid constant pressure on one area of the nose. Gently
wash around nose with soap and water and dry before replacing
tape. Provide nasal hygiene daily and p.r.n.
■ Provide good oral hygiene every 2 hours and p.r.n. (mouthwash,
water, toothettes → clean tongue, teeth, gums, cheeks, and mucous
membranes). If Pt is performing oral hygiene, remind him or her not
to swallow any water.
BASICS
01Rnotes-Myer(p3)-01 2/14/06 3:42 PM Page 17
Copyright © 2003, 2006 by F. A. Davis.
18
Removal
■ Explain procedure to Pt. Observe standard precautions.
■ Remove tape from nose and face.
■ Clamp or plug tube (prevents aspiration), instruct Pt to hold
breath, and remove tube in one gentle but swift motion.
■ Assess for signs of aspiration.
NG Tube Feedings
■ Confirm placement prior to using: (1) using a 20-mL syringe,
inject a 20-mL bolus of air into the feeding tube while
auscultating the abdomen. Loud gurgling indicates proper
placement. DO NOT attempt this with water! (2) Use a 20-mL
syringe and gently aspirate gastric content. Dip litmus paper into
gastric aspirate—a pH of 1–3 suggests proper placement.
■ Maintenance: Flush with 30 mL of water every 4 to 6 hours and
before and after administering tube feedings, checking for
residuals, and administering medications.
■ Medication: Dilute liquid medications with 20–30 mL of water.
Obtain all medications in liquid form. If liquid form is not
available, check with pharmacy to see if medication can be
crushed. Administer each medication separately and flush with
5–10 mL of water between each medication. Do not mix
medications with feeding formula!
■ Residuals: Check before bolus feeding, administration of
medication, or every 4 hours for continuous feeding. Hold
feeding if greater than 100 mL and recheck in 1 hour. If residuals
are still high after 1 hour, notify physician.
Types of Tube Feedings
■ Initial tube feedings: Advance as tolerated by 10–25 mL/hour
every 8–12 hours until goal rate is reached.
■ Intermittent feedings: Infusions of 200–400 mL of enteral
formulas several times per day infused over a 30-minute period.
■ Continuous feedings: Feedings that are initiated over 24 hours
with the use of an infusion pump.
BASICS
01Rnotes-Myer(p3)-01 2/14/06 3:42 PM Page 18
Copyright © 2003, 2006 by F. A. Davis.
19
Checking Residuals
■ Using a 60-mL syringe, withdraw from the gastric feeding
tube any residual formula that may remain in the stomach.
■ The volume of this formula is noted, and if it is greater than a
predetermined amount the stomach is not emptying properly
and the next feeding dose is withheld.
■ This process can indicate gastroparesis and intolerance to the
advancement to a higher volume of formula.
Tube Feeding Complications
Problem Possible Causes and Interventions
Nausea,
vomiting,
& bloating
Diarrhea
Constipation
Aspiration and
gastric reflux
Occluded tube
Displaced tube
BASICS
■ Large residuals: Withhold or decrease
feedings.
■ Medication: Review meds and consult
physician.
■ Rapid infusion rate: Decrease rate.
■ Too rapid administration: Reduce rate.
■ Refrigerated TF (too cold): Administer at room
temp.
■ Tube migration into duodenum: Retract tube to
reposition in the stomach and reconfirm
placement.
■ Decreased fluid intake: Provide adequate
hydration.
■ Decreased dietary fiber: Use formula with
fiber.
■ Improper tube placement: Verify placement.
■ Delayed gastric emptying: Check residuals.
■ Position of patient: Keep HOB elevated 30Њ–45Њ.
■ Inadequate flushing: Flush more routinely.
■ Use of crushed meds: Switch to liquid meds.
■ Improperly secured tube: Retape tube.
■ Confused patient: Follow hospital protocol.
01Rnotes-Myer(p3)-01 2/14/06 3:42 PM Page 19
Copyright © 2003, 2006 by F. A. Davis.