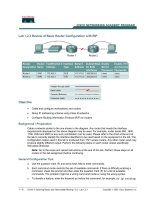
VLAN LAB Objective • Create VLANs • Configuration of trunk port
Bạn đang xem bản rút gọn của tài liệu. Xem và tải ngay bản đầy đủ của tài liệu tại đây (1.52 MB, 30 trang )
VLAN
LAB Objective
•
Create VLANs
•
Configuration of trunk ports
•
Configuration of Access ports
•
Assign IP to hosts
•
Verification
Vlan Name
cisco
redhat
Vlan ID
10
20
Create VLAN on ACC1 and ACC2 switches
Switch>EN
Switch#conf t
Switch(config)#hostname ACC1
ACC1(config)#vlan 10
ACC1(config-vlan)#name cisco
ACC1(config-vlan)#exit
ACC1(config)#vlan 20
ACC1(config-vlan)#name redhat
ACC1(config-vlan)#exit
ACC1(config)#
Switch#conf t
Switch(config)#hostname ACC2
ACC2(config)#vlan 10
ACC2(config-vlan)#name cisco
Ports
Fa0/10-15
Fa0/20-23
Subnet
192.168.10.0/24
192.168.20.0/24
ACC2(config-vlan)#exit
ACC2(config)#vlan 20
ACC2(config-vlan)#name redhat
ACC2(config-vlan)#exit
Configure Trunk port (ACC1 and ACC2)
Before configuring trunk ports we will know the basic function of DTP.
DTP is normally used on Cisco IOS switches to negotiate if the interface should become an access port or
trunk.
By default DTP is enabled and the interfaces of your switches will be in “dynamic auto” or “dynamic
desirable” mode. Without configuring anything on the interfaces, the default is dynamic auto mode and
the interfaces will be in access mode.
Dynamic auto + dynamic auto = access
ACC1#show interfaces fastEthernet 0/24 switchport
Name: Fa0/24
Switchport: Enabled
Administrative Mode: dynamic auto
Operational Mode: static access
Administrative Trunking Encapsulation: dot1q
Operational Trunking Encapsulation: native
Negotiation of Trunking: On
Access Mode VLAN: 1 (default)
Trunking Native Mode VLAN: 1 (default)
Voice VLAN: none
Administrative private-vlan host-association: none
Administrative private-vlan mapping: none
Administrative private-vlan trunk native VLAN: none
Administrative private-vlan trunk encapsulation: dot1q
Administrative private-vlan trunk normal VLANs: none
Administrative private-vlan trunk private VLANs: none
Operational private-vlan: none
Trunking VLANs Enabled: All
Pruning VLANs Enabled: 2-1001
Capture Mode Disabled
Capture VLANs Allowed: ALL
ACC2#show interfaces fastEthernet 0/24 switchport
Name: Fa0/24
Switchport: Enabled
Administrative Mode: dynamic auto
Operational Mode: static access
Administrative Trunking Encapsulation: dot1q
Operational Trunking Encapsulation: native
Negotiation of Trunking: On
Access Mode VLAN: 1 (default)
Trunking Native Mode VLAN: 1 (default)
Voice VLAN: none
Administrative private-vlan host-association: none
Administrative private-vlan mapping: none
Administrative private-vlan trunk native VLAN: none
Administrative private-vlan trunk encapsulation: dot1q
Administrative private-vlan trunk normal VLANs: none
Administrative private-vlan trunk private VLANs: none
Operational private-vlan: none
Dynamic auto or dynamic desirable + access = access
Depending on the switch model and IOS version, the default might be “dynamic auto” or “dynamic
desirable”.
•
dynamic auto + dynamic desirable = trunk
•
dynamic desirable + dynamic desirable = trunk
•
dynamic auto or dynamic desirable + trunk = trunk
Now configure trunk on ACC1 switch and no configuration on ACC2 switch
ACC1(config)#interface fastEthernet 0/24
ACC1(config-if)#switchport mode trunk
ACC1#show interfaces fastEthernet 0/24 switchport
Name: Fa0/24
Switchport: Enabled
Administrative Mode: trunk
Operational Mode: trunk
Administrative Trunking Encapsulation: dot1q
Operational Trunking Encapsulation: dot1q
Negotiation of Trunking: On
Access Mode VLAN: 1 (default)
Trunking Native Mode VLAN: 1 (default)
Voice VLAN: none
Administrative private-vlan host-association: none
Administrative private-vlan mapping: none
Administrative private-vlan trunk native VLAN: none
Administrative private-vlan trunk encapsulation: dot1q
Administrative private-vlan trunk normal VLANs: none
Administrative private-vlan trunk private VLANs: none
Operational private-vlan: none
Trunking VLANs Enabled: All
Pruning VLANs Enabled: 2-1001
Check the switch ACC2
ACC2#show interfaces fastEthernet 0/24 switchport
Name: Fa0/24
Switchport: Enabled
Administrative Mode: dynamic auto
Operational Mode: trunk
Administrative Trunking Encapsulation: dot1q
Operational Trunking Encapsulation: dot1q
Negotiation of Trunking: On
Access Mode VLAN: 1 (default)
Trunking Native Mode VLAN: 1 (default)
Voice VLAN: none
Administrative private-vlan host-association: none
Administrative private-vlan mapping: none
Administrative private-vlan trunk native VLAN: none
Administrative private-vlan trunk encapsulation: dot1q
Administrative private-vlan trunk normal VLANs: none
Administrative private-vlan trunk private VLANs: none
Operational private-vlan: none
Trunking VLANs Enabled: All
Pruning VLANs Enabled: 2-1001
But the port is already trunk ports, right? This is because of DTP
Dynamic auto or dynamic desirable + trunk = trunk
The DTP protocol is unauthicated which means that a station can send false DTP packets, pretending to
be a switch. If the switchport is configured as a dynamic port, an attacker can lure the switchport to
become a trunk port and he will gain access to all VLANs allowed on that trunk. Therefore, after a
network has been installed, it is the best practice to set the mode statically and deactivate the DTP
protocol on a port using the command switchport nonegotiate (this command is necessary only for trunk
ports, as the static access ports do not send DTP packets automatically).
ACC1(config)#interface fastEthernet 0/24
ACC1(config-if)#switchport mode trunk
ACC1(config-if)#switchport nonegotiate
ACC1(config-if)#end
Verification
On ACC1 switch
ACC1#show interfaces fastEthernet 0/24 switchport
Name: Fa0/24
Switchport: Enabled
Administrative Mode: trunk
Operational Mode: trunk
Administrative Trunking Encapsulation: dot1q
Operational Trunking Encapsulation: dot1q
Negotiation of Trunking: Off
Access Mode VLAN: 1 (default)
Trunking Native Mode VLAN: 1 (default)
Voice VLAN: none
Administrative private-vlan host-association: none
Administrative private-vlan mapping: none
Administrative private-vlan trunk native VLAN: none
Administrative private-vlan trunk encapsulation: dot1q
Administrative private-vlan trunk normal VLANs: none
Administrative private-vlan trunk private VLANs: none
Operational private-vlan: none
On ACC2 switch
ACC2#show interfaces fastEthernet 0/24 switchport
Name: Fa0/24
Switchport: Enabled
Administrative Mode: dynamic auto
Operational Mode: static access
Administrative Trunking Encapsulation: dot1q
Operational Trunking Encapsulation: native
Negotiation of Trunking: On
Access Mode VLAN: 1 (default)
Trunking Native Mode VLAN: 1 (default)
Voice VLAN: none
Administrative private-vlan host-association: none
Administrative private-vlan mapping: none
Administrative private-vlan trunk native VLAN: none
Administrative private-vlan trunk encapsulation: dot1q
Administrative private-vlan trunk normal VLANs: none
Administrative private-vlan trunk private VLANs: none
Operational private-vlan: none
Now this port of this switch can not be a trunk port as we have disabled auto negotiation, so we need to
create trunk port manually
ACC2(config)#interface fastEthernet 0/24
ACC2(config-if)#switchport mode trunk
ACC2(config-if)#switchport nonegotiate
ACC2#show interfaces fastEthernet 0/24 switchport
Name: Fa0/24
Switchport: Enabled
Administrative Mode: trunk
Operational Mode: trunk
Administrative Trunking Encapsulation: dot1q
Operational Trunking Encapsulation: dot1q
Negotiation of Trunking: Off
Access Mode VLAN: 1 (default)
Trunking Native Mode VLAN: 1 (default)
Voice VLAN: none
Administrative private-vlan host-association: none
Administrative private-vlan mapping: none
Administrative private-vlan trunk native VLAN: none
Administrative private-vlan trunk encapsulation: dot1q
Administrative private-vlan trunk normal VLANs: none
Administrative private-vlan trunk private VLANs: none
Operational private-vlan: none
Now this port become a trunk
Configure Access port
ACC1(config)#interface range fastEthernet 0/10-15
ACC1(config-if-range)#switchport mode access
ACC1(config-if-range)#switchport access vlan 10
ACC1(config)#interface range fastEthernet 0/20-23
ACC1(config-if-range)#switchport mode access
ACC1(config-if-range)#switchport access vlan 20
ACC2(config-vlan)#interface range fastEthernet 0/10-15
ACC2(config-if-range)#switchport mode access
ACC2(config-if-range)#switchport access vlan 10
ACC2(config)#interface range fastEthernet 0/20-23
ACC2(config-if-range)#switchport mode access
ACC2(config-if-range)#switchport access vlan 20
Assign IP Address to host
Our given subnet for vlan 10: 192.168.10.0/24 & Vlan 20: 192.168.20.0/24
So we will assign IP to associated vlan hosts from this subnet
Verification
First, we will apply ping commands which are the same vlan host
Successful, but if we try to ping the different vlan host, what happen? Let’s check
Every Vlan is like a separate island, can’t communicate with other vlans unless if we configure inter-vlan
routing. We will do this later.
ASA Port-Channel and Redundant Interface
Port-Channel
A Port-Channel provides a method of aggregating multiple Ethernet links into a single
logical channel. The benefit of Ether Channel or Port Channel is that you are able to
configure redundancy and load balancing in the same time; ASA Interfaces will be
bundle to a link in the Layer 2 then you assign all VLANs directly to the Port Channel
and so they applied to all Interfaces of ASA.
Redundant Interfaces
They are used for interface redundancy. The idea is to provide for the physical link
failure. That is – you combine two physical interfaces on the ASA into a virtual one, then
you configure all the Layer 3 parameters on this virtual interface. At the same time only
ONE of the interfaces in a group is active (that is - no load sharing), if it fails ASA
transparently switches to the next available interface in a group and all the traffic passes
through it.
First, Make the Interfaces are up
ASA(config)# interface ethernet 2
ASA(config-if)# no shutdown
ASA(config-if)# interface ethernet 3
ASA(config-if)# no shutdown
ASA(config-if)# interface ethernet 0
ASA(config-if)# no shutdown
ASA(config-if)# interface ethernet 1
ASA(config-if)# no shutdown
ASA(config-if)# exit
ASA(config)#
Port-channel Configuration
ciscoasa(config)# hostname ASA
ASA(config)# interface ethernet 2
ASA(config-if)# channel-group 10 mode on
INFO: security-level, delay and IP address are cleared on Ethernet2.
ASA(config-if)# no security-level
ASA(config-if)# no ip address
ASA(config-if)# exit
ASA(config)#
ASA(config)# interface ethernet 3
ASA(config-if)# channel-group 10 mode on
INFO: security-level, delay and IP address are cleared on Ethernet3.
ASA(config-if)# no nameif
ASA(config-if)# no security-level
ASA(config-if)# no ip address
ASA(config-if)# exit
Create sub-interface, Vlan & assign security-level and IP address
ASA(config)# interface port-channel 10.10
ASA(config-subif)# vlan 10
ASA(config-subif)# no shutdown
ASA(config-subif)# nameif inside1
INFO: Security level for "inside1" set to 0 by default.
ASA(config-subif)# security-level 100
ASA(config-subif)# ip address 192.168.10.1 255.255.255.0
ASA(config-subif)# exit
ASA(config)# interface port-channel 10.20
ASA(config-subif)# vlan 20
ASA(config-subif)# nameif inside2
INFO: Security level for "inside2" set to 0 by default.
ASA(config-subif)# security-level 100
ASA(config-subif)# ip address 192.168.20.1 255.255.255.0
ASA(config-subif)# no shutdown
ASA(config-subif)# exit
Verification
The ports are shutdown state, apply no shut down
ASA(config)# interface port-channel 10
ASA(config-if)# no shutdown
ASA(config-if)# exit
ASA(config)# interface port-channel 10.10
ASA(config-subif)# no shutdown
ASA(config-subif)# interface port-channel 10.20
ASA(config-subif)# no shutdown
ASA(config-subif)# end
Now Verify it again
The ports are functional
Ether-Channel, trunk, Vlan, Access port configuration on Switch
Switch#conf t
Enter configuration commands, one per line. End with CNTL/Z.
Switch(config)#interface range ethernet 0/0-1
Switch(config-if-range)#channel-group 10 mode on
Creating a port-channel interface Port-channel 10
Switch(config-if-range)#exit
Switch(config)#interface port-channel 10
Switch(config-if)#switchport trunk encapsulation dot1q
Switch(config-if)#switchport mode trunk
Switch(config-if)#exit
Switch(config)#vlan 10
Switch(config-vlan)#vlan 20
Switch(config-vlan)#exit
Switch(config)#interface ethernet 0/3
Switch(config-if)#switchport mode access
Switch(config-if)#switchport access vlan 10
Switch(config-if)#exit
Switch(config)#interface ethernet 0/2
Switch(config-if)#switchport mode access
Switch(config-if)#switchport access vlan 20
Switch(config-if)#exit
From Router 5
Router#conf t
Router(config)#hostname R5
R5(config)#interface fastEthernet 0/0
R5(config-if)#ip address 192.168.10.10 255.255.255.0
R5(config-if)#no shutdown
R5(config-if)#exit
R5(config)#no ip routing
R5(config)#ip default-gateway 192.168.10.1
R5(config)#end
From Router 4
Router(config)#hostname R4
R4(config)#interface fastEthernet 0/0
R4(config-if)#ip address 192.168.20.20 255.255.255.0
R4(config-if)#no shutdown
R4(config-if)#exit
R4(config)#no ip routing
R4(config)#ip default-gateway 192.168.20.1
Configure redundant Interface
ASA(config)# interface redundant 1
ASA(config-if)# member-interface ethernet 0
INFO: security-level and IP address are cleared on Ethernet0.
ASA(config-if)# member-interface ethernet 1
INFO: security-level and IP address are cleared on Ethernet1.
ASA(config-if)# no shutdown
ASA(config-if)# nameif outside
INFO: Security level for "outside" set to 0 by default.
ASA(config-if)# ip address 192.168.30.1 255.255.255.0
ASA(config)# interface ethernet 0
ASA(config-if)# no shutdown
ASA(config)# interface ethernet 1
ASA(config-if)# no shutdown
ASA(config-if)# exit
Assign IP to R6 router
Router(config)#hostname R6
R6(config)#interface fastEthernet 0/0
R6(config-if)#ip address 192.168.30.30 255.255.255.0
R6(config-if)#no shutdown
R6(config-if)#exit
R6(config)#no ip routing
R6(config)#ip default-gateway 192.168.30.1
Create object-group
ASA(config)# object network vlan10
ASA(config-network-object)# host 192.168.10.10
ASA(config-network-object)# object network vlan20
ASA(config-network-object)# host 192.168.20.20
ASA(config-network-object)# exit
ASA(config)# object network out-pc
ASA(config-network-object)# host 192.168.30.30
ASA(config-network-object)# exit
Create ACL to permit ICMP
ASA(config)# access-list out-in permit icmp object out-pc object vlan10
ASA(config)# access-list out-in permit icmp object out-pc object vlan20
ASA(config)# access-group out-in in interface outside
ASA(config)#
Verification
SD-WAN
Cisco SD-WAN is a WAN Solution which enables digital and cloud transformation for Enterprise. It uses
all the routing, Security, along with Centralized policy with orchestration facility for large and medium
scale networks.
Cisco SD-WAN is a cloud-first architecture that separates data and control planes, managed through the
Cisco vManage console. You can quickly establish an SD-WAN overlay fabric to connect data centers,
branches, campuses, and co-location facilities to improve network speed, security, and efficiency.
Benefits of Cisco SD-WAN.
Customers deploying Cisco SD-WAN have:
●
65% lower cost of connectivity
●
38% lower five-year cost of operations per 100 users
●
33% more efficient WAN management
●
59% faster onboarding of new services
●
58% faster implementation of policy and configuration changes
●
94% reduction in unplanned downtime
●
40% improvement in Microsoft 365 performance
●
48% reduction in application latency
Why software-defined WAN?
Enhanced application experience
•
•
•
Predictable SLA for voice, cloud, and other critical enterprise applications
Dynamic path selection that automatically steers critical applications around network problems
Multiple hybrid active-active links for all scenarios
Pervasive security
•
•
•
•
Complete integrated security with cloud-delivered SASE or on-premises model, depending on the
business requirements and compliance needs of your organization
Fully integrated with cloud-delivered Cisco Umbrella ®, offering protection against security
blind spots and cyberthreats
Zero-trust foundation with authentication, encryption, and segmentation
Web security, enterprise firewall, IPS, AMP next-generation antivirus, DNS layer enforcement,
URL filtering, and SSL decryption proxy
Optimized for multicloud
•
•
•
•
Enables SD-WAN to extend to major public cloud and colocation providers with Cloud OnRamp
Automatically selects the fastest, most reliable path for real-time optimized performance with
Microsoft 365, Salesforce, and other major SaaS applications
Automated workflow integration for AWS, Azure, and Google Cloud
Regionalized internet access using colocation facilities to quickly spin up new services and
provide consistent policy for employees, partners, and guests across the WAN
Operational simplicity
•
•
•
Full integration of unified communications, multicloud, and security into SD-WAN
End-to-end visibility, segmentation policy management, and security enforcement across the
network with a single dashboard
Automation with template-based zero-touch provisioning and RESTful integration
Visibility and actionable insight
•
•
•
Granular visibility into applications and infrastructure, enabling rapid failure correlation and
mitigation
Sophisticated forecasting and what-if analysis for effective resource planning
Insightful policy recommendations and root cause analysis based on traffic patterns
The most widely deployed SD-WAN
•
•
•
•
Cisco boasts large deployments in all major sectors, such as retail, healthcare, financial services,
and energy, and is the most widely deployed SD-WAN across the Fortune 2000, with
deployments in 70% of Fortune 100 enterprises
Thousands of production sites in every major industry
Rich analytics with benchmarking data across the industry
Deployed in PCI- and HIPAA-compliant industry sectors
Cisco Viptela SD-WAN components
vManage Network Management System (NMS)—The vManage NMS is a centralized network
management system that lets you configure and manage the entire overlay network from a simple
graphical dashboard – in the data center.
vSmart Controller—The vSmart controller is the centralized brain of the Viptela solution, controlling
the flow of data traffic throughout the network. The vSmart controller works with the vBond orchestrator
to authenticate Viptela devices as they join the network and to orchestrate connectivity among the vEdge
routers – in the data center.
vBond Orchestrator—The vBond orchestrator automatically orchestrates connectivity between vEdge
routers and vSmart controllers. If any vEdge router or vSmart controller is behind a NAT, the vBond
orchestrator also serves as an initial NAT-traversal orchestrator – in the DMZ.
vEdge Routers—The vEdge routers sit at the perimeter of a site (such as remote offices, branches,
campuses, data centers) and provide connectivity among the sites. They are either hardware devices or
software, vEdge Cloud router. vEdge routers handle the transmission of data traffic.
Domain ID: a logical grouping of vEdge routers and vSmart controllers. vEdge routers can connect only
with the vSmart controllers in their own domain.
Site ID: a physical location within the Viptela overlay network, such as a branch office, a data center, or a
campus. Each Viptela device at a site is identified by the same site ID
System IP Address: similar to the router ID on a regular router
TLOC: transport location, identifies the physical interface where a vEdge router connects to the WAN
transport network or to a NAT gateway.
OMP (Overlay Management Protocol): runs inside the DTLS connection and carries the routes, next
hops, keys, and policy information needed to establish and maintain the overlay network. OMP runs
between the vEdge router and the vSmart controller and carries only control information.
How do you deploy Cisco SD-WAN?
●
Deployed in virtual, cloud, or physical form factors with full cloud management
●
In-house IT or managed service
●
Pricing is based on hardware and annual subscription licenses
VRF-lite
VRF-lite is considered a way of using VRF's to segment networks without MPLS. VRF
(virtual routing and forwarding) is a core technology of MPLS which allows a service
provider to provide BGP routing to many customer VPNs while isolating each customer's
routing tables.VRF lite provides the same isolation in an enterprise LAN.
VRF lite is used to separate router interfaces within the routing tables. It can be used
when multiple customers share a router.
Basic Configuration
R1(config)#interface fastEthernet 0/0
R1(config-if)#ip address 192.168.10.1 255.255.255.0
R1(config-if)#no shutdown
R1(config-if)#exit
R1(config)#int fastEthernet 1/0
R1(config-if)#ip address 192.168.20.1 255.255.255.0
R1(config-if)#no shutdown
R1(config-if)#exit
R1(config)#interface fastEthernet 1/1
R1(config-if)#ip address 100.100.100.1 255.255.255.0
R1(config-if)#no shutdown
R1(config-if)#exit
R1(config)#interface fastEthernet 2/0
R1(config-if)#ip address 200.200.200.1 255.255.255.0
R1(config-if)#no shutdown
R1(config-if)#exit
ISP1(config)#int fastEthernet 0/0
ISP1(config-if)#ip address 100.100.100.2 255.255.255.0
ISP1(config-if)#no shutdown
ISP1(config-if)#exit
ISP1(config)#interface loopback 0
ISP1(config-if)#ip address 2.2.2.2 255.255.255.255
ISP1(config-if)#exit
ISP2(config)#interface loopback 0
ISP2(config-if)#ip address 3.3.3.3 255.255.255.255
ISP2(config-if)#exit
ISP2(config)#interface fastEthernet 0/0
ISP2(config-if)#ip address 200.200.200.3 255.255.255.0
ISP2(config-if)#no shutdown
ISP2(config-if)#exit
Here we will configure the IPv4 address family. VRF must exist before it can be used.
R1(config)#vrf definition ISP1
R1(config-vrf)#address-family ipv4
R1(config-vrf-af)#exit
R1(config)#vrf definition ISP2
R1(config-vrf)#address-family ipv4
R1(config-vrf-af)#exit
Here, every interface has a single VRF. If an interface has no VRF specified, the interface
belongs to the default VRF. We will use the vrf forwarding command on the interface
to associate an interface with the VRF.
R1(config)#interface fastEthernet 1/1
R1(config-if)#vrf forwarding ISP1
% Interface FastEthernet1/1 IPv4 disabled and address(es) removed due to enabling
VRF ISP1
R1(config-if)#ip address 100.100.100.1 255.255.255.0
Here we need to re-assign IP Address as the Addresses are removed when configuring
VRF
R1(config-if)#no shutdown
R1(config-if)#exit
R1(config)#interface fastEthernet 2/0
R1(config-if)#vrf forwarding ISP2