huong dan su dung linqthings4sale trong dotnetnuke
Bạn đang xem bản rút gọn của tài liệu. Xem và tải ngay bản đầy đủ của tài liệu tại đây (1.64 MB, 34 trang )
To use this tutorial you need:
1. Visual Studio Visual Web Developer Express 2008 (download) or Visual
Studio 2008
2. DotNetNuke (download)
3. ASP.NET 3.5 (or higher) (download)
This tutorial will show you how to create a DotNetNuke module using LINQ to SQL.
This will greatly speed module development.
Also see:
Creating a DotNetNuke Module using LINQ to SQL (Part 2)
SETUP
Follow one of the the options below to install DotNetNuke and to create a
DotNetNuke Website:
Setting-up the Development Environment (using IIS)
Setting-up the Development Environment (without IIS)
Setting-up the Development Environment on Windows Vista (using IIS)
Install Visual Studio Express 2008 if you haven't already done so. (download)
Use Visual Studio 2008 to open DotNetNuke:
If using DotNetNuke 4.7 or lower, you will get a message like this:
Click Yes. This will add the needed changes to the web.config to allow LINQ to SQL
to run.
In Visual Studio, select "Build" then "Build Solution". You must be able to build it
without errors before you continue. Warnings are ok.
Are you Ready to Create the Module?
You must have a DotNetNuke 4 website up and running to continue. If you do not
you can use this link and this link to find help.
DotNetNuke is constantly changing as it evolves so the best way to get up-to-date
help and information is to use the DotNetNuke message board.
Create the Table
Log into the website using the Host account.
Click on the HOST menu and select SQL
Paste the following script into the box:
Collapse
CREATE TABLE ThingsForSale (
[ID] [int] IDENTITY(1,1) NOT NULL,
[ModuleId] [int] NOT NULL,
[UserID] [int] NULL,
[Category] [nvarchar](25),
[Description] [nvarchar](500),
[Price] [float] NULL
) ON [PRIMARY]
ALTER TABLE ThingsForSale ADD
CONSTRAINT [PK_ThingsForSale] PRIMARY KEY CLUSTERED
([ID]) ON [PRIMARY]
Select the "Run as Script" box and click "Execute".
Set Up The Module
If you haven't already opened the DotNetNuke site in Visual Studio (or Visual Web
Developer Express), select File then Open Web Site.
Select the root of the DotNetNuke site and click the Open button.
Right-click on the App_Code folder and select New Folder.
Name the folder LinqThings4Sale.
In the Solution Explorer, double-click on the web.config file to open it.
In the web.config file add the line:
<add directoryName="LinqThings4Sale" />
to the <codeSubDirectories> section. This is done to instruct ASP.NET that there
will be code created in a language other than VB.NET (which is the language of the
main DotNetNuke project).
Right-click on the App_Code folder and select Refresh Folder.
The LinqThings4Sale folder icon will now change to indicate that the folder is now
recognized as a special folder.
Create the LINQ to SQL Class
Right-click on the LinqThings4Sale directory located under the App_Code
directory and select Add New Item.
In the Add New Item window, select the LINQ to SQL Classes template, enter
LinqThings4Sale.dbml for the Name and select Visual C# for the Language. Click
the Add button.
Wait a few minutes and the Object Relational Designer will open in the Edit
window.
From the toolbar, select View then Server Explorer.
In the Server Explorer, right-click on the root node (Data Connections) and select
Add Connection.
Enter the information to connect to the database the DotNetNuke site is running on.
This will not be the connection that the module will use when it runs (you will set that
connection in a later step). This is only a connection to allow you to use the Object
Relational Designer.Click the OK button.
When the connection shows up in the Server Explorer, click the plus icon to expand
it's object tree to display the tables.
Locate the ThingsForSale table.
Click on it and drag and drop it on the Object Relational Designer panel on the left.
Click anywhere in the white space on the Object Relational Designer panel so that
the LinqThings4SaleDataContext properties show in the Properties window (you
can also select it from the drop-down in the properties window).
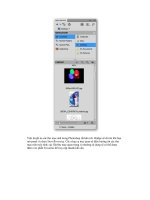
In the Connection drop-down select SiteSqlServer (Web.config). This instructs the
class to use the connection string of the DotNetNuke site that it is running on.
The connection properties should resemble the graphic on the right.
Close the LinqThings4Sale.dbl file. You should see a confirmation screen asking
you to save it. Click the Yes button.
The Data Access layer is now complete.
Create The Module
In the Solution Explorer, Right-click on the DesktopModules folder and select New
Folder.
Name the folder LinqThings4Sale.
Right-click on the LinqThings4Sale folder and select Add New Item.
From the Add New Item box, select the Web User Control template, enter
View.ascx for the Name, select Visual C# for the Language, and check the box next
to Place code in separate file.
When the View.ascx page opens, switch to source view and locate the Inherits line.
Change it to:
DotNetNuke.Modules.LinqThings4Sale.View
Save the file.
Click the plus icon next to the View.ascx file in the Solution Explorer (under the
LinqThings4Sale directory) Double-click on the View.ascx.cs file to open it.
Replace all the code with the following code:
Collapse
using System;
using System.Collections;
using System.Configuration;
using System.Data;
using System.Linq;
using System.Web;
using System.Web.Security;
using System.Web.UI;
using System.Web.UI.HtmlControls;
using System.Web.UI.WebControls;
using System.Web.UI.WebControls.WebParts;
using System.Xml.Linq;
using DotNetNuke;
using DotNetNuke.Security;
using LinqThings4Sale;
namespace DotNetNuke.Modules.LinqThings4Sale
{
public partial class View :
DotNetNuke.Entities.Modules.PortalModuleBase
{
protected void Page_Load(object sender, EventArgs e)
{
}
}
}
Save the file. From the Toolbar, select Build then Build Page. The page should build
without errors.
Switch to the View.ascx file and switch to the Design View. From the Toolbox, in the
Data section, select the LinqDataSource control.
Drag the LinqDataSource control to the design surface of the View.ascx page. Click
on the options (right-arrow on the right side of the control) and select Configure Data
Source.
In the Configure Data Source box, select
LinqThings4Sale.LinqThings4SaleDataContext in the drop-down and click the
Next button.
The Configure Data Selection screen will show. Leave the default options.
Click the Where button.
On the Configure Where Expression screen:
• Select ModuleId in the Column drop-down
• Select = = in the Operator drop-down
• Select None for the Source drop-down
Click the Add button.
This instructs the LinqDataSource control to filter the results by ModuleId. Each
new instance of the module will have a different ModuleId. We will pass this
ModuleId to the LinqDataSource control in the code behind in a later step. Click the
OK button.
Click the Finish button.
On the options for the LinqDataSource control, check the box next to Enable
Delete, Enable Insert, and Enable Update.
Drag a GiridView control from the Toolbox and place it under the LinqDataSource
conrol. On the options for the GridView control, select LinqDataSource1 from the
Choose Data Source drop-down.
The GridView will bind to the data source and create columns for the fields in the
table.
On the options for the GridView control, check the box next to Enable Paging,
Enable Sorting, Enable Editing, and Enable Deleting.
On the options for the GridView control, click the Edit Columns link.
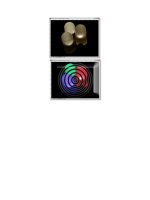
Select the ID column in the Selected Fields section, and under the BoundField
properties section, change Visible to False. Do the same for the ModuleId and
UserID fields. Click the OK button.
The GridView will now resemble the image on the right.
Drag a FormView control to the design surface and place it a few spaces below the
GridView (you will have to place a LinkButton control between them in a later
step).
On the options for the FormView control, select LinqDataSource1 on the Choose
Data Source drop-down. Click the Edit Templates link.
On the options for the FormView control, select InsertItem Template on the
Display
drop-down.
Switch to source view and replace the InsertItemTemplate section with the
following code:
Collapse
<InsertItemTemplate>
Category: <asp:DropDownList ID="DropDownList1" runat="server"
DataSource='<%# Eval("Category") %>'
SelectedValue='<%# Bind("Category") %>' EnableViewState="False">
<asp:ListItem>Home</asp:ListItem>
<asp:ListItem>Office</asp:ListItem>
<asp:ListItem>Electronics</asp:ListItem>
<asp:ListItem>Misc.</asp:ListItem>
</asp:DropDownList>
Price: $
<asp:TextBox ID="PriceTextBox" runat="server" Text='<%# Bind("Price")
%>' Width="56px"
CausesValidation="True" EnableViewState="False"></asp:TextBox><br />
<asp:RangeValidator ID="RangeValidator1" runat="server"
ControlToValidate="PriceTextBox"
ErrorMessage="Price must be greater than 0" MaximumValue="99999"
MinimumValue="1"></asp:RangeValidator>
<asp:RequiredFieldValidator ID="RequiredFieldValidator1"
runat="server"
ControlToValidate="PriceTextBox"
ErrorMessage="A price is
required"></asp:RequiredFieldValidator><br />
Description:<br />
<asp:TextBox ID="DescriptionTextBox" runat="server" Text='<%#
Bind("Description") %>'
MaxLength="499" TextMode="MultiLine" Width="286px"
EnableViewState="False"></asp:TextBox><br
/>
<asp:LinkButton ID="InsertButton" runat="server"
CausesValidation="True"
CommandName="Insert"
Text="Insert" OnClick="InsertButton_Click"></asp:LinkButton>
<asp:LinkButton ID="InsertCancelButton" runat="server"
CausesValidation="False"
CommandName="Cancel"
Text="Cancel" OnClick="InsertCancelButton_Click"></asp:LinkButton>
</InsertItemTemplate>
Switch to design view, Select Edit Templates and then select InsertItem Template
and the form will resemble the image on the right.
On the options for the FormView control, click on End Template Editing.
In the Properties for the FormView, set the DefaultMode to Insert.
Also, in the Properties for the FormView, set Visible to False.
In the ToolBox, click on the LinkButton control.
Drag the control to the design surface and drop it between the GridView and the
FormView.
In the properties for the LinkButton (if you have a hard time selecting the properties,
switch to source view and double-click on "<asp:LinkButton"), set the Text to Add
My Listing.
Create the Code Behind
The View.ascx file should now resemble the image on the right. A few code behind
methods are now required to complete the module.
Code Behind for the LinqDataSource Control
We want to alter the behavior of the LinqDataSource control so that it only shows
the records for this particular instance of the module. In addition, when inserting a
record we want to insert the current ModuleId and the current UserID. Right-click on
the LinqDataSource control and select Properties. The properties will show up in
the Properties window (if it doesn't, switch to source view and click on
"<asp:LinqDataSource").