Build Your Own Website the Right Way using HTML & CSS docx
Bạn đang xem bản rút gọn của tài liệu. Xem và tải ngay bản đầy đủ của tài liệu tại đây (12.63 MB, 144 trang )
Build It the Right Way—First Time,
Every Time
Hey there.
I recently came across a website that explains the importance of learning something
the right way:
“Learning is easy. Our brains work like a computer with a really powerful word
processor, so anything that you type in and ‘save’ will be stored in a file that can
be accessed at a later date. The problem with most people, though, is that they tend
to save their files in a ‘read only’ format, which means that they are unable to edit
them in the future. In addition, many of these learning files are ‘locked’ inside the
brain, and the password is so StRoNg77 that it is often forgotten. Unfortunately for
us, our brain doesn't come equipped with an administrator to resend passwords,
retrieve documents, and unlock files.”
1
You may have experienced this in one or more areas of your life: that word you can
never spell right, or perhaps that song to which you always sing the wrong lyr-
ics—even though you know they’re incorrect. Maybe your dad taught you how to
play tennis, and then when you were older you took professional lessons, and dis-
covered your technique was all wrong—and it was so hard to change!
Building a website is no different. There are lots of wrong ways to do it. Hacks and
workarounds may seem like a good idea at the time, but they will only bring you a
world of pain later—and as we know, it’s not easy to change habits. To ensure your
first website is easy to update, works in all browsers, and doesn’t constantly break
and give errors, you must learn how to build it using industry best practices.
Build Your Own Website the Right Way using HTML & CSS will teach you exactly
this. Reading through the sample chapters, you’ll soon discover that this how-to
guide is perfect for beginners with no knowledge about coding or building web
pages. All you need to get started is a PC or laptop—and this book. You’ll learn
everything from basic HTML and CSS, optimizing graphics and using forms to
1
/>tracking your website’s visitors and utilizing social media. This sample contains
four complete chapters to give you a taste of what this book is all about:
1. Chapter 1: Setting Up Shop
2. Chapter 2: Your First Web Pages
3. Chapter 8: Interacting with Social Media
4. Chapter 9: What to Do When Things Go Wrong
Enjoy!
Build Your Own Website the Right Way Using HTML & CSS (www.sitepoint.com)
viii
What’s in This Excerpt
Preface
Chapter 1: Setting Up Shop
In this chapter, we’ll make sure that you have all the tools you’re going to need
to build your website. I’ll explain where you can access the right tools—all of
them for free! By the chapter’s end, you’ll be ready to get cracking on your first
website.
Chapter 2: Your First Web Pages
Here, we’ll learn what makes a web page. We’ll explore HTML, understand the
basic requirements of every web page, and investigate the common elements
that you’ll see on many web pages. Then, you’ll start to create pages yourself.
In fact, by the end of this chapter, you’ll have the beginnings of your first website.
Chapter 4: Shaping Up With CSS
This chapter reveals what CSS can do for border styles and page layouts in
general. First, we’ll review the full range of border effects that you can apply to
elements such as headings and paragraphs. We’ll experiment with dotted borders,
and big, bold borders, as well as some more subtle effects. In the second half of
the chapter, we’ll learn how it’s possible to use CSS to position the elements of
a web page—including blocks of navigation—anywhere on the screen.
Chapter 8: Interacting With Social Media
With the website almost built, it’s time to start thinking about other websites
and services out there that you can use to your advantage. As (seemingly)
everyone is on Facebook or Twitter these days, it would be remiss of us not to
look at the opportunities that those sites and their services can offer. We’ll look
at how you can embed your Facebook and Twitter updates on your site simply
and easily and show how to add “Like" and “Follow" links.
What’s in the Rest of the Book
Chapter 3: Adding Some Style
Now we’ll start to add a bit of polish to the web pages we created in Chapter 2.
You’ll learn what CSS is and why it’s a good technology, before putting it into
action for yourself. As the chapter progresses, you’ll see the project website start
to take shape as we apply background and foreground colors, change the appear-
ance of text, and make web links look different according to whether they’ve
been visited or not.
Chapter 5: Picture This! Using Images on Your Website
As the chapter title suggests, this one’s all about images. We’ll discover the
difference between inline images and background images, and look into the issue
of making images accessible for blind or visually impaired web surfers. We’ll
also learn how to adjust pictures to suit your website using the software that
we downloaded in Chapter 1. Then, we’ll put all this knowledge together in a
practical sense to create a photo gallery for the project site.
Chapter 6: Tables: Tools for Organizing Data
Here, we’ll learn when tables should be used and, perhaps more importantly,
when they should not be used. Once the basics are out of the way, I’ll show
how you can breathe life into an otherwise dull-looking table—again, using
CSS—to make it more visually appealing.
Chapter 7: Forms: Interacting with Your Audience
In Chapter 7, we learn all about forms—what they’re used for, what’s required
to build a form, and what you can do with the data you collect through your
form. I’ll teach you what the different form elements—text inputs, checkboxes,
and so on—do, and show you how to use CSS to make a form look more attract-
ive. Finally, I’ll show you how you can use a free web service to have the data
that’s entered into your form emailed to you.
Chapter 9: Launching Your Website
It’s all well and good to build a website for fun, but you need a way for people
to see it—that’s what this chapter is all about. We’ll learn about hosting plans,
discuss the pros and cons of using free services, and look at the tools you’ll
need in order to transfer your files from your computer to a web server for the
world to see.
Chapter 10: Enhancing the Site with HTML5 and CSS3
You will have already been using HTML5 up to this point, though not features
that are new to HTML5. Likewise, you’ll have a good grounding of CSS by this
stage, but there are some new CSS3 features that you’ll really love. In this
chapter, we’ll give the project site an HTML5 and CSS3 makeover, showing
Build Your Own Website the Right Way Using HTML & CSS (www.sitepoint.com)
x
how you can enhance the site, but also pointing out some of the pitfalls and
quirks to be aware of with these newer features.
Chapter 11: Adding Interactivity with jQuery
The days of static websites are well and truly over. You want to present a dy-
namic, interactive site that gives users a sense of ownership and inclusion—not
to mention some seriously impressive effects. How do you add that all-important
layer of “behavior” to your site? That’s where jQuery—a downloadable JavaScript
library brimming with functionality—comes in.
Chapter 13: Pimp My Site: Cool Stuff You Can Add for Free
You’ve heard of the MTV reality program Pimp My Ride, right? No? Well, every
week, these guys take an everyday car and transform it—with some well-placed
and carefully executed cosmetic touches—into a real head-turner of a vehicle.
And that’s the aim of this chapter for your website! You’ll discover that there
are all kinds of tools, plugins, and add-ons that you can build into your website
to make it even more useful to you and your visitors. Among the tools on offer
are site search facilities, statistics programs, and online discussion forums.
Chapter 14: Where to Now? What You Can Learn Next
In the final chapter, we summarize the skills you’ve learned in this book, and
then consider your options for expanding on these. I’ll recommend websites
that can take you to the next level, and books that really should be on your
bookshelf—or rather, open on your desk next to your computer! We want to
ensure you continue to learn the good stuff once you’ve put this book down.
Build Websites Like a Pro
xi
Chapter
1
Setting Up Shop
Before you dive in and start to build your website, we need to set your computer
up so that it’s ready for the work that lies ahead. This is what this chapter is all
about: ensuring that you have all the tools you need installed and are ready to go.
If you were to look at the hundreds of computing books for sale in your local
bookstore, you’d be forgiven for thinking that you need to invest in a lot of different
programs to build a website. However, the reality is that most of the tools required
are probably sitting there on your computer, tucked away where you wouldn’t think
to look for them. And if ever you don’t have the tool for the job, there’s almost certain
to be one or more free programs available that can handle the task.
I’ve assumed that you already have an internet connection, most likely broadband
(or similar). There’s no need to worry if you have a slower connection, though: it
won’t affect any of the tasks we’ll undertake in this book. It will, however, mean
that some of the suggested downloads or uploads may take longer to complete, but
you probably knew that already.
Planning, Schmanning
At this point, it might be tempting to look at your motives for building a website.
Do you have a project plan? What objectives do you have for the site?
While you probably have some objectives, and some idea of how long you want
to spend creating your site, we’re going to gloss over the nitty-gritty of project
planning to some extent. Project planning is still an important aspect to consider,
but because you’ve picked up a book entitled Build Your Own Website The Right
Way, I’ll assume you probably want to get right into the building part.
As this is your first website, it will be a fairly simple one, so we can overlook
some of the more detailed aspects of site planning. Later, once you’ve learned—and
moved beyond—the basics of building a site, you may feel ready to tackle a larger,
more technically challenging site. When that time comes, proper planning will
be a far more important aspect of the job. But now, let’s gear up to build our first
simple site.
The Basic Tools You Need
As I mentioned, many of the tools you’ll need to build your first website are already
on your computer. So, what tools do you need?
■
The primary—and most basic—tool required is a text editor, which is a program
that allows you to edit plain text files. You’ll use this to write your web pages.
■
Once you’ve written a web page, you can see how it looks in a web
browser—that’s the application you use to view websites.
■
Finally, when you’re happy with your new web page, you can put it on the
Internet using an FTP client; this is a utility that allows you to transfer files
across the Internet using the File Transfer Protocol. Using FTP may seem a little
complicated at first but, thankfully, you won’t need to do it too often. We’ll
discuss FTP clients in detail in Chapter 9.
You already have most of these programs on your computer, so let’s go and find
them.
Build Your Own Website The Right Way Using HTML & CSS (www.sitepoint.com)
Build Your Own Website The Right Way Using HTML & CSS2
Windows Basic Tools
In the following section—and indeed the rest of the book—where we refer to the
Windows operating system, that’s a shorthand way of saying Windows 7 (in all its
confusing varieties), Microsoft’s latest incarnation of its operating system. Any in-
structions and screenshots will be with Windows 7 in mind. However, we’ll also
cater for people using older versions of Windows. There are still many people out
there who use XP or Vista, so where instructions provided for Windows 7 differ
from earlier versions, we’ll explain these for you.
Your Text Editor: Notepad
The first tool we’ll consider is the text editor. Windows comes with a very simple
text editor called Notepad. Many professional web designers using complicated
software packages first started out years ago using Notepad; indeed, many profes-
sionals using expensive pieces of software aimed to save time still resort to using
Notepad for many tasks. Why? Well, because it’s so simple, little can go wrong. It
also loads much more quickly than full-featured web development programs. Bells
and whistles are definitely not featured.
You can find Notepad in the Start menu under All Programs > Accessories.
Shortcut to Notepad
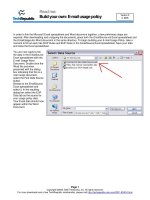
To save yourself navigating to this location each time you want to open Notepad,
create a shortcut on your desktop. With the Start menu open to display Notepad’s
location, hold down the Ctrl key, and then click and hold down the mouse button.
Now drag the Notepad icon to your desktop. When you release the mouse button,
a shortcut to the application will appear on your desktop, as in Figure 1.1. The
same goes for any other application you may find yourself using frequently in
Windows.
Figure 1.1. Creating a shortcut to Notepad
Build Websites Like a Pro
3Setting Up Shop
Notepad is the most basic of applications, as you can see from Figure 1.2.
Figure 1.2. Notepad: a contender for the world’s plainest program
Your Web Browser: Internet Explorer
Once you’ve created a web page using Notepad, you’ll need a way to view the results
of your handiwork. You’ll remember that in the preface to this book, Internet Explorer
(IE) was mentioned. Well, that’s your viewer. As Figure 1.3 shows, Internet Explorer
is in the Programs folder (accessed via All Programs from the Start menu, near the
Windows logo), but a shortcut may also lurk on your desktop.
Figure 1.3. Internet Explorer: Microsoft’s browser of choice
Build Your Own Website The Right Way Using HTML & CSS (www.sitepoint.com)
Build Your Own Website The Right Way Using HTML & CSS4
Mac OS X Basic Tools
Like Windows, the Mac operating system (specifically OS X; we won’t be looking
at previous versions of the Mac OS) has a number of tools that you can use straight
out of the box. These tools are practically the equivalent to the Windows programs
mentioned above.
Your Text Editor: TextEdit
While Windows has Notepad, the Mac has TextEdit, which can be found in the
Applications folder, as Figure 1.4 illustrates.
Figure 1.4. TextEdit comes as part of Mac OS X’s default installation
Unlike Notepad, TextEdit works as a rich text editor by default, which means we
can work with fonts, make text bold and italic, and so on. However, we want to
work with TextEdit as a plain text editor, so you’ll need to adjust some of TextEdit’s
preferences. Start TextEdit, and then select TextEdit > Preferences from the menu to
bring up the Preferences screen. Select Plain text within New Document Attributes;
then close the Preferences screen. The next time you create a new file in TextEdit,
it will be a plain text document.
Build Websites Like a Pro
5Setting Up Shop
Your Web Browser: Safari
The default browser for Mac users is Safari. You can usually find Safari in the dock
(being the bar of icons at the bottom of your screen), but you can also access it
through the Applications folder, as Figure 1.5 illustrates.
Figure 1.5. Safari is available via Mac’s Applications folder
Stick It in the Dock
Just as you can drag shortcuts to programs onto the Windows desktop, you can
add programs to the dock in Mac OS X. To add a program to the dock, just drag
its icon from the Applications folder onto the dock, and presto! The application is
now easily accessible whenever you need it.
If you’re using a slightly older Mac, you may also have a copy of Internet Explorer
installed. My advice on Internet Explorer for Mac? Send it to the Trash. The Mac
version of IE was abandoned by Microsoft many years ago, so it is considerably
outdated and rarely supported or used in the wider world. None of the newer Macs
come with this application installed, and it bears no real resemblance to its Windows
counterpart, for those more comfortable using IE.
Build Your Own Website The Right Way Using HTML & CSS (www.sitepoint.com)
Build Your Own Website The Right Way Using HTML & CSS6
Beyond the Basic Tools
You can certainly make a good start using the tools mentioned above. However,
once you’re dealing with a handful of web pages and other resources, you may want
to go beyond the basics. We’ll cover using some slightly more advanced applications
later in the book.
Countless other text editors and web browsers are available for download, and many
of them are free. Obviously, we don’t have time to describe each and every one of
them, so I’ve settled on a few options that have worked for me in the past that you
might like to download and have at your disposal. And remember, they’re all free!
Windows Tools
NoteTab
NoteTab’s tabbed interface lets you have many different files open simultaneously
without cluttering up your screen, as Figure 1.6 illustrates. Files that you’ve opened
are remembered even after you close the program and open it again later, which is
very useful when you’re working on a batch of files over many days. You can
download the free NoteTab, or its Light version, from />Figure 1.6. NoteTab Light’s tabbed interface
Build Websites Like a Pro
7Setting Up Shop
Firefox
As mentioned in the preface, Firefox is a popular alternative to Internet Explorer
and, as we proceed through this book, will be our browser of choice for a number
of reasons. As with NoteTab, Firefox offers a tabbed interface that helps keep your
computer free from window clutter. You can download Firefox from
the browser is depicted in Figure 1.7.
Figure 1.7. Firefox—this creature is worth hunting down
Mac OS X Tools
It is true that there are fewer free programs available for the Mac operating system
than there are for Windows. However, there are a few programs that you might like
to consider as you move beyond the basics.
TextWrangler
TextWrangler is a free, simple text editor made by BareBones Software. As with
NoteTab for Windows, TextWrangler can tidy up your workspace by allowing sev-
eral text files to be open for editing at the same time (the documents are listed in a
pull-out drawer to one side of the interface, rather than in tabs). You can download
Build Your Own Website The Right Way Using HTML & CSS (www.sitepoint.com)
Build Your Own Website The Right Way Using HTML & CSS8
TextWrangler—shown in Figure 1.8—from the BareBones Software website,
1
or
from the Mac App store.
Figure 1.8. TextWrangler, a free text editor from BareBones Software
Firefox
Firefox is also popular with Mac users, many of whom prefer to use it instead of
Safari (often because of the extra features—known as add-ons—that can be bolted
on to the browser). A web page viewed in Firefox should display the same, regardless
of whether the browser is installed on a PC running Windows, on a Mac running
OS X, or on Linux, a free, open source operating system (generally favored by highly
technical people who like to tinker with their computers a lot). The predictability
of Firefox is a welcome change from the bad old days of endless browser competition,
and is one very good reason why we’ll mainly use Firefox in the examples included
in this book.
Not Just Text, Text, Text
You can build an entire website using just the tools mentioned above, but it won’t
be the sexiest site on the Web. What’s missing are images. So far, the programs we’ve
mentioned are used to manipulate plain text or view web pages. If your website is
going to be visually appealing, you’ll need to create and manipulate images, either
from scratch using photos you’ve taken, or by using images that you have the legal
right to use on your website.
1
/>Build Websites Like a Pro
9Setting Up Shop
Unfortunately, when it comes to image-editing software, that old saying, “You get
what you pay for” applies. A professional image-editing program that you install
on your machine, like Photoshop or Fireworks, costs hundreds of dollars. While
these programs offer some excellent capabilities, I’d only recommend that you buy
them if you’re sure that they’re right for you. If you already have a copy of one of
these, or a similar image-editing program, by all means use it and experiment with
it. Programs like PaintShop Photo Pro X3 or Photoshop Elements (a cut-down version
of Photoshop) are more reasonably priced; however, for the purposes of this book,
we’ll only look at tools that are free to download and offer enough functionality to
give you an idea of what’s possible.
Keep an eye open for free image editors that are included (usually as downloads,
sometimes on disks) with internet, computing, and design magazines. Software
vendors often give away older versions of their software in the hope that users might
upgrade to a new version at a later date. Look out for PaintShop Photo Pro X3 (with
a cheesy name like that, it’s hard to miss!), or any image editor that supports lay-
ers—a way to construct an image by stacking two or more layers, one on top of the
other. We’ll keep our image editing fairly simple throughout this book, but it’s cer-
tainly worth keeping an eye open for free (and full-featured) image-editing software,
as such offers will not always be available.
Taking the Big Boys for a Spin
The most commonly used image-editing packages are available for trial download.
They are large downloads (hundreds of megabytes), and may need to be left to
download overnight, even on a broadband connection.
These trial versions are typically available for 30 days’ use; after that time, you
can decide whether you want to buy the full software or stop using the program.
Those 30 days, however, might provide just enough time for you to use the software
while you work through this book.
Adobe Photoshop A trial of Photoshop’s latest version is available
for download.
2
If you’d rather try the lighter Pho-
toshop Elements, trial versions are available for
Windows
3
and Mac.
4
2
/>3
/>4
/>Build Your Own Website The Right Way Using HTML & CSS (www.sitepoint.com)
Build Your Own Website The Right Way Using HTML & CSS10
Adobe Fireworks You can download a trial version of Fireworks
from the Adobe website.
5
PaintShop Photo Pro X3 PaintShop Photo Pro X3 is available for Windows
only. To download a trial version, visit Corel’s
website
6
and click the Free Trials link in the navig-
ation bar.
Windows Tools
The standard Windows install hasn’t always been blessed with image-editing soft-
ware. Certainly this was the case with Windows XP, although, if you bought the
computer as a bundle with PC, scanner, and digital camera, you might be lucky and
find image-editing software included in the deal. (Scout around in your Start > All
Programs menu to see what you can uncover).
In Windows Vista, the Photo Gallery application saw some big improvements over
its previous XP incarnation and included some basic, but still useful, image manip-
ulation tools, including cropping, color, and contrast adjustment. The Photo Gallery
application can be found directly in the Start menu.
In Windows 7, however, those image adjustments were taken away again, at least
from the default installation. You can choose to open the image from Photo Gallery
into Paint, where you gain some very basic editing tools (cropping, rotating), as seen
in Figure 1.9. Or, you could install these extra photo adjustment tools by grabbing
the free Windows Live Photo Gallery.
7
5
/>6
/>7
/>Build Websites Like a Pro
11Setting Up Shop
Figure 1.9. Windows’ Photo Gallery application, which lets you open the image in Paint
Picasa
Whether you’re using Windows 7, Vista, or XP, you may find the image-editing
possibilities offered by the installed programs restrictive. With that in mind, you
might like to try out an excellent image-management tool that Google offers for free
download. The program is called Picasa (it’s also available for Mac users), and it’s
well-equipped to handle most tasks that you’re likely to encounter as you manage
Build Your Own Website The Right Way Using HTML & CSS (www.sitepoint.com)
Build Your Own Website The Right Way Using HTML & CSS12
imagery for your website. Download a copy from the Picasa website,
8
and soon
enough you’ll be using this program to crop, rotate, add special effects, and catalog
the images stored on your computer. Figure 1.10 gives you an idea of the program’s
interface.
Figure 1.10. Picasa: Google’s full-featured image-management tool
Mac OS X Tools
The Mac has a reputation for being favored by designers and creative types, and the
platform makes many tools available to the budding artist; however, they usually
come at a price, one that’s higher than the Windows equivalents. So, what free
software can we use on the Mac, assuming that we want a more permanent tool
than a 30-day trial version of Photoshop or Fireworks?
Preview
Preinstalled on every Mac that you buy these days, Preview handles a raft of simple
image amendments such as cropping and rotating, though you probably know it
best as “the app that opens when I view a PDF.” We’ll be explaining how to use it
for some image changes in Chapter 5.
8
/>Build Websites Like a Pro
13Setting Up Shop
Figure 1.11. Preview handles the basics of image editing
iPhoto
Also included with Mac OS X is a program that probably needs no introduction to
the experienced Mac user: iPhoto. This excellent program is not intended to be a
fully featured image editor; it’s really designed for managing and viewing large
numbers of photos stored on a computer. It’s great for organizing photo albums, but
iPhoto also has some very useful editing facilities that take it beyond a mere cata-
loging tool.
Images can be rotated by arbitrary angles (using the Straighten tool in edit mode),
and a whole range of color adjustments are possible, as seen in Figure 1.12. iPhoto
can be found in the Applications folder, or in the dock.
Build Your Own Website The Right Way Using HTML & CSS (www.sitepoint.com)
Build Your Own Website The Right Way Using HTML & CSS14
Figure 1.12. Using the image-adjustment tools in iPhoto
Online Tools
I’ve focused on programs that you can download and install on your computer for
the purposes of image editing, but there is another way that avoids this entirely.
You can do a surprisingly large amount of editing online for free using Adobe’s
Photoshop Express
9
. The editor is accessed in the navigation menu under Online
Tools and, once you’ve uploaded the image you want to tinker with, you’ll discover
a wide range of options. Removing red-eye, smoothing out blemishes, blurring or
sharpening parts of the image: all of these are possible online. Then, when you’re
happy with your changes, you can save it back to your computer’s hard drive.
Figure 1.13. Where to find Photoshop Express Editor
9
/>Build Websites Like a Pro
15Setting Up Shop
Figure 1.14. Using Photoshop Express to crop an image
Creating a Spot for Your Website
So far, we’ve covered some of the tools you’ll need to create your website. We’ve
looked at programs that are readily available, and where you can find them on your
computer. And when the free tools that came with your computer are not up to the
job, I’ve suggested other programs that you can download and use. Our next task
on the to-do list is to create a space for your website on the hard drive.
Windows
The best place to keep your website files is in a dedicated folder that’s easy to find
within the Documents library (in Vista and XP, just Documents or My Documents,
respectively). The Documents library can easily be found by clicking on the Windows
Explorer icon that sits in the Taskbar (the icon looks like a tabbed folder you might
find in a letter tray). In Windows Vista, you’ll find the Documents folder inside
C:\Users\yourusername; in XP it’s under C:\Documents and Settings\yourusername.
Now create a new folder here called “Web” by selecting File > New > Folder.
Figure 1.15. The Documents library in Windows 7 containing our new “Web” folder
Build Your Own Website The Right Way Using HTML & CSS (www.sitepoint.com)
Build Your Own Website The Right Way Using HTML & CSS16
Displaying the User Folder/My Documents Folder
Can’t find your user folder on your Windows 7 or Vista desktop? Missing your
My Documents folder in XP? You may have removed the icon by accident—it’s
easily done—or it may have never been set up in the first place. This is how you
can place or return the folder to your desktop:
1. From the Start Menu, select Control Panel.
2. Select Appearance and Personalization (or Appearance and Themes in XP).
3. Windows 7 and Vista users: choose Personalization, and at top left is a list of
options, including Change Desktop Icons. A new dialog box will appear, so check
the User’s Files option in the Desktop Icons section, and press OK. Close the Ap-
pearance and Personalization window. You can also access this feature by right-
clicking on the desktop and choosing it from the pop-up menu, as seen in Fig-
ure 1.16
4. XP users: select Change the desktop background from the list of options, and
click the Customize Desktop… button at the bottom. Check the My Documents
option in the dialog box that appears and click OK. Close the Appearance and
Themes window by pressing OK.
5. Your user folder/My Documents folder should now be on the desktop, as shown
in Figure 1.17.
Figure 1.16. Getting to the Personalize options in Windows 7 is also possible by right-clicking on the desktop
Build Websites Like a Pro
17Setting Up Shop