Internet of Thing ASM 02
Bạn đang xem bản rút gọn của tài liệu. Xem và tải ngay bản đầy đủ của tài liệu tại đây (1.64 MB, 25 trang )
Higher Nationals in Computing
Internet of Things
ASSIGNMENT
No.2
Project name:
Smart Parking Sensor System
Learner’s name: Huynh Tran Anh Khoa
Assessor name: NGUYEN VAN SON
Class: GCS0903A
Learner’s ID: GCS200252
Subject’s ID: 1690
Assignment due: 31 August 2022
Assignment submitted:
ASSIGNMENT 2 FRONT SHEET
Qualification
TEC Level 5 HND Diploma in Computing
Unit number and
Unit 43: Internet of Things
title
Submission date
August 31 2022
Re-submission
Date
Date Received 1st
submission
August 31 2022
Date Received 2nd
submission
Student Name
Huỳnh Trần Anh
Khoa
Student ID
GCS200252
Class
GCS0903A
Assessor name
Nguyễn Văn Sơn
Student declaration
I certify that the assignment submission is entirely my own work and I fully understand the
consequences of plagiarism. I understand that making a false declaration is a form of
malpractice.
Student’s signature
KHOA
Grading grid
P5
X
P6
X
P7
X
M5
M6
D2
D3
1|Page
Summative Feedback:
Grade:
Resubmission Feedback:
Assessor Signature:
Date:
Internal Verifier’s Comments:
Signature & Date:
2|Page
Assignment Brief 2 (RQF)
Higher National Certificate/Diploma in Business
Student Name/ID
Number:
Huỳnh Trần Anh Khoa / GCS200252
Unit Number and Title:
Unit 43 – Internet of Things
Academic Year:
2022
Unit Assessor:
Nguyen Van Son
Assignment Title:
Assignment 2 – Internet of Things
Issue Date:
Submission Date:
August 31 2022
Internal Verifier Name:
Date:
Submission Format:
Format:
This assignment is an Individual assignment and specifically including 1
document:
You must use font Calibri size 12, set number of the pages and use multiple
line spacing at 1.3. Margins must be: left: 1.25 cm; right: 1 cm; top: 1 cm and
bottom: 1 cm. The reference follows Harvard referencing system. The
recommended word limit is 2.000-2.500 words. You will not be penalized for
exceeding the total word limit. The cover page of the report has to be the
Assignment front sheet 2.
Submission Students are compulsory to submit the assignment in due date and in a way
requested by the Tutors. The form of submission will be a soft copy posted on
/>Note:
The Assignment must be your own work, and not copied by or from another
student or from
books etc. If you use ideas, quotes or data (such as diagrams) from books, journals or other
sources, you must reference your sources, using the Harvard style. Make sure that you
know how to reference properly, and that understand the guidelines on plagiarism. If you
do not, you definitely get fail
Unit Learning Outcomes:
3|Page
LO1 Analyse what aspects of IoT are necessary and appropriate when designing software
applications
LO2 Outline a plan for an appropriate IoT application using common architecture,
frameworks, tools, hardware and APIs
LO3 Develop an IoT application using any combination of hardware, software, data,
platforms and services.
LO4 Evaluate your IoT application and detail the problem your IoT application solves, the
potential impact on people, business, society and the end user and the problems it might
encounter when integrating into the wider IoT ecosystem
Assignment Brief and Guidance:
You currently work as a product developer for a new startup where you design IoT products
for the consumer, corporate, government and defence clients. As part of your role your
manager has tasked you to plan and develop a new IoT product, service or application for
a potential client. You are required to identify a target user and conduct tests with this user
and include this feedback into multiple iterative versions of your product.
Part 1 (Assignment 1):: For the first part, you must:
•
•
Plan an IoT application for a specific target end user and the tests you intend to
conduct with this user. This plan will be in the form of a document and will include
supporting evidence and material, such as user personas and customer journey
maps.
Create multiple iterations of your application and modify each iteration with
enhancements gathered from user feedback and experimentation. This will follow
the pathway outlined in your plan.(log book,)
Part 2 (Assignment 2): For the second part, you must produce a report to prove that:
•
•
Show evidence about Developed IoT application using any combination of
hardware, software, data, platforms and services (video or images of your IoT
system with code snippet)
Evaluate your IoT application and detail the problem your IoT application solves, the
potential impact on people, business, society and the end user and the problems it
might encounter when integrating into the wider IoT ecosystem
4|Page
Learning Outcomes and Assessment Criteria
Pass
Merit
Distinction
LO3 Develop an IoT application using any combination of hardware, software, data,
platforms and services.
P5 Employ an
appropriate set of tools
to develop your plan into
an IoT application.
M5 Reconcile and evaluate
end user feedback and
determine advantages and
disadvantages of your
chosen IoT techniques.
D3 Critical evaluate
security risks that your
application might
encounter.
P6 Run end user
experiments and
examines feedback.
LO4 Evaluate your IoT application and detail the problem your IoT application solves,
the potential impact on people, business, society and the end user and the problems
it might encounter when integrating into the wider IoT ecosystem
P7 Evaluate end user
feedback from your IoT
application.
M6 Undertake a critical
review and compare your
final application with the
original plan.
D4 Critique the overall
success of your application.
Did it solve your problem?
What is the potential impact
on people, business, society
and the end user? What
problems might it
encounter when integrating
into the wider IoT
ecosystem?
5|Page
Table of Contents
1.
Develop IoT application (P5) ...................................................................................... 7
1.1
Project introduction ............................................................................................ 7
1.1.1
Project overview .................................................................................................. 7
1.1.2
Members and roles .............................................................................................. 8
1.1.3
Project Plan .......................................................................................................... 9
1.2
Project model design ........................................................................................ 10
1.3
List of devices for the project ............................................................................ 10
1.3.1
Arduino Uno R3 .................................................................................................. 10
1.3.2
LCD with I2C ....................................................................................................... 11
1.3.3
HC-SR04 Ultrasonic Sensor ................................................................................ 12
1.3.4
A Buzzer ............................................................................................................. 12
1.3.5
10 mm LED ......................................................................................................... 13
1.4
Assembly .......................................................................................................... 14
1.4.1
HC-SR04 Ultrasonic Distance Sensor with Arduino UNO ................................... 14
1.4.2
LCD I2C with Arduino UNO. ............................................................................... 14
1.4.3
Piezo (Buzzer) with Arduino UNO. ..................................................................... 15
1.4.4
LEDs with Arduino UNO. .................................................................................... 15
1.5
Coding .............................................................................................................. 16
1.5.1
1.6
Coding for Arduino ............................................................................................. 16
Clips and photos of the project (evidence)......................................................... 19
2.
Run end user experiments and examines feedback (P6, P7)...................................... 20
3.
Discuss the drawback in your system and solutions for improving (P6, P7) ............... 23
4.
Conclusion ............................................................................................................... 23
References ..................................................................................................................... 24
6|Page
1. Develop IoT application (P5)
1.1 Project introduction
1.1.1 Project overview
As already indicated in the report. We shall build a project in this report to fulfill the demands of
investors. At the same time, it will assist to enhance people's suitable parking while moving into co
memorial centers.
It is a model that contains sensors, lights, noises, and, most importantly, an LCD screen that displays
the warning signals to everyone. Furthermore, when pulling up to the parking lot, there is still a legal
line, just as in other parking lots.
It is a cylinder; all of the indicator lights illuminate, and the LCD displays its operations. And each
parking area will have its own set of equipment. The distance will be used by the sensor and display
to measure and show the required information. The following is how it works:
+ The parking place is empty; the green light turns on, and the LCD displays the words "Empty." It
indicates that the parking space is vacant. And the distance between that cell and becoming empty is
5m.
+ The car is reversing, and the distance is between 5m and 2.5m. The yellow light will appear
immediately, and the instruction will be to proceed deeper.
+ When the car is less than 2.5m and larger than or equal to 1m, the red light illuminates and the
message "Parking" appears.
+ Finally, if the automobile backs into the parking lot for more than 1m, the buzzer will ring and the
words warning will appear on the screen.
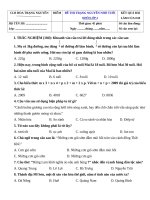
Here are some images of the gadget as it was developed in Tinkercad. It aids us in determining if the
circuit and equipment will operate consistently when put to use.
7|Page
Figure 1: Project demo on Tinkercad
1.1.2 Members and roles
We have 4 members include:
Students ID Name
Role
GCS200763
GCS200252
GCS18268
GCS200454
Team leader
Team member
Team member
Team member
Ha Quang Thong
Huynh Tran Anh Khoa
Hoang Thanh Khoi
Vo Hoang Hien
Figure 2: Team working
8|Page
1.1.3 Project Plan
Everyone on our team worked on the project for a total of four weeks.
•
•
•
The first and second week: we came together to agree on the idea and contribute
the code together.
The third week: we came up with the idea of building the model and assembling the
components together.
Fourth week: We fix the bugs encountered by the device, test them one last time
and write the report.
Nominate
Designated
participants
Completion
schedule
1
Discuss and agree on the topic for the
project
All members
Fully
2
List of sensors and operating procedures
Khoi, Thong
Fully
3
Coding
Thong, Khoi
Fully
4
Assemble components build models
All members
Fully
5
Testing the model
Hien, Khoi
Fully
6
Create and modify a project demo video.
Khoa
Fully
7
Conduct a survey to gather comments.
Khoa
Fully
8
Write report
All members
Fully
9|Page
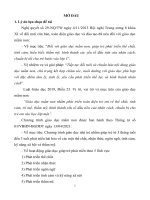
1.2 Project model design
Figure 3: Smart Parking Sensor System
1.3 List of devices for the project
1.3.1 Arduino Uno R3
Figure 4: Arduino Uno R3
10 | P a g e
Technical specifications
−
−
−
−
−
−
−
−
−
−
−
−
−
−
Microcontroller: Microchip ATmega328P
Operating Voltage: 5 Volts
Input Voltage: 7 to 20 Volts
Digital I/O Pins: 14 (of which 6 provide PWM output)
Analog Input Pins: 6
DC Current per I/O Pin: 20 mA
DC Current for 3.3V Pin: 50 mA
Flash Memory: 32 KB of which 0.5 KB used by bootloader
SRAM: 2 KB
EEPROM: 1 KB
Clock Speed: 16 MHz
Length: 68.6 mm
Width: 53.4 mm
Weight: 25 g
1.3.2 LCD with I2C
Figure 5: Display with I2C
Technical specifications
• Parameter: Value
• Screen Type: Dual colour LCD
• Screen Resolution: 128*64 Pixels
• Screen Active Area (L*W): 47.1*26.5mm
• Individual Pixel Size: 0.33*0.33mm
• Communication Mode: I2C (100Kbit/s and 400Kbit/s)
• Controller: STM8S005KBT6
• Operating Frequency: 16 MHz
• Weight : 20g
11 | P a g e
1.3.3 HC-SR04 Ultrasonic Sensor
Figure 6: Ultrasonic Sensor
Technical specifications (lastminuteengineers, 2022)
o Operating Voltage: DC 5V
o Operating Current: 15mA
o Operating Frequency: 40KHz
o Max Range: 4m
o Min Range: 2cm
o Ranging Accuracy: 3mm
o Measuring Angle: 15 degrees
o Trigger Input Signal: 10µS TTL pulse
o Dimension: 45 x 20 x 15mm
1.3.4 A Buzzer
Figure 7: The piezo
12 | P a g e
Technical specifications
•
•
•
•
•
•
Color is black
The frequency range is 3,300Hz
Operating Temperature ranges from – 20° C to +60°C
Operating voltage ranges from 3V to 24V DC
The sound pressure level is 85dBA or 10cm
The supply current is below 15mA
1.3.5 10 mm LED
Figure 8: 10 mm LEDS
LED specifications
•
•
•
•
•
•
•
Long Life: LEDs can last over 100,000 hours (10+ years) if used at rated specifications
No annoying flicker likes from fluorescent lamps
LEDs are impervious to heat, cold, shock and vibration
LEDs do not contain breakable glass
Solid-State, shock and vibration resistant
Extremely fast turn on/Off times
Low power consumption puts less load on the electrical systems increasing battery
life
13 | P a g e
1.4 Assembly
1.4.1 HC-SR04 Ultrasonic Distance Sensor with Arduino UNO
Arduino Uno
GND
D2
D3
5V
Ultrasonic
Distance Sensor
GND
ECHO
TRIG
VCC
1.4.2 LCD I2C with Arduino UNO.
Arduino Uno
GND
5V
SDA
SCL
LCD 16 x 2 (I2C)
GND
VCC
SDA
SCL
14 | P a g e
1.4.3 Piezo (Buzzer) with Arduino UNO.
Arduino Uno
GND
D7
Piezo
Negative
Positive
1.4.4 LEDs with Arduino UNO.
Arduino Uno
GND
D4
D5
D6
LEDs
Cathode
Resistor with
Anode (Green)
Resistor with
Anode (Yellow)
Resistor with
Anode (Red)
15 | P a g e
1.5 Coding
1.5.1 Coding for Arduino
16 | P a g e
17 | P a g e
18 | P a g e
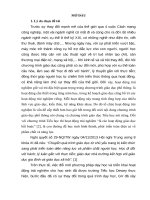
1.6 Clips and photos of the project (evidence)
19 | P a g e
Figure 9: Project model
Video of our project:
/>
2. Run end user experiments and examines feedback (P6, P7)
To get user input, our team decided to conduct a brief survey. The primary goal of the poll
was to determine how people interact with our cutting-edge sensor parking. We plan to
investigate in depth:
- When the project is finished.
- The project's flawless score.
- The project's unfinished point
Finally, we collected three clients and demonstrated how distance sensors for automobiles
operate. Then we asked them to fill out our survey.
20 | P a g e
Figure 10: Our survey on Google forms
21 | P a g e
Here are a few of the comments we gathered:
Full Name
Student’s ID
Score
Hồ Thị Hà Phương
GBH190324
3
Goods
Dislike
- This is a
fantastic
concept.
- The model is
still a work in
progress with a
lot of
patchwork.
- Effective
execution
- The signaling
system is not
functioning as
planned.
- Applicable in
practice
Trần Minh Sang
GBS190217
4
- Excellent
Concept
- The model is
experiencing
screen issues.
- The notice
board and
display lights
are quite
visible.
Lê Huỳnh Phương Thảo
GBS210318
4
- Sensor not
recognized
- Excellent
concept and
design.
- When put into
effect, it will
secure
everyone's
safety.
- If the
automobile
reverses too
rapidly, the light
system reacts
immediately.
22 | P a g e
3. Discuss the drawback in your system and solutions for improving (P6, P7)
With our system, after testing and collect surveys and questionnaire from user’s feedback,
we realize some problem and drawback below:
Problem and Drawback
Solutions for improving
Sensor can’t identify exactly distance of car in Use more sensors to improve accuracy of
every angle
system, draw grid for each car.
Because each grid, each car need a device, Optimization area, calculate number of device
that make cost of this system increase with can deploy for the best quantity of cars and
quantity.
system.
Some errors can broke device of make car hit
Regular maintenance and check the system
device
Maintenance duration is too long
Maintenance each device by order. Split
device to maintenance by group
Piezo and led can’t attention for drivers,
We need to change the soundspeaker louder,
brighter led that can attention drivers
Drivers can’t read notification on LCD
Use brighter and bigger LCD, can reverse letter
to help drivers can read with rearview mirrors
4. Conclusion
In conclusion, after working together on this project, we now know what the Internet of
Things is and how to use it. We also know how to work together and are learning how to use
various electrical devices with tools and hardware such as Arduino. Furthermore, because it
only mimics a portion of the actual parking system, our approach needs be greatly improved
in order to be useful.
23 | P a g e
Here is the picture when our project applies of parking
References
/>
[Accessed July 25, 2019].
/>[Accessed June 27 2016]
Seeedstudio, I2C LCD, />[Accessed August 30, 2022]
Make-it.ca, LED Specifications and Application Notes, [Accessed August 30, 2022]
Elprocus, What is a Buzzer: Working & Its Applications, Available at :
[Accessed August 30, 2022]
24 | P a g e