Pro Spring MVC: With Web Flow potx
Bạn đang xem bản rút gọn của tài liệu. Xem và tải ngay bản đầy đủ của tài liệu tại đây (15.39 MB, 590 trang )
Deinum
Serneels
Shelve in
Programming Languages / Java
User level:
Intermediate–Advanced
www.apress.com
SOURCE CODE ONLINE
RELATED
Pro Spring MVC: with Web Flow
Get started building enterprise-quality web applications with Pro Spring MVC!
This book takes you through the entire process of designing, implementing, and
deploying a Java web application using Spring MVC and Spring Web Flow. It includes
detailed analysis of the code and functionality, as well as numerous tips and tricks to help
you get the most out of Spring MVC, Spring Web Flow, and web development in general.
You’ll gain key practical knowledge and learn how you can apply similar designs and
techniques to your own code.
Right from the start, you’ll learn practical applications of the frameworks by using
them with an application that is developed throughout the book. Each chapter defines
real-world problems and solutions; solutions which you then use to upgrade the sample
application.
With Pro Spring MVC, you’ll learn how to:
• Use the Spring MVC architecture
• Develop with the DispatcherServlet
• Configure your development environment
• Deploy to a local web server and to a remote cloud-based deployment platform
• Write controllers
• Use Spring MVC with REST and Ajax
• Resolve and implement views
• Test your Spring MVC applications
• Implement Spring Security
• Build applications with Spring Web Flow
Pro Spring MVC does more than simply cover the technical details, it fully explains many
of the underlying concepts and gives you the practical knowledge you need to succeed.
After reading this book, you’ll fully understand how to use Spring MVC to build your own
web application from scratch or create a new web interface for an existing one.
BOOKS FOR PROFESSIONALS BY PROFESSIONALS
®
THE EXPERT’S VOICE
®
IN SPING
www.it-ebooks.info
For your convenience Apress has placed some of the front
matter material after the index. Please use the Bookmarks
and Contents at a Glance links to access them.
www.it-ebooks.info
iv
Contents at a Glance
Foreword xvi
About the Authors xviii
About the Technical Reviewer xx
Acknowledgments xxi
Introduction xxiii
Chapter 1: Configuring a Spring Development Environment 1
Chapter 2: Spring Framework Fundamentals 25
Chapter 3: Web Application Architecture 51
Chapter 4: Spring MVC Architecture 65
Chapter 5: Implementing Controllers 107
Chapter 6: Implementing Controllers — Advanced 177
Chapter 7: REST and AJAX 215
Chapter 8: Resolving and Implementing Views 237
Chapter 9: Testing Spring MVC Applications 273
Chapter 10: Spring Web Flow 321
Chapter 11: Building Applications with Spring Web Flow 373
Chapter 12: Advanced Spring Web Flow 429
Chapter 13: Spring Security 477
Appendix: Cloud Foundry: Deploying to the Cloud 535
Index 555
www.it-ebooks.info
v
Contents
Foreword xvi
About the Authors xviii
About the Technical Reviewer xx
Acknowledgments xxi
Introduction xxiii
Chapter 1: Configuring a Spring Development Environment 1
Prerequisites 1
Java Development Kit 2
Servlet Container 2
Integrated Development Environment 2
The Sample Application 2
A Bookstore Sample Application 3
The Build System 4
Building the Sample Application 6
Deploying the Sample Application 8
SpringSource Tool Suite (STS) 10
Configuring STS for Gradle projects 10
Importing the Sample into STS 12
Running the Application on the SpringSource vFabric tc Server 17
Editing the Application 19
Summary 22
www.it-ebooks.info
C H A P T E R 1
1
Configuring a Spring
Development Environment
Before you can really start your journey into Spring MVC, you need to make sure you have your
development environment set up right. This chapter will begin by walking you through that process.
Next, it will provide some details about the sample bookstore application that ships with this book. But
before going into either the details of the development environment or the sample application, this
chapter will provide an overview of the prerequisites for your environment in general.
The sample application that ships with the book is used to explain the concepts of Spring MVC and
MVC in general. It is not intended to be a full-blown, ready-to-use production application; nor is it to be
used as a Java or full Spring Framework application. The main intent of the app is to help explain and
express the Spring MVC concepts used throughout the book.
Prerequisites
To build the sample application, you need to have a Java Development Kit (JDK) installed; and for
(standalone) deployment, you need a servlet container that supports version 3.0 of the Servlet
Specification (we chose to use Tomcat 7). To make development easier, you will need to use an
integrated development environment (IDE); for this book, we, the authors, chose to use the
SpringSource Tool Suite (STS). Table 1-1 lists the products and versions used while writing this book.
Development on the selected products still continues, so it might be that there is a newer version
available at the time you read this. However, there is nothing in the code that shouldn’t work on or with
newer versions of the software.
Table 1-1. Software Versions and Download Sites
Product Version Download
JDK 1.6.0 Update 31
www.oracle.com/technetwork/java/javase/downloads/index.html
Tomcat 7.0.26
SpringSource Tool
Suite
2.9.0
www.springsource.com/developer/sts
www.it-ebooks.info
CHAPTER 1 CONFIGURING A SPRING DEVELOPMENT ENVIRONMENT
2
Java Development Kit
The first ingredient is the Java Development Kit. JDK7 was recently released; however, it seems that JDK6
is still much more widely used, particularly in the enterprise. There are no known issues with running
the sample application with JDK7, so those who want to “live on the edge” are free to do so. Those who
want the smoothest ride possible should choose JDK6.
Note You may already have the Java Runtime Edition installed; however, you still need the Java Development
Edition (JDK). The JRE is only for running Java applications, whereas the JDK is for compiling Java code.
Servlet Container
To run a Java web application, you need a web container. The sample application is using Servlet 3.0
features; and as such, you need a Servlet 3.0 capable web container. Tomcat
( is an excellent candidate and widely used in production systems. There is
nothing Tomcat-specific in the sample file, so feel free to use Jetty, JBoss, Glassfish, or any other modern
web container or application server.
Tip STS includes its own version of Tomcat called tc-server (www.vmware.com/products/vfabric-
tcserver/). This is an excellent product built on top of Tomcat, and it offers value for both developer and
production environments.
Integrated Development Environment
Although Spring itself doesn’t require a particular development environment (over and above the Java
Development Kit), becoming familiar with a good IDE is highly recommended.
Given Spring’s ubiquity in Enterprise Java development, excellent support for it can be found in the
major IDEs like Eclipse (www.eclipse.org) and IntelliJ IDEA (www.jetbrains.com/idea/). SpringSource
has also invested significant effort into providing its own distribution based upon Eclipse called the
SpringSource Tool Suite (STS). And while the “vanilla” version Eclipse is excellent, STS provides
additional levels of polish when it comes to developing Spring-based applications.
The Sample Application
This section delves into the sample application you will build throughout the book. For example, you
will learn about the build system selected and used for the sample application. Next, you will learn how
to import the sample application into STS and take your first steps in deploying the first part of the
application.
The main intent of the sample application is to show the features and possibilities of Spring MVC.
Although Spring MVC is part of the Spring Framework, this application is not intended to provide full,
www.it-ebooks.info
CHAPTER 1 CONFIGURING A SPRING DEVELOPMENT ENVIRONMENT
3
in-depth coverage on all the features of the Spring Framework. If you want to read and learn more about
the Spring Framework, we suggest checking out Pro Spring 3 (Apress, 2012).
A Bookstore Sample Application
The sample application that will be built and used throughout this book is a simple bookstore. You will
learn how to add functionality for searching, displaying, and buying books. To buy books, the user of the
app needs to have an account with the app’s associated bookstore, so there is also going to be some
account registration and a login page. The sample application will remain more or less the same
throughout the book. In the Spring Web Flow chapters, however, you’ll see some important differences
that exist mainly to illustrate some of the Spring Web Flow functionality.
You can find the code for the sample application with the source code for this book. Go ahead and
download and extract it. Note that the top-level directory contains a number of folders entitled
chapterX-bookstore. As you progress through this book, you will continually be adding new functionality
to the sample application. In some cases, you will be revisiting code from previous chapters. For
simplicity and clarity, the authors decided to separate each chapter’s progression into a separate project;
to see the relevant code for Chapter X, simply load the project in the chapterX-bookstore folder.
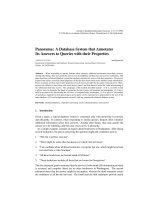
In addition to the directories for each chapter, you can also find two projects that are shared
between all the book’s chapters (see Figure 1-1). These projects are called bookstore-shared and
bookstore-web-resources, and they are shared with all projects. One project contains the shared
business layer, while the other has the images, stylesheets, and other, similar files.
Figure 1-1. An overview of the bookstore components
Note The project in chapterX-bookstore contains the solution for Chapter X.
While this approach does have the downside of requiring you to load many projects into STS (one
per chapter), it also means that you can see exactly how the application progresses—if you want to solve
the problems in Chapter 7 yourself, then copy the Chapter 6 project and start working, using Chapter 7
as a reference point if you get stuck.
www.it-ebooks.info
CHAPTER 1 CONFIGURING A SPRING DEVELOPMENT ENVIRONMENT
4
For convenience, the root directory of the sample application for the relevant chapter (i.e.,
chapter1- bookstore for this chapter) will be referred to as SAMPLE_ROOT. The SAMPLE_ROOT will obviously
be different for each chapter.
The authors tried to create a realistic but simple sample application; to that end, we tried to use the
technologies of today. For example, we use JPA 2.0 for the persistence layer, relying on Hibernate 4.1 for
our specific implementation. For the web pages, the primary technology used is Java Server Pages (JSPs).
A thorough tutorial on JSPs is outside the scope of this book; however, there are many good books on
this topic available, such as Pro JSP 2 (Apress, 2005). You can also find a wealth of other resources for this
technology, including Oracle’s own tutorial at
Note The observant reader probably noticed the JEE5 bit in the tutorial URL. The JEE6 version of the tutorial
covers JSF but not JSP; hence, the reference to the JEE5 tutorial.
The Build System
The topic of how to build applications has been subject to decades of arguments, fanaticism, and
downright stupidity. We could have taken the easy way out and avoided this discussion by building and
deploying entirely with the SpringSource Tool Suite (STS), which we will discuss later in this chapter.
However, the authors felt that was a disservice to you. STS is sufficient for managing a developer’s
workflow, but it isn’t quite sufficient for the operational management aspects. Typically, an application
is built using one mechanism (the IDE), while an entirely different mechanism is used to deploy it to
production. This is often a source of frustration, and it leads to the wonderful “works on my machine”
syndrome.
With this in mind, our strong opinion is that it is the developer’s responsibility to ensure that an
application works in an environment as close to production as possible, including the build mechanism
itself! You will see how sophisticated build tools make that possible. The build tool you are going to use
in this book is Gradle (). This is a fairly new but up-and-coming project-automation
tool (project automation is a fancy term for build tool) that has a strong pedigree and has already
established a very good reputation. A full discussion on build tools is outside the scope of this book;
however, suffice it to say that Gradle combines the power of Maven’s “configuration over convention”
approach with the succinctness of Groovy.
Note The Gradle project won the 2010 Springy Award for Most Innovative Product/Project
1
and was a finalist in
the 2011 JAX Innovation Awards election.
The Gradle infrastructure is driven by a build.gradle script (this is somewhat equivalent to Maven’s
pom.xml) and an optional settings.gradle file; both can be found in the SAMPLE_ROOT directory.
1
www.it-ebooks.info
CHAPTER 1 CONFIGURING A SPRING DEVELOPMENT ENVIRONMENT
5
Tip If you prefer to use Maven, please note that Gradle is perfectly capable of generating Maven POMs (project
object models). For more information, read “Maven POM generation” at
Dependency Management
Java’s strength is its ecosystem. The wealth of high quality libraries is the currency used to pay for the
language’s verbosity and pain. However, its greatest strength is, as ever, its greatest weakness: it isn’t
unusual for small-to-medium projects to have a dependency graph of more than 50 libraries. This
proliferation of libraries is made worse by the correct use of modularization!
The problem with the dependencies is that the dependencies also have dependencies, which also
have dependencies, which also Well, you probably get the point. There are direct dependencies
(dependencies for the project) and transitive dependencies (dependencies needed by the direct
dependencies). However, that isn’t the only problem because there is also something that could be
called versioning hell. If there are multiple dependencies and these dependencies have a dependency on
both library x and on different versions of that library, this presents an additional challenge. But, wait,
there’s more! You don’t want to sit at your computer and Google for all the missing (transitive)
dependencies, download them, redeploy your application, and then notice you have still another
missing dependency (or maybe the wrong version of a dependency).
Dependency management helps you out here. For example, it helps you with downloading and
discovering what you need, and it tries to resolve all of the versioning conflicts. In this case, you can let
the computer do the hard work for you, and you can focus at the task at hand, which is solving the
business problem—selling books, in this book’s example (not searching for dependencies late into the
night).
Note Gradle’s dependency management infrastructure is compatible with the somewhat industry-standard
Maven repositories—and it has excellent support for resolving dependencies.
The Gradle Build File
Gradle is more than a dependency-management tool, as already mentioned. It is also a build tool; and,
as such, it can do a lot for you. For example, if you open the build.gradle file, you’ll see the
dependencies needed by all the subprojects. Gradle can also help you build (compile, test, and create a
war archive) your application, and the Groovy language can be used to easily modify or influence the
way you build your application. To help build the application, there is a plugin that can deploy the
application to an embedded Tomcat instance. This instance can, in turn, be used to run the integration
tests (see Chapter 9).
www.it-ebooks.info
CHAPTER 1 CONFIGURING A SPRING DEVELOPMENT ENVIRONMENT
6
These functions are just the beginning of what Gradle can provide. If you are interested in more
complex builds, try reading the Gradle reference guide
2
or taking a look at the Gradle build
3
as used by
the Spring Framework
4
(yes, even SpringSource uses Gradle).
Building the Sample Application
To build the sample, cd into the SAMPLE_ROOT directory and execute the gradlew script. Assuming you are
on Unix system, this will look something like Figure 1-2.
Figure 1-2. The initial build output
You will notice the first thing that the gradlew script does is download the Gradle distribution itself!
This is why there is no “install gradle” step—it is self-installing.
Note We recommend checking the gradlew script into source control. The Continuous Integration (CI) server
and (as well as other developers) all use this script. Upgrading to a new version of Gradle is as simple as updating
the
gradlew script which, when executed, will silently upgrade itself.
2
3
4
www.it-ebooks.info
CHAPTER 1 CONFIGURING A SPRING DEVELOPMENT ENVIRONMENT
7
Note Speaking of upgrades; at the time of writing, v1.0 hadn’t been released, so the code in this book relies on
the latest milestone: milestone 9. Your output might differ slightly.
After Gradle has downloaded itself, you should build the sample application by executing
/gradlew build (see Figure 1-3).
Figure 1-3. Building ample application output
Notice how Gradle downloaded the sample dependencies and went through the lifecycle of
compiling, testing, and packaging the sample application. Similar to Maven, Gradle contains a local
cache of JARs (a .gradle directory in your home folder). Subsequent executions are much faster because
no network access is required (see for more information).
www.it-ebooks.info
CHAPTER 1 CONFIGURING A SPRING DEVELOPMENT ENVIRONMENT
8
Tip For a list of all tasks that can be executed, type
gradlew tasks
.
Assuming everything went well, the output should be a chapter1-bookstore-1.0.0.war file in the
build/libs directory.
Deploying the Sample Application
The next step is to deploy the application to a web container. Tomcat ( is an
excellent candidate, so you could download and install that. As noted previously, there is nothing
Tomcat-specific in the sample file, so feel free to use Jetty, JBoss, Glassfish, or any other modern web
container.
Note With a view toward reducing the number of new things you must learn—if you’re more familiar with
another web container, then it probably makes sense to stick with what you know for now.
Now copy the WAR file from SAMPLE_ROOT/build/libs/chapter1-bookstore-1.0.0.war to
TOMCAT_ROOT/webapps. If Tomcat hasn’t started, then start it by executing TOMCAT_ROOT/bin/startup.sh
run (or .bat for Windows).
Now open up your favorite web browser and navigate to http://localhost:8080/chapter1-
bookstore-1.0.0. If everything went well, you should see the screen in Figure 1-4.
www.it-ebooks.info
CHAPTER 1 CONFIGURING A SPRING DEVELOPMENT ENVIRONMENT
9
Figure 1-4. The bookstore’s home page
What! Is that the best you can do? That screen looks awful! Of course, you can do better :).
However, the point of this sample app is to start really simple and build up, so there is no
extraneous fluff getting in the way of the details. Don’t worry; the application will get much better as you
go.
Note chapter1-bookstore-1.0.0 isn’t the best name; for one, it doesn’t exactly roll off the tongue. The
default naming strategy in Tomcat is to set the context path to be the name of the WAR file. For example, if the
name of the WAR file were
bookstore.war, then the context path would be /bookstore.
Congratulations! You have accomplished the critical, but often overlooked step of ensuring that
your application can be built and works outside your IDE. The next step is to install STS and actually
look at the sample that you have just so excellently deployed.
Before doing so, make sure to press Control-C to shutdown Tomcat.
www.it-ebooks.info
CHAPTER 1 CONFIGURING A SPRING DEVELOPMENT ENVIRONMENT
10
SpringSource Tool Suite (STS)
As we explained earlier, Spring doesn’t require a specific development environment, but we do
recommend that you consider a good IDE. Leading IDEs like Eclipse and IntelliJ IDEA are excellent
choices, but the SpringSource Tool Suite (STS), based on Eclipse, provides additional benefits for
developing Spring-based applications. We use STS in this book.
Configuring STS for Gradle projects
To install Gradle support, click Install Extensions. The first time you do this, STS will download a list of
extensions, which can take a few seconds. Eventually, the Install Extensions page will be ready (see
Figure 1-5).
Figure 1-5. The Extensions tab in STS
www.it-ebooks.info
CHAPTER 1 CONFIGURING A SPRING DEVELOPMENT ENVIRONMENT
11
Next, search for “gradle”; Figure 1-6 shows the results.
Figure 1-6. The “gradle” search results
Now select the check box next to Gradle Support and click Install on the bottom right. Review the
prompt and click Next to open the Install dialog (see Figure 1-7).
www.it-ebooks.info
CHAPTER 1 CONFIGURING A SPRING DEVELOPMENT ENVIRONMENT
12
Figure 1-7. The Install dialog
Click Next to get to the Install Details dialog and click Next again to get to the license. Finally, read
the license agreements (who reads these?) and click Finish. The Gradle plugin should now start
downloading and installing. Once it finishes, you will be asked to restart—click Yes. As mentioned
previously, typical Java applications can have large dependency graphs. Gradle has already dealt with
this, and it would be painful to have to manually resolve the dependencies in order to register them with
STS. Luckily, STS actually understands Gradle projects (just as it understands Maven projects).
Importing the Sample into STS
Now that STS knows how to navigate a Gradle project, the next step is to import the project into STS. To
do this, select File
Import (i.e. choose the Import option from the File menu). This opens the Import
dialog. Choose Gradle
Gradle Project (see Figure 1-8). Finally, click Next (see Figure 1-9).
www.it-ebooks.info
CHAPTER 1 CONFIGURING A SPRING DEVELOPMENT ENVIRONMENT
13
Figure 1-8. The STS Import dialog
www.it-ebooks.info
CHAPTER 1 CONFIGURING A SPRING DEVELOPMENT ENVIRONMENT
14
Figure 1-9. The Import Gradle Project dialog
Now click Browse and navigate to the directory containing the sample projects. Next, click
Build Model.
www.it-ebooks.info
CHAPTER 1 CONFIGURING A SPRING DEVELOPMENT ENVIRONMENT
15
Note STS will download its own version of Gradle and, if you skipped the previous step of building the sample
application via the command line, STS will also download the application’s dependencies. This may take a few
minutes.
Once Gradle has built its internal representation of the structure of your project (i.e. the project and
any subprojects), it will allow you to choose which projects to import (see Figure 1-10).
Figure 1-10. Gradle projects that can be imported.
www.it-ebooks.info
CHAPTER 1 CONFIGURING A SPRING DEVELOPMENT ENVIRONMENT
16
You can either select the root bookstore project or click Select All to import all projects. Afterwards,
click Finish to instruct STS to actually import your project. This might take a while as STS is downloading
all missing dependencies and will compile all projects. However, the projects should eventually appear
in STS (see Figure 1-11).
Figure 1-11. STS after importing projects
Tip We suggest that you close the projects you aren’t currently working on. To do this, select the projects to
close, right-click, and then select the menu option, Close Project. You can reopen a project by double-clicking it.
www.it-ebooks.info
CHAPTER 1 CONFIGURING A SPRING DEVELOPMENT ENVIRONMENT
17
Running the Application on the SpringSource vFabric tc Server
Before you can run the application, you must tell STS which web container to run the application on.
You have two choices: use the Tomcat installation you downloaded earlier or use the prebuilt VMware
vFabric tc Server.
Note Registering Tomcat is as simple as right-clicking the Servers section at the bottom right, choosing New
Server, expanding the menu to Apache/Tomcat v7.0 Server, clicking Next, browsing to the installation root of
Tomcat, clicking Open, and then clicking OK.
To run the application on the server, right-click the project and choose Run As Run on Server (see
Figure 1-12).
Figure 1-12. Selecting the Run on Server menu option
www.it-ebooks.info
CHAPTER 1 CONFIGURING A SPRING DEVELOPMENT ENVIRONMENT
18
Choosing Run on Server should open the Run On Server dialog (see Figure 1-13).
Figure 1-13. The Run On Server dialog
Choose the VMware vFabric tc Server Developer Edition v2.6 entry (or Tomcat, which will be shown
if you decide to use that). Next, ensure that “Always use this server when running this project” is selected
and click Finish. The application should then be built and deployed onto the tc Server. Once it starts, the
Welcome page should load (see Figure 1-14).
www.it-ebooks.info
CHAPTER 1 CONFIGURING A SPRING DEVELOPMENT ENVIRONMENT
19
Note You may notice that tc Server takes considerably longer to start than vanilla Tomcat as it initializes
various sub-components.
Figure 1-14. The running application
Editing the Application
Congratulations on getting this far! Was it worth it? The authors think so. To demonstrate the power of
STS, let’s do some editing. Don’t worry about the details at this point; they will be explained in detail
later. For now, you should just focus on using STS.
Open IndexController (use Control-Shift-T and then type IndexController or use the tree to
navigate to it) and navigate to Line 12 (see Figure 1-15).
www.it-ebooks.info
CHAPTER 1 CONFIGURING A SPRING DEVELOPMENT ENVIRONMENT
20
Figure 1-15. The IndexController code
Now replace (or modify) the code on the IndexController tab, as shown in Listing 1-1.
Listing 1-1. The IndexController with the Model Attribute
package com.apress.prospringmvc.bookstore.web;
import org.springframework.stereotype.Controller;
import org.springframework.web.bind.annotation.RequestMapping;
import org.springframework.web.servlet.ModelAndView;
@Controller
public class IndexController {
www.it-ebooks.info
CHAPTER 1 CONFIGURING A SPRING DEVELOPMENT ENVIRONMENT
21
@RequestMapping(value = "/index.htm")
public ModelAndView indexPage() {
ModelAndView mav = new ModelAndView("/WEB-INF/views/index.jsp");
mav.addObject("theModelKey", "Spring says HI!");
return mav;
}
}
Next, open up index.jsp by using Control-Shift-R to open resources and then typing index.jsp (see
Figure 1-16).
Figure 1-16. The contents of index.jsp
Under the paragraph line (<p>), enter <br/><p>The model says ${theModelKey}</p>. Next, save the
changes and pay attention to the fact that the new changes are reloaded automatically in the Console
tab. Refresh the web page by clicking the double-arrow icon on the web page (the fourth icon in from the
left) to view the changes (see Figure 1-17).
www.it-ebooks.info