Photography for the Web ppt
Bạn đang xem bản rút gọn của tài liệu. Xem và tải ngay bản đầy đủ của tài liệu tại đây (5.12 MB, 61 trang )
Make Your Photos Come to Life!
A good snapshot stops a moment from running away.
—Eudora Welty
Welcome to the sample chapters of our exciting new book, Photography for the Web. It will show
you how to turn your ordinary pictures into extraordinary images.
Most of us have experienced a similar situation; you’ve been living in a new city for almost three
weeks, and your family and friends are begging you to send them pictures of your new place. But
no matter how hard you try, your living room ends up looking like a shoe box in the photos. Even
though you have an amazing view of the city from your balcony, it looks dark and dreary when you
view the shots on your laptop. You become more frustrated as you try different angles and lighting
without any luck. Why can’t you take a decent photo to share online with your loved ones?
Well now you can.
Photography for the Web, written by Paul Duncanson, will teach you how to take photographs that
will impress even the harshest critics.
This sample includes:
■
a summary of contents
■
information about the author, editors, and SitePoint
■
Table of Contents
■
Preface
■
Chapters 1 and 2
■
the book’s Index
With help from our friends at Digital Photography School, we’ve produced a book that will provide
you with all you need to know about using your camera to its full potential. You’ll also learn how
to make your photos even more spectacular using computer software to edit and enhance.
Soon enough you’ll be giving your photographs as gifts to family and friends, or perhaps using your
images to revamp your website or blog. Maybe you’ll sell a few for an extra penny, or print them
out and display them in your home. Whatever the plan, it will all snap into place once you’ve read
our book.
Get your copy now!
1
1
/>What’s In This Excerpt?
Preface
Chapter 1: About Your Camera
Learn about how your camera works in order to understand how we can make the most of our
camera’s ability to do the work for us.
Chapter 2: Photo Basics
Learn how to master exposure, depth of field, and shutter speed, and discover the meaning of
terms like white balance, metering, f-stop, and ISO. Master the secrets of composition: space,
patterns, placement, lines, angles, and balance.
Index
What’s In the Rest of the Book?
Chapter 3: Advanced Techniques
Explore more advanced methods and accessories to better prepare you when capturing the
scene, rather than just dealing with what the elements throw at you.
Chapter 4: Storing and Managing Your Images
Read about at the importance of backups, the benefits of metadata and tags for sorting and rating
your images, and some of the image organizing software options to manage your output
Chapter 5: Editing Your Images
Discover the tricks of the trade to improve the quality of your output, such as color balance,
tonal correction, cropping, rotation, distortion, and the removal of flaws.
Chapter 6: Sharing Your Images
Find out about the various ways people distribute images electronically, from email and blogging,
to image hosting services like Flickr.
Chapter 7: Further Steps
Explore the possibilities for exhibiting your work, how to meet like-minded shutterbugs, and
how to make a financial return on your hobby.
iv
Photography for the Web
by Paul Duncanson
Copyright © 2010 SitePoint Pty. Ltd.
Expert Reviewer: Simon Pollock Editor: Kelly Steele
Technical Editor: Raena Jackson Armitage Indexer: Fred Brown
Technical Editor: Andrew Tetlaw Cover Design: Alex Walker
Chief Technical Officer: Kevin Yank
Printing History:
First Edition: May 2010
Notice of Rights
All rights reserved. No part of this book may be reproduced, stored in a retrieval system or transmitted in any form or by
any means, without the prior written permission of the publisher, except in the case of brief quotations employed in critical
articles or reviews.
Notice of Liability
The author and publisher have made every effort to ensure the accuracy of the information herein. However, the information
contained in this book is sold without warranty, either express or implied. Neither the authors and SitePoint Pty. Ltd., nor
its dealers or distributors will be held liable for any damages to be caused either directly or indirectly by the instructions
contained in this book, or by the software or hardware products described herein.
Trademark Notice
Rather than indicating every occurrence of a trademarked name as such, this book uses the names only in an editorial
fashion and to the benefit of the trademark owner with no intention of infringement of the trademark.
Published by SitePoint Pty. Ltd.
48 Cambridge Street Collingwood
Victoria Australia 3066
Web: www.sitepoint.com
Email:
ISBN 978-0-9805768-7-0
Printed and bound in Canada
v
About the Author
Paul Duncanson has been playing around with cameras for far more years than he cares to remember. When
digital cameras became as good as film (but without the waiting and the messy chemicals) he started taking it
seriously. He began taking photos professionally before finishing his studies at Melbourne’s Photography
Studies College () and now works as a freelancer, covering advertising and other commercial
photography, along with the occasional wedding.
About the Expert Reviewer
Simon Pollock is the community manager for the Digital Photography School
( and a live music photographer based in London, England. Starting
out as a musician who enjoyed taking pictures, Simon has switched it around and now photographs musical
artists ranging from Paolo Nutini to Counting Crows to Metallica
—though he still enjoys playing his guitar
from time to time. Simon writes about his music photography experiences and other camera-related ramblings
on his blog at , and can be found on Twitter most hours of the day at
About the Technical Editors
Raena Jackson Armitage is an Australian web developer with a background in content management, speaking,
and training. When she's not thinking about the Web, she loves knitting, gaming, all-day breakfasts, and cycling.
Raena’s personal website is at .
Andrew Tetlaw has been tinkering with websites as a web developer since 1997. At SitePoint he is dedicated
to
making the world a better place through the technical editing of SitePoint books, kits, articles, and newsletters.
He is also a busy father of five, enjoys beer, and often neglects his blog at
About the Chief Technical Officer
As Chief Technical Officer for SitePoint, Kevin Yank keeps abreast of all that is new and exciting in web
technology. Best known for his book, Build Your Own Database Driven Web Site Using PHP & MySQL, he also
co-authored Simply JavaScript with Cameron Adams and Everything You Know About CSS Is Wrong! with
Rachel Andrew. In addition, Kevin hosts the SitePoint Podcast and co-writes the SitePoint Tech Times, a free
email newsletter that goes out to over 240,000 subscribers worldwide.
Kevin lives in Melbourne, Australia and enjoys speaking at conferences, as well as visiting friends and family
in Canada. He
’s also passionate about performing improvised comedy theater with Impro Melbourne
( and flying light aircraft. Kevin’s personal blog is
Yes, I’m Canadian
(
About SitePoint
SitePoint specializes in publishing fun, practical, and easy-to-understand content for web professionals. Visit
to access our blogs, books, newsletters, articles, and community forums.
Chapter
1
About Your Camera
At the most basic level, the camera is one of the simplest machines you can own. The lever, the
wheel, and the toaster are slightly simpler, but only just. At its core a camera is nothing more than
a box with a hole at one end and a light-sensitive element at the other. Everything beyond that is
bells and whistles, but it’s the bells and whistles that do all the cool stuff—providing the means to
turn a small shaft of light streaming through a hole in the side of a box into art.
There are a multitude of manufacturers and models out there, too many for me to tell you how to
use the specific camera you own, so don’t throw away your manual just yet. The manufacturer’s
manual is the best way to learn what each control does, but it rarely, if ever, tells you why you might
want to do it. That’s what I aim to cover with this book.
However, before we become too deeply immersed in the art and science of photography, let’s take
a look at the general features of a camera and make sure we understand their functions.
Types of Digital Camera
When we discuss digital cameras, there’s very little agreement on what labels to apply to different
physical designs. For instance, how small does a camera have to be before it can be called compact?
Or, what price point separates cameras for the professional from those for the enthusiast? Then, to
confound the situation, manufacturers have taken each of the various options that feature in most
cameras and branded them; for example, Vibration Reduction, MEGA Optical Image Stabilizer,
Anti-Shake, Super Steady Shot, and Vibration Compensation are all labels for exactly the same
Photography for the Web 2
feature found in most cameras. Sometimes it’s hard to be certain what a photographer with a different
camera from yours is talking about.
So while there are no official definitions, in general usage it works like this: a compact camera is
one that is noticeably smaller than a full-sized model. It might fit in a large coat pocket. Cameras
referred to as subcompact (like the Nikon Coolpix S220 depicted in Figure 1.1) or ultracompact are
smaller again, fitting in your pocket and still allowing room for other items. It’s about as convenient
to carry around as a mobile phone. Many camera companies design their subcompacts to have a
front surface area that has similar dimensions to a credit card.
Figure 1.1. Nikon’s Coolpix S220: at 90x56x18mm (with the lens retracted), the very definition of subcompact
The More Compact, the Less Features
Most of the significantly compact cameras lack the full range of manual controls you’ll need to
follow along with the examples in the next few chapters. Their preset scene modes, however, often
come close to what’s needed.
The one camera format that does have an agreed upon definition is the SLR, which stands for Single
Lens Reflex. The SLR camera is named for the way its viewfinder works. In an SLR camera, a mirror
directs light from the main lens into the viewfinder. When you look through the SLR’s viewfinder,
you see the same light the sensor sees when the shutter opens. Some compact cameras have view-
finders that look like SLR viewfinders but are in fact small, enclosed LCD displays that show a live
view from the sensor. An SLR viewfinder gives you a clearer view than any LCD. We’ll talk more
about this shortly.
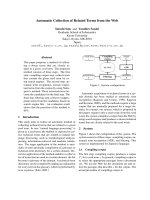
The images below show the path taken by light through an SLR camera. Figure 1.2 indicates the
shutter closed; the prism’s role is to turn the image the right way up (after the mirror inverts it).
Figure 1.3 shows the light path with the shutter open.
Photography for
the Web (www.sitepoint.com)
3About Your Camera
Figure 1.2. The light path through an SLR camera with the shutter closed …
Figure 1.3. … And open—in this instance you’re unable to see through the viewfinder
The extra optics needed to bounce the light around like that take space. SLR cameras are larger than
most other digital cameras on the market. They also give the most control over the image-making
process. The accuracy of sighting and degree of control are two of the main reasons SLR cameras
are favored by professional photographers.
Because they’re the choice of professional photographers, camera manufacturers tend to lavish more
attention developing the features and accessories of their SLR cameras. The largest, highest resolution
sensors are found in SLR cameras. A single SLR model will often have a wider range of accessories
than the manufacturer’s whole compact camera range. Then there are the lenses.
Lenses on SLR cameras are interchangeable. Compact cameras are stuck with one fixed lens that’s
okay at everything but great at nothing. SLR cameras have a range of lenses that are each superb for
Digital Images that Dazzle. Get snapping today.
Photography for the Web 4
a small range of purposes. You buy the lenses you need for the kinds of photos you shoot, and swap
them as needed.
The main disadvantage of the SLR format is the very reason why we have compact cameras. The
extra mirrors, prisms, and lenses that an SLR needs for its viewfinder contribute to the size of the
camera, as Figure 1.4 shows. Even the smallest SLR is unable to fit in a pocket. (Maybe in very large
pockets, but it would be uncomfortable.) On top of that, most SLRs come without a live preview
on their LCD displays, although in the last few years some models have gained the feature that allows
you to set up a shot via the display.
Figure 1.4. The Nikon D90
At the more expensive end of the non-SLR section of the camera market, you’ll find “SLR-like”
cameras—cameras that look like an SLR but lack interchangeable lenses and the unique viewfinder
arrangement of an actual SLR. Some will be advertised as “super-zoom” or similar if they have a
lens with a maximum zoom in double figures. The Nikon Coolpix P90 depicted in Figure 1.5 is one
of these types.
Figure 1.5. Nikon Coolpix P90
Photography for the Web (www.sitepoint.com)
5About Your Camera
There’s another class of camera that caters for large-format photography and involves sensors signi-
ficantly larger than the standard 35mm film frame. Because the sensors are so large their price puts
them out of reach of the amateur photographer. They’re large, expensive, and way beyond the scope
of this book.
Another term you’ll encounter in the photography world quite a lot is “point and shoot.” Some
people use it to describe a camera that does all the work for you, without providing many options
to take control. In other contexts it can mean letting the camera do all the work even if it does have
manual controls. Since the most expensive digital SLRs can be set to shoot fully automatically,
“point and shoot” is a fairly useless term for distinguishing types of cameras, so we’ll avoid using
it here.
What do all these bells and whistles do?
Now that we’re using the same labels to describe our cameras, let’s take a look at the parts of a
camera, what their functions are, and how they will affect your picture taking.
The Sensor
At the back of the lightproof box that’s the core of your camera lies the sensor, a chip covered with
millions of light-sensitive sites in a space no bigger than a postage stamp. Light through the lens
forms an image of what the camera is pointing at on the surface of the sensor. The sensor converts
the light’s brightness at each of those millions of sites into an electrical signal that’s then sent to
the camera’s processor. Figure 1.6 shows the 12.3 megapixel sensor of the Nikon D5000 SLR. The
sensor’s sensitive area is 23.6x15.8mm, making this considerably larger than the sensors of most
compact cameras.
Each of those light-sensitive sites on the surface of
the sensor makes up one pixel of the finished image.
The more pixels an image has, the finer the detail
and hence, the larger it can be displayed before it
becomes evident that it’s all just a bunch of tiny
dots; thus, the pixel count of a sensor can be import-
ant if you want to produce large images. A few years
ago camera marketing was entirely megapixel-based,
almost as if the megapixels were the product and
the cameras just a container to hold them. Megapixel
Figure 1.6. The 12.3 megapixel sensor of the Nikon D5000 SLR
hysteria has calmed down a bit in recent years as
camera manufacturers, their marketing departments, and their customers have realized two things:
1. Not everyone wants to create billboards.
2. Bigger isn’t always better.
Digital Images that Dazzle. Get snapping today.
Photography for the Web 6
The decline in megapixels being the number one selling feature has partly been replaced by the
marketing of “mega-zoom lenses” (or the equivalent company-branded feature), yet there’s still a
tendency for people to think of megapixels as the primary measure of a camera’s quality. And that’s
misguided.
Let’s consider the size of the images you’ll be making with your camera. Canon’s PowerShot SX1
is a standard 10 megapixel camera. It produces, at maximum resolution, an image file that’s 3648
by 2736 pixels. If you just want to display it on your computer’s monitor, it’s likely to be around
four times the number of pixels your monitor can show (perhaps much more). Put it on a web page
and, allowing for the browser window surrounding it and any other design elements that might be
on the page, you need even fewer pixels. To produce a high-quality print of the image you’ll want
to put those pixels on paper at 240 pixels or more per inch, giving you a print size of around 15 by
11 inches—far bigger than most home photo printers. You can see how 10 megapixels is far more
than most people will ever need.
Sites, Not Websites
Just to be clear, I use the term “sites” in this section to refer to the light-sensitive dots that make up
a camera’s sensor. I wouldn’t want you to think I’m alluding to the location for an event or building,
nor am I referring to websites in this instance, though I will be in chapters to come. I’m unsure how
many websites you can cram into a camera’s sensor, nor will I answer the question in this book.
Cramming more megapixels onto a sensor is a bad idea for image quality too. Sensor chips come
in a range of standard sizes, and camera designers build their products to make images on surfaces
of those sizes. Adding more light-sensitive sites to a chip of a fixed size means decreasing the size
of each site. Smaller sites are less sensitive and so they capture less light. A lack of sensitivity can
be overcome by amplifying the signal produced by each light detector, but this can add visible
noise. Images produced with very small, high-resolution sensors show much more graininess than
those made with chips comprising larger individual light detectors, especially when the light levels
are low. Compare the quality of an image taken with a mobile phone camera to one from any larger
camera taken under ordinary indoor lighting.
Figure 1.7 shows some typical camera sensor sizes. It’s entirely possible to pack a dozen megapixels
on the smallest, as well as the largest, of these, but the picture quality difference is often visible.
Photography for
the Web (www.sitepoint.com)
7About Your Camera
Figure 1.7. Various camera sensor sizes
Clearly there’s no need to worry about the megapixel count of your camera. You almost certainly
have enough. Instead, concern yourself more with the quality of the pixels you have. Take test shots
well before you shoot anything important and look at them in full size on your computer. Remember
that the LCD display of the camera has a much lower resolution than the sensor. For every LCD
pixel there are tens of sensor pixels. Noise that appears as a variation in brightness between single
pixels might be invisible on the live LCD display. You might well find that you have an unusable
photo when it’s too late to reshoot.
Figure 1.8 shows the night sky shot at maximum sensor sensitivity. The sky has been rendered
spotty by the amplification of the sensor data. This was shot with a Canon EOS 30D SLR, which
has a relatively large sensor. If your camera’s small enough to fit inside your pocket, it will produce
more noise than this under similar conditions.
Figure 1.8. The night sky shot at maximum sensor sensitivity
Digital Images that Dazzle. Get snapping today.
Photography for the Web 8
The Lens
The first thing a person sees when you point a camera at them is the lens. It’s more complex than
it appears. The piece of glass at the front of the camera is only the first of a series spread along the
length of the lens tube. There may be more than a dozen finely shaped pieces of glass in a camera
lens, all moving back and forth with incredible precision every time you shift focus or zoom.
Once upon a time the owner of a compact digital camera would have been proud to have five times
the zoom factor. Nowadays cameras with built-in lenses can have a zoom range of 20 times or more.
A high magnification factor is handy if you need to photograph a subject that’s a long way away,
but there are drawbacks.
Due to their increased mechanical complexity and the more pieces of glass needed, lenses with a
high zoom factor rarely produce images as sharp as those with limited (or no) zoom. For really
defined images, SLR camera owners often use a prime lens, one with a fixed focal length and no
ability to change magnification at all. In order to “zoom in” with a prime lens the photographer
moves closer to the subject. Low tech for sure, but the difference in sharpness can be quite remark-
able. The superiority of a camera’s lens has greater influence on the quality of the final image than
the megapixel count of the sensor, or any other factor of the camera hardware. The best sensor ever
built can only capture what light the lens delivers to it, and a cheap lens can blur and distort your
image in ways that Photoshop can never fix.
The camera’s lens is often a bigger factor in the price of the camera than the sensor. Long zooms
are expensive to make (as are wide apertures, but we’ll get to that in the next section). At the pro-
fessional end of the camera market, it’s very common for a single SLR lens to cost more than the
camera to which it’s attached. Figure 1.9 shows where all the professional photographers’ money
goes.
Figure 1.9. A lens for every purpose: one of each model in Canon’s EF lens range for SLR cameras
Focal Length versus Zoom Factor
Despite the zoom factor being marked in big shiny letters on the box, the capabilities of a compact
camera’s lens can seem a bit unclear. Manufacturers often fail to explain what exactly is being
Photography for
the Web (www.sitepoint.com)
9About Your Camera
multiplied by 10, 15, or 24. It may indicate the maximum magnification (that is, 10, 15, 24) times
the minimum, but what is the minimum and what does that mean?
Let’s look at real-world examples: the Canon PowerShot SX200IS and the Sony Cyber-shot DSC-
H20, two compact cameras released early in 2009. The Canon boasts a 12x zoom, while the Sony
only zooms by a factor of 10. If you go by just those numbers it looks like the Canon is the better
choice for shooting distant objects. Alas, it isn’t that simple.
To meaningfully compare the performance of lenses, we need to know more than just the ratio of
the maximum to the minimum magnification. Lenses for SLR cameras are sold by their focal length.
The focal length of a lens is the distance from the optical center to the place where the light is fo-
cused—where the camera’s sensor is placed. How to calculate or use that distance is less important
than knowing how the focal length affects the view though the lens: a long focal length gives you
a narrow field of view (also called angle of view), while a short focal length gives you a wide field
of vision. The narrower the angle of view, the greater the magnification.
In our example, the Sony has a base focal length of 38mm, while the Canon’s is 28mm. At their
maximum zoom, the Canon has a focal length of 336mm while the Sony goes to 380mm. There’s
13% greater magnification with the Sony.
Whenever you see a camera with a big “X times” zoom factor advertised, look carefully at the doc-
umentation; you’ll usually find, in finer print, the focal length of the lens. Sometimes you might
have to look elsewhere, like the manufacturer’s website, or even a reputable camera review site
(Digital Photography Review
1
maintains an extensive database of technical information on digital
cameras of all kinds as far back as the mid-1990s).
Lenses are broadly grouped into three categories based on their focal length. Standard lenses show
you a view similar to what you’d see with your own eye without the camera. They have a focal
length around 50mm. Wide-angle lenses, typically with focal lengths less than 35mm, show you a
wider view, while telephoto lenses (focal lengths of 80mm or more) show a narrower field of view.
Zoom lenses have movable parts that allow them to cover a range of focal lengths.
The angle of view is also affected by the size of the sensor. A smaller sensor captures a smaller
view, so it can achieve a longer zoom from a shorter focal length.
Old Standards in the Digital Age
When we refer to a focal length in this book we’ll always use its 35mm equivalent. The 35mm film
standard has been around long enough that is has become the universal language for translating
camera specifications. Since most digital SLR camera designs are based on the 35mm format, it’s
likely to stay that way for a while.
1
Digital Images that Dazzle. Get snapping today.
Photography for the Web 10
Lost in Translation?
Most manufacturers translate the angle of view into the equivalent focal length for a 35mm camera,
but that isn’t always what’s printed on the camera. If the minimum focal length printed on the lens
of a compact camera is less than 10mm it hasn’t been translated to a 35mm equivalent. If it’s nowhere
to be found in your camera’s manual either, you can usually find that information on the manufac-
turer’s website, or definitely in Digital Photography Review’s database.
In the example we looked at above, the Canon camera has a focal length range from 28mm to 336mm,
while the Sony ranges from 38mm to 380mm. If you want to shoot broad landscapes instead of
distant objects, the Canon would be the best choice for its wide-angle view. This isn’t easily worked
out from reading the camera’s magnification range alone, but it’s a very useful point to know.
It’s a little tricky to understand what a lens of a specific focal length will capture just by reading
the numbers, so here’s what some common focal lengths will show you if you point them at a
cityscape.
Figure 1.10 shows the view through a 16mm lens. 16mm is a rather wide angle, perhaps too wide
for some views. Diagonally it covers just over 108 degrees.
Figure 1.10. City view through a 16mm lens may be too wide
A 38mm lens is at the shorter end of standard lenses. Figure 1.11 shows the view of the city through
a 38mm lens, which is as wide as some cameras go at the bottom end of the scale.
Photography for
the Web (www.sitepoint.com)
11 About Your Camera
Figure 1.11. Falling within the standard range is the 38mm lens
A good all-purpose focal length is 50mm, demonstrated in Figure 1.12. It’s very similar to what
you’d see looking at the same scene through one eye without a camera.
Figure 1.12. 50mm: a good all-purpose focal length
Now zooming in to the lower end of telephoto lenses, Figure 1.13 depicts the view at 100mm.
Digital Images that Dazzle. Get snapping today.
Photography for the Web 12
Figure 1.13. View from a 100mm lens: an example of what shorter telephoto lenses can achieve
Figure 1.14 shows the view with a 200mm lens, a very popular telephoto length.
Figure 1.14. The 200mm lens is very popular among the telephoto range
Photography for the Web (www.sitepoint.com)
13About Your Camera
And again, the same view in Figure 1.15 using a 480mm lens. The current range of 35mm SLR
lenses available extends to 1,200mm (which can be increased to 2,400mm with an add-on extender),
but I think we’ve made our point.
Figure 1.15. Ready for my close-up, Mr DeMille
Focal length affects more than just how large an object appears in your image; it also affects the
perspective of your image. Table 1.1 compares the angles of view of different size lenses.
Table 1.1. Angles of view comparison
50mm38mm16mm
480mm200mm100mm
Digital Images that Dazzle. Get snapping today.
Photography for the Web 14
When using very short focal lengths, there can be
quite a dramatic effect on perspective. An ultra
wide-angle lens exaggerates the apparent distance
between objects in the foreground and back-
ground. To fill the frame of a wide-angle shot you
need to be much closer to your subject, and this
can cause considerable distortion. If you use a
10mm lens to shoot a close-up of a person, it’s
entirely possible for the tip of the nose to be twice
as close to the camera as the person’s ears. The
sides of the head recede into the distance, while
the nose looms larger in the foreground.
Figure 1.16. Why portraiture with a wide-angle lens is a bad idea
Figure 1.16 shows a close-up shot using a 16mm
lens. Notice how the left side of the face is smaller than the right, the nose is enormous, the top of
the head seems to curve away from us, and the glasses lenses appear to be asymmetrical. The lesson,
I hope, is clear. Avoid using a wide-angle lens to take portraits.
The Aperture and Shutter
The aperture is the hole in a camera lens that allows light to enter the camera. In among the many
pieces of glass in your lens is the iris, which controls the lens’s aperture. Logically, opening the
iris and increasing the aperture lets more light into the camera, while closing it reduces the amount
of incoming light. Photographers use a wider aperture when wanting to reduce the depth of field—
the level of distance between the closest objects and farthest objects that remain in sharp focus. For
instance, a picture taken with a shallow depth of field would have only the main object in focus,
with any other elements appearing blurry.
In most of the camera’s automatic modes of shooting you have no direct control over the aperture.
When shooting in manual or semiautomatic modes (which we’ll cover in Chapter 2), you’ll find
that mastering the use of the aperture control is a very important part of photography.
While the aperture controls the amount of light entering the camera, the shutter is the device that
controls the amount of time the camera’s sensor is exposed to the light entering the camera. When
the shutter is closed, no light can reach the sensor. Shutter speed is the measure of time the shutter
is open. A slow shutter speed means the shutter stays open for a long period of time, and, unsur-
prisingly, a fast shutter speed means the shutter is open for a short amount of time.
Aperture and shutter speed are combined to control the overall amount of light that reaches the
sensor when taking a photo, as we’ll see in Chapter 2.
Photography for
the Web (www.sitepoint.com)
15About Your Camera
The Viewfinder
There are several distinct types of viewfinder. Each has its advantages and disadvantages, and all
will affect the way you take photos.
On most cameras the LCD display gives a live feed of whatever the sensor is capturing. On smaller
cameras it’s often the only option for setting up your shot. In the most compact cameras there’s no
space for a separate viewfinder. A large display is terrific for visualizing the composition of an image,
and is large enough to allow you to shoot under conditions where you might have to hold the
camera some distance from your eye, such as shooting over the heads in a crowd.
Large LCD screens can sometimes perform poorly as viewfinders in very bright light. Their own
brightness can be overwhelmed by direct sunlight, making it hard to see the details of what it is
you’re aiming at. Lower-resolution LCD displays may also be unable to display the kind of fine
detail needed for accurate manual focusing. When shooting with a camera that only has an LCD
display, autofocusing is essential. Many compact cameras have the ability to detect faces within a
scene and focus on them, and that’s a great way to overcome the problem when shooting portraits.
Otherwise, you can often increase the display’s magnification to better see where the image is focused.
The problem of viewing an external LCD display in bright light is completely overcome by view-
finders with an eyepiece. Not all of them give you a direct view of the subject, though. Many compact
digital cameras have an electronic viewfinder, which consists of a very small LCD display mounted
internally in front of the viewfinder eyepiece, like the Nikon model shown in Figure 1.17. This
eliminates the problem of bright light contrast, but does not fix the fine detail dilemma.
Figure 1.17. The back of the Nikon Coolpix P90 showing both LCD display and electronic viewfinder
The issue of fine detail goes away with optical viewfinders. On a compact camera this is a hole that
passes right through the camera body, containing its own separate set of lenses that create as close
a match as possible for what the sensor sees through the main lens. Because they’re a bit out of line
Digital Images that Dazzle. Get snapping today.
Photography for the Web 16
with the main lens, they don’t quite line up with the view; any markings that overlay the view are
usually placed a little off center to compensate for the difference in alignment.
The Single Lens Reflex (SLR) camera is a special case of optical viewfinding. Looking through the
viewfinder shows you exactly what the sensor will see when you open the shutter, because you’re
seeing it through exactly the same pieces of glass. The viewfinder of an SLR overlays lots of useful
information on the scene—grids to help keep the image straight, a selection of points on which to
focus, and a display of all the current camera settings, as demonstrated in Figure 1.18.
Figure 1.18. The viewfinder overlay of a typical SLR camera
Onboard Flash
It might seem odd, but it’s only the most expensive cameras aimed at professional photographers
that lack a built-in flash. Everyone else gets one of these horrible little items, whether they want it
or not.
You might assume from that last sentence that built-in flashes are to be avoided at all costs (or at
least that this author detests them). That’s not entirely true. If you have absolutely no other light
sources and no way to keep your camera or subject still for a really long exposure, it’s probably
better to use the built-in flash than miss the shot.
Built-in flashes do have problems: they cause red eyes in your subjects, cast very harsh shadows,
and are unable to be pointed from anywhere other than where the camera is. In Chapter 2, you’ll
learn ways to do without your camera’s flash to light your scene. In Chapter 3 you’ll learn how to
better work with flashes—built-in and external.
For now, we’ll just deal with the worst problem of built-in flashes: most of them turn on automat-
ically. Many compact cameras, when faced with a slightly dim scene, go flash-happy, whether they
need to or not. Nobody likes having a flash go off in their eyes, either, so it’s probably a good idea
to check your manual and learn how to turn the flash off. It will save your batteries, too.
Photography for the
Web (www.sitepoint.com)
17About Your Camera
Preset Scene Options
As you progress through this book you’ll learn how to take control of your camera and to tell it
what to do. You’ll make choices that will create great photos but, while you’re learning, you should
take advantage of your camera’s ability to do some of the work for you.
Manufacturers’ claims aside, your camera is not a very smart piece of hardware. It’s unable to know
a good photograph from a bad one. It has no comprehension of what it’s being pointed at. However,
it can measure how bright a scene is, and recognize when the point at which it’s aimed is out of
focus and adjust itself. Some autofocus programs can recognize when an object is face-shaped and
focus on it. That’s about all it can do without your input, but the average camera user barely knows
how to manually set the camera to capture the image they want. Many camera designers program
their products with a range of preset scene options. They can be used for a number of standard
types of scene, and the camera will adjust its settings to best suit that type of shot under the current
lighting conditions.
These pre-programmed options vary from camera to camera; Figure 1.19 shows the selection
available on a Nikon D5000. On larger cameras they’re often set via a dial on top of the camera.
Smaller cameras with less room for knobs and dials will put them on menus accessible via the LCD
display. High-end cameras aimed purely at the professional photographer may have no preset modes
at all.
Figure 1.19. The Mode Dial of a Nikon D5000 and icons representing the presets from which you can choose
Digital Images that Dazzle. Get snapping today.
Photography for the Web 18
Automatic Mode
Automatic mode tells your camera to use its best judgement to select shutter speed, aperture, focus,
flash, and a range of other settings, to take the best shot that it can. With some cameras, auto mode
lets you override flash or change it to red-eye reduction, but beyond that everything else is left up
to the camera. If you’re shooting in standard conditions you’ll probably record a decent shot using
automatic mode; however, you need to keep in mind that your camera knows nothing about the
type of scene you’re looking at or the style of shot you’re taking.
There will almost certainly be more modes to choose from, designed to make the best guesses about
how to shoot specific types of scenes. Following are some of the more common scene modes.
Portrait Mode
When you switch to portrait mode your camera will automatically select a wide aperture, which
helps to keep your background out of focus. This ensures that only the subject of the portrait is in
focus and does not get lost in a busy background. After all, the person you’re shooting should be
the center of attention. Portrait mode works best when you’re photographing a single subject, as in
Figure 1.20.
Figure 1.20. A portrait shot should focus on the subject
Photography for the Web (www.sitepoint.com)
19About Your Camera
Landscape Mode
Landscape mode is almost the exact opposite of portrait mode in that it sets the camera up with a
narrow aperture to ensure as much of the scene as possible is in focus. It’s therefore ideal for cap-
turing shots of wide scenes, particularly those which have points of interest at different distances
from the camera, as in Figure 1.21. At times your camera could also select a slower shutter speed
in this mode, so you might want to consider a tripod or other method to ensure your camera is still.
Figure 1.21. Focusing far and wide in a landscape shot
Digital Images that Dazzle. Get snapping today.
Photography for the Web 20
Macro Mode
Macro mode—also called close-up—lets you position your camera very close to your subject. It’s
great for shooting flowers, like the one in Figure 1.22, insects, or other small objects. Different digital
cameras will have macro modes with distinct capabilities, including various focusing distances.
Check your camera’s manual to find its minimum focusing distance. When you use macro mode
you’ll notice that focusing is less forgiving at short distances.
Figure 1.22. Macro mode sets the camera to focus as close as possible to let you see things larger than life
Night Mode
Night mode is for shooting nearby subjects in low-light situations. It combines the flash, to illuminate
the subject, with a slower shutter speed, to let in some light from the background. It can be a good
idea to use a tripod in this mode to avoid your background being blurred, but it can also be fun to
take handheld shots to purposely blur your background—especially with lights behind your subject
(great for parties with colored lights). Figure 1.23 shows the difference between automatic mode at
night (on the left) and night mode (on the right). At night in automatic mode the camera fires the
flash only, while in night mode the shutter remains open after the flash has fired to let more light
in.
Photography for
the Web (www.sitepoint.com)