Craft and Vision: Eleven ways to improve your photography
Bạn đang xem bản rút gọn của tài liệu. Xem và tải ngay bản đầy đủ của tài liệu tại đây (36.61 MB, 68 trang )
CRAFT
&VISION
11
11 Ways to Improve
Your Photography
A FREE eBook from | Edited by David duChemin
Contents
MAKE YOUR IMAGES MORE DYNAMIC 4
FORGET LENS STEREOTYPES 47
UNDERSTAND THE STAGES 26
TAME YOUR DIGITAL EXPOSURES 10
SLOW DOWN AND LEARN TO SEE 54
CREATE PROJECTS AND COLLABORATE 31
THE POWER OF THE PRINT 16
MAKE STRONGER PORTRAITS 61
REFINE YOUR COMPOSITION 36
LEARN TO DIRECT THE EYE 20
THE POWER OF THE MOMENT 41
I’ve been a photographer for over 25 years now.
Both my craft and my photographic vision are
much different now than they were when I
first started. I like to think they’ve evolved and
improved in their ability to express what I hope
for. Certainly, to a large extent, that evolution
and growth came with the passing of time. Give
anyone a quarter century doing one thing and
they are bound, it is hoped, to get better. But I
don’t think I needed 25 years. I think with more
focused teaching and study I could have learned
my lessons faster, arrived at this place sooner. I
don’t at all mean that I’ve arrived at some magi-
cal photographic destination called mastery. In
fact, I don’t believe such a destination exists.
But on this journey I think I might have avoid-
ed some of the potholes, diversions, and ruts,
had I learned some lessons sooner than others.
In this free eBook I’ve asked the authors at Craft
& Vision, our weird little publishing house, to
contribute an article about something they wish
they’d learned sooner, a way in which others
could improve their photography. I also asked
them to give me something that didn’t include
going out and buying new gear. Our first eBook
was titled TEN: 10 Ways to Improve Your Craft
Without Buying Gear. The whole ethos of Craft
& Vision’s efforts has been, from the begin-
ning, to focus on those things that can truly
improve your photography, and more (or more
expensive) gear seldom truly does that. Better
that we become more curious, more observant
practitioners of our craft—photographers who
understand the basics, recognize the power of
the moment, and know how to work with lines
and tension, tones and colour, to communicate.
A new lens is often the last thing we need.
So, these friends of mine dug in and, without
any further suggestions, turned in some top-
ics close to their heart. Eli Reinholdtsen wrote
about the power of moments. Nicole S. Young
wrote about more intentional compositions.
Andrew S. Gibson wrote about personal projects
and collaboration while Alexandre Buisse dis-
cussed sharing our work as a means to growth.
Piet Van den Eynde, in his usual style, gave me
two articles—one about giving your images a
greater sense of energy, the other about seeing
beyond the usual stereotypes about lenses.
Landscape photographer Michael Frye talks
about learning to direct the eyes of the readers
of our photographs. Stuart Sipahigil wrote about
slowing down and learning to see. An upcom- We'd love to be of service to you, in some way, as
ing C&V author, Martin Bailey, sheds some light you pursue your vision and work on your craft,
on printing. And I’ve chimed in with an article
about taming digital exposures and creating
stronger portraits. Together we’ve tried to create
something that is, and will always be, free. A gift
back to the amateur photography community
we love and from which we ourselves come.
If you enjoy this book, copy it and send it out
into the world. Give it to friends. Give your
colleagues a break: stop sending those emails
about your cat and send this instead. Tweet
about it. Blog about it. Or just read it, pick up
your camera, and go make something beauti-
ful. Never mind the new gear. Just go make
some photographs that make you happy.
If this book makes you hungry for more, we’re
dedicated to teaching photography without
the smokescreens and the distractions. At the
end of this book there is an ad for the Craft &
Vision store, where most of our eBooks are $5,
though we pride ourselves on creating resources
that are worth much more.
but if the only way we do that is through this
free eBook, we’re glad to have been a part of
the journey you take with your camera.
Peace,
David duChemin
Ottawa, Canada
November, 2011
Introduction
PIET VAN DEN EYNDE
Another reason for the less-than-ideal transition from reality to image is that mak-
ing a photograph (I prefer the term “make a photograph” to “take a photograph”
because it better reflects the creative process of photography) means going from
three dimensions (width, height, and depth) to two, eliminating depth.
Therefore, a big part of creating compelling photographs is trying to translate or
even exaggerate that feeling of depth into your final, two-dimensional image. Wide-
angle lenses can be a great tool for this, as I discuss elsewhere in this eBook.
But there’s a third reason, and another important dynamic in photog-
raphy: when you’re making a photograph, you’re actually not only cut-
ting out the third dimension, but also the fourth: a photograph is not only
a spatial crop (a frame from a bigger scene), but also crop in time.
The best way to translate a feeling of time (or timelessness), and there-
fore dynamism, into a picture is to work with your shutter speed.
CAPTURING SPATIAL DYNAMISM
(Cropping in Space)
As stated above, there are a number of techniques you can use to improve what I’d call
“spatial” dynamism in your pictures, i.e. better manage the loss of the third (depth)
dimension. These techniques include working with leading lines, incorporating di-
agonals in your images, framing with the rule of thirds in mind, using shallow depth
of field to isolate foreground from background, etc. In this article, however, I’d like
to focus on translating the dynamics of time and movement into your images.
It happens to all of us: you’re at a great place with a great ambience, you make a picture of it
and when you look at your LCD or the print later on, the image has nowhere near the impact the
actual scene had. That’s because three things are happening: rst of all, our brain tends to focus
on only the beautiful parts of what we see. It sees the beautiful landscape, and—as if our mind
had a built-in Photoshop Clone Stamp or Content-Aware Fill—disregards the power lines at the
top of the frame and the rubbish piled up at the bottom.
Make Your Images More Dynamic PIET VAN DEN EYNDE
Digital photography revolves around
these three basic variables: shutter speed,
aperture, and ISO. Settling on any two
will automatically lock the third one in
place, just like drawing two corners of a
triangle will also determine the third one.
Don’t work in “P” mode or one of those
preprogrammed scene modes, but make
informed decisions. You should be in
control of your camera, not an engineer!
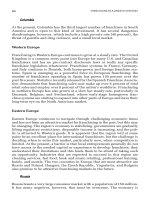
Let’s start with a simple example to il-
lustrate this: a rock surrounded by water
right beyond Sweden’s highest waterfall.
Both images were taken just minutes apart.
The time of capture was almost identi-
cal, the timing of the capture wasn’t!
Although many people will probably like
the second image more than the first, be-
cause of its more poetic nature (and quite
frankly, because images with dreamy, blurry
water have become somewhat iconic in
photography and travel magazines), one
isn’t necessarily better than the other—it’s
your intent that matters. If you want to
show the relentlessness of the waters below
the waterfall, then the first choice of param-
eters would be the most appropriate one.
For image A, I just selected the fastest shut-
ter speed I had, and checked if the aperture
and ISO were still within working range. For
image B, I knew I’d need the longest shutter
speed possible, so I started by setting my
ISO to the lowest and my aperture to the
maximum, but the resulting shutter speed
was still too fast for what I was after, as it
was very bright that day. So I put on my
variable neutral density filter (I use one by
Light Craft Workshop, but other options
exist). If you don’t have a neutral density
filter, in a pinch a polarizer will also do,
as it also cuts a couple of stops of light.
CAPTURING TIME
(Cropping in Time)
1) Intentional shutter speed
Rocks near a waterfall,
photographed at the fastest
shutter speed of the camera
(and resulting settings for
ISO and aperture to get a
good exposure).
f/2.8 | 1/4000s | ISO 3200
The same rocks, photographed
with a slow shutter speed of
three seconds. Camera set to
smallest aperture and lowest
ISO. Variable neutral density
lter added to further slow
down the shutter speed.
f/22 | 3 seconds | ISO 200
Make Your Images More Dynamic PIET VAN DEN EYNDE
Panning is an effective technique to
translate movement to a still image. When
you’re panning, you’re following your
subject during the exposure, so the subject
is rendered (relatively) sharp against a
streaky, blurry background. The results are
always a bit hit-or-miss, but these tips will
help you achieve a higher success ratio.
- Start by putting your camera on shutter
priority and set it to a speed of 1/15 (for
slower subjects) to 1/30 of a second. In
bright sunlight, you will probably need to
be at your lowest ISO and at your small-
est aperture, which actually is helpful to
get your subject sharp. Sometimes, you
might even need a neutral density filter.
- Prefocus (and preset your exposure)
to where your subject will appear.
- Set your camera to high- or continuous-
speed shooting (the position where the
camera keeps making pictures as long as
you keep the shutter pressed), so that you
can make a couple of pictures during the
actual panning movement: this increases
your chances of having a good shot.
- Hit the shutter when your subject ap-
pears in the viewfinder and follow its
trajectory while shooting. Rotate your
body around its vertical axis and don’t
stop abruptly. Some people find it help-
ful to position their feet in the direction
the panning movement will finish.
- As said, this technique takes practice and
even that’s no recipe for success, but your
“keepers” will definitely be worth the effort.
- Roundabouts (with you in the centre)
are great places to learn the moves, as
the subjects stay the same distance from
you as they move through the frame.
2) Compress motion into a still frame using panning
A boring,
uninteresting
background…
…can become an interesting streak of colour in a panning shot.
Make Your Images More Dynamic PIET VAN DEN EYNDE
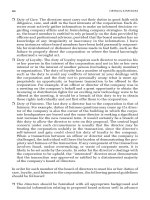
For this image, I actually had something different in
mind: having just spent months in the quiet Javanese
countryside, I wanted to convey the hectic Singapore
rush hour with a classic long exposure, turning tail-
lights into streaks of red and headlight into beams
of yellow. However, the images did not convey what
I wanted them to, partly because I could not go low
enough with my shutter speed. So I decided to experi-
ment and zoomed during the 1/3 second exposure. This
lengthened the streaks and made the traffic appear
the way I wanted: as a hectic glowing inferno.
Using slow shutter speeds to convey motion can be a
good thing, if there’s at least one part in the image that’s
stable, like the rocks (stable) in the water (flowing) we dis-
cussed before. However, when everything is moving, your
picture very easily becomes an abstract. Great if that’s
what you’re after, but not if you want the scene to be
recognizable. In this picture, which I discuss in greater de-
tail in my eBook Making Light II, I wanted to convey the
frenzy of the rickshaw ride, which called for a longer ex-
posure. Still, I wanted an anchor point in the image that
would be relatively sharp, so I used my flash to freeze the
driver (and also lighten up the interior of the rickshaw).
3) Long shutter speeds and zooming
Astrophotography? No, just trafc in Singapore.
Nikon D90 | f/22 @ 1/3s | 19mm | ISO 100
Using a relatively slow shutter speed allowed
me to capture the frenzy of this rickshaw ride.
A ash froze the driver and added ll light to
the dark “cabin.”
NIKON D90 | f/10 @ 1/3s | 10mm | ISO 200 | Flash
Make Your Images More Dynamic PIET VAN DEN EYNDE
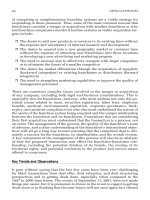
A similar thing was done with this image of an Iranian blacksmith: the relatively slow shutter speed (compared to the
speed at which the blacksmith swung his arm) of 1/80 of a second made the arm movement register as a flow, giving
the image a sense of dynamism. Some flash was added to focus extra light on the subject and freeze the rest of him.
4) Combining ash and slow shutter speed
Make Your Images More Dynamic PIET VAN DEN EYNDE
Casting the iron while it’s hot: it applies to photographic opportunity as much as it does
to this blacksmith.
NIKON D700 | f/4.5 @ 1/80s | 21mm | ISO 200 | Flash
Piet Van den Eynde is a Belgian
freelance photographer. He also
writes books, magazine articles,
and gives training about digital
photography and post-processing
with Adobe Lightroom and Adobe
Photoshop. In 2009, he threw his
camera, a ash, and an umbrella in his bicycle panniers and
cycled 5,000 miles through Turkey, Iran, India, and Indonesia
for a photography project called PortraitsOfAsia. Learn more
about Piet on his website, />Check out Piet’s Craft & Vision titles at
/>DAVID DUCHEMIN
While a great photograph is so much more than “getting the exposure right,”
there’s much to be said for understanding at least the very basics of your
craft. The more skill and understanding you have, the easier it is to use that
skill to get the results you want, and make the photograph look the way
you want it to.
So let’s look at the basics. First, there are two fundamentally different ways to
approach your digital exposures. You can shoot in JPG, do very little to your
photographs in the digital darkroom (Adobe Photoshop, Lightroom, or Apple
Aperture, for example) and move on. Or you can make the digital darkroom
a much more important part of your process. Most photographers I know
prefer to work in Adobe Lightroom to make up for some of the shortfalls of
digital capture and bring their photograph into closer alignment with their
vision. Either approach is fine but it’s good to know which path you’re go-
ing to take so your in-camera approach gives you the best possible digital
negative. I’m going to assume you are going to do a little work in the digital
darkroom, but if not, you can still use this article to get great exposures.
It helps to know what your camera is doing when it meters. It also helps to
know what it means to create the best possible digital negative.
So let’s look at both.
Tame Your Digital Exposures DAVID DUCHEMIN
One of the rst things you learn when you pick up a lm camera is how to properly expose the
negative. Blow the exposure with lm and you’ve not got much recourse. The same is true of
digital exposures. There is only so much room for error.
The meter, for all its advances, aims to do one thing—to give you
a good exposure for any given scene. There are two problems,
however. The first is that the camera doesn’t know what you
want the photograph to look like. So it guesses. That’s problem
number one. The guess. The second problem is how it makes
that guess. It assumes that for any one scene the best exposure
is an average of middle grey, or 18% grey. So if the camera sees a
largely black scene it will give you a reading to render that scene
18% grey. To do so it has to overexpose a little. Likewise if the
camera sees a largely white scene, it will give you a reading to
render that scene the same 18% grey, underexposing to do so,
and making the bright snow, for example, a muddy grey. Not
ideal. So when we were shooting film we learned to overexpose
the brighter scenes a little and underexpose the darker scenes.
Cameras are getting smarter, and the spot meters today allow
for some very accurate exposures. The problem, of course,
is that many of us—most of us?—are no longer recording to
film. We’re recording to digital with the intent of working on
the images in the digital darkroom. Digital work introduces
a new problem: digital files, composed of pixels, are only so
flexible. They contain only so much information. So if you
accidentally underexposed your photograph, and want later to
pull details out of shadows, there is only so much detail there
before you get horrible digital noise. There are other problems
with trying to bend a digital file past the limited flexibility it
has, all of them making the photograph look less than beauti-
ful. The solution then is to create a better digital negative.
I define the best digital negative, assuming I will be working
on the image in Lightroom or Photoshop, as the one with the
most amount of data, or digital information. More digital in-
formation means more flexibility. More flexibility means more
ability to manipulate without making a horrible digital mess
of your photograph. If only there was some way of knowing
how much digital information we’d captured. There is, but
first I have two suggestions for getting the best digital nega-
tives you can. The first is to shoot in RAW. RAW files are huge,
but that increase in size is because they contain MUCH more
data. That’s important. Secondly, while digital sensors are get-
ting better and better in low light at high ISO, you’ll still get
cleaner files and more room to pull detail out of shadows if you
favour lower ISOs when you can. Now, back to our wish that
there were some way to know how much data was in our files.
Enter the histogram, and every digital camera I know of has
the ability to display this important graph. Those same digi-
tal cameras have an LCD preview screen for looking at your
photograph. Ignore that preview image. Sure, use it to check
focus and composition, but it will not give you an accurate
representation of the exposure. For that you need a very
basic knowledge of the histogram, and it’s not as intimidat-
ing or complicated as you might think, so hang in there.
This is the histogram from Adobe Lightroom, but the one on
your LCD will look similar. The histogram below represents a
scene captured with no blown highlights—notice the mountains
and valleys don’t go off the right side of the chart, which means
there is no lost detail in the highlights—and the data doesn’t go
off the left side, which means no lost details in the shadows.
Tame Your Digital Exposures DAVID DUCHEMIN
Now, I’m going to assume you know nothing
about the histogram. It’s a graph, that’s all it is,
and it’s deceptively simple. That graph repre-
sents the light values in the scene you’ve just
captured at the exposure values you’ve captured
it at. On the far left are shadows with no details,
totally plunged shadows of darkness. On the far
right are highlights with no details, total burned
out whiteness. And between those two extremes
are all the tonal values from black (left) to white
(right). The height or shapes of the peaks and
valleys, for this exercise, don’t matter. Ignore
them. You can do something in-camera about
where the peaks and valleys sit from left to
right, but can’t do a thing about their height
or shape. That’s the scene, and unless you’re in
the studio or have large lights to overpower the
natural light, ignore the height of the peaks.
Why the histogram matters now gets—for
a moment—a little more complicated. It’s
logical, or so you’d think, that as long as
you get the whole scene into the box of
the histogram—neither wildly over- nor
under-exposed—you can tweak the rest in
Lightroom and be done with it. Simple, per-
fect exposure, right? Wrong. You’ve created a
digital negative but not the best one. Why?
Because the histogram reflects some quirky
math that can only really be understood by
wizards and occultists, and it doesn’t respond
to the logic of mortals like you and I.
Remember I said the best digital negative was
the one with the most information? Well
the right half of the histogram is capable
of storing exponentially more information
than the left half. WAY more information.
And the right quarter of the histogram, WAY
more than the other three combined. How
much more? Again, I’m simplifying, but if
the right quarter of the histogram can hold
2000 levels of information, the quarters to
the left of it can hold 1000, 500, and 250
respectively. There isn’t much information
at all in the darks. That right quarter of the
histogram can hold twice what the rest of the
entire histogram can hold. It’s a WAY bigger
bucket, and it holds WAY more information.
Remember: more information means better
image quality and more flexibility in the digital
darkroom before noise becomes an issue.
So what do you do with this knowledge?
Here’s how I approach exposure. First, I
shoot on AV mode or manual almost 100%
of the time. I leave my metering on whatever
your camera’s equivalent of centre-weighted
average is. Then I take the shot. Click. (1)
Before you look at the images/histograms:
I did this in Lightroom as a simulation
only and it’s meant to be just an illustra-
tion. Pretend you’re looking at the his-
togram on your camera’s LCD screen.
Now I look at the histogram. Way too dark. See
those peaks and valleys? They’re all on the left
half of the histogram, with very little informa-
tion in the right half, never mind the rightmost
quarter, which is where the most amount of
digital information is stored. So I want more
information, which means more light.
Tame Your Digital Exposures DAVID DUCHEMIN
1
I need to overexpose. So I use the
EV+/- function on my camera, push the
exposure a stop, try again. Click. (2)
Getting better. But while the image LOOKS
OK-ish on the LCD screen, the histogram is tell-
ing me otherwise. It is still, in terms of a good
digital negative, underexposed. So I go back to
my EV +/- and bump it another stop. Click. (3)
Much better. But remember, this is just a
simulation in Lightroom and what we’re
looking at is the histogram only. What the
photograph looks like on the back of the LCD
doesn’t matter. You’re exposing for data, not
aesthetics. You fix the aesthetics in the digital
darkroom where you’ll have much more con-
trol. Even if things are a little light-looking,
you know you can bring the exposure back in
Lightroom or Aperture without a loss of detail
or quality. Look at the histogram—it’s where
it should be, as far over to the right without
going off the end. What matters is that now
you have LOTS of digital information.
So the name of the game is getting to know your
histogram so you can create the best possible
digital negative. And the best possible digital
negative is the one with the most information.
There will be times when you have a scene with
a larger range of tones than the camera can
capture. In this case you have options, several
of them. Decrease that range with the use of
graduated neutral density filters to hold back
the sky, which is often the brightest part of the
frame, or use a flash to pop the shadows. Or you
might take three to five bracketed exposures
and bring them together in Photomatix or
Photoshop as an HDR (High Dynamic Range)
image. Or you can just make a choice to create
an image with either plunged shadows and/
or burned out highlights. Sometimes there are
highlights you can’t, or shouldn’t tame. The
sun for example. Sometimes it’s OK to blow the
highlights completely out, then what matters
is which highlights you are losing detail in.
Tame Your Digital Exposures DAVID DUCHEMIN
2
3
The same goes for shadows. Current digital cameras just
can’t capture every scene from darkest shadows to light-
est highlights, so sometimes you make the best decision
possible, asking yourself what you want the photograph
to look like and what detail you are willing to lose. In the
image of the woman lighting candles in Kathmandu, I
knew my histogram would peak on the left—there’s just
no way the camera can capture such a broad range of light,
so I let my shadows plunge. And there was no way I could
get detail in the flames of the candles, so I knew my his-
togram would peak on the right. I just made sure it didn’t
peak so much that I was losing detail in the other light
areas, like her face. I also made sure I was shooting RAW
instead of JPG, and shooting at the lowest ISO I could, in
this case ISO 800 (once upon a time ISO 800 was incredibly
high, but with today’s cameras, it is still relatively low).
This should give you a good start on digital ex-
posures. Remember to expose to the right and
when you blow out highlights, ask yourself which
highlights you’re losing. There is no perfect
histogram, just a great digital negative, and you
sometimes have to make compromises to get there.
Tame Your Digital Exposures DAVID DUCHEMIN
David duChemin is a nomad, a world
and humanitarian photographer, the
accidental founder of Craft & Vision,
and the author of Within The Frame:
The Journey of Photographic Vision,
VisionMongers: Making a Life and a
Living in Photography, and Vision &
Voice: Rening Your Vision in Adobe Photoshop Lightroom.
David’s latest book, Photographically Speaking, was
published October, 2011. David’s work and blog can be seen
at
Check out David’s Craft & Vision titles at
MARTIN BAILEY
Photography is booming because of the ease in which a
good photograph can now be made and viewed, but with
this, many of us have become lazy when it comes to actu-
ally creating physical prints of our images. To compound
the problem, in the first five years or so of mainstream
digital photography, although we had good inkjet print-
ers that could print photographs, getting really good
quality prints was difficult and left many photographers
frustrated with the process and unhappy with the results.
The sad thing is that this nasty aftertaste from early experi-
ences is robbing photographers worldwide of a pleasure that
we took for granted just a decade ago. In fact, although we
made prints, a decade ago, our options were so much more
limited than they are now. We’d select a type of film for a
certain look, then we’d select a finish for our images, usu-
ally either gloss or lustre, and we’d have them all printed
at a size just about big enough to see what we’d shot, and
we’d then maybe get a few enlargements of the best photos
every once in a while. Even for those fortunate enough to
have printed their own images in a darkroom, there were
still only a relatively limited number of papers and chemi-
cal processes readily available, and once people bought
into a process, they’d often stick with it for some time.
The digital age has liberated the photographer. Not only
can we now change ISO for each image, without having
to finish up a roll of film first, we can view the images as
we make them, and correct mistakes right there in the
field. In post-processing, we can change the look of each
individual image, and our options for papers or other
substrates to print to are now almost endless. Of course,
when working on a project, you’ll often select one or
two types of paper, and aim for a consistent look across
your body of work, but there’s a myriad of possibilities.
If you don’t yet own a printer and aren’t yet sure that
home printing is for you, consider picking up an A4 or US
Letter size printer, as these are now very cheap, and recent
models provide excellent quality. Just make sure you
Digital photography has given us so much. We can now totally control the photographic process
from capture to output, in a multitude of formats, in the comfort of our own homes and without
smelly chemicals.
The Power of the Print MARTIN BAILEY
select something that has individual colour
cartridges, not multiple colours in one or two
cartridges, as some colours will run out before
others, causing waste if you had to throw out
the entire cartridge. Also, look for a printer
with at least six colours in the cheaper end of
the market, or eight or more if you decide to
go for a 13” x 19” (A3 Plus/Super B) printer.
Resist the temptation to buy an older used
printer if you are on a tight budget. You’ll
get better results with much less stress using
something as cheap as a new $100 A4 printer.
One of the main sources of frustration for
photographers printing their own work
is dark prints. The source of the problem
though is not dark prints, it’s overly bright
monitors. Factory settings for computer
displays have them set too bright for most
photographers’ working environment. In
general, this gives the photographer a false
impression of what their images really look like
and so we expect the prints to be brighter.
To set your display brightness accurately, you’d
need to ensure that your display is calibrated
and use the ambient light checks to adjust your
brightness during the process. If you don’t
already have a calibration tool, try turning
your display down to around one third of its
full brightness. As a reference point, I have my
external monitor turned down to 12% Bright-
ness! This can be a shock to the system at first.
Your images will look dark, and it will feel
horrible, but I assure you, once you’ve worked
like this for a few days you will get used to it.
You might also find that some of your images
are too dark out of the camera. To overcome
this, you’ll need to rely on the histogram, either
when shooting new images or preparing old
images for print. Unless you intentionally shot
a low-key or dark image, you should not see
much of a gap between the data on the right
side of your histogram data and the right shoul-
der of the histogram box, like in this histogram.
The Power of the Print MARTIN BAILEY
If you do see a large gap, you might need to brighten up
your images using the exposure sliders in Photoshop,
Lightroom, or Aperture (or whatever program you use)
until your histogram looks more like this. Once you’ve
adjusted the exposure of your image, try a print and com-
pare it to what you see on your display. If it’s still too dark,
your display may still be too bright. Continue to adjust
until your prints are close to what you see on the display.
It’s important to note though that this is just a quick way
to get close results and not your ideal workflow. The goal
is to shoot images that are brighter (if they were too dark)
and to do all of your editing on a darker monitor. Then
your prints will look great from the start and you’re actu-
ally seeing a more accurate view of what your images really
look like. Resist the temptation to increase the bright-
ness of your monitor again when you’re not printing.
Although this will give you better results straight away,
to ensure that your colours are accurate, you also need
to remove your printer manufacturer’s interpretation
of what the average consumer wants to see in a print.
To do this, you need to turn off printer management
of the colours, and tell the printer exactly what profile
to use and allow Photoshop, Lightroom, or Aperture to
handle the colour. Your printer will come with profiles
for your printer manufacturer’s papers. If you buy a third
party manufacturer’s paper, you can usually download
their profiles too. If you really get into this, you can
create your own custom profiles relatively easily too
now, with a slightly higher-end calibration tool.
It might all sound like a lot of hard work, but once you’ve
got a few basics under your belt, it really isn’t. Printing
can be frustration free most of the time, and very fulfill-
ing. If you had a bad experience printing more than a
few years ago, I implore you to give it another try. There’s
never been a more exciting time for photographers to
create images, and to create beautiful, tactile prints from
them to display and enjoy. I show my work a lot, and
receive praise in many forms, but the highest praise I’ve
received was when people stand in front of a physical
print, and actually shed a tear. I would love for you to
experience this too, through the power of the print.
The Power of the Print MARTIN BAILEY
Martin Bailey is a Tokyo-based
art and assignment photographer
who is passionate about creating
photography that invokes emotions,
and helping others to do the same.
He runs photography workshops
and releases a weekly photography
podcast, along with a photography-centric blog and forum.
Learn more about Martin on his website,
Check out Martin’s Craft & Vision titles at
/>(The Passionate Printer – available January 2012.)
MICHAEL FRYE
LIGHT
Light can make your subject stand out, and draw viewers’ atten-
tion right to it—or pull their eyes away to something completely
different. Look at this image of Half Dome (A) and notice what
areas attract your attention. Where does your eye go first? Sec-
ond? Third? If you’re like most people, you probably looked
first at the sunburst, and next at either the yellow trees or the
cloud wrapped around Half Dome. Why? Because these are
the brightest and most colourful areas in the photograph.
Our attention is naturally drawn to bright spots and warm
colours. In this image, I want people to look at the sunburst,
the yellow trees, and Half Dome; to me these are the most in-
teresting parts of the photograph. So the light complemented
this scene perfectly. But it doesn’t always work this way.
When someone looks at one of your photographs, what do they see? Where do they look rst,
second, and third? How do their eyes move through the frame? To communicate effectively
through your photographs, you have to direct your viewers’ attention. You can’t just hope that
they’ll notice your subject—you have to make them look at it. How do you that? With light, design,
and processing.
Learn to Direct the Eye MICHAEL FRYE
A
In the first image of Bridalveil Fall (B), most of the waterfall is in the
shade, so your eye gets pulled to less interesting, but brighter, ar-
eas in the upper-right and lower-right corners of the frame. There’s
competition between the subject—the waterfall—and the light.
In the second photograph (C), a sunbeam spot-lit the waterfall, drawing attention
to the two main subjects, the water and the rainbow, because they’re the brightest
and most colourful things in the frame. To me this image is far more successful.
If your main subject is dark, with bright areas next to it, or behind it,
you’ll create a visual competition between your subject and those adjacent
highlights. Ideally you want the main points of interest to be the bright-
est things in the frame, so that viewers’ eyes go there immediately.
Of course there are always exceptions. If a dark subject contrasts with
brighter surroundings, our attention goes right to it, as it goes to this
Joshua tree silhouetted against the sky (D). So a dark subject can work—if
it stands out clearly against a brighter background. While our eyes usu-
ally get drawn to bright spots, they always get pulled toward contrast.
Learn to Direct the Eye MICHAEL FRYE
LIGHT – continued
B
D
C
You can also direct viewers’ eyes with lines and shapes. In this autumn
photograph of El Capitan (E), the light does a lot of the work: the
two main focal points, the cliff and the foreground leaves, stand out
because they’re the brightest and most colourful things in the frame.
But your attention is also directed to El Capitan because nearly every
prominent line in the photograph points right to it (F). Even though
El Capitan occupies only a small part of the frame, you can’t miss it.
The next example (G) is more subtle, but shows the power of
circular design. Again, light plays a role: the dark silhouette
of the small bush stands out against the lighter water behind
it, while your attention also gets pulled toward the brighter
patches of water, particularly along the left and top sides.
Those bright reflections in the river form a semicircle, and in
the lower-right corner there’s another, less-obvious semi-circular
shape that draws your eye back, and completes the circle (H).
This circular design keeps your gaze from wandering out of the
frame, and brings your attention back to the central bush.
The subjects in this photograph are mundane: a shrub and some
water. But the light and lines make the image interesting. The more
you think about the underlying design of your photographs, and how
lines and shapes direct the eye, the better your compositions will be.
Learn to Direct the Eye MICHAEL FRYE
DESIGN
E
F
G
H
Nature rarely provides perfect illumination, so
sometimes we have to help it along. Even the best
photographs often benefit from dodging and burn-
ing—selectively lightening or darkening parts of the
image in software. Lightening an object draws more
attention to it; darkening something makes it less
obvious. Both can be used to direct the viewer’s eye.
I was lucky to find beautiful, backlit mist under-
neath Bridalveil Fall in Yosemite one June morn-
ing (I). But the left side and upper-left corner are
both bright, and light areas along the edge tend
to pull your eye out of the frame. On the other
hand, Bridalveil Fall is a major focal point, but it is
shaded and dark, and needs to draw the eye more.
I used Lightroom’s Adjustment Brush to darken the
left edge and upper-left corner, and lighten the area
around the waterfall. The illustration (J) shows the
areas I changed, and the exposure settings I used
with the Adjustment Brush (negative amounts for
darkening, positive numbers for lightening).
Of course you can make similar adjustments
with the Dodge and Burn tools in Photo-
shop—or, for more flexibility, make a Levels
or Curves adjustment layer, then paint on the
layer mask to select the area you’d like to change.
(Paint with white to select, black to hide.)
With either Lightroom or Photoshop (or any other
software) large, soft-edged brushes usually work
best for dodging and burning, as they create gradual
transitions that make the changes less apparent. And
don’t overdo it—a small amount of lightening or
darkening can make a large difference, and bigger
moves usually look heavy-handed and obvious. In
this example the changes are subtle, but your eye now
travels more easily to the most interesting parts of the
photo—Bridalveil Fall and the mist in the centre (K).
Almost every photograph can benefit from dodg-
ing and burning. After you’ve adjusted the overall
colour balance, contrast, and saturation, look at the
brighter parts of the image. Are any of these spots
distracting—do they pull the eye away from more
interesting things? If so, darken them to help draw
attention elsewhere. Then look at the darker regions.
Are any of these areas important focal points that
need to draw the eye more? If so, lighten them.
Learn to Direct the Eye MICHAEL FRYE
PROCESSING
I J
K
You can’t always control the light, but you can look
for situations where light makes your subject stand out
from its surroundings. You may not be able to move
mountains or trees to create a perfect composition,
but you can become more conscious of how lines and
shapes direct attention, and use that to your advantage.
And if the light and design aren’t perfect, you can use
dodging and burning to draw the eye a little better.
When you make conscious decisions about where you
want viewers to look, and use the tools of light, design,
and processing to direct people’s eyes, you become a
creator and communicator with a camera, rather than
just a snap-shooter. Take charge: be the director of
your photographs—and of your viewers’ attention.
Learn to Direct the Eye MICHAEL FRYE
BE THE DIRECTOR
Michael Frye is a professional
photographer specializing in
landscapes and nature. He is a
contributor to numerous magazines
on the art and technique of
photography, and is the author of The
Photographer’s Guide to Yosemite,
Yosemite Meditations, and Digital Landscape Photography:
In the Footsteps of Ansel Adams and the Great Masters.
Learn more about Michael on his website,
Check out Michael’s Craft & Vision titles at