data entry and validation with c sharp and vb .net windows forms 2003
Bạn đang xem bản rút gọn của tài liệu. Xem và tải ngay bản đầy đủ của tài liệu tại đây (7.86 MB, 568 trang )
Data Entry and Validation with C# and VB .NET Windows Forms
by Nick Symmonds
ISBN:1590591089
Apress
© 2003
(764 pages)
This text demonstrates design patterns for everyday data entry programming tasks, showing
the pitfalls of using some of the .NET controls and how to program around them.
Table of Contents
Data Entry and Validation with C# and VB .NET Windows Forms
Introduction
Chapter 1
-
The .NET Data Entry Controls
Chapter 2
-
UI Design Considerations for Data Entry
Chapter 3
-
Data Presentation Screen Issues
Chapter 4
-
Keyboard- and Mouse-Based Data Entry
Chapter 5
-
The Object-Oriented GUI
Chapter 6
-
Advanced Data Entry
Chapter 7
-
Error Handling
Chapter 8
-
Advanced Validation and Custom Data Validation Controls
Chapter 9
-
XML Data Entry and Validation
Chapter 10
-
Keeping Users Happy
Chapter 11
-
Pulling It All Together
Application Blocks
Index
List of Figures
List of Tables
List of Listings
List of Sidebars
Back Cover
The old hacker adage “Garbage in, garbage out” has never been so important as it is today. With ever-
increasing amounts of information flowing into and out of modern applications, the task of an application
developer to control and verify information is critically important to any software project.
For the first time,
Data Entry and Validation with C# and VB .NET Windows Forms
brings together current
knowledge on this subject in an understandable, easy-to-read form. Covering development and best practices
for data entry and validation, including GDI+, custom controls, localization, accessibility, proper data
validation techniques, and best practices with Visual Basic and C#,
Data Entry and Validation with C# and VB
.NET Windows Forms
is a book no modern programmer should be without.
About the Author
Nick Symmonds works for the Security and Safety Solutions division of Ingersoll-Rand, developing and
integrating security software. He started out his professional life as an electronics technician. While getting his
bachelor's degree in electrical engineering from the University of Hartford, he started to gravitate toward
programming. Nick has spent quite a few years programming in assembly, C, C++, and Visual Basic. Recently,
he has latched onto .NET like a lamprey and loves digging into the .NET core. Nick has written several articles
on programming and has two books currently out:
Internationalization and Localization Using Microsoft .NET
(Apress, 2002) and
GDI+ Programming in C# and VB .NET
(Apress, 2002).
Data Entry and Validation with C# and VB .NET
Windows Forms
Nick Symmonds
Apress
™
Copyright © 2003 Nick Symmonds
All rights reserved. No part of this work may be reproduced or transmitted in any form or by any means,
electronic or mechanical, including photocopying, recording, or by any information storage or retrieval
system, without the prior written permission of the copyright owner and the publisher.
(pbk):
1-59059-108-9
12345678910
Trademarked names may appear in this book. Rather than use a trademark symbol with every
occurrence of a trademarked name, we use the names only in an editorial fashion and to the benefit of
the trademark owner, with no intention of infringement of the trademark.
Technical Reviewer: Adriano Baglioni
Editorial Board: Dan Appleman, Craig Berry, Gary Cornell, Tony Davis, Steven Rycroft, Julian
Skinner, Martin Streicher, Jim Sumser, Karen Watterson, Gavin Wright, John Zukowski
Assistant Publisher: Grace Wong
Project Manager: Beth Christmas
Copy Editor:
Nicole LeClerc
Production Manager: Kari Brooks
Proofreader: Linda Siefert
Compositor:
Susan Glinert Stevens
Indexer:
Rebecca Plunkett
Artist: April Milne
Cover Designer: Kurt Krames
Manufacturing Manager: Tom Debolski
Distributed to the book trade in the United States by Springer-Verlag New York, Inc., 175 Fifth Avenue,
New York, NY, 10010 and outside the United States by Springer-Verlag GmbH & Co. KG,
Tiergartenstr. 17, 69112 Heidelberg, Germany.
In the United States: phone 1-800-SPRINGER, email , or visit
. Outside the United States: fax +49 6221 345229, email
, or visit
.
For information on translations, please contact Apress directly at 2560 Ninth Street, Suite 219,
Berkeley, CA 94710. Phone 510-549-5930, fax 510-549-5939, email , or visit
.
The information in this book is distributed on an "as is" basis, without warranty. Although every
precaution has been taken in the preparation of this work, neither the author(s) nor Apress shall have
any liability to any person or entity with respect to any loss or damage caused or alleged to be caused
directly or indirectly by the information contained in this work.
The source code for this book is available to readers at in the Downloads
section.
For Celeste. You are the love of my life.
About the Author
Nick Symmonds started out his professional life as an electronics technician. While getting his
bachelor's degree in electrical engineering from the University of Hartford, he started to gravitate toward
programming. Nick has spent quite a few years programming in assembly, C, C++, and VB. Recently,
he has latched onto .NET like a lamprey and loves digging into the .NET core. Nick has written several
articles on programming and has two books currently out:
Internationalization and Localization Using
Microsoft .NET
(Apress, 2002) and
GDI+ Programming in C# and VB .NET
(Apress, 2002). He works
for the Security and Safety Solutions division of Ingersoll-Rand, developing and integrating security
software.
Nick lives with his family in the northwest hills of Connecticut and enjoys golfing, biking, and exploring
the hills on his motorcycle.
About the Technical Reviewer
Adriano Baglioni
got his first taste of computers as a freshman in high school, using BASIC on a
PDP-11/70. He pursued his interest in computers at Rensselaer Polytechnic Institute (RPI), where he
graduated with a bachelor's degree in computer and systems engineering. He followed that up with a
master's degree in computer science, also from RPI. He has worked in the computer industry for 20
years, programming mostly in C and C++. His experience runs the gamut from embedded programming
on 8051s to scientific programming on mainframes. He currently works at Veeder-Root Co., developing
software for environmental monitoring equipment.
When it's time to take a break from the computer, Adriano enjoys hiking, biking, and camping with his
wife, Carol.
Acknowledgments
This is my third book for Apress. Each time it becomes more enjoyable. The level of professionalism
within this company is unparalleled. Thanks to Beth Christmas for keeping me on track as my project
manager. Nicole LeClerc did a wonderful job again as copy editor. I can't believe how fast you do what
you do. Thanks to all those at Apress who helped and advised me on this book.
Special thanks go out to Adriano Baglioni. Without his technical review comments, this book would not
be nearly as good as it is. It was a pleasure working with you again.
Introduction
Anyone who has ever worked with a computer has had to enter data into it somehow. Anyone who has
done any Windows programming (or DOS programming, if you go back far enough) has had to write
data entry screens. What is data entry without some kind of validation?
Then again, what is validation?
Validation
is the process of the receiving data (via the keyboard, the
mouse, voice, serial connections, and so on) and making sure that the data meets the specifications
you have laid out. For instance, if you are looking for a number but receive a character, your validation
code would ignore that character.
I wrote this book because it encompasses pretty much what most Windows programmers do on a day-
to-day basis. As programmers, we all work with data. We collect it, massage it, store it, retrieve it, and
present results back to the user. As a matter of fact, data entry and validation are likely such constant
themes throughout your programming day that I bet you don't even realize you're doing them.
When most new programmers think of data entry, they think "Booooring!" What often comes to mind
are endless screens of text-based data entry fields for insurance companies. Where is the fun in that?
After all, there is no chance for any creativity and after a few weeks of this kind of work, life becomes
dull. It seems like assembly-line programming at its worst.
Data Entry Code Can Be Interesting
Is data entry and validation really this simple and dull? I think not. If it were, I would have changed
professions long ago.
Data entry involves two aspects. One is to collect data and the other is to make sure the data makes
sense. The fun part is how you go about programming it.
If you think that writing screen after screen of data entry fields is boring, how do you think end users
feel using these screens? I would say they feel even more bored. Your job as a programmer here is
twofold. First, you need to make the data entry screens not so boring to use, and second, you need to
make the screens not so boring to program. An additional task is to make the screens sensible. The
only thing worse to a user than an uninteresting program is a frustrating one. How many times have you
used a program and had to hunt down certain data fields in screens where they don't belong? You tend
to wonder, what were they thinking?! Perhaps you have received some feedback like this about your
own program.
Who Should Read This Book
This book is for intermediate and well-seasoned programmers who are already writing in .NET or want
to change over to .NET. I assume a level of programming knowledge commensurate with a basic
understanding of .NET and a good understanding of programming in general. Readers should know
some object-oriented and general programming techniques such as the following:
Function overloading
Inheritance
Class design and instantiation
Use of threads and the advantages (and pitfalls) of threading
Exception handling
Readers should also be familiar with some of the .NET-specific topics such as the following:
Garbage collection
JIT compiler
Organization of the .NET namespaces
Why You Should Read This Book
Take a look through your friendly local bookstore's computer book section. You will find quite a few
books about .NET. They all seem to fall somewhere in the following categories:
Books on everything you could possibly know about C# in 1,500 pages (ditto for Visual Basic .NET
[VB .NET])
Books outlining how to do a specific task within .NET, such as writing an ASP page
All kinds of books about the .NET Framework and the philosophy behind it
Books for all the "idiots" and "dummies" who write the majority of our computer programs
Basically what you will see are "task" books. Rarely will you see a book devoted to a programming
specialty that requires knowledge of quite a few tasks along with interesting uses of the .NET
Framework and good general practices. Some examples of task book topics that I have seen are as
follows:
Programming games in .NET
Writing scientific programs in .NET
Writing a scalable client/server program in .NET
If you think about some specialties, you may need several books just to get all the information you need
to accomplish what you do every day. This book isn't a task book; it's a programming specialty book. In
it you will find information on subjects such as
Programming graphics
Programming Windows Forms
Using localization
Using XML
Building user controls
I cover quite a few other topics as well. You see, by including these few subjects in this book, I've
saved you from buying five other books. Granted, I don't go into great depth on any of these items, but
by the time you finish reading this book, you'll be familiar with them and know how to use them. Isn't
that what you're really interested in, anyway?
What Makes This Book Unique
Visual Studio .NET is not new anymore. Since the product's release in early 2002, Microsoft has been
evangelizing the advantages of .NET, Web services, and just moving ahead in the programming game
in general.
You probably already have a couple of books on .NET.
[
1
]
Perhaps you have written a program or two
just to try things out and kick the tires a little. My local bookstore has multiple shelves filled with books
on .NET. What distinguishes this book from the others is the application-oriented aspect. As I have
stated, I present an end result here that you may not see in other books.
You will see quite a few techniques in this book that you can surely find elsewhere. However, instead of
showing you how to program mouse events, for example, I show you how to program mouse events
within the context of the all-important data entry screen.
You might consider this book a consolidation of best practices for getting the most out of the .NET
Framework with an eye toward the user interface and data validation. Knowing a technique is not the
same as knowing how to apply it. This book teaches you how to better apply what you probably do on a
daily basis, but within the context of .NET.
[
1
]
Perhaps you have one of my previous books on .NET:
GDI+ Programming in C# and VB .NET
or
Internationalization and Localization Using Microsoft .NET
What You Will Get Out of This Book
As with my last two books, I decided to include all examples in both C# and VB .NET. I like to do this
because it appeals to a wider audience, and it also lets you see what the differences are between C#
and VB when you are programming the same task. You will also see how C# and VB .NET really do
use the same underlying framework to accomplish the same tasks. As a developer, I feel that this is
one of the most awesome advantages to come out of .NET as a whole.
As far as the Framework goes, you will see quite a bit of it in the chapters ahead. Think about all the
things necessary for a good data entry screen. Here is some of what you will see:
Determining which controls to use and when
Writing a world-ready program
Creating graphics using the GDI+ namespaces
Threading
Using collection classes
Understanding accessibility issues
Deciding which type of document interface to use
Performing everyday data validation
Extending controls
Creating custom data validation controls
Using error handling
Understanding XML and hardware I/O
Being able to create friendly and usable data entry screens is not really taught in schools or even
treated as a subject in most books. This book tries to remedy that situation and get you on the road to
writing an effective program.
A Word About the Examples
I encourage you to enter at least some of the examples by hand in both languages. I feel it is good to
be familiar with the two flagship languages of .NET: VB .NET and C#. You will see some cases where
VB is better than C# and some cases where C# is better for a particular task than VB.
For those of you who want to run the examples without the pain of writing them, you can download all
the code from the Downloads section of the Apress Web site (
).
All the examples in this book have gone through a thorough review process. They are not professional-
level, robust products, but they should work as intended. I take responsibility for all programming errors
in this book. If you find an error, please let me know about it and I will post the corrected code on the
Apress Web site. You can reach me at
.
Some Points About the Code
The code that I wrote for the examples follows some simple guidelines. I describe those guidelines here
so you will know what to expect and where to find certain code sections.
Designating Events
I like to know what is happening in my code and I also like to be able to control it. There is quite a bit of
functionality in the IDE that allows you to automatically handle events or assign event handlers using the
IDE. As far as VB .NET goes, you can get an event handler for a certain control by double-clicking the
control. The IDE will generate the event shell for you similar to VB 6.0. This consists of the event handler
procedure name followed by the event it handles. It looks like this:
Private Sub cmdClose_Click(ByVal sender As System.Object, _
ByVal e As System.EventArgs) Handles cmdClose.Click
The C# IDE does much the same thing, except that it creates a delegate for you and assigns the
delegate within the "Windows Form Designer generated code" section.
I do not use this method of programming for events for the following reasons:
The IDE will choose the name of my event handler. I can change it later, but in the case of C# I
need to dig through the "Windows Form Designer generated code" section to find the delegate
assignment.
Using VB, you cannot remove or change the event handler assignment at runtime.
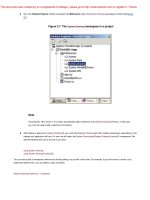
You are also able to assign event handlers for C# using the IDE directly. You can do this by assigning
handler names in the Properties screen of the IDE, as shown in
Figure 1
.
Figure 1:
Assigning event handlers via the Properties screen
Although this is all well and good, it has two problems:
The delegate assignment is done in the "Windows Forms Designer generated code" section.
If you delete the control, the event handler code still remains.
Here is what I prefer to do. If I know at design time what I need, I assign all my event handlers in the
constructor. This puts them all in one place, one right after the other.
For VB code, I use the AddHandler command to assign delegates to events. This allows me to assign
multiple events to one handler, and it also allows me to use RemoveHandler later in the code to remove
a delegate from handling an event.
Compartmentalizing Code
I like to use regions. I use a section at the top of each class to hold all the class local variables. I put all
the mouse handling events in their own region. I like to put all class properties in their own region.
Using regions is a great way to partition your code and see only the section of code that you are working
on.
Included Code
When I provide code in this book, I usually do not include the "Windows Form Designer generated code"
region. I instead put a marker to note where this section belongs.
This section contains all the stuff the IDE puts in your code that concerns the controls on your form. It
also has the Dispose method for both C# and VB. The constructor for VB is in this section as well, but
the C# constructor is not.
Anyway, if you are typing in the project as I describe, the IDE will fill in this code for you. Including it is a
waste of paper.
It is time to turn the page and start programming. I hope that you will find this book interesting and gain
some insights that help you in your career.
Chapter 1: The .NET Data Entry Controls
Overview
This chapter covers the controls that most of you are familiar with. In fact, I am willing to bet that you
work with many of these controls on a daily basis. Perhaps you did not know this. For instance, did you
know that the TextBox, ComboBox, Button, and so forth all have the built-in capability to let you validate
what the user is doing at a given moment? In fact, many controls allow you to tailor what data the user
can enter so you do not even have to validate. This chapter covers many of these controls.
When I first started programming in Visual Basic (VB) as a young lad, I used the TextBox for just about
every type of user input. However, I did not set up the TextBox to do much of the validation work for
me. I relied on my own code to do this. This chapter shows you how to use the TextBox and other
controls to do much of the validation for you.
If you have done any user interface programming at all, I am sure you are familiar with many of these
controls. If you are a VB 6.0 veteran and are just starting out in .NET, you will find that many of the
familiar controls now have some pretty interesting additional functionality. Much of this functionality has
to do with how the user enters data and how you validate it.
Validation Defined
I should first explain what I mean by "validation" when it comes to the basic controls. There are quite a
few things you need to keep in mind when setting up fields in a form. Here are some considerations to
make when you use TextBoxes and other free-form data entry controls:
Is the user allowed in this field?
Should the field be numeric or alpha, or both?
If the field is numeric, what are the bounds?
Is there a minimum length to the field?
Is there a maximum length to the field?
Should control characters be allowed?
Are there any other characters that are not allowed?
Should the field be validated on a character-by-character basis or when the user leaves the field?
Will there be multiple lines to this field?
Believe it or not, .NET provides controls that actually allow you to set up many of these parameters as
control properties without your even writing any validation code. Let's look at some of the validation
events. In the following sections, I outline some of the most commonly used controls.
Every visible control that can be written to can let you know when it is time to perform any validation.
Two events are raised concerning validation:
Validating:
This occurs when the control tells you it needs validation.
Validated:
This occurs when the control thinks you are finished validating.
There is also a Boolean property called CausesValidation that, if set to false, suppresses these two
events.
The validation events are considered
focus events.
The focus events occur when a control either gets
the focus of attention on a form or loses it. These events occur in a certain order that lets you
determine when you want to validate. The order is as follows:
Enter:
The cursor has entered the control.
Focus:
The control has gained focus of the keyboard and mouse.
Leave:
The input focus is leaving the control.
Validating:
The control is currently validating.
Validated:
The control is done validating.
Lost Focus:
The control has completely lost focus.
If you capture the Validating event, your delegate can either let the subsequent events go on or
suppress them. You would suppress subsequent events if your validation code indicated a failure.
I cover validation events in more detail later in this chapter.
The Simple Data Entry Controls
In this section, I start with the most basic property of any of the controls derived from the Control base class,
the Text property. If you are familiar with .NET, you know that everything is derived from some object and its
lineage can be traced back to the original System. Object base class. This includes all the data entry controls.
For you VB 6.0 programmers who are new to .NET, this may seem a little daunting. After all, the TextBox is
just there. The same is true for the Label and ComboBox. You probably never knew—or considered—that
these controls derived from anything. VB 6.0 hides quite a bit of the plumbing from the programmer.
Note
The VB 6.0 label text field is the Caption property. The VB 6.0 text box text field is the Text property.
The fact that these two are named differently yet serve the same purpose may lead you to believe
that in VB 6.0 they are not the same control with slightly different behaviors (as in .NET). The
TextBox and Label controls in .NET both have the same Text property. This is because they derive
from the same base class.
The Base Control
The .NET Framework has a particular base class called System.Windows.Forms.Control. This class is
responsible for quite a bit of the functionality of the following derived controls:
Button
DataGrid
GroupBox
ListView
ListControl
TreeView
Label
TextBox
DateTimePicker
MonthCalendar
ScrollableControl
These are just a few of the controls that derive from the base control. I cover some of the other controls,
such as the PictureBox and Splitter controls, in Chapter 5
.
What these controls give you that VB 6.0 does not is a sense of continuity and behavioral predictability.
After all, they share many of the same properties, methods, and events.
So, now you know how the major controls are derived from a base control and how the Text property (and
many others) is the same for all of these. If you scan the .NET help files on some of these controls, you will
find properties that are inherited from the Control base class and some that are peculiar to the control itself. I
encourage you to look at the help for a particular control. If you pick a property that is derived from a parent
class, you will be able to trace the control through its lineage back to the Control class. You can go back
further even to the base Object class.
If you are not familiar with inheritance and such, you will find this quite eye-opening. You may even wonder if
you can make your own TextBox or Button controls. This is a good thing to wonder about because the answer
is yes. As a matter of fact, I take you through how to extend one of these controls to make your own
application-specific control in Chapter 8
.
So far I have mentioned what I think simple data validation is. Pretty soon I present a small example that
shows how to use some simple validation rules. In the
next section
, however, I want to touch on data entry.
Simple Data Entry
When most people think of data entry, they think again of the TextBox. This is probably the most used control
on a form. In fact, if you want to really make the user work at it, you could make the TextBox the only data
entry control on a form. There are a few other controls, though, that you may not think of right away as data
entry controls. I have already mentioned some of them in the list of controls derived from the Control class
(see the sidebar "The Base Control
").
For instance, how about the GroupBox? How can you use this control for data entry? It doesn't do anything,
right? Well, it can do two things. It can group controls together so that the user sees controls with common
functionality in one place. It also does another important thing regarding RadioButtons.
Normally, RadioButtons are mutually exclusive controls with respect to each other. What do I mean by this?
Suppose you have four RadioButtons on a form. Anytime one of the RadioButtons is clicked, its Checked
property is set to true. When this happens, all the other RadioButtons on the form are automatically
unchecked. Only one RadioButton can be checked at a time.
Putting a RadioButton in a GroupBox separates it programmatically from RadioButtons that are outside of the
GroupBox. A RadioButton that is inside a GroupBox can be checked at the same time that a RadioButton
outside the GroupBox is checked. Figure 1-1 shows how this looks.
Figure 1-1:
A form showing how RadioButtons can be grouped
While I'm on the subject of GroupBoxes and RadioButtons, the RadioButton is a great data entry control. You
may not think of it in those terms, but judicious use of RadioButtons allows you to give valid choices to users
that they can't screw up. As far as validation goes, this is the perfect control. The user can only choose what
you want him or her to.
You will normally use the RadioButton when you know the data that the user will need to choose during design
time. Its practicality is also limited to only a few choices on a page, really. Hundreds of RadioButtons on a
single page can be rather overwhelming. I once tried out some software where the programmer was obviously
enamored with the VB RadioButton. It was a terminal emulation program. Figure 1-2 shows what part of the
modem configuration screen looked like.
Figure 1-2:
A busy RadioButton screen
Figure 1-2 shows a partial screen as I remember it. Anyway, my point here is that this screen is overloaded
with RadioButtons. The screen may be foolproof, but the number of choices seems daunting and it is difficult
to tell at a glance just what the communications port is set for.
There is another problem with using RadioButtons in this manner. Can you guess what it is? The screen is
hard-coded for only these values. Suppose, as a programmer, you wanted to use a serial port that was
capable of speeds of 28.8Kbps. You would need to change the screen and recompile the program.
A better way to present these particular choices is via ComboBoxes. Figure 1-3 shows this same port
configuration screen using ComboBoxes.
Figure 1-3:
An alternate terminal setup
This is a much better way to present the various choices to the user. The screen is succinct and these
controls do not allow the user to make strange choices.
[
1
]
When the user clicks the OK button, you can run
some code that determines if the values the user chose make sense.
Now suppose your serial port was tweaked to provide greater speed than your choices allow. If you filled each
ComboBox with entries from an external file such as an .ini file, there would be no screen changes necessary
to add an entry to or delete an entry from one of these ComboBoxes. If you plan ahead and think about how
each screen of your program works, you can usually make things easier for yourself down the line from a
maintenance perspective.
Note
Be careful about how many items you have in your ComboBox. The .NET help file states that the
maximum is 100. If you allow a user to type in new values, you will get an exception if the number of
values exceeds the maximum. Granted, most users would not do this, but I guarantee that your
friendly test engineer will.
Simple Validation
So now you have your two terminal setup screens and the user has made his or her choices and has clicked
the OK button. What now?
Let's start with the RadioButton screen. There is really no on-the-fly validation that you can effectively use for
this screen. In the click event handler for the OK button, you will need to write some code to see if the choices
the user made are correct. Usually this entails plenty of if-then blocks and various sanity checks. If something
is wrong, you need to pop up an error message that tells the user what is wrong and how to fix it.
The problem with this approach is that you could go back and forth, with the user making changes and you
rejecting them. Wouldn't it be better to force the user to choose only those values that make sense?
This is where the second form comes in. What you can do here is on-the-fly validation that is easy for you and
unobtrusive to the user. Here are the basic steps:
Disable all the ComboBoxes except for the first one. Also disable the OK button.
1.
When the user makes a choice, fill in the values for the next ComboBox and enable it.
2.
Repeat step 2 until all the choices are made.
3.
Enable the OK button.
4.
By the time the user gets to click the OK button, you have already validated all the choices and there is
probably no need to point out any errors to the user.
The best way to demonstrate this is to create an example. The example in this section is fairly simple, but it
serves to explain how you can steer the user toward certain data choices. Once the choices are made, you
can be sure they are correct and there is no need to validate them.
This example includes the coded screen shown in Figure 1-3. To make the process a little easier, I limit the
scope of finished serial port setup choices to the following. They are shown here as speed, data length, parity,
and stop bits.
9600, 7, odd, 1
9600, 7 even, 2
9600, 8, none, 1
4800, 6, mark, 1
4800, 7, space, 1
4800, 7, space, 2
2400, 5, odd, 1
2400, 5, even, 1
2400, 5, even, 1.5
2400, 6, odd, 1
In reality there are many more choices, but limiting this program to these choices serves the example's
purposes.
A Simple Validation Example
1.
First of all, start a new C# or VB program project and call it "SerialPort." Follow these steps to create the form:
Add a Label and change its text to Speed
.
1.
Add a ComboBox below the Label and name it cmbSpeed
.
2.
Add a Label below the ComboBox and change its text to Data Length
.
3.
Add a ComboBox below the preceding Label and name it
cmbLen
.
4.
Add a Label below the preceding ComboBox and change its text to Parity
.
5.
Add a ComboBox below the preceding Label and name it cmbParity
.
6.
Add a Label below the preceding ComboBox and change its text to
StopBits
.
7.
Add a ComboBox below the preceding Label and name it
cmbStop
.
8.
Add a Label below the preceding ComboBox and change its text to
Flow Control
.
9.
Add a ComboBox below the preceding Label and name it
cmbFlow
.
10.
Add a Button to the bottom of the form and call it cmdClose. Change its text to
Close
.
11.
Set the form's start-up position to Center Screen.12.
Figure 1-3 shows what this form looks like. Listings 1-1a
and
1-1b contain the code for this terminal setup
program.
Note
I usually do not show the Windows Form Designer–generated code for the C# examples. There is
nothing extraordinary in this code. The VB examples show only the constructor and dispose
methods contained in the "Windows Form Designer generated code" section of the code. The
missing code is noted by ellipses on three consecutive lines.
Listing 1-1a:
C# Code for the Terminal Setup Program
using System;
using System.Drawing;
using System.Collections;
using System.ComponentModel;
using System.Windows.Forms;
using System.Data;
namespace SerialPort
{
/// <summary>
/// For example purposes this is the list of possibilities.
/// 9600,7,o,1
/// 9600,7,e,2
/// 9600,8,n,1
/// 4800,6,m,1
/// 4800,7,s,1
/// 4800,7,s,2
/// 2400,5,o,1
/// 2400,5,e,1
/// 2400,5,e,1.5
/// 2400,6,o,1
/// Any type of flow control
/// </summary>
public class Form1 : System.Windows.Forms.Form
{
private System.Windows.Forms.Label label1;
private System.Windows.Forms.ComboBox cmbSpeed;
private System.Windows.Forms.ComboBox cmbLen;
private System.Windows.Forms.Label label2;
private System.Windows.Forms.ComboBox cmbParity;
private System.Windows.Forms.Label label3;
private System.Windows.Forms.ComboBox cmbStop;
private System.Windows.Forms.Label label4;
private System.Windows.Forms.ComboBox cmbFlow;
private System.Windows.Forms.Label label5;
private System.Windows.Forms.Button cmdClose;
private System.ComponentModel.Container components = null;
public Form1()
{
InitializeComponent();
this.StartPosition = FormStartPosition.CenterScreen;
//Handle the click events for each combo box
cmbSpeed.SelectedIndexChanged += new EventHandler(this.Speed);
cmbLen.SelectedIndexChanged += new EventHandler(this.DataLen);
cmbParity.SelectedIndexChanged += new EventHandler(this.Parity);
cmdClose.Click += new EventHandler(this.CloseMe);
cmbSpeed.DropDownStyle = ComboBoxStyle.DropDownList;
cmbSpeed.Items.Add("9,600");
cmbSpeed.Items.Add("4,800");
cmbSpeed.Items.Add("2,400");
cmbSpeed.SelectedIndex=0;
cmbFlow.DropDownStyle = ComboBoxStyle.DropDownList;
cmbFlow.Items.Add("NONE");
cmbFlow.Items.Add("XON/XOFF");
cmbFlow.Items.Add("HARDWARE");
cmbFlow.SelectedIndex = 0;
}
protected override void Dispose( bool disposing )
{
if( disposing )
{
if (components != null)
{
components.Dispose();
}
}
base.Dispose( disposing );
}
#region Windows Form Designer generated code
#endregion
[STAThread]
static void Main()
{
Application.Run(new Form1());
}
private void Form1_Load(object sender, System.EventArgs e)
{
}
#region Click events
private void Speed(object sender, EventArgs e)
{
switch (cmbSpeed.Text)
{
case "9,600":
cmbLen.Items.Clear();
cmbLen.Items.Add("7 Bits");
cmbLen.Items.Add("8 Bits");
break;
case "4,800":
cmbLen.Items.Clear();
cmbLen.Items.Add("6 Bits");
cmbLen.Items.Add("7 Bits");
break;
case "2,400":
cmbLen.Items.Clear();
cmbLen.Items.Add("5 Bits");
cmbLen.Items.Add("6 Bits");
break;
case "1,200":
cmbLen.Items.Clear();
cmbLen.Items.Add("8 Bits");
break;
}
cmbLen.SelectedIndex = 0;
}
private void DataLen(object sender, EventArgs e)
{
switch (cmbLen.Text)
{
case "5 Bits":
if (cmbSpeed.Text == "2,400")
{
cmbParity.Items.Clear();
cmbParity.Items.Add("ODD");
cmbParity.Items.Add("EVEN");
}
break;
case "6 Bits":
if (cmbSpeed.Text == "4,800")
{
cmbParity.Items.Clear();
cmbParity.Items.Add("MARK");
}
if (cmbSpeed.Text == "2,400")
{
cmbParity.Items.Clear();
cmbParity.Items.Add("ODD");
}
break;
case "7 Bits":
if (cmbSpeed.Text == "9,600")
{
cmbParity.Items.Clear();
cmbParity.Items.Add("ODD");
cmbParity.Items.Add("EVEN");
}
if (cmbSpeed.Text == "4,800")
{
cmbParity.Items.Clear();
cmbParity.Items.Add("SPACE");
}
break;
case "8 Bits":
if (cmbSpeed.Text == "9,600")
{
cmbParity.Items.Clear();
cmbParity.Items.Add("NONE");
}
break;
}
cmbParity.SelectedIndex = 0;
}
private void Parity(object sender, EventArgs e)
{
switch (cmbParity.Text)
{
case "NONE":
if (cmbLen.Text == "8 Bits")
{
cmbStop.Items.Clear();
cmbStop.Items.Add("1");
}
break;
case "ODD":
if (cmbLen.Text == "5 Bits")
{
cmbStop.Items.Clear();
cmbStop.Items.Add("1");
}
if (cmbLen.Text == "6 Bits")
{
cmbStop.Items.Clear();
cmbStop.Items.Add("1");
}
if (cmbLen.Text == "7 Bits")
{
cmbStop.Items.Clear();
cmbStop.Items.Add("1");
}
break;
case "EVEN":
if (cmbLen.Text == "5 Bits")
{
cmbStop.Items.Clear();
cmbStop.Items.Add("1");
cmbStop.Items.Add("1.5");
}
if (cmbLen.Text == "7 Bits")
{
cmbStop.Items.Clear();
cmbStop.Items.Add("2");
}
break;
case "SPACE":
if (cmbLen.Text == "7 Bits")
{
cmbStop.Items.Clear();
cmbStop.Items.Add("1");
cmbStop.Items.Add("2");
}
break;
case "MARK":
if (cmbLen.Text == "6 Bits")
{
cmbStop.Items.Clear();
cmbStop.Items.Add("1");
}
break;
}
cmbStop.SelectedIndex = 0;
}
private void CloseMe(object sender, EventArgs e)
{
this.Close();
}
#endregion
}
}
Listing 1-1b:
VB Code for the Terminal Setup Program
'/// For example purposes this is the list of possibilities.
'/// 9600,7,o,1
'/// 9600,7,e,2
'/// 9600,8,n,1
'/// 4800,6,m,1
'/// 4800,7,s,1
'/// 4800,7,s,2
'/// 2400,5,o,1
'/// 2400,5,e,1
'/// 2400,5,e,1.5
'/// 2400,6,o,1
'/// Any type of flow control
Public Class Form1
Inherits System.Windows.Forms.Form
#Region " Windows Form Designer generated code "
Public Sub New()
MyBase.New()
'This call is required by the Windows Form Designer.
InitializeComponent()
Me.StartPosition = FormStartPosition.CenterScreen
'Handle the click events for each combo box
AddHandler cmbSpeed.SelectedIndexChanged, AddressOf Speed
AddHandler cmbLen.SelectedIndexChanged, AddressOf DataLen
AddHandler cmbParity.SelectedIndexChanged, AddressOf Parity
AddHandler cmdClose.Click, AddressOf CloseMe
cmbSpeed.DropDownStyle = ComboBoxStyle.DropDownList
cmbSpeed.Items.Add("9,600")
cmbSpeed.Items.Add("4,800")
cmbSpeed.Items.Add("2,400")
cmbSpeed.SelectedIndex = 0
cmbFlow.DropDownStyle = ComboBoxStyle.DropDownList
cmbFlow.Items.Add("NONE")
cmbFlow.Items.Add("XON/XOFF")
cmbFlow.Items.Add("HARDWARE")
cmbFlow.SelectedIndex = 0
End Sub
'Form overrides dispose to clean up the component list.
Protected Overloads Overrides Sub Dispose(ByVal disposing As Boolean)
If disposing Then
If Not (components Is Nothing) Then
components.Dispose()
End If
End If
MyBase.Dispose(disposing)
End Sub
#End Region
Private Sub Form1_Load(ByVal sender As System.Object, _
ByVal e As System.EventArgs) Handles MyBase.Load
End Sub
Private Sub Speed(ByVal Sender As Object, ByVal e As EventArgs)
Select Case (cmbSpeed.Text)
Case "9,600"
cmbLen.Items.Clear()
cmbLen.Items.Add("7 Bits")
cmbLen.Items.Add("8 Bits")
Case "4,800"
cmbLen.Items.Clear()
cmbLen.Items.Add("6 Bits")
cmbLen.Items.Add("7 Bits")
Case "2,400"
cmbLen.Items.Clear()
cmbLen.Items.Add("5 Bits")
cmbLen.Items.Add("6 Bits")
Case "1,200"
cmbLen.Items.Clear()
cmbLen.Items.Add("8 Bits")
End Select
cmbLen.SelectedIndex = 0
End Sub
Private Sub DataLen(ByVal Sender As Object, ByVal e As EventArgs)
Select Case (cmbLen.Text)
Case "5 Bits"
If cmbSpeed.Text = "2,400" Then
cmbParity.Items.Clear()
cmbParity.Items.Add("ODD")
cmbParity.Items.Add("EVEN")
End If
Case "6 Bits"
If cmbSpeed.Text = "4,800" Then
cmbParity.Items.Clear()
cmbParity.Items.Add("MARK")
End If
If cmbSpeed.Text = "2,400" Then
cmbParity.Items.Clear()
cmbParity.Items.Add("ODD")
End If
Case "7 Bits"
If cmbSpeed.Text = "9,600" Then
cmbParity.Items.Clear()
cmbParity.Items.Add("ODD")
cmbParity.Items.Add("EVEN")
End If
If cmbSpeed.Text = "4,800" Then
cmbParity.Items.Clear()
cmbParity.Items.Add("SPACE")
End If
Case "8 Bits"
If cmbSpeed.Text = "9,600" Then
cmbParity.Items.Clear()
cmbParity.Items.Add("NONE")
End If
End Select
cmbParity.SelectedIndex = 0
End Sub
Private Sub Parity(ByVal Sender As Object, ByVal e As EventArgs)
Select Case (cmbParity.Text)
Case "NONE"
If cmbLen.Text = "8 Bits" Then
cmbStop.Items.Clear()
cmbStop.Items.Add("1")
End If
Case "ODD"
If cmbLen.Text = "5 Bits" Then
cmbStop.Items.Clear()
cmbStop.Items.Add("1")
End If
If cmbLen.Text = "6 Bits" Then
cmbStop.Items.Clear()
cmbStop.Items.Add("1")
End If
If cmbLen.Text = "7 Bits" Then
cmbStop.Items.Clear()
cmbStop.Items.Add("1")
End If
Case "EVEN"
If cmbLen.Text = "5 Bits" Then
cmbStop.Items.Clear()
cmbStop.Items.Add("1")
cmbStop.Items.Add("1.5")
End If
If cmbLen.Text = "7 Bits" Then
cmbStop.Items.Clear()
cmbStop.Items.Add("2")
End If
Case "SPACE"
If cmbLen.Text = "7 Bits" Then
cmbStop.Items.Clear()
cmbStop.Items.Add("1")